AWS Cloud Operations Blog
Automate Setup of AWS Application Migration Service and Elastic Disaster Recovery
Introduction
AWS Application Migration Service (AWS MGN) is the automated lift-and-shift service that facilitates server migrations to AWS at scale. AWS Elastic Disaster Recovery (AWS DRS) is the service which increases resilience of both on-premises and cloud-based applications by replicating data to AWS.
Customers using AWS MGN or AWS DRS are required to perform manual setup and initialization tasks. There are several steps to enable these services using the AWS Console or the AWS CLI, some of which require administrator permissions. Use of administrator permissions is commonly restricted in enterprise environments, leading to dependencies on external teams to perform administrative actions.
This blog demonstrates how to automate the initialization and setup of AWS MGN and AWS DRS leveraging AWS Service Catalog based automation. With AWS Service Catalog based automation, the AWS MGN and AWS DRS initialization process is streamlined in a multi-account environment, so teams can easily setup these services at scale.
Solution Overview
This solution automates the initialization and default replication configuration setup for AWS MGN and AWS DRS using AWS Service Catalog Products, making migration and disaster recovery capabilities more easily accessible to application teams in their AWS Accounts. A Service Catalog Portfolio makes sharing the service initialization automation with multiple accounts in AWS Organizations seamless. The Service Catalog Portfolio consists of two Products, which automate the initialization and creation of the default replication configurations for AWS MGN and AWS DRS services.
Figure 1 shows an example AWS Organization structure in which the AWS MGN and AWS DRS Service Catalog Products are shared from the AWS Organizations Management Account or a delegated administrator account. For more details on how you can simplify the process of sharing Service Catalog Portfolios in your AWS Organization, please refer to documentation on Sharing Service Catalog Portfolios and Simplify sharing your AWS Service Catalog portfolios in an AWS Organizations setup.
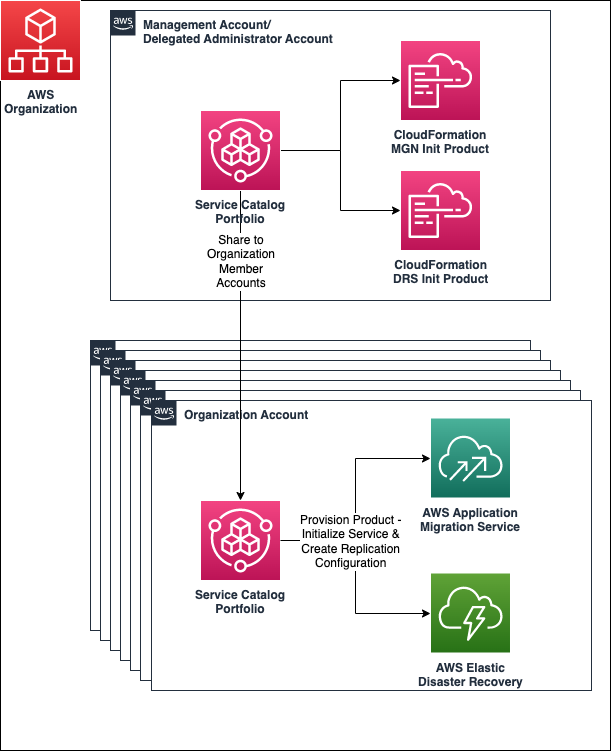
Figure 1: AWS Organizations and Service Catalog Portfolio Sharing
The AWS MGN and AWS DRS initialization and replication configuration steps are automated with Service Catalog AWS CloudFormation based Products and CloudFormation custom resources. The custom resources deploy Python based Lambda functions and use the AWS SDK for Python (Boto3) to make AWS MGN and AWS DRS API calls, which initialize the services. For more details on the initialization steps, please see AWS DRS initialization and permissions and AWS MGN initialization and permissions.
Prerequisites
For this post, you should have basic knowledge of GitHub repositories and the following AWS services:
- AWS Identity and Access Management (IAM)
- AWS Cloud9
- Amazon Simple Storage Service (Amazon S3)
- AWS Organizations
- AWS CloudFormation
- AWS Service Catalog
- AWS Application Migration Service
- AWS Elastic Disaster Recovery
- AWS CLI
- Amazon Virtual Private Cloud (Amazon VPC)
It is assumed that you have the following prerequisites:
- AWS Organizations
- IAM User or Role to assume in the management account or a delegated administrator account for AWS Service Catalog
- IAM Role to assume in an AWS Organizations member account
If the prerequisites do not exist, it is assumed you are able to create and AWS Organization and IAM resources in the AWS accounts. Please review the CloudFormation templates provided with the solution to align the required IAM actions with your roles in each account.
Additionally, you must enable trusted access for Service Catalog via the AWS Organizations management account. In this step, you use the AWS Organizations service to enable trusted access for AWS Service Catalog. This allows Service Catalog to perform tasks in your AWS Organizations and its member accounts on your behalf. This enablement can only be done from the management account in the AWS Organizations.
- Make sure you’re logged in to your AWS Organizations management account using the AWS CLI with administrator privileges. Read AWS CLI configuration documentation for more details.
- Enable AWS Organizations trusted access for AWS Service Catalog by entering the following into AWS CLI:
aws organizations enable-aws-service-access --service-principal servicecatalog.amazonaws.com- To verify if this step was successful, run the following command and verify the output:
$ aws organizations list-aws-service-access-for-organization
{
    "EnabledServicePrincipals": [
        {
            "ServicePrincipal": "servicecatalog.amazonaws.com",
            "DateEnabled": "20XX-XX-00T00:00:00.000000-00:00"
        }
    ]
}
A CloudFormation template is provided to deploy a AWS Cloud9 Environment, which automates some of the steps described in the Solution Deployment Steps section of this post and provides an environment for deploying IAM roles into an AWS Organizations member account. You must have an Amazon VPC, with a subnet and route to the internet. This will allow the AWS Cloud9 instance to reach the AWS Cloud9 Service Endpoint and to download dependencies from GitHub.
In the AWS Organizations Member account where you launch the Service Catalog Products, you must meet all the prerequisite networking requirements for AWS MGN and AWS DRS. Most notably, an Amazon VPC, subnet(s) and security group(s) must exist in the account and region you intend to provision the AWS MGN and AWS DRS Service Catalog Products. You will provide subnet and security group IDs as parameters when launching each Product. Please see AWS MGN Replication Server Settings and AWS DRS Replication Server Settings documentation for more information on these requirements.
Additionally, in the AWS Organizations member account, you must create a role, or have an existing one, which allows assuming (using sts:AssumeRole) the ServiceCatalogEndUserRole in the member account. Later in this post, the ServiceCatalogEndUserRole will be created in the member account. The ServiceCatalogEndUserRole will be deployed with a Trust Policy that allows other principals in the AWS Organizations member account to assume it.
Please note, the solution described in the blog creates resources that incur cost. Although there is no additional charge for using AWS Cloud9, you pay for the underlying AWS resources (EC2 instance and EBS volume) that you use. Please see the AWS Cloud9 pricing page for more details. An Amazon S3 Bucket is created to store code binaries for the solution, please review the S3 pricing page to understand how S3 costs are incurred.
Solution Deployment Steps
Before beginning with the solution steps, please choose an AWS Region where the required services for this blog post are available, (us-east-1 – N. Virginia for example). Use the list of AWS Services by Region to validate support in your desired region. Also take note of AWS Account IDs for your:
- AWS Organizations management account (or Service Catalog Delegated Administrator Account)
- AWS Organizations member account where you will provision the AWS MGN and AWS DRS Service Catalog Products.
You will use this information throughout the deployment process.
Step 1 – Deploy the AWS Cloud9 Automation to Create AWS MGN and AWS DRS Service Catalog Products
In this solution, we use AWS Cloud9 to automate the creation and sharing of AWS MGN and AWS DRS Service Catalog products. To deploy the AWS Cloud9 based automation clone this GitHub repository or download the zip file from the repository and unzip the contents on your local machine. The repository contains a CloudFormation template that deploys the AWS Cloud9 Environment. In the AWS Organizations Management or Delegated Administrator account, navigate to the CloudFormation console and create a stack, referring to the CloudFormation template at this location: /cloud9/cloud9-mgndrs-init.yml in the cloned or unzipped location on your local machine.

Figure 2: Navigate to the CloudFormation Console

Figure 3: Create a CloudFormation Stack

Figure 4: Choose AWS Cloud9 CloudFormation Template
Choose the desired parameter values, or leave the defaults where applicable. Please note, all Stack parameters require a value and all have a default value. Figure 5 contains an example from the CloudFormation Create stack console, along with details for each parameter:

Figure 5: CloudFormation Create Stack Console
- pCloud9InstanceType – Dropdown list including “t” family EC2 instance types.
- pCloud9InstanceVolumeSize – Numeric field for the instance volume size (in GB) for the AWS Cloud9 instance.
- pCloud9SubnetId – AWS-specific CloudFormation parameter for Subnet ID. Note: This subnet must have a route to the internet which allows the AWS Cloud9 instance to reach the AWS Cloud9 Service Endpoint and for fetching dependencies from GitHub.
- pMGNDRSServiceCatalogCodeZipUrl – Text field for the URL of the zipped solution code. This will be downloaded by the AWS Cloud9 instance to perform solution setup activities, which include creating other CloudFormation Stacks and AWS resources. The value defaults to the GitHub repository zip download URL.
- pS3BucketOwner – Text field used to tag the S3 Bucket deployed for Service Catalog setup with an Owner tag.
- pServiceCatalogEndUserRoleName – Text field used to name the Service Catalog End-User role that is created for this solution.
After creating the AWS Cloud9 stack, you’ll see three additional stacks get created during the process: Service-Catalog-Product-S3, IAM-Service-Catalog-Launch-Constraint, and MGN-DRS-Init-Service-Catalog. After these stacks are created successfully the AWS Cloud9 stack will also be marked as CREATE_COMPLETE.
Please note: This process will take approximately 10 minutes to complete. During this time, the AWS Cloud9 CloudFormation stack status will be CREATE_IN_PROGRESS.
Upon completion of the Stack creation, the following resources should be created:
Note: To find resources deployed in the AWS account, navigate to the CloudFormation console, click the desired stack, and click the Resources tab.

Figure 6: CloudFormation Stack – Resources Tab
Figures 7, 8, and 9 show examples from the AWS Console.
- S3 Bucket containing:
- Packaged CloudFormation templates to create the AWS MGN and AWS DRS Service Catalog Products
- Nested templates which the packed CloudFormation templates refer to

Figure 7: S3 Bucket with Packaged CloudFormation Templates
- IAM Roles:
- Service Catalog Product Launch Constraint
- Service Catalog End User Role

Figure 8: IAM Roles for Service Catalog
- Service Catalog
- Portfolio for AWS MGN and AWS DRS
- Product for AWS MGN initialization and default replication configuration
- Product for AWS DRS initialization and default replication configuration
- Portfolio for AWS MGN and AWS DRS

Figure 9: Service Catalog Portfolio and Products for AWS MGN and AWS DRS Initialization
The Service Catalog Portfolio will be shared via your AWS Organizations to all Accounts.
In the CloudFormation console, click on your AWS Cloud9 Stack and click Outputs, then make note of the AWS Cloud9 Instance Role ARN as that information will be used in the next step. Figure 10 shows guidance for gathering the CloudFormation Output.

Figure 10: CloudFormation Stack Outputs
Move on to Step 2 to configure an AWS Organizations Member account and to provision the Products.
Step 2 – Validate or Create an IAM Role in the AWS Organizations Member Account and Deploy IAM Roles Required for Launching AWS MGN and AWS DRS Service Catalog Products
The AWS MGN and AWS DRS Service Catalog Portfolio you created in the previous step will be automatically shared with all accounts in the AWS Organizations, in the same region where you created the Portfolio in the management account. Before the AWS MGN and AWS DRS Products are can be provisioned , the AWS Organizations member account must be set up.
First, in the member account, create an IAM role which meets the following criteria:
- Has a trust policy that allows the EC2 Instance Role associated with the AWS Cloud9 Instance to assume it, for example:
- Please note: the IAM Role ARN in the Principal element of the trust policy should be the CloudFormation Output oCloud9InstanceRoleArn you made note of in the previous step.
{
    "Version": "2012-10-17",
    "Statement": [
        {
            "Sid": "Statement1",
            "Effect": "Allow",
            "Principal": {
                "AWS": "arn:aws:iam::<org_management_account_id>:role/cloud9-mgn-drs"
            },
            "Action": "sts:AssumeRole"
        }
    ]
}- Has permission policy to create IAM Roles and CloudFormation Stacks in the member account
- For example, the AWS managed IAM policies called IAMFullAccess and AWSCloudFormationFullAccess will meet this requirement.
For instructions on how to create IAM roles, please follow the instructions in: Creating an IAM role (console).
After creating the IAM role in member account, login to the AWS Organizations management account or the Service Catalog Delegated administrator account where you deployed the AWS Cloud9 stack. Then navigate to the AWS Cloud9 Environment user interface by typing ‘Cloud9’ into the AWS console search box as shown in Figure 11.

Figure 11: Open the AWS Cloud9 Console
Open the AWS Cloud9 environment IDE by clicking “Open” as shown in Figure 12.

Figure 12: Open the AWS Cloud9 IDE
The AWS CLI on the previously deployed AWS Cloud9 Environment will be used to assume this role in the member account. Then a script called service-catalog-shared-account-setup.sh will be run from the AWS Cloud9 Environment to create the required roles for Service Catalog in the member account.
The AWS managed temporary credentials must be disabled as shown in the Figure 13: AWS Cloud9 Settings
In AWS Cloud9, choose the gear icon in top right corner to open a new tab and choose the Preferences tab. Next, choose AWS Settings and toggle the AWS managed temporary credentials setting to off, then close the Preferences tab. Figure 13 shows the steps to change AWS Resources settings in the AWS Cloud9 Environment.

Figure 13: AWS Cloud9 Settings
Validate you are now assuming the instance role attached to the AWS Cloud9 EC2 instance using the command below:
Admin:~/environment $ aws sts get-caller-identity
{
    "UserId": "AROAYEXAMPLEUSERIDMPG5DW:i-<instance_id>",
    "Account": "<account_id>",
    "Arn": "arn:aws:sts::<account_id>:assumed-role/cloud9-mgn-drs/<instance_id>"
}
Ensure the output of the command resembles what is above.
Now, assume this role in the member account using the following command:
aws sts assume-role --role-arn <arn_of_role> --role-session-name org-member-sessionUsing the output from the command above and the example below, set the credentials in the terminal on the AWS Cloud9 instance:
export AWS_ACCESS_KEY_ID=<access_key_id>
export AWS_SECRET_ACCESS_KEY=<secret_access_key>
export AWS_SESSION_TOKEN=<session_token>
Next, cd to the mgn_drs_setup_automation directory, if you are not there already, and run the following script:
./scripts/service-catalog-shared-account-setup.sh <region>Use the same AWS Region where you deployed the AWS Cloud9 Environment in the management account. This will deploy the required IAM roles for the Service Catalog Launch Constraint and Service Catalog End User in that account.
Please note: IAM Role creation must only be performed once per AWS Organizations member account.
Step 3 – Initializing AWS MGN and AWS DRS Using Service Catalog Products in the Member Account
Using the AWS Console, login to the AWS Organizations member account. Once logged in to member account, Switch role to the ServiceCatalogEndUserRole that was created in previous step. See Figures 14 and 15 for directions on how to Switch role in the AWS Console. Account ID is the Account ID of the member account you are logged into.

Figure 14: AWS Console – Settings Switch role

Figure 15: AWS Console – Switch Role
In the same AWS Region, you created the Portfolio in the management or delegated administrator account using the AWS Cloud9 automation, navigate to the Service Catalog Console. Click Products and you will see the two Service Catalog Products shared with the Member account as shown in Figure 16.

Figure 16: Service Catalog Products
Next, choose a Product and click the Launch product button. Provide a name in Provisioned product name field, select a Product version (in this case only v1 will be available), and fill in the values for the parameters.

Figure 17: Launch Service Catalog Product
Please note: decide on a ‘central’ region for deploying IAM roles and provide that region name in the central region used for conditionally deploying IAM roles for AWS DRS and AWS MGN parameter. You will provide this same region when you provision Products in other regions to ensure the CloudFormation stack deploys IAM roles only once per account. Also, a value is required for every Product parameter except for KMS Key ARN for EBS encryption, which can be left blank or empty to use AWS Managed KMS Keys, otherwise provide a Customer Managed Key ARN. Please be sure the CMK resource policy allows use of the key by all principles in your AWS account.
When finished, click the Launch product button at the bottom of the page. You will be automatically brought to the details page of the Product you just provisioned. Wait for the Status to read Available.

Figure 18: Service Catalog Provisioned products
To validate that the AWS MGN or AWS DRS service was initialized and configured, switch to an IAM role with access to the AWS MGN or AWS DRS service, and navigate to the service console in your AWS account. In the example above, the AWS DRS service was initialized using the Service Catalog Product. You should see the default replication settings on the DRS service console match the information you provided when provisioning the DRS initialization Service Catalog Product.

Figure 19: AWS DRS Default Replication Settings
Also, in the CloudFormation console, you will find two or three stacks, which includes a main stack and nested stack(s). One nested stack for IAM roles, if you chose the region you provisioned the Product in as the ‘central’ region, and one nested stack for the service initialization and replication configuration automation.

Figure 20: CloudFormation Stacks
At this point, you are now ready to utilize the AWS MGN or AWS DRS service in your account in the region where you deployed the Service Catalog product. If you need to initialize the AWS MGN or AWS DRS service in other regions, you can create the Service Catalog Portfolio desired region and provision the Service Catalog Product in those regions to initialize the services.
Clean Up
To clean up the solution, first assume a role in the AWS Organizations management or delegated administrator account where you created the AWS Cloud9 instance and Amazon S3 bucket, IAM roles, and Service Catalog resources.
Navigate to the CloudFormation console in the region you previously deployed the resources in this blog, and find the Service-Catalog-Product-S3 stack. In the Resources tab for this stack find the AWS::S3::Bucket resource and click the link to navigate to the bucket, make note of the bucket name, navigate to the Buckets list, select the bucket, then select then click the Empty button. Refer to Figure 21 for instructions.

Figure 21: Empty Amazon S3 Bucket
Next, Navigate to the Service Catalog console. Click the AWS MGN and AWS DRS initialization portfolio, and go to the Share tab. Here, select the AWS Organizations ID share, click Actions and select Unshare. Refer to Figure 22 for instructions.

Figure 22: Unshare Service Catalog Portfolio
Navigate back to the CloudFormation console, and for each stack (Service-Catalog-Product-S3, IAM-Service-Catalog-Launch-Constraint, MGN-DRS-Init-Service-Catalog, and the AWS Cloud9 Stack) select each of the stacks and click the Delete button. Refer to Figure 23 for instructions.

Figure 23: Delete CloudFormation Stacks – AWS Organizations Management Account
Next, assume a role in the AWS Organizations member account. Navigate to the CloudFormation console in the region you previously deployed the resources in this blog, and find the IAM-Service-Catalog-Launch-Constraint Stack. Select the Stack, then select Delete. Refer to Figure 24 for instructions.

Figure 24: Delete CloudFormation Stacks – AWS Organizations Member Account
In the AWS Organizations member account where the AWS MGN and/or AWS DRS Service Catalog Products were provisioned, use the AWS CLI to assume an existing role in the account with IAM permissions and run the following commands:
- Assume Role
User:~/ $ aws sts assume-role --role-arn <arn_of_role> --role-session-name org-member-delete-blog-resources- If AWS DRS Service Catalog Products were Provisioned
User:~/ $ aws iam remove-role-from-instance-profile --instance-profile-name AWSElasticDisasterRecoveryReplicationServerRole --role-name AWSElasticDisasterRecoveryReplicationServerRole

User:~/ $ aws iam remove-role-from-instance-profile --instance-profile-name AWSElasticDisasterRecoveryRecoveryInstanceRole --role-name AWSElasticDisasterRecoveryRecoveryInstanceRole

User:~/ $ aws iam remove-role-from-instance-profile --instance-profile-name AWSElasticDisasterRecoveryConversionServerRole --role-name AWSElasticDisasterRecoveryConversionServerRole- For AWS MGN Service Catalog Products were Provisioned
User:~/ $ aws iam remove-role-from-instance-profile --instance-profile-name AWSApplicationMigrationConversionServerRole --role-name AWSApplicationMigrationConversionServerRole

User:~/ $ aws iam remove-role-from-instance-profile --instance-profile-name AWSApplicationMigrationReplicationServerRole --role-name AWSApplicationMigrationReplicationServerRole

User:~/ $ aws iam remove-role-from-instance-profile --instance-profile-name AWSApplicationMigrationLaunchInstanceWithSsmRole --role-name AWSApplicationMigrationLaunchInstanceWithSsmRole

User:~/ $ aws iam remove-role-from-instance-profile --instance-profile-name AWSApplicationMigrationLaunchInstanceWithDrsRole --role-name AWSApplicationMigrationLaunchInstanceWithDrsRole
Finally, assume the ServiceCatalogEndUserRole in the AWS Organizations Member Account you deployed the Product(s) and navigate to the Service Catalog console. Click Provisioned Products, select each Product you provisioned and click Terminate, following the prompts to terminate the provisioned Products. Refer to Figure 25 for instructions.

Figure 25: Terminate Service Catalog Product
Summary
In this post, we showed how to automate initialization and default replication configuration settings for both AWS Application Migration Service and AWS Elastic Disaster Recovery by creating a Service Catalog Portfolio with two CloudFormation Products. This solution provides application or infrastructure teams a self-service way to initialize and setup AWS MGN and/or AWS DRS, without administrator level access in the AWS account. Additionally, the Service Catalog automation simplifies the AWS MGN and AWS DRS setup by eliminating manual and error prone steps and provides a consistent way to initialize these services in multiple accounts and regions.