AWS Cloud Operations Blog
Deploy and Customize AWS accounts using Account Factory for Terraform in AWS Control Tower
Customers use AWS Control Tower Account Factory to create a new AWS account or enroll existing AWS accounts in their AWS Organizations. Customers launch Account Factory from the AWS Control Tower console or via AWS Service Catalog API. We hear from customers that they want to manage their AWS accounts in the same way that they manage their AWS infrastructure using Terraform. We launched AWS Control Tower Account Factory for Terraform (AFT) at re:Invent 2021, a new Terraform module to provision and customize AWS accounts using Terraform. In this post, we’ll walk you through the steps to deploy a new AWS account using AFT, and then we’ll show you how to customize the account created via AFT.
AFT follows a GitOps model and sets up a Terraform pipeline to provision and customize AWS accounts in AWS Control Tower. You create an account request in Terraform and commit to the repository that triggers the AFT workflow for Account Factory. After Account Factory execution is complete, AFT runs additional customization steps automatically.
AFT uses four separate repositories to manage this entire workflow. Let’s review each repository and its function:
aft-account-request– handles placing or updating account requests. This is where you place a request for a new AWS account.aft-global-customizations– manages Terraform-based customizations that are applicable to all of the accounts created by and managed with AFT.aft-account-customizations– manages Terraform-based customizations that are applicable to specific accounts created by and managed with AFT.aft-account-provisioning-customizations– manages customizations using AWS Step Functions. The state machines can use AWS Lambda functions as an example to communicate with external applications. This stage runs before the global and account level customizations stage.
Deployment overview
Before we go into the walkthrough details, let’s discuss what we’ll be deploying. First, we’ll create a new AWS account by submitting a request to the aft-account-request repository. AWS Control Tower Account Factory provisions the new AWS account, and the AFT pipeline starts to apply the customizations. We add Terraform customization in the aft-global-customizations repository to apply Amazon S3 Block public access for all accounts managed by AFT. We also add Terraform customization in aft-account-customizations for two categories: PRODUCTION and SANDBOX. For PRODUCTION, we add a custom guardrail using an AWS Config Rule to check if VPC Flow Logs is enabled. In SANDBOX customization, we add Terraform configuration to setup monthly AWS Budget. Inside the account request, we specify whether or not to use PRODUCTION or SANDBOX category for account-level customization.
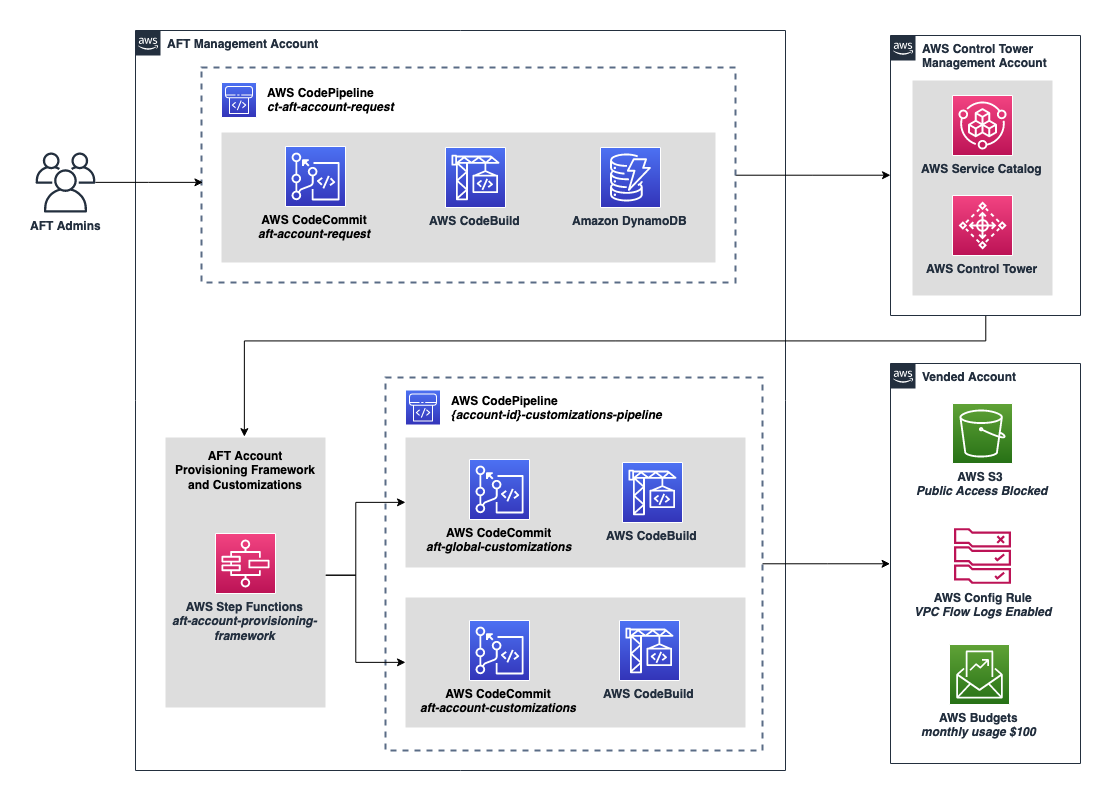
Figure 1. AFT diagram describing gitops workflow of new account request, AWS Control Tower Account Factory and AFT pipeline to deploy account and global customizations.
Prerequisites
Here are the prerequisites before you start:
- You should have an AWS Control Tower environment deployed and available. Follow the getting started guide if you need to launch AWS Control Tower.
- You should have an AFT deployed on a dedicated AFT Management account. Follow the guide on this post to set up AFT.
- A new root email address for a new vended AWS account that you’ll submit through AFT.
- A new or existing Organizational Units (OU) governed by AWS Control Tower, which is needed as part of new account request parameter in AFT.
- Integrated development environment (IDE) with Git, Terraform, and AWS Command Line Interface (AWS CLI) installed. Your IDE environment must be configured with AWS credentials to your AFT Management account.
- Make sure to specify the AWS Control Tower home region in the commands where applicable
In this post, we use AWS CodeCommit as the version control system (VCS). To learn more about third-party VCS and details for each prerequisite, see the AFT getting started documentation.
Account customizations repo
You can target a specific set of customizations during the new account request by specifying the parameter account_customizations_name inside the aft-account-request module. We’ll discuss in-depth about the aft-account-request in a later section. For now, it’s sufficient to just be aware of this parameter. We’ll create two categories of customizations: PRODUCTION and SANDBOX. When we request a new account, we specify which customization template to choose from: PRODUCTION or SANDBOX.
- From the IDE terminal, run the following commands. These commands will clone the sample repository and push it to your
aft-account-customizationsrepository. Replace the placeholder AWS_REGION value with your Control Tower home region.
- Open the
main.tffile on theaft-account-customizations/PRODUCTION/terraformdirectory. This is a Terraform configuration which creates an AWS Config guardrail to check if VPC Flow Logs are enabled. - Open the
main.tffile on theaft-account-customizations/SANDBOX/terraformdirectory. This is a Terraform configuration which sets a monthly budget of $100 on the account that you’re creating with this customization. - Open the
api_helpersdirectory, which is where you add bash/python script to further customize your account.
To add additional account level customization, create a new directory following the same structure. You specify the account_customization_name when creating a new account request, and AFT applies all of the Terraform configurations specified in the specific customization directory.
To use custom variables in your Terraform configuration, you pass the custom_fields value during the account request. These custom fields will be available as the AWS Systems Manager (SSM) Parameter Store in the vended AWS account under path /aft/account-request/custom-fields/{field-name}. In your Terraform configuration, you can retrieve these custom fields using data source. We’ll discuss in depth about custom_fields in a later section.
Global customizations repo
You can apply customizations to all of the accounts managed by AFT. For example, in this post, we’ll configure Amazon S3 Block Public Access to block public access to every Amazon Simple Storage Service (Amazon S3) bucket in all of the accounts managed by AFT.
- From the IDE terminal, run the following command. These commands will clone the sample repository and push it to your
aft-global-customizationsrepository. Replace the placeholder AWS_REGION value with your Control Tower home region.
- Open the
main.tffile on theaft-global-customizations/terraformdirectory. This is a Terraform configuration that blocks all public Amazon S3 access when deployed in the account.
Both account level and global customizations will be executed inside of the account-specific Code Pipeline. Global customizations will be applied ahead of the account level customizations. You won’t see this pipeline yet, since we haven’t submitted a new account request.
Provisioning customizations repo
Provisioning customizations utilize Step Functions State Machine to execute custom logic, and non-Terraform configuration as part of account provisioning. For example, you may require integration with external systems, such as ticketing system, security, identity, network, or cost management. Provisioning customization are implemented prior to the account and global customization stages.
In this post, we’ll use a simple state machine that performs pass operations to demonstrate the basic functionality.
- From the IDE terminal, run the following command to copy example account customization. Replace the placeholder AWS_REGION value with your Control Tower home region.
- Open the
terraform/states/customizations.asl.jsonfile to examine the State Machine definition. - This State Machine has a single state with type Pass. This state passed its input to the output without doing any work.
- Open the
aft-account-provisioning-customizations/terraform /states.tffile to examine the Terraform code which builds the Step Function State Machine using the template file.asl.jsonearlier. - Updating to this repository triggers the provisioning customization pipeline. Navigate to AWS CodePipeline and locate the
ct-aft-account-provisioning-customizationspipeline. This pipeline runs after you commit to the repository and build the state machine. - After the pipeline has completed successfully, navigate to Step Functions and locate the
aft-account-provisioning-customizationsstate machine.
Account request repo
To create and update the AWS account using AFT, use the aft-account-request Terraform module. Provide the mandatory input, such as account root email address and the OU. Each time that you add or modify the account request, the Terraform file is committed to the repository and will trigger the AFT pipeline.
- From the IDE terminal, run the following command to copy the example account customization. Replace the placeholder AWS_REGION value with your Control Tower home region.
- Updating to this repository triggers the account request pipeline.
- Navigate to CodePipeline and confirm that your
ct-aft-account-requestpipeline status is Succeeded. It may take a few minutes for the pipeline to complete. - So far, we only populate the boilerplate without yet submitting a real account request. In the next section, we’ll submit a new account request.
Provision new account
Now we’ll provision a new AWS account via AFT using the SANDOX customization that we configured earlier.
- From your IDE, navigate to the
aft-account-request/terraformdirectory. - Create a new file, and give it a name
account-requests.tf - Add the following Terraform code and replace the placeholder {{PLACEHOLDER NAME}} with your own value, for example for the account email, name, OU, and SSO. Make sure that you set
account_customizations_namewith either PRODUCTION or SANDBOX. You can modify other values such as tags and custom fields.
- Save the file and run the following code to commit to the repository. Replace the placeholder AWS_REGION value with your Control Tower home region.
- Once you commit the account request to the repository, AFT will trigger the Account Factory process in the AWS Control Tower management account.
This process will take some time. You can monitor the Account Factory process from the Service Catalog console in the AWS Control Tower Management account. After AWS Control Tower Account Factory is complete, the AFT pipeline continues with the customizations. You can monitor the AFT customization status by reviewing the execution of the Step function aft-account-provisioning-framework from within the AFT Management account.
Validate the result
To recap what we’ve completed so far, the newly provisioned AWS account will have global customization, which blocks Amazon S3 public access and SANDBOX customization. This sets a $100 spending Budget on the account. Follow these steps to validate the result:
- Sign in to the new AWS account that you provision from AFT.
- Open the Amazon S3 console here.
- Choose Block Public Access settings for this account.
- Observe that all of the settings should be ON.
- If you set account customizations name as
SANDBOX, then go to AWS Budgets here. - Locate the newly created budget called ‘budget-monthly-total’ set for $100.00.
- If you set the account customizations name as PRODUCTION, then navigate to AWS Config and locate the AWS Config rule vpc_flow_log_guardrail.
- Navigate to SSM, and select Parameter Store. Locate two SSM Parameter custom1 and custom2 (parameter name may vary if you modify the example provided earlier).
- These parameters originated from the
custom_fieldsattributes that you specify in the aft-account-request repository. You can use it as a data source in your global/account level customizations.
This completes the validation steps. You have successfully setup AFT repository with sample customizations and launched a new AWS account via AFT.
Other considerations
By using AFT, you can submit multiple account requests simultaneously. AFT will queue each individual account request, and AWS Control Tower Account Factory will process it sequentially. AFT also lets you import existing AWS accounts governed by AWS Control Tower. To use this feature, make sure that you update your AFT module to the latest version. Importing an existing AWS account is similar to requesting a new AWS account. You define the existing AWS account in the aft-account-request repository and trigger the pipeline to run.
To automatically store custom_fields as SSM parameters in the vended account, make sure that you upgrade your AFT module to the latest version. Note that if a custom field is removed from the account request, then the corresponding SSM Parameter Store will also be removed. At the time of writing this post, AFT only supports the standard string value for the SSM Parameter Store. If you must retrieve sensitive secrets, then consider using the pre- or post-API helpers to retrieve it from SSM.
AFT global customizations run before the account level customizations. Note that the update to aft-global-customizations or aft-account-customizations repository won’t automatically trigger the pipeline for each vended account. To re-baseline each vended account after you add new customizations, use the aft-invoke-customizations state machine. See the example event schema here. AFT can invoke a maximum of five customizations at a time. The step function waits and loops until all of the accounts matching the event criteria are complete.
Conclusion
In this post, you learned how to create a new AWS account in AFT, and how to apply global and account level customizations. If you are interested in diving deeper into AFT setup and repository, then see the AFT lab series in AWS Control Tower workshop. If you’re looking for an additional example tutorial, then see the tutorial in HashiCorp Terraform learn portal and additional samples in AFT GitHub repository. You can also report any issues or questions by visiting the AFT GitHub repository. Don’t forget to check our future post where we’ll dive deeper into account provisioning customization using Step Functions.
Authors: