AWS Cloud Operations Blog
Managing the account lifecycle in account-per-tenant SaaS environments on AWS
Software as a service (SaaS) companies have many options when they implement multi-tenancy in their applications. The AWS SaaS Factory Program provides recommendations for different deployment patterns depending on factors such as cost, compliance, and end-customer requirements.
You might find that silo methods like VPC-per-tenant are not sufficient. Your application might be in a highly regulated industry, for example, or you might have domain or customer requirements, or you might be migrating a legacy application to AWS. In these cases, consider provisioning an AWS account for each of your tenants.
In this blog post, I will cover the management of AWS accounts that are used to build a SaaS environment that uses an account-per-tenant model. I provide a suggested account lifecycle and information about how to baseline an account and maintain the accounts once they are in use. This post is for independent software vendors (ISVs) who deliver SaaS products to, at most, thousands of tenants. Do not use this account structure if your SaaS application might potentially have more tenants than this.
Prerequisites
Before you continue, familiarize yourself with the concepts in the Best Practices for Organizational Units with AWS Organizations blog post and the Organizing Your AWS Environment Using Multiple Accounts whitepaper. The strategies described in this blog post should be implemented along with the strategies described in the whitepaper. You should be familiar with the isolation models recommended in the SaaS Tenant Isolation Strategies whitepaper. You should also be familiar with the definition of Tenant in the SaaS Lens for the AWS Well-Architected Framework.
Using AWS Organizations to manage tenant environments
Using AWS accounts to provide isolation between tenants comes with a unique set of challenges that aren’t present in the pool model or even other types of silo models, like a VPC-per-tenant. If each tenant receives their own account, you could wind up with several thousand AWS accounts to manage. Managing each of these on their own can be unwieldy. Fortunately, AWS Organizations allows for the automatic creation and management of several AWS accounts.
Figure 1 shows a typical account-per-tenant model. There is a management account and three organizational units (OUs). The Infrastructure OU, as defined in the Organizing Your AWS Environment Using Multiple Accounts whitepaper, contains accounts with shared services, like orchestration mechanisms, authentication, and centralized logging. The Workload and Suspended OUs contain accounts provisioned for each of your tenants. Individual AWS accounts are mapped one to one to each of your tenants. The accounts in the Workload OU contain production-level infrastructure for a single tenant. The accounts in the Suspended OU are accounts that are no longer in use. They do not contain AWS resources.
The management account can perform actions that no other account in the organization can perform, including account creation and AWS Organizations changes. For this reason, the management account exists outside of the OUs and must not be used to provide services to any of the other AWS accounts. For more information about the purpose of the management account, see AWS Organizations terminology and concepts.
Figure 1 provides an example of how you could deploy this setup.
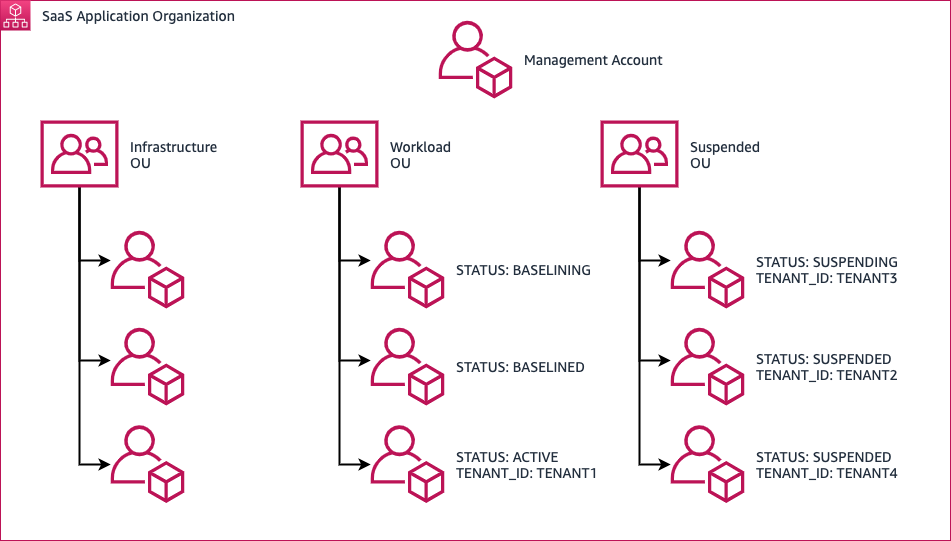
Figure 1: A Setup for Account-per-Tenant Isolation
Tagging flow
The data plane consists of two separate OUs: Workload and Suspended. The purpose of these OUs is described in the Organizing Your AWS Environment Using Multiple Accounts whitepaper. You should use tags to minimize the movement of accounts between OUs. The tags serve two purposes: account status and tenant assignment. An account that has been tagged with ACTIVE, SUSPENDING, or SUSPENDED for a tenant must never be reused for a different tenant.
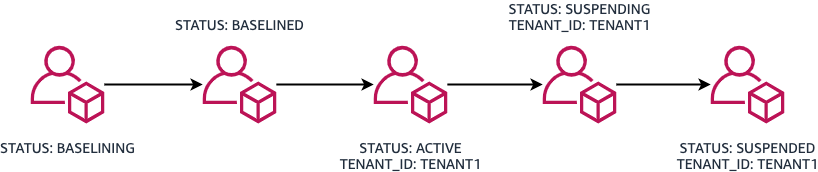
Figure 2: Flow between STATUS tags during the account lifecycle
BASELINING tag
Denotes newly provisioned AWS accounts that are not yet ready for use. The baselining process should include changes that need to be made to an account that do not incur a cost (for example, enabling Enterprise Support on a member account, increasing service limits, or creating IAM roles). When the baselining is complete, this account is retagged with the BASELINED tag.
BASELINED tag
Denotes accounts that have not yet been assigned to a tenant. These accounts already have Enterprise Support enabled and service limits set. Because account baselining is not immediate, you should keep a pool of accounts with this tag. The number of accounts you keep with this tag depends on the rate at which you onboard new tenants.
ACTIVE tag
Denotes accounts that are currently assigned to a tenant. Each account is assigned to a single tenant. When an account is assigned to a tenant, the TENANT_ID tag value is set to a unique tenant identifier, like a UUID.
SUSPENDING tag
Used for accounts that are no longer being actively used for a tenant, but still contain resources that need to be deleted. After a tenant discontinues service, the resources in the account must be deprovisioned. First, the account is moved from the Workload OU to the Suspended OU. The STATUS tag value is changed from ACTIVE to SUSPENDING. Automation in your SaaS application deletes resources like AWS CloudFormation templates from the account. After the account resources are deprovisioned, the account’s STATUS tag value changes to SUSPENDED.
SUSPENDED tag
Applied to accounts that are no longer being actively used by a tenant. All the resources in the account have been deleted. There’s no way to reset an account, meaning that there’s no reliable way to guarantee that previous tenant information is not still in the account. Accounts that have been moved to the Suspended OU should never be reused.
Accounts that are in the Suspended OU still count toward the overall account limit in an organization. Because there is currently no way to delete an account programmatically, you need to set up a workflow where accounts with the SUSPENDED tag are deleted manually. Manually deleting an account created with the AWS Organizations CreateAccount API action involves resetting the password for the root account, logging into the account, and requesting that the account be deleted. More information about closing an AWS account associated with an AWS Organization can be found on this page: Closing an AWS account.
It is important to keep track of the number of accounts that are currently in the organization that supports your SaaS application. You can determine the number of accounts in your organization with the ListAccounts API action. If the number of accounts is approaching the account limit, clear out the accounts with the SUSPENDED tag.
Baselining accounts for tenants
Before you can onboard a new tenant to your SaaS application, you must provision an account for a tenant to use. The process of creating an account with the AWS Organizations API action occurs in minutes. The process of baselining an account with AWS Enterprise Support and initial service limits, however, can take several hours to several days. Because baselined accounts cannot be provisioned for a new tenant on demand, you should maintain a pool of already provisioned accounts. The number depends on the rate at which you onboard new tenants. You might also need to consider different baselines for different tiers in your SaaS product. For example, an AWS account assigned to an enterprise tier tenant might require higher limits than an account assigned to a developer tier tenant.
Provisioning AWS accounts
You use the AWS Organizations CreateAccount API action to provision accounts. When the account is first provisioned, it should be placed into the Workload OU with the STATUS tag set to BASELINING. The account provisioning process can take several minutes. After the account is successfully created, enable AWS Enterprise Support.
Enabling AWS Enterprise Support
AWS Enterprise Support comes with resources that are helpful for managing a large number of accounts and limits across those accounts.
To enable Enterprise Support on a member account, it must first be enabled on the management account. After AWS Enterprise Support is enabled on the management account, you can use the Support API to request Enterprise Support on organization member accounts. Using the AWS Organizations API, you can retrieve the account number of the newly created account. Then, use the Support API to open a support case in the management account to request that the account number of the member account be added to AWS Enterprise Support. By adding this new account to the AWS Enterprise Support plan, the spend of the account will count towards the AWS Enterprise Support cost.
The Automating Service Limit Increases and Enterprise Support with AWS Control Tower blog post provides an AWS Lambda function that enables Enterprise Support automatically when an account is created.
Setting up Service Quota Limits
There are at least two solutions for initially setting limits across multiple AWS accounts.
If there are 10 or fewer limits that need to be set, and they will be the same across every account in your organization, you can use Service Quotas request templates. Specify the AWS Region, service, and the new value for the specific quota. The request template is then associated with an organization in AWS Organizations. Limits are requested automatically when a new account is provisioned.
If several limits must be set across several Regions, the request template limit of 10 items will not be sufficient. In this case, use the Service Quotas API to request limit increases. Check the limit before you request a new one using the GetServiceQuota API action. If you want to check the current vCPU limit for On-Demand Standard instances, issue the GetServiceQuota API call with the following AWS Command Line Interface (AWS CLI) command:
The response to this API call will include a Value key. The value for the Value key represents the current limit. If the limit is insufficient, it can be increased programmatically using the RequestServiceQuotaIncrease API action. For example, suppose your new accounts need a default limit of 3,000 vCPUs to support the services you run for your tenants. You would make a call to the RequestServiceQuotaIncrease API with the following body:
Managing a tenant
After the limit increases are in place, the AWS account can join the pool of available accounts. This involves changing the STATUS tag to BASELINED. After this tag is applied, the tenant onboarding mechanism can assign this account to a tenant by setting the STATUS tag to ACTIVE and assigning a TENANT_ID tag with a tenant identifier as the value.
Onboarding a tenant with a baselined account
You will need to assign a tenant one of the baselined accounts as part of your SaaS solution’s new tenant onboarding process. This is done by setting the STATUS tag on an unassigned account from BASELINED to ACTIVE. The TENANT_ID tag also needs to be set to a unique tenant identifier. Once the account is associated with the tenant, you will also need to provision any infrastructure required for your SaaS application and deploy the application. You will also need to integrate this new deployment with any shared resources in your SaaS application. This step will be different for each SaaS application.
Monitoring limits in member accounts
Limits in each AWS account are set independently, but they should be set consistently, depending on the tier the tenant subscribes to. For example, if your lowest tier has a maximum vCPU limit of 3000, every other account assigned to a tenant in that tier should have the same limit applied. Depending on the usage per tenant, you might need to increase limits in a particular tenant account. Monitor resource consumption and see how it compares to limits in a particular account.
Amazon CloudWatch can monitor across accounts and across Regions. By setting up CloudWatch metric alarms in each of the tenant accounts and then making them available in the account you monitor from, you can quickly become aware of limit issues.
There are three mechanisms for monitoring limits in member accounts: AWS Trusted Advisor, Service Quotas, and manual monitoring. AWS Trusted Advisor supports common services like Amazon RDS, Amazon EC2, Amazon EBS, and Amazon DynamoDB. For information about setting up CloudWatch alarms for Trusted Advisor, see the Monitoring Service Limits with Trusted Advisor and Amazon CloudWatch blog post.
For a list of services that currently support utilization monitoring by the Service Quotas tool, see Visualizing your service quotas and setting alarms. To set up CloudWatch alarms on these limits, see Service Quotas and Amazon CloudWatch alarms.
If neither AWS Trusted Advisor nor Service Quotas support monitoring limit utilization, you will need to monitor resource utilization manually. The Service Quotas tool holds the current value of a limit. The current utilization of a limit can be calculated through the various AWS APIs.
For example, suppose you need to monitor the limit for the maximum number of nodes per Region in Amazon ElasticCache. Neither Service Quotas nor AWS Trusted Advisor offer support for monitoring this limit. You might be able to monitor the number of nodes provisioned in a Region using Amazon EventBridge scheduled events to periodically run a Lambda function. This Lambda function would invoke the ElasticCache DescribeCacheClusters API action and the Service Quotas GetServiceQuota API action. The Lambda function would count the number of clusters in the response and use the PutMetricData API action to put this information into Amazon CloudWatch. It would also use the Value key returned by the GetServiceQuota API call to maintain a separate metric tracking the existing limit.
You can use an alarm based on a metric math expression to determine when to raise a limit. For example, you can use the two metrics calculated above to determine when 80% of the limit Is used. For more information, see Creating a CloudWatch alarm based on a metric math expression. This alarm sends a notification to an SNS topic, which passes the alarm information to a Lambda function. This Lambda function parses the alarm information and requests a limit increase through the Service Quotas API.
Working with application deployments
When application updates need to be deployed, each set of tenant infrastructure must be updated across every account. In a pool model, this is generally straightforward: There should only be one set of infrastructure to update. However, when each tenant has their own set of infrastructure, updates must be applied to each tenant. That means if there are 1,000 tenants, you need to update 1,000 individual infrastructure deployments.
Upon creation, each account in an organization is provisioned with an IAM role. Using this IAM role, you can create another role or set of roles to be used specifically for deploying application updates into the account. After you’ve bootstrapped the required IAM roles into the account, you can delete the IAM role that AWS Organizations created when the account was provisioned. By deleting this role in the data plane account, you will avoid having an unused IAM role with administrative permissions.
For example, suppose your application consists of a CloudFormation template that deploys several EC2 instances. The role you use to deploy the template must be able to create a CloudFormation stack and run EC2 instances. The role you use should be limited only to the permissions required to deploy the application.
You can integrate this process into a CI/CD pipeline. For example, during the deployment of an application update, you can retrieve a list of tenants and their associated AWS accounts from the AWS Organizations API. Then, the deployment process can assume a role in the tenant’s assigned AWS account to perform the deployment. This can be done one at a time or in batches.
Monitoring tenant costs
In this model, measuring a large portion of the costs incurred by a tenant is straightforward. Each tenant account generates its own bill. Because there is only one tenant per AWS account, this entire bill can be attributed to a single tenant.
You can find the costs incurred by each account in the organization’s management account. For more information, see Billing and account activity.
Offboarding a tenant
You might need to retire an AWS account a tenant once used. There is no reliable method for resetting an AWS account to the state it was in when the tenant first started using it. Even when you deploy infrastructure with CloudFormation, there’s still a risk that data or resources will persist.
There is also currently no way to programmatically delete an account. To delete an AWS account, sign in to the root account and submit a request to delete the account. Depending on the number of accounts you have and tenant churn, this might become a cumbersome process. For these reasons, you should use the AWS Organizations API to modify the tags on an account and move it to the Suspended OU.
When a tenant first leaves your platform, move the account to the Suspended OU and update the STATUS tag to SUSPENDING. You can then start deleting resources in the account (for example, S3 buckets, CloudFormation stacks, or other resources that incur a billing cost). After the resources are deleted, the STATUS tag associated with the account should be updated to SUSPENDED. Do not reuse the account.
Considerations for tiered SaaS offerings
SaaS providers often offer different experiences to their customers by packaging their offerings in tiers. These can include non-paid offerings, like free tiers or trials. These are subscriptions that offer limited functionality or full functionality for a limited amount of time. Not every customer who uses a non-paid offering will convert to a paid subscription. If you assign a new account to each non-paying customer, you could eventually end up with several inactive accounts that were only used for a brief time.
To solve this problem, create at least one account dedicated to non-paying customers. The shared account contains several deployments of the same application. To avoid extensive refactoring into a pool-based model, you should use a VPC-per-tenant model. If a VPC-per-tenant is not applicable, deploy your application in the appropriate silo-based model. If a customer does not convert at the end of a trial, you won’t have a suspended AWS account. You simply remove the resources the customer used.
There are some disadvantages to having a shared account for non-paying customers. If a customer does convert to a paid SaaS plan, decide what to do with the customer’s data in the non-paid account. There are two obvious options:
- Migrate the customer from the non-paid account to their own account.
- Let the customer know that the non-paid offering is not for production use.
The first option requires significant custom tooling to accomplish. You will need to migrate the customer’s data and configuration to one of the accounts with the BASELINED tag. The second option is easier, but might result in a less than optimal customer experience. Be sure to set expectations with your customers when they sign up for non-paid accounts.
If you have an account that contains multiple free-tier clients, tag the account with a TENANT_ID value like FREE_TIER_ACCOUNTS. That way, there isn’t an account with the STATUS tag set to ACTIVE that doesn’t have a TENANT_ID definition.
Finally, make it clear to your customers that the isolation boundary for the non-paid tier account and the paid accounts will be different.
Conclusion
Using an AWS account per tenant for your SaaS application requires planning not required by other tenant isolation models. Most of the planning is unique to the SaaS application.
In this post, I shared information about how to efficiently manage an account per-tenant-model. I outlined areas to focus on and AWS services to use when deploying this model. The information in this post should give you a head start on the path to isolating your tenants with AWS accounts. You can start experimenting with AWS Organizations by following this tutorial: Creating and configuring an organization.