Networking & Content Delivery
Visitor Prioritization on e-Commerce Websites with CloudFront and CloudFront Functions
When we wrote the previous post (Visitor Prioritization on e-Commerce Websites with CloudFront and Lambda@Edge) five years ago, Visitor Prioritization was a relatively new concept. Since then, we saw a huge need for traffic shaping, throttling, and request prioritizing, especially in the gaming and media industries. Of course, e-Commerce sites still require this capability for daily sales and campaigns.
After AWS announced CloudFront Functions in May 2021, customers submitted a number of requests and questions like the following:
- Whether CloudFront Functions can be used for this use case or not.
- And if yes, what are the pros and cons.
- What is the pricing structure, prerequisites, and so on.
The answer is yes, CloudFront Functions helps in this area, because this new feature isn’t just for simple header manipulation but edge computing. Therefore, it provides a good fit for visitor prioritization use cases as well.
AWS also launched AWS WAF Bot Control in April 2021. It protects customers’ sites from malicious bots which generate unwanted traffic and access. Some questions from customers included how to use the AWS WAF Bot Control to provide better user experiences with CloudFront Functions. Therefore, we realized that this is a good chance to re-introduce our visitor prioritization capability with CloudFront Functions, as well as how to integrate with AWS WAF Bot Control.
Invoke Point Lambda@Edge/CloudFront Functions
CloudFront Functions only works during the viewer request and response phase, while Lambda@Edge works during both viewer and origin events. Therefore, you must implement the visitor prioritization function at the viewer request phase. They can protect your origin. CloudFront Function’s pricing is much cheaper than Lambda@Edge and its concurrency constraint is higher than Lambda@Edge (see the Quotas document). But Lambda@Edge still provides origin-based request/response manipulation capability. Furthermore, when compared to CloudFront Functions, it provides more flexible computing capability (see CloudFront Functions post). Therefore, you may need to use Lambda@Edge in addition to CloudFront Functions especially for complicated use cases.
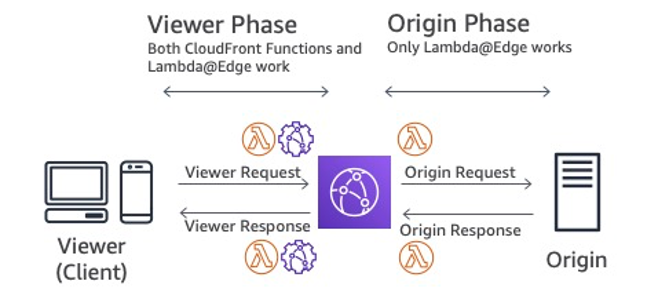
Figure 1. Event triggering point for Lambda@Edge and CloudFront Function
Visitor Prioritization workflow overview (legitimate or normal use case)
The following diagram represents typical Visitor Prioritization workflow. For each request, CloudFront Functions checks whether the request is legitimate or not, then determines if it can go to the origin or not.
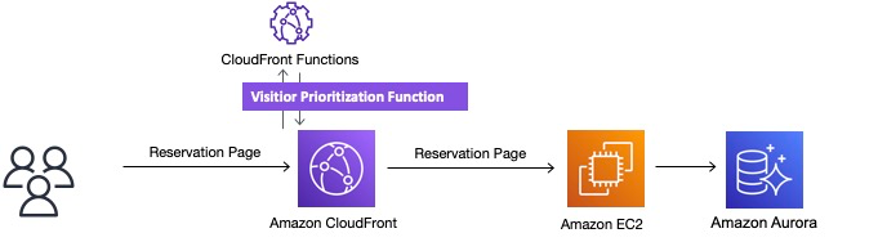
Figure 2. Visitor Prioritization workflow for legitimate user
- The client requests e-Commerce site access during campaig.
- CloudFront Function runs the Visitor Prioritization Function.
- Legitimate request goes to the origin (in this diagram, Amazon EC2 + Amazon Aurora) to process the request.
Visitor Prioritization workflow overview (waiting room)
If you must turn on Visitor Prioritization, then CloudFront Functions checks whether the request can go to the origin or should route to the waiting room. As introduced above, CloudFront Functions only works at the viewer phase, it can’t change the current origin to other origins such as Amazon Simple Storage Service (Amazon S3). It can only change the URL path for routing to the waiting room. For example, you can rewrite the requested path as “waitingroom.html”, which is composed of static files, not the original workload linked to the database or any backend resources. Even though this approach can help a lot with reducing the load generated by EC2 and Aurora database, but it doesn’t provide 100% of the origin workload offloading.
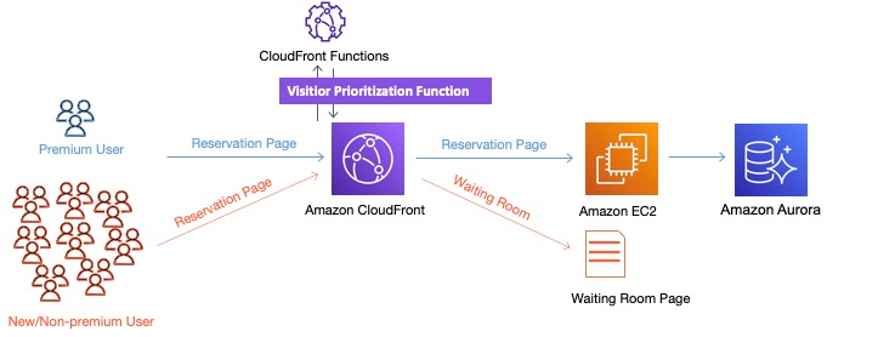
Figure 3. Visitor Prioritization workflow when triggering the waiting room
Therefore, if this is the case for your origin, then you can offload by using HTTP redirect. CloudFront can change the origin based on the PATH condition (behavior). Moreover, if you set up the Amazon S3 origin for some specified PATH, then you can route all waiting room traffic to Amazon S3. You can also set different TTL for this redirected PATH, and then you can control the waiting room contents’ TTL differently.
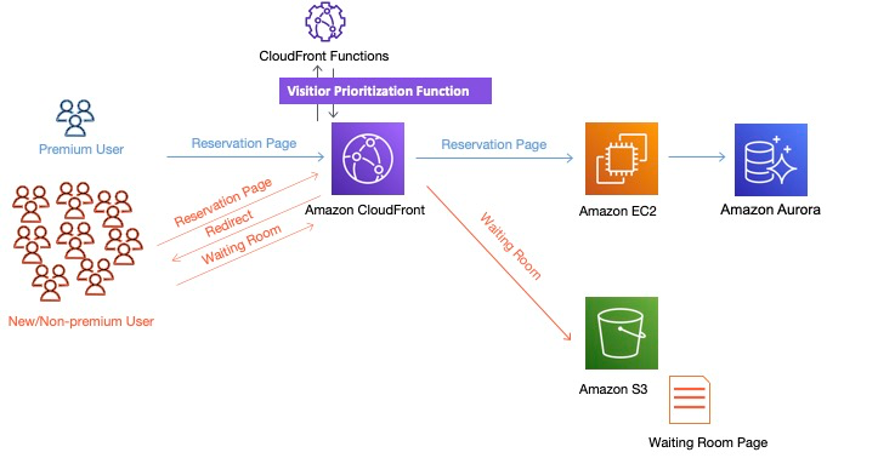
Figure 4. Visitor Prioritization workflow when waiting room traffic is separated into S3
Another redirect technique rather than the page basis is a domain base. It may seem strange that we have introduced another domain technique here. However, if you want to close the origin for an emergency reason, having a fully independent waiting room can help a lot. Therefore, I recommend that you consider or implement both to switch the waiting room based on your scenario. The good news is that CloudFront Function supports these requirements. We implemented essences in the following sample code already, so that you can enhance it to implement your requirements.
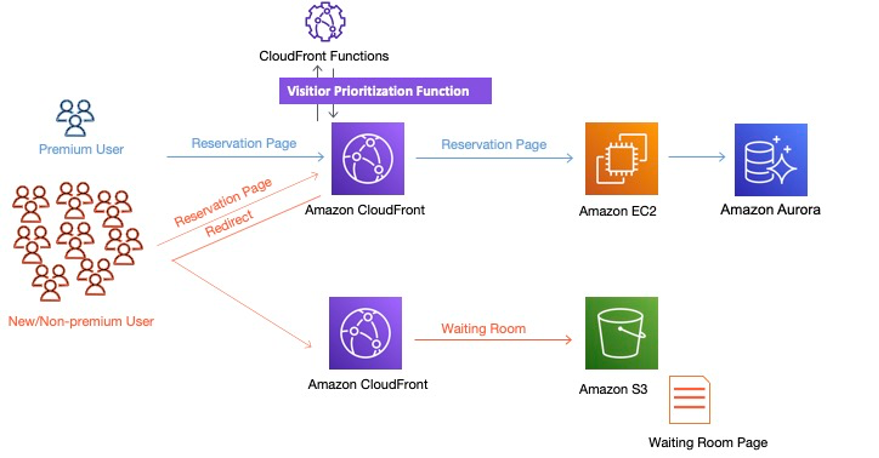
Figure 5. Visitor Prioritization workflow when waiting room traffic is separated into another domain
Integration with AWS WAF Bot Control
AWS WAF Bot Control protects your sites from malicious Bot traffic. This is especially true in the case that you want to use the visitor prioritization solution, where you also want to minimize this type of traffic. Therefore, I recommend that you use AWS WAF and Bot Control. Even before Bot Control, AWS WAF provided an IP list-based Bot mitigation capability. AWS released the following two IP-based managed rule sets:
By using these rules, you can block malicious requests. And, in addition to these IP rules, you can use your own IP list or partner provided rule sets.
AWS WAF Bot Control can work with these IP based rules, and it can provide more fine-grained control over bot traffic. Generally, you welcome search engine access. But if you want to enable visitor prioritization, then you may want to block even legitimate search engine traffic. And of course, you always want to block machine generated traffic. By using AWS WAF Bot Control with the visitor prioritization solution, you can control bot-based traffic. Then you can provide a much better user experience even under a high traffic situation.
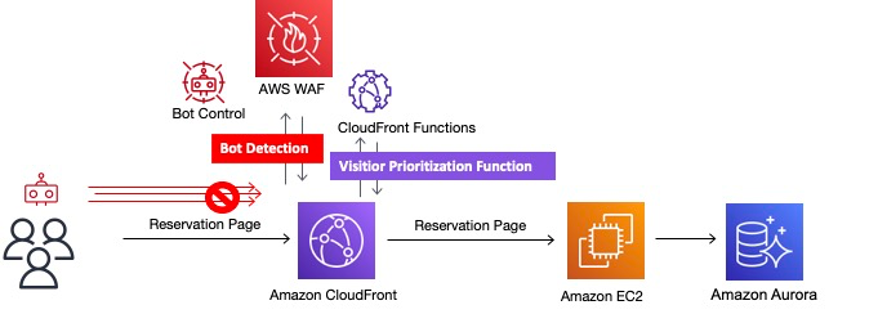
Figure 6. Combine AWS WAF Bot Control with visitor prioritization workflow
- Malicious Bots request e-Commerce site access.
- AWS WAF checks its request, then it detects if this request comes from a malicious bot. Next is the response based on the AWS WAF Bot Control setting (e.g., 403 error status code).
- CloudFront returns a response based on the Bot Control’s setting.
Note that AWS WAF supports a custom response. Based on this setting, AWS WAF returns the appropriate response code, not only 403 but others including 200.
Solution deployment prerequisites
The following prerequisites are required:
- Create a new AWS account or use an existing account.
- Create a new CloudFront distribution or use an existing one.
- Set up at least two HTML files on your origin to check the path modification behavior.
- In this example, we use “/index.html” as a default page and “/waitingroom.html” as a waiting room page.
Create a new CloudFront Functions
Step 1: Customize the function code
- The Visitor Prioritization CloudFront Function is provided as the following JavaScript code:
/*
 * A flag indicating whether the origin is ready to accept traffic.
 * Unlike Lambda@Edge, CloudFront Functions doesn't support network call.
 * So if you want to change this value, you need to modify then re-deploy
 * this function.
 */
var originAcceptingTraffic = true;

/*
 * The origin hit rate (a value between 0 and 1) specifies a percentage of
 * users that go directly to the origin, while the rest go to
 * a "waiting room." Premium users always go to the origin.  if you want to
 * change this value, you need to modify then re-deploy this function.
 */
var originHitRate = 0.3;

/*
 * Waiting Room Redirect URL
 */

var FullClose = `https://FullCLOSE SITE` // Change the redirect URL to your choice

function handler(event) {
    var request = event.request;
//    var response = event.response;
    var uri = event.request.uri;
    var cookies = event.request.cookies;
    var premiumUserCookieValue = 'some-secret-cookie-value';


    if(!originAcceptingTraffic) {
        console.log("Origin is not accepting any traffic. " +
                    "All requests go to the Full close waiting room.");
        var response = {
                 statusCode: 302,
                 statusDescription: 'Found',
                 headers:
                         { "location": { "value": FullClose } }
                     }
        return response;
    }

    // Check Whether Cookie is available or not.
    // in this sample it checks premium-user-cookie. This name is case
    // sensitive, so if you use upper charactor, please modify name parameter.
    if(cookies.hasOwnProperty("premium-user-cookie") && cookies["premium-user-cookie"].value === premiumUserCookieValue){
        console.log(`Verified Permium user cookie, this request goes to Origin cause it has Cookie with a valid secret value of "${premiumUserCookieValue}".`);
        return request;
      }

    // Lotterly to check go to origin
    if (Math.random() >= originHitRate) {
        console.log("An unlucky user goes to the waiting room.");
        request.uri = '/waitingroom.html';
        return request;
    }
    console.log("A lucky user goes to the origin.");
    return request;
};- Open the file in a text editor, and then update the following fields in the code to meet your requirements:
- originAcceptingTraffic: The default is true. Set this to false if your origin isn’t ready to accept traffic.
- originHitRate: A number between 0 and 1. This value indicates the percentage of incoming new and regular customer requests that are allowed to go to your website.
- FullClose: The redirection URL to be used when the origin isn’t available – ‘originAcceptingTraffic = false’.
Step 2: Create a CloudFront Function
- In the CloudFront console, create the CloudFront Function and copy the function code that you edited in Step 1. Then paste it into the code editor in the console, replacing the default code in the editor.
- Deploy to the development stage by selecting the Save changes button.
Test the function
Once the function is deployed in the development stage, you can try the function to see if it’s working. Based on the CloudFront Function Test console, various test scenarios that you need to verify can now be simulated.
Test case 1: Request with premium cookie
- On the function page created in the previous step, choose the Test tab.
- The function should be triggered at the viewer request phase, so choose Viewer Request in the Event Type field.
- The code is currently deployed in the development stage, so select Development in the Stage field.
- Enter the request parameters as follows:
- HTTP Method: GET
- URL Path: Set your default page path (e.g., /index.html)
- IP address: empty
- Add Cookie as follows:
- Name: premium-user-cookie
- Value: some-secret-cookie-value
- Attributes: empty
- Select “Test function” button.
- You can see that the uri value in the Output section is always the default page path.

Figure 7. CloudFront Function’s response when requested with premium cookie
Test case 2: Request without the premium cookie
- After removing only the cookie setting in the test case 1, perform the test again.
- You can see that the uri value in the Output section is randomly changed to either the default page path or /waitingroom.html. You can control the response rate for each page by adjusting the originHitRate value in the code.

Figure 8. CloudFront Function’s response when requested without premium cookie
You can also verify that the function works as intended by adjusting the values of various variables within the code. But you should note that when you update a code, it only affects the development stage. To update the code in the live stage, you should publish the function.
Associate the function with CloudFront distribution
When you’re ready to use your function after testing various scenarios, it’s time to publish the function.
Step 1: Publish the function to the live stage
- On the function page, choose the Publish tab.
- Select Publish function button to publish your tested code in the development stage to the live stage.
After publishing the function, you can associate the function with one or more cache behaviors in the CloudFront distribution.
Step 2: Associate the function
- Select Add association button.
- Distribution: choose your CloudFront distribution ID
- Event type: select Viewer Request
- Cache behavior: choose Default(*) (or any other behavior to which you want to apply the CloudFront Function.)
- Select the Add association button.
- Wait for the function to be deployed completely in CloudFront.
Now your CloudFront Function is associated with the behavior that you configured for your CloudFront distribution, and the updates have been published to AWS locations globally.
Test your deployment
Once you complete deployment, you can confirm if your CloudFront function works properly in the live stage.
First, you must check the ETag header for “index.html” and “waitingroom.html”.
$ curl -i https://[your origin endpoint]/index.html
HTTP/1.1 200 OK
x-amz-id-2: N4+xzqRSqQY+ZuAJkmRL6xAAesBVjsg20TVGYlzzeMmbJ4pdejuGh/pVItKvIshcpSOcthC2zMc=
x-amz-request-id: X6TM23EJY639X5R5
Date: Fri, 13 Aug 2021 06:25:26 GMT
Last-Modified: Tue, 20 Jul 2021 08:16:11 GMT
ETag: "d85834344bc3cb3267806005e1f9bf79"
Accept-Ranges: bytes
Content-Type: text/html
Server: AmazonS3
Content-Length: 10

$ curl -i https://[your origin endpoint]/waitingroom.html
HTTP/1.1 200 OK
x-amz-id-2: c8J1YAkV4n79eVxA0OImCec+KSnUDFHnjTCBE9hZukYRDwKnpRePeNHlsw/jfHDFd2upiItANrU=
x-amz-request-id: 5QKH9WDW0R453FH5
Date: Fri, 13 Aug 2021 06:26:18 GMT
Last-Modified: Tue, 20 Jul 2021 08:16:12 GMT
ETag: "87a8e81f406d0e3252d1e045d6c247f9"
Accept-Ranges: bytes
Content-Type: text/html
Server: AmazonS3
Content-Length: 12
Then you can try the test scenario that you performed in the CloudFront Test Console once again.
Test case 1: request with premium cookie (30 attempts)
$ for i in `seq 1 30`; do echo $i; curl -i --cookie "premium-user-cookie=some-secret-cookie-value" https://[CloudFront endpoint]/index.html 2>&1 | grep etag >> curlResultWithCookie.log; done; cat curlResultWithCookie.log |sort |uniq -c;

30 etag: "d85834344bc3cb3267806005e1f9bf79"  <<< index.html's etag
If cookies are included, you can see that “index.html” is responded to all requests without redirecting to the waiting room.
Test case 2: request without premium cookie (30 attempts)
$ for i in `seq 1 30`; do echo $i; curl -i https://[CloudFront endpoint]/index.html 2>&1 | grep etag >> curlResultWithoutCookie.log; done; cat curlResultWithoutCookie.log |sort |uniq -c

  21 etag: "87a8e81f406d0e3252d1e045d6c247f9"  <<< waitingroom.html's etag
   9 etag: "d85834344bc3cb3267806005e1f9bf79"  <<< index.html's etag
Conversely, if the cookie isn’t included, then you can see that index.html and waitingroom.html are mixed from the response. The ratio of redirection to the waiting room can be controlled through the “originHitRate” variable set in the CloudFront Function code.
AWS CloudFormation Template and AWS Cloud Development Kit
If you want to test immediately, then you can create an AWS CloudFormation stack using this template.
This template creates
- An S3 bucket with Origin Access Identity.
- CloudFront Distribution which use the Amazon S3 origin above.
- CloudFront Functions
If you’re familiar with AWS Cloud Development Kit (AWS CDK), then you can also utilize the AWS CDK sample from our Github repository that has an additional implementation.
This sample shows how to automatically turn on/off whether or not to send to the waiting room according to Amazon CloudWatch metrics, such as request count per minute.
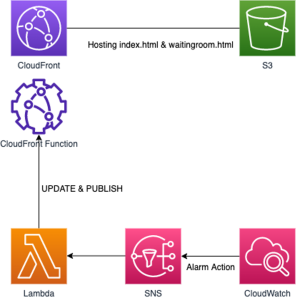
Figure 9. Architecture of the solution – Visitor Prioritization Switcher
Conclusion
CloudFront Functions provide similar or better capability for a visitor prioritization solution than Lambda@Edge. Because CloudFront Functions can handle huge amounts of traffic with low latency and price, while Lambda@Edge supports more complicated use cases like external network integration, library support, and much longer computing capability. Therefore, it will help your computing capability. In turn, you will likely use both CloudFront Functions and Lambda@Edge in some cases. AWS WAF and Bot Control provide additional bot mitigation capabilities, including unwanted traffic prevention. Furthermore, using these services will help your site even though there are non-visitor prioritization use cases. Security and visibility always help your sites, and continuous monitoring helps your site’s availability. We hope the guidelines in this blog help improve your site’s availability, scalability, and performance.

Yoshihisa Nakatani
Yoshihisa Nakatani is Edge Services Specialist Solutions Architect Manager, APAC. Yoshihisa focuses on AWS customers who uses Edge Services like Amazon CloudFront, AWS WAF including Bot Control, AWS Shield, AWS Firewall Manager, and AWS Global Accelerator in APAC.

Gabin Lee
Gabin Lee is Edge Services Specialist Solutions Architect based in South Korea. Gabin is passionate about building scalable, resilient and secure architecture using various Edge services.

Akira Mori
Akira Mori is Senior Solutions Architect based in Japan. Akira is passionate about Edge Services and helps companies of all sizes (from Small & Medium Business to Enterprises) in their Cloud journey.