AWS Security Blog
Protect your remote workforce by using a managed DNS firewall and network firewall
More of our customers are adopting flexible work-from-home and remote work strategies that use virtual desktop solutions, such as Amazon WorkSpaces and Amazon AppStream 2.0, to deliver their user applications. Securing these workloads benefits from a layered approach, and this post focuses on protecting your users at the network level. Customers can now apply these security measures by using Route 53 Resolver DNS Firewall and AWS Network Firewall, two managed services that provide layered protection for the customer’s virtual private cloud (VPC). This blog post provides recommendations for how you can build network protection for your remote workforce by using DNS Firewall and Network Firewall.
Overview
DNS Firewall helps you block DNS queries that are made for known malicious domains, while allowing DNS queries to trusted domains. DNS Firewall has a simple deployment model that makes it straightforward for you to start protecting your VPCs by using managed domain lists, as well as custom domain lists. With DNS Firewall, you can filter and regulate outbound DNS requests. The service inspects DNS requests that are handled by Route 53 Resolver and applies actions that you define to allow or block requests.
DNS Firewall consists of domain lists and rule groups. Domain lists include custom domain lists that you create and AWS managed domain lists. Rule groups are associated with VPCs and control the response for domain lists that you choose. You can configure rule groups at scale by using AWS Firewall Manager. Rule groups process in priority order and stop processing after a rule is matched.
Network Firewall helps customers protect their VPCs by protecting the workload at the network layer. Network Firewall is an automatically scaling, highly available service that simplifies deployment and management for network administrators. With Network Firewall, you can perform inspection for inbound traffic, outbound traffic, traffic between VPCs, and traffic between VPCs and AWS Direct Connect or AWS VPN traffic. You can deploy stateless rules to allow or deny traffic based on the protocol, source and destination ports, and source and destination IP addresses. Additionally, you can deploy stateful rules that allow or block traffic based on domain lists, standard rule groups, or Suricata compatible intrusion prevention system (IPS) rules.
To configure Network Firewall, you need to create Network Firewall rule groups, a Network Firewall policy, and finally, a network firewall. Rule groups consist of stateless and stateful rule groups. For both types of rule groups, you need to estimate the capacity when you create the rule group. See the Network Firewall Developer Guide to learn how to estimate the capacity that is needed for the stateless and stateful rule engines.
This post shows you how to configure DNS Firewall and Network Firewall to protect your workload. You will learn how to create rules that prevent DNS queries to unapproved DNS servers, and that block resources by protocol, domain, and IP address. For the purposes of this post, we’ll show you how to protect a workload consisting of two Microsoft Active Directory domain controllers, an application server running QuickBooks, and Amazon WorkSpaces to deliver the QuickBooks application to end users, as shown in Figure 1.
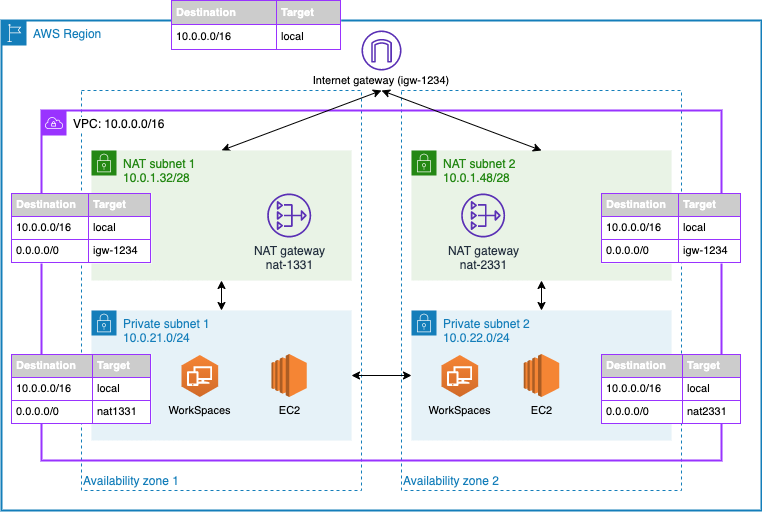
Figure 1: An example architecture that includes domain controllers and QuickBooks hosted on EC2 and Amazon WorkSpaces for user virtual desktops
Configure DNS Firewall
DNS Firewall domain lists currently include two managed lists to block malware and botnet command-and-control networks, and you can also bring your own list. Your list can include any domain names that you have found to be malicious and any domains that you don’t want your workloads connecting to.
To configure DNS Firewall domain lists (console)
- Open the Amazon VPC console.
- In the navigation pane, under DNS Firewall, choose Domain lists.
- Choose Add domain list to configure a customer-owned domain list.
- In the domain list builder dialog box, do the following.
- Under Domain list name, enter a name.
- In the second dialog box, enter the list of domains you want to allow or block.
- Choose Add domain list.
When you create a domain list, you can enter a list of domains you want to block or allow. You also have the option to upload your domains by using a bulk upload. You can use wildcards when you add domains for DNS Firewall. Figure 2 shows an example of a custom domain list that matches the root domain and any subdomain of box.com, dropbox.com, and sharefile.com, to prevent users from using these file sharing platforms.
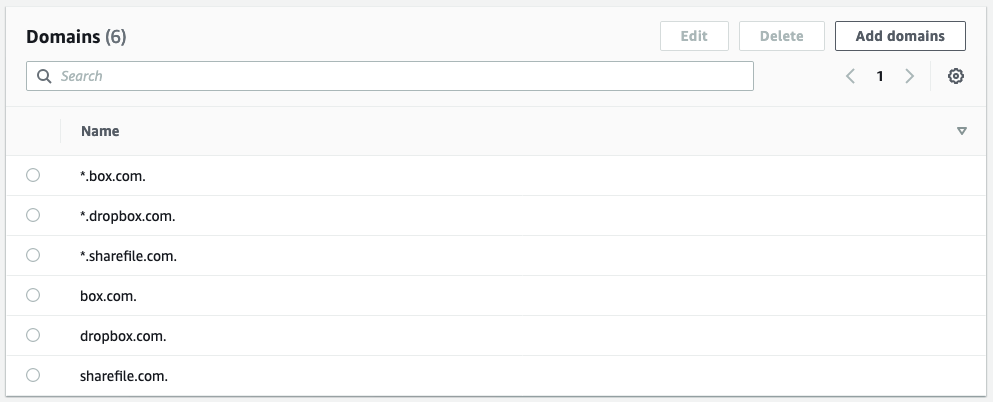
Figure 2: Domains added to a customer-owned domain list
To configure DNS Firewall rule groups (console)
- Open the Amazon VPC console.
- In the navigation pane, under DNS Firewall, choose Rule group.
- Choose Create rule group to apply actions to domain lists.
- Enter a rule group name and optional description.
- Choose Add rule to add a managed or customer-owned domain list, and do the following.
- Enter a rule name and optional description.
- Choose Add my own domain list or Add AWS managed domain list.
- Select the desired domain list.
- Choose an action, and then choose Next.
- (Optional) Change the rule priority.
- (Optional) Add tags.
- Choose Create rule group.
When you create your rule group, you attach rules and set an action and priority for the rule. You can set rule actions to Allow, Block, or Alert. When you set the action to Block, you can return the following responses:
- NODATA – Returns no response.
- NXDOMAIN – Returns an unknown domain response.
- OVERRIDE – Returns a custom CNAME response.
Figure 3 shows rules attached to the DNS firewall.
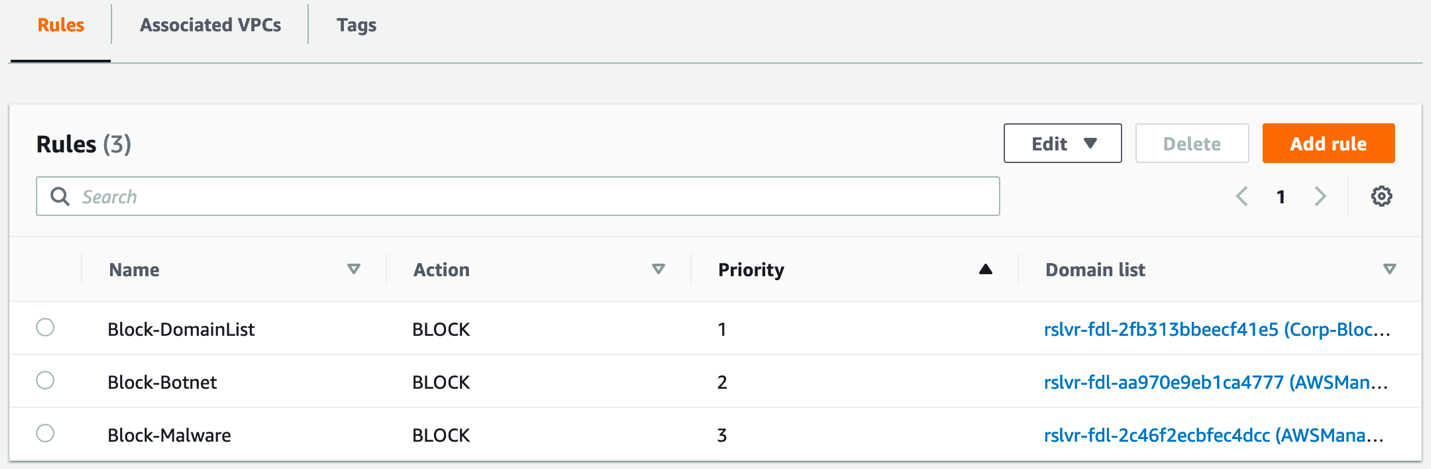
Figure 3: DNS Firewall rules
To associate your rule group to a VPC (console)
- Open the Amazon VPC console.
- In the navigation pane, under DNS Firewall, choose Rule group.
- Select the desired rule group.
- Choose Associated VPCs, and then choose Associate VPC.
- Select one or more VPCs, and then choose Associate.
The rule group will filter your DNS requests to Route 53 Resolver. Set your DNS servers forwarders to use your Route 53 Resolver.
To configure logging for your firewall’s activity, navigate to the Route 53 console and select your VPC under the Resolver section. You can configure multiple logging options, if required. You can choose to log to Amazon CloudWatch, Amazon Simple Storage Service (Amazon S3), or Amazon Kinesis Data Firehose. Select the VPC that you want to log queries for and add any tags that you require.
Configure Network Firewall
In this section, you’ll learn how to create Network Firewall rule groups, a firewall policy, and a network firewall.
Configure rule groups
Stateless rule groups are straightforward evaluations of a source and destination IP address, protocol, and port. It’s important to note that stateless rules don’t perform any deep inspection of network traffic.
Stateless rules have three options:
- Pass – Pass the packet without further inspection.
- Drop – Drop the packet.
- Forward – Forward the packet to stateful rule groups.
Stateless rules inspect each packet in isolation in the order of priority and stop processing when a rule has been matched. This example doesn’t use a stateless rule, and simply uses the default firewall action to forward all traffic to stateful rule groups.
Stateful rule groups support deep packet inspection, traffic logging, and more complex rules. Stateful rule groups evaluate traffic based on standard rules, domain rules or Suricata rules. Depending on the type of rule that you use, you can pass, drop, or create alerts on the traffic that is inspected.
To create a rule group (console)
- Open the Amazon VPC console.
- In the navigation pane, under AWS Network Firewall, choose Network Firewall rule groups.
- Choose Create Network Firewall rule group.
- Choose Stateful rule group or Stateless rule group.
- Enter the desired settings.
- Choose Create stateful rule group.
The example in Figure 4 uses standard rules to block outbound and inbound Server Message Block (SMB), Secure Shell (SSH), Network Time Protocol (NTP), DNS, and Kerberos traffic, which are common protocols used in our example workload. Network Firewall doesn’t inspect traffic between subnets within the same VPC or over VPC peering, so these rules won’t block local traffic. You can add rules with the Pass action to allow traffic to and from trusted networks.
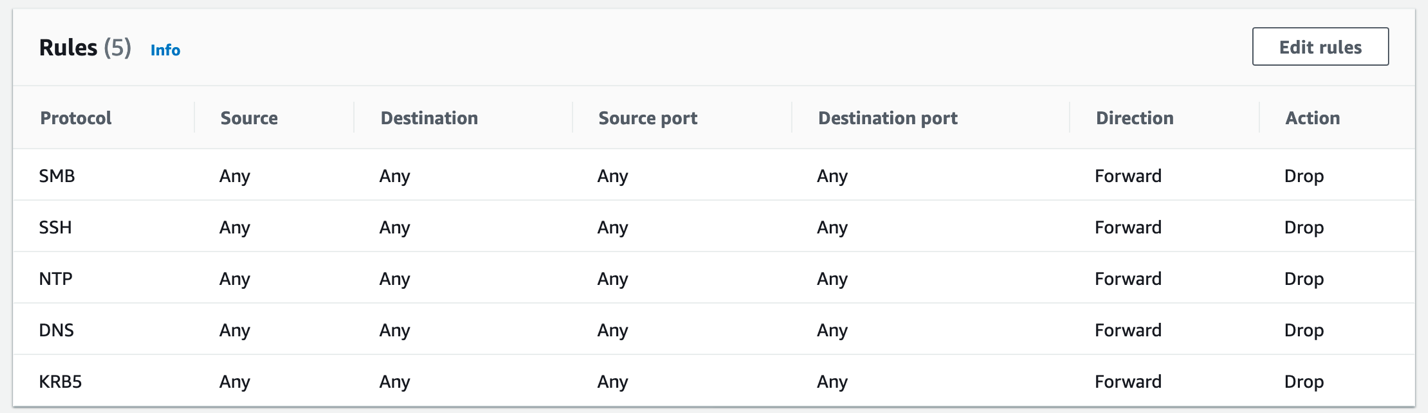
Figure 4: Standard rules created to block unauthorized SMB, SSH, NTP, DNS, and Kerberos traffic
Blocking outbound DNS requests is a common strategy to verify that DNS traffic resolves only from local resolvers, such as your DNS server or the Route 53 Resolver. You can also use these rules to prevent inbound traffic to your VPC-hosted resources, as an additional layer of security beyond security groups. If a security group erroneously allows SMB access to a file server from external sources, Network Firewall will drop this traffic based on these rules.
Even though the DNS Firewall policy described in this blog post will block DNS queries for unauthorized sharing platforms, some users might attempt to bypass this block by modifying the HOSTS file on their Amazon WorkSpace. To counter this risk, you can add a domain rule to your firewall policy to block the box.com, dropbox.com, and sharefile.com domains, as shown in Figure 5.
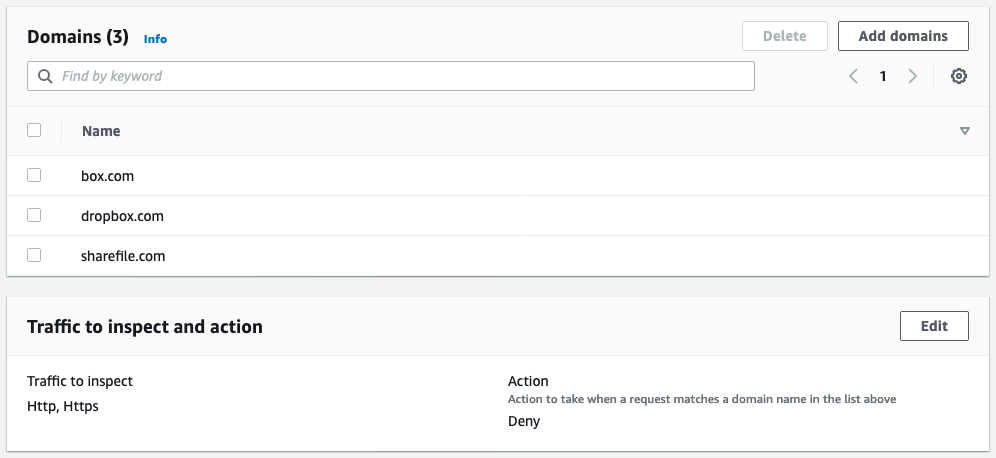
Figure 5: A domain list rule to block box.com, dropbox.com, and sharefile.com
Configure firewall policy
You can use firewall policies to attach stateless and stateful rule groups to a single policy that is used by one or more network firewalls. Attach your rule groups to this policy and set your preferred default stateless actions. The default stateless actions will apply to any packets that don’t match a stateless rule group within the policy. You can choose separate actions for full packets and fragmented packets, depending on your needs, as shown in Figure 6.
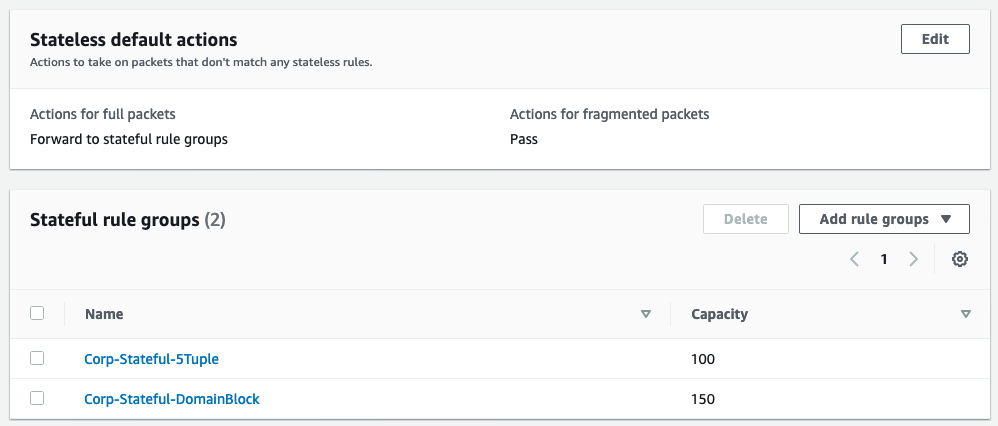
Figure 6: Stateful rule groups attached to a firewall policy
You can choose to forward the traffic to be processed by any stateful rule groups that you have attached to your firewall policy. To bypass any stateful rule groups, you can select the Pass option.
To create a firewall policy (console)
- Open the Amazon VPC console.
- In the navigation pane, under AWS Network Firewall, choose Firewall policies.
- Choose Create firewall policy.
- Enter a name and description for the policy.
- Choose Add rule groups.
- Select the stateless default actions you want to use.
- For any stateless or stateful rule groups, choose Add rule groups to add any rule groups that you want to use.
- (Optional) Add tags.
- Choose Create firewall policy.
Configure a network firewall
Configuring the network firewall requires you to attach the firewall to a VPC and select at least one subnet.
To create a network firewall (console)
- Open the Amazon VPC console.
- In the navigation pane, under AWS Network Firewall, choose Firewalls.
- Choose Create firewall.
- Under Firewall details, do the following:
- Enter a name for the firewall.
- Select the VPC.
- Select one or more Availability Zones and subnets, as needed.
- Under Associated firewall policy, do the following:
- Choose Associate an existing firewall policy.
- Select the firewall policy.
- (Optional) Add tags.
- Choose Create firewall.
Two subnets in separate Availability Zones are used for the network firewall example shown in Figure 7, to provide high availability.
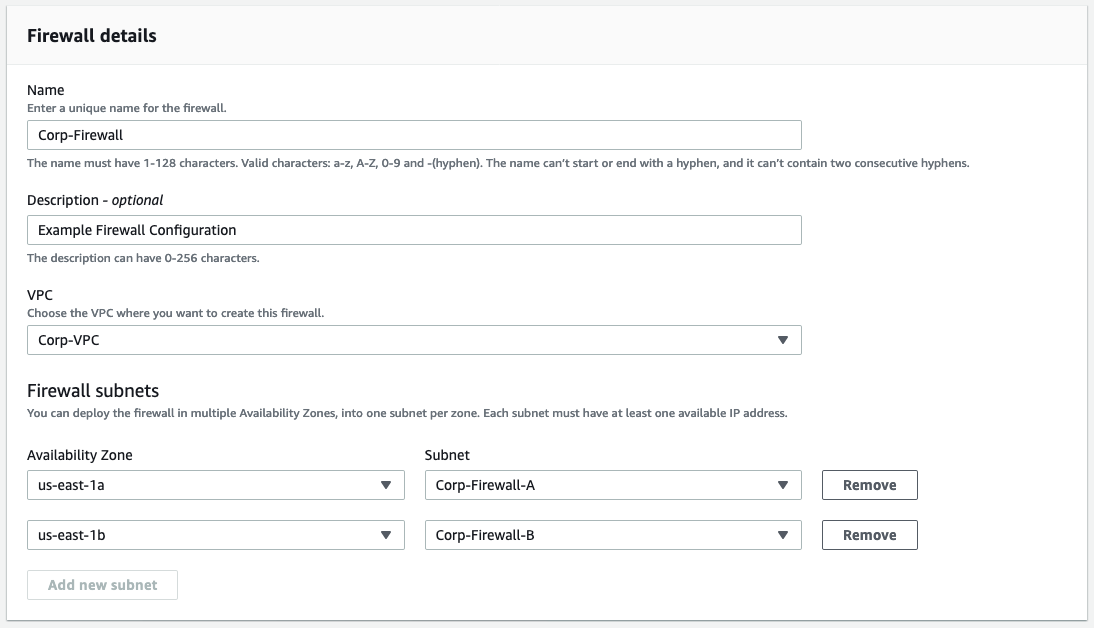
Figure 7: A network firewall configuration that includes multiple subnets
After the firewall is in the ready state, you’ll be able to see the endpoint IDs of the firewall endpoints, as shown in Figure 8. The endpoint IDs are needed when you update VPC route tables.
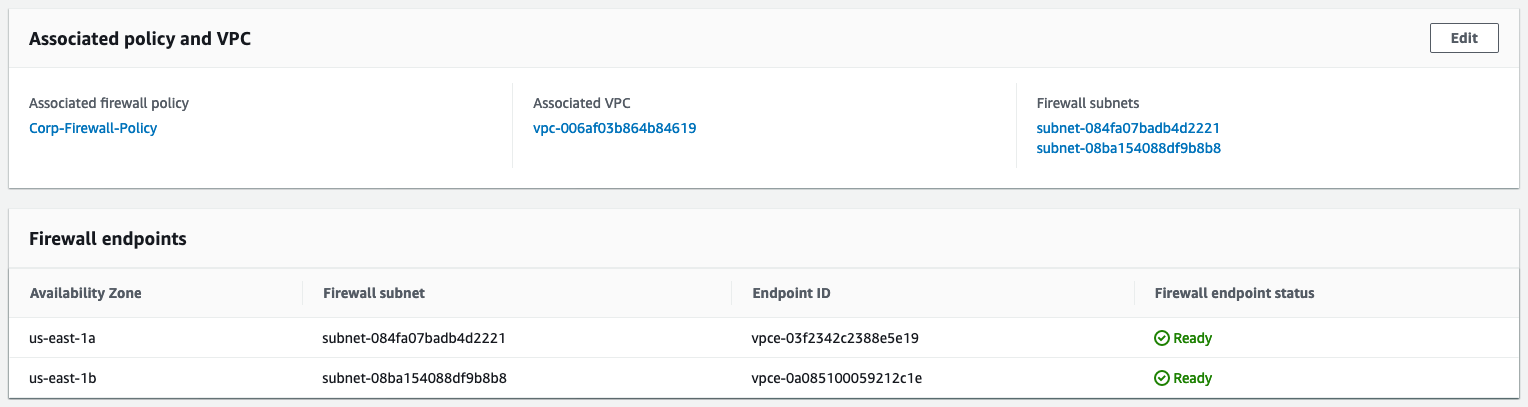
Figure 8: Firewall endpoint IDs
You can configure alert logs, flow logs, or both to be sent to Amazon S3, CloudWatch log groups, or Kinesis Data Firehose. Administrators configure alert logging to build proactive alerting and flow logging to use in troubleshooting and analysis.
Finalize the setup
After the firewall is created and ready, the last step to complete setup is to update the VPC route tables. Update your routing in the VPC to route traffic through the new network firewall endpoints. Update the public subnets route table to direct traffic to the firewall endpoint in the same Availability Zone. Update the internet gateway route to direct traffic to the firewall endpoints in the matching Availability Zone for public subnets. These routes are shown in Figure 9.
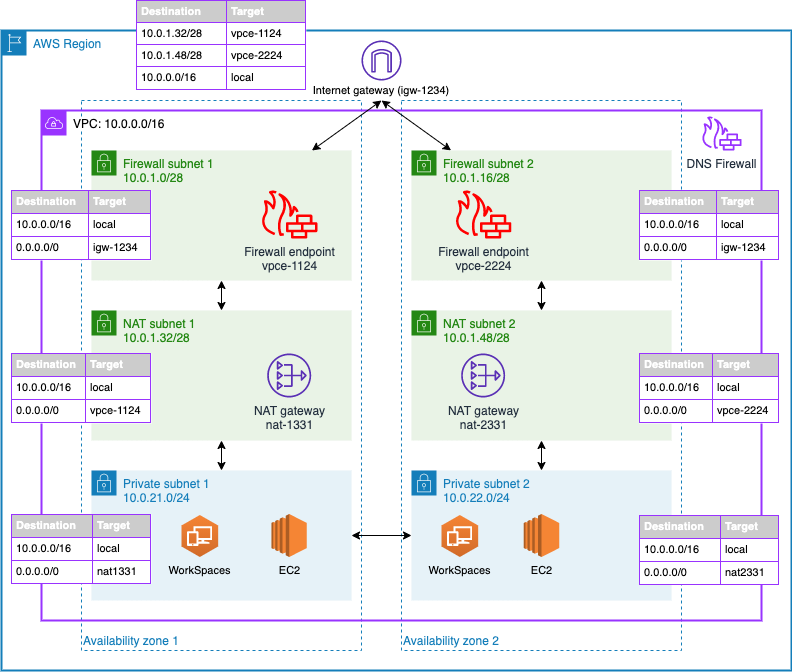
Figure 9: Network diagram of the firewall solution
In this example architecture, Amazon WorkSpaces users are able to connect directly between private subnet 1 and private subnet 2 to access local resources. Security groups and Windows authentication control access from WorkSpaces to EC2-hosted workloads such as Active Directory, file servers, and SQL applications. For example, Microsoft Active Directory domain controllers are added to a security group that allows inbound ports 53, 389, and 445, as shown in Figure 10.
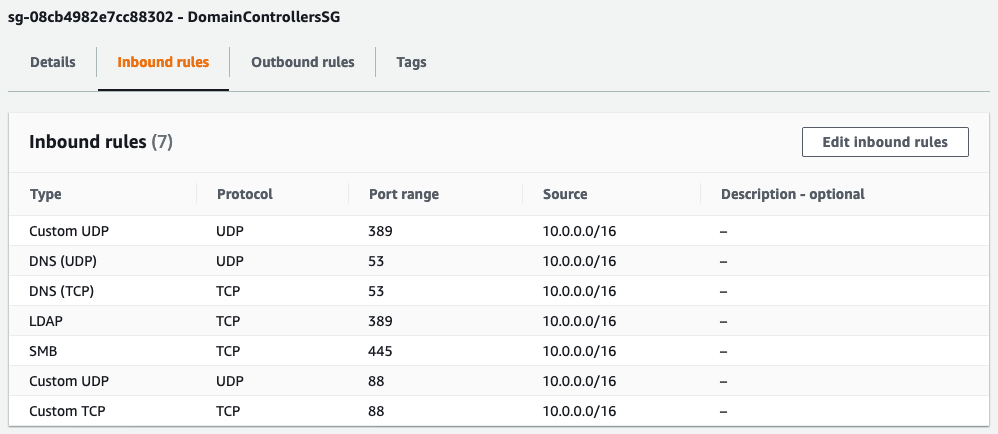
Figure 10: Domain controller security group inbound rules
Traffic from WorkSpaces will first resolve DNS requests by using the Active Directory domain controller. The domain controller uses the local Route 53 Resolver as a DNS forwarder, which DNS Firewall protects. Network traffic then flows from the private subnet to the NAT gateway, through the network firewall to the internet gateway. Response traffic flows back from the internet gateway to the network firewall, then to the NAT gateway, and finally to the user WorkSpace. This workflow is shown in Figure 11.
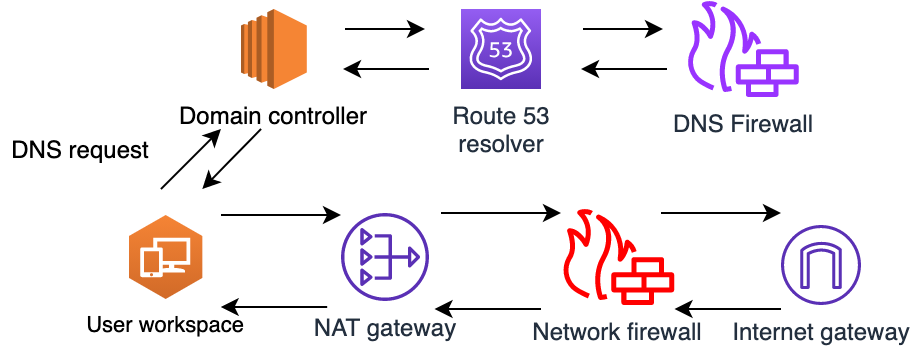
Figure 11: Traffic flow for allowed traffic
If a user attempts to connect to blocked internet resources, such as box.com, a botnet, or a malware domain, this will result in a NXDOMAIN response from DNS Firewall, and the connection will not proceed any further. This blocked traffic flow is shown in Figure 12.

Figure 12: Traffic flow when blocked by DNS Firewall
If a user attempts to initiate a DNS request to a public DNS server or attempts to access a public file server, this will result in a dropped connection by Network Firewall. The traffic will flow as expected from the user WorkSpace to the NAT gateway and from the NAT gateway to the network firewall, which inspects the traffic. The network firewall then drops the traffic when it matches a rule with the drop or block action, as shown in Figure 13. This configuration helps to ensure that your private resources only use approved DNS servers and internet resources. Network Firewall will block unapproved domains and restricted protocols that use standard rules.

Figure 13: Traffic flow when blocked by Network Firewall
Take extra care to associate a route table with your internet gateway to route private subnet traffic to your firewall endpoints; otherwise, response traffic won’t make it back to your private subnets. Traffic will route from the private subnet up through the NAT gateway in its Availability Zone. The NAT gateway will pass the traffic to the network firewall endpoint in the same Availability Zone, which will process the rules and send allowed traffic to the internet gateway for the VPC. By using this method, you can block outbound network traffic with criteria that are more advanced than what is allowed by network ACLs.
Conclusion
Amazon Route 53 Resolver DNS Firewall and AWS Network Firewall help you protect your VPC workloads by inspecting network traffic and applying deep packet inspection rules to block unwanted traffic. This post focused on implementing Network Firewall in a virtual desktop workload that spans multiple Availability Zones. You’ve seen how to deploy a network firewall and update your VPC route tables. This solution can help increase the security of your workloads in AWS. If you have multiple VPCs to protect, consider enforcing your policies at scale by using AWS Firewall Manager, as outlined in this blog post.
If you have feedback about this post, submit comments in the Comments section below. If you have questions about this post, start a new thread on the AWS Network Firewall forum or contact AWS Support.
Want more AWS Security how-to content, news, and feature announcements? Follow us on Twitter.