AWS Security Blog
Using Amazon Verified Permissions to manage authorization for AWS IoT smart home applications
This blog post introduces how manufacturers and smart appliance consumers can use Amazon Verified Permissions to centrally manage permissions and fine-grained authorizations. Developers can offer more intuitive, user-friendly experiences by designing interfaces that align with user personas and multi-tenancy authorization strategies, which can lead to higher user satisfaction and adoption. Traditionally, implementing authorization logic using role based access control (RBAC) or attribute based access control (ABAC) within IoT applications can become complex as the number of connected devices and associated user roles grows. This often leads to an unmanageable increase in access rules that must be hard-coded into each application, requiring excessive compute power for evaluation. By using Verified Permissions, you can externalize the authorization logic using Cedar policy language, enabling you to define fine-grained permissions that combine RBAC and ABAC models. This decouples permissions from your application’s business logic, providing a centralized and scalable way to manage authorization while reducing development effort.
In this post, we walk you through a reference architecture that outlines an end-to-end smart thermostat application solution using AWS IoT Core, Verified Permissions, and other AWS services. We show you how to use Verified Permissions to build an authorization solution using Cedar policy language to define dynamic policy-based access controls for different user personas. The post includes a link to a GitHub repository that houses the code for the web dashboard and the Verified Permissions logic to control access to the solution APIs.
Solution overview
This solution consists of a smart thermostat IoT device and an AWS hosted web application using Verified Permissions for fine-grained access to various application APIs. For this use case, the AWS IoT Core device is being simulated by an AWS Cloud9 environment and communicates with the IoT service using AWS IoT Device SDK for Python. After being configured, the device connects to AWS IoT Core to receive commands and send messages to various MQTT topics.
As a general practice, when a user-facing IoT solution is implemented, the manufacturer performs administrative tasks such as:
- Embedding AWS Private Certificate Authority certificates into each IoT device (in this case a smart thermostat). Usually this is done on the assembly line and the certificates used to verify the IoT endpoints are burned into device memory along with the firmware.
- Creating an Amazon Cognito user pool that provides sign-up and sign-in options for web and mobile application users and hosts the authentication process.
- Creating policy stores and policy templates in Verified Permissions. Based on who signs up, the manufacturer creates policies with Verified Permissions to link each signed-up user to certain allowed resources or IoT devices.
- The mapping of user to device is stored in a datastore. For this solution, you’ll use an Amazon DynamoDB table to record the relationship.
The user who purchases the device (the primary device owner) performs the following tasks:
- Signs up on the manufacturer’s web application or mobile app and registers the IoT device by entering a unique serial number. The mapping between user details and the device serial number is stored in the datastore through an automated process that is initiated after sign-up and device claim.
- Connects the new device to an existing wireless network, which initiates a registration process to securely connect to AWS IoT Core services within the manufacturer’s account.
- Invites other users (such as guests, family members, or the power company) through a referral, invitation link, or a designated OAuth process.
- Assign roles to the other users and therefore permissions.
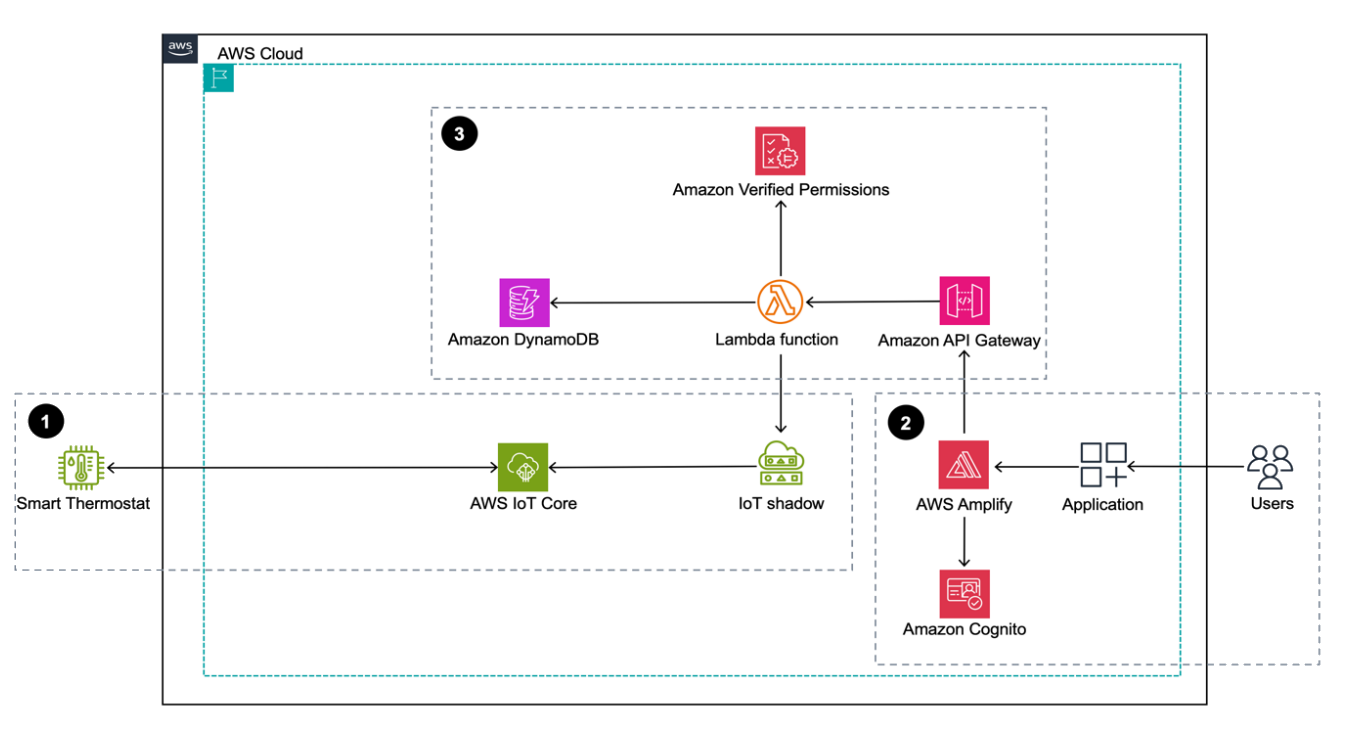
Figure 1: Sample smart home application architecture built using AWS services
Figure 1 depicts the solution as three logical components:
- The first component depicts device operations through AWS IoT Core. The smart thermostat is on site and it communicates with AWS IoT Core and its state is managed through the AWS IoT Device Shadow Service.
- The second component depicts the web application, which is the application interface that customers use. It’s a ReactJS-backed single page application deployed using AWS Amplify.
- The third component shows the backend application, which is built using Amazon API Gateway, AWS Lambda, and DynamoDB. A Cognito user pool is used to manage application users and their authentication. Authorization is handled by Verified Permissions where you create and manage policies that are evaluated when the web application calls backend APIs. These policies are evaluated against each authorization policy to provide an access decision to deny or allow an action.
The solution flow itself can be broken down into three steps after the device is onboarded and users have signed up:
- The smart thermostat device connects and communicates with AWS IoT Core using the MQTT protocol. A classic Device Shadow is created for the AWS IoT thing Thermostat1 when the UpdateThingShadow call is made the first time through the AWS SDK for a new device. AWS IoT Device Shadow service lets the web application query and update the device’s state in case of connectivity issues.
- Users sign up or sign in to the Amplify hosted smart home application and authenticate themselves against a Cognito user pool. They’re mapped to a device, which is stored in a DynamoDB table.
- After the users sign in, they’re allowed to perform certain tasks and view certain sections of the dashboard based on the different roles and policies managed by Verified Permissions. The underlying Lambda function that’s responsible for handling the API calls queries the DynamoDB table to provide user context to Verified Permissions.
Prerequisites
- To deploy this solution, you need access to the AWS Management Console and AWS Command Line Interface (AWS CLI) on your local machine with sufficient permissions to access required services, including Amplify, Verified Permissions, and AWS IoT Core. For this solution, you’ll give the services full access to interact with different underlying services. But in production, we recommend following security best practices with AWS Identity and Access Management (IAM), which involves scoping down policies.
- Set up Amplify CLI by following these instructions. We recommend the latest NodeJS stable long-term support (LTS) version. At the time of publishing this post, the LTS version was v20.11.1. Users can manage multiple NodeJS versions on their machines by using a tool such as Node Version Manager (nvm).
Walkthrough
The following table describes the actions, resources, and authorization decisions that will be enforced through Verified Permissions policies to achieve fine-grained access control. In this example, John is the primary device owner and has purchased and provisioned a new smart thermostat device called Thermostat1. He has invited Jane to access his device and has given her restricted permissions. John has full control over the device whereas Jane is only allowed to read the temperature and set the temperature between 72°F and 78°F.
John has also decided to give his local energy provider (Power Company) access to the device so that they can set the optimum temperature during the day to manage grid load and offer him maximum savings on his energy bill. However, they can only do so between 2:00 PM and 5:00 PM.
For security purposes the verified permissions default decision is DENY for unauthorized principals.
| Name | Principal | Action | Resource | Authorization decision |
| Any | Default | Default | Default | Deny |
| John | john_doe | Any | Thermostat1 | Allow |
| Jane | jane_doe | GetTemperature | Thermostat1 | Allow |
| Jane | jane_doe | SetTemperature | Thermostat1 | Allow only if desired temperature is between 72°F and 78°F. |
| Power Company | powercompany | GetTemperature | Thermostat1 | Allow only if accessed between the hours of 2:00 PM and 5:00 PM |
| Power Company | powercompany | SetTemperature | Thermostat1 | Allow only if the temperature is set between the hours of 2:00 PM and 5:00 PM |
Create a Verified Permissions policy store
Verified Permissions is a scalable permissions management and fine-grained authorization service for the applications that you build. The policies are created using Cedar, a dedicated language for defining access permissions in applications. Cedar seamlessly integrates with popular authorization models such as RBAC and ABAC.
A policy is a statement that either permits or forbids a principal to take one or more actions on a resource. A policy store is a logical container that stores your Cedar policies, schema, and principal sources. A schema helps you to validate your policy and identify errors based on the definitions you specify. See Cedar schema to learn about the structure and formal grammar of a Cedar schema.
To create the policy store
- Sign in to the Amazon Verified Permissions console and choose Create policy store.
- In the Configuration Method section, select Empty Policy Store and choose Create policy store.
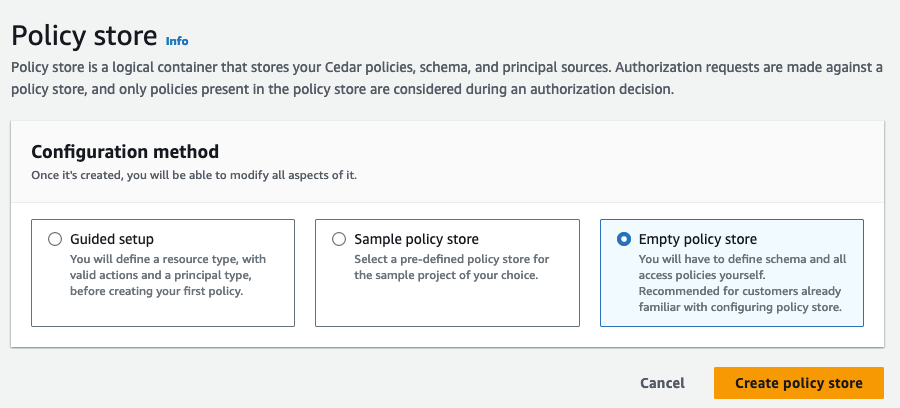
Figure 2: Create an empty policy store
Note: Make a note of the policy store ID to use when you deploy the solution.
To create a schema for the application
- On the Verified Permissions page, select Schema.
- In the Schema section, choose Create schema.

Figure 3: Create a schema
- In the Edit schema section, choose JSON mode, paste the following sample schema for your application, and choose Save changes.
{
    "AwsIotAvpWebApp": {
        "entityTypes": {
            "Device": {
                "shape": {
                    "attributes": {
                        "primaryOwner": {
                            "name": "User",
                            "required": true,
                            "type": "Entity"
                        }
                    },
                    "type": "Record"
                },
                "memberOfTypes": []
            },
            "User": {}
        },
        "actions": {
            "GetTemperature": {
                "appliesTo": {
                    "context": {
                        "attributes": {
                            "desiredTemperature": {
                                "type": "Long"
                            },
                            "time": {
                                "type": "Long"
                            }
                        },
                        "type": "Record"
                    },
                    "resourceTypes": [
                        "Device"
                    ],
                    "principalTypes": [
                        "User"
                    ]
                }
            },
            "SetTemperature": {
                "appliesTo": {
                    "resourceTypes": [
                        "Device"
                    ],
                    "principalTypes": [
                        "User"
                    ],
                    "context": {
                        "attributes": {
                            "desiredTemperature": {
                                "type": "Long"
                            },
                            "time": {
                                "type": "Long"
                            }
                        },
                        "type": "Record"
                    }
                }
            }
        }
    }
}
When creating policies in Cedar, you can define authorization rules using a static policy or a template-linked policy.
Static policies
In scenarios where a policy explicitly defines both the principal and the resource, the policy is categorized as a static policy. These policies are immediately applicable for authorization decisions, as they are fully defined and ready for implementation.
Template-linked policies
On the other hand, there are situations where a single set of authorization rules needs to be applied across a variety of principals and resources. Consider an IoT application where actions such as SetTemperature and GetTemperature must be permitted for specific devices. Using static policies for each unique combination of principal and resource can lead to an excessive number of almost identical policies, differing only in their principal and resource components. This redundancy can be efficiently addressed with policy templates. Policy templates allow for the creation of policies using placeholders for the principal, the resource, or both. After a policy template is established, individual policies can be generated by referencing this template and specifying the desired principal and resource. These template-linked policies function the same as static policies, offering a streamlined and scalable solution for policy management.
To create a policy that allows access to the primary owner of the device using a static policy
- In the Verified Permissions console, on the left pane, select Policies, then choose Create policy and select Create static policy from the drop-down menu.

Figure 4: Create static policy
- Define the policy scope:
- Select Permit for the Policy effect.

Figure 5: Define policy effect
- Select All Principals for Principals scope.
- Select All Resources for Resource scope.
- Select All Actions for Actions scope and choose Next.

Figure 6: Define policy scope
- Select Permit for the Policy effect.
- On the Details page, under Policy, paste the following full-access policy, which grants the primary owner permission to perform both SetTemperature and GetTemperature actions on the smart thermostat unconditionally. Choose Create policy.
	permit (principal, action, resource)
	when { resource.primaryOwner == principal };
Figure 7: Write and review policy statement
To create a static policy to allow a guest user to read the temperature
In this example, the guest user is Jane (username: jane_doe).
- Create another static policy and specify the policy scope.
- Select Permit for the Policy effect.

Figure 8: Define the policy effect
- Select Specific principal for the Principals scope.
- Select AwsIotAvpWebApp::User and enter jane_doe.

Figure 9: Define the policy scope
- Select Specific resource for the Resources scope.
- Select AwsIotAvpWebApp::Device and enter Thermostat1.
- Select Specific set of actions for the Actions scope.
- Select GetTemperature and choose Next.

Figure 10: Define resource and action scopes
- Enter the Policy description: Allow jane_doe to read thermostat1.
- Choose Create policy.
- Select Permit for the Policy effect.
Next, you will create reusable policy templates to manage policies efficiently. To create a policy template for a guest user with restricted temperature settings that limit the temperature range they can set to between 72°F and 78°F. In this case, the guest user is going to be Jane (username: jane_doe)
To create a reusable policy template
- Select Policy template and enter Guest user template as the description.
- Paste the following sample policy in the Policy body and choose Create policy template.
permit (
    principal == ?principal,
    action in [AwsIotAvpWebApp::Action::"SetTemperature"],
    resource == ?resource
)
when { context.desiredTemperature >= 72 && context.desiredTemperature <= 78 };
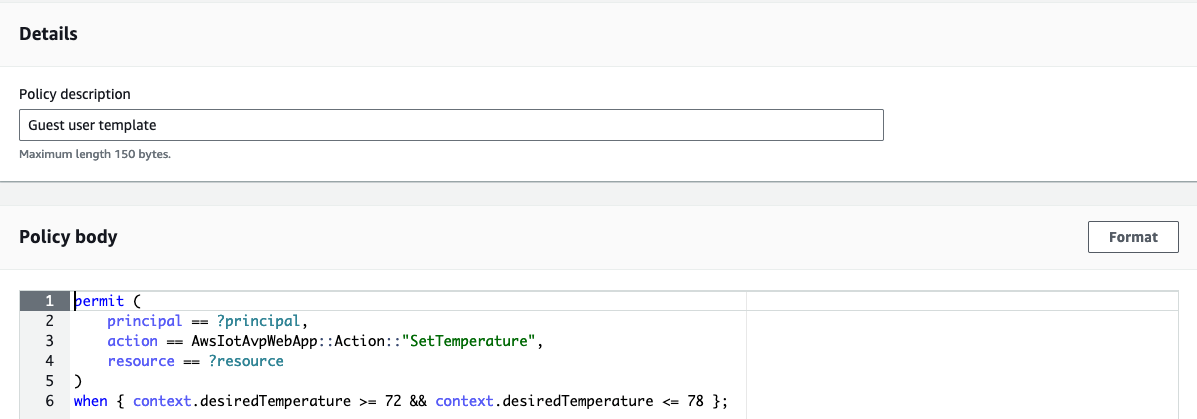
Figure 11: Create guest user policy template
As you can see, you don’t specify the principal and resource yet. You enter those when you create an actual policy from the policy template. The context object will be populated with the desiredTemperature property in the application and used to evaluate the decision.
You also need to create a policy template for the Power Company user with restricted time settings. Cedar policies don’t support date/time format, so you must represent 2:00 PM and 5:00 PM as elapsed minutes from midnight.
To create a policy template for the power company
- Select Policy template and enter Power company user template as the description.
- Paste the following sample policy in the Policy body and choose Create policy template.
permit (
    principal == ?principal,
    action in [AwsIotAvpWebApp::Action::"SetTemperature", AwsIotAvpWebApp::Action::"GetTemperature"],
    resource == ?resource
)
when { context.time >= 840 && context.time < 1020 };
The policy templates accept the user and resource. The next step is to create a template-linked policy for Jane to set and get thermostat readings based on the Guest user template that you created earlier. For simplicity, you will manually create this policy using the Verified Permissions console. In production, application policies can be dynamically created using the Verified Permissions API.
To create a template-linked policy for a guest user
- In the Verified Permissions console, on the left pane, select Policies, then choose Create policy and select Create template-linked policy from the drop-down menu.

Figure 12: Create new template-linked policy
- Select the Guest user template and choose next.

Figure 13: Select Guest user template
- Under parameter selection:
- For Principal enter AwsIotAvpWebApp::User::”jane_doe”.
- For Resource enter AwsIotAvpWebApp::Device::”Thermostat1″.
- Choose Create template-linked policy.

Figure 14: Create guest user template-linked policy
Note that with this policy in place, jane_doe can only set the temperature of the device Thermostat1 to between 72°F and 78°F.
To create a template-linked policy for the power company user
Based on the template that was set up for power company, you now need an actual policy for it.
- In the Verified Permissions console, go to the left pane and select Policies, then choose Create policy and select Create template-linked policy from the drop-down menu.
- Select the Power company user template and choose next.
- Under Parameter selection, for Principal enter AwsIotAvpWebApp::User::”powercompany”, and for Resource enter AwsIotAvpWebApp::Device::”Thermostat1″, and choose Create template-linked policy.
Now that you have a set of policies in a policy store, you need to update the backend codebase to include this information and then deploy the web application using Amplify.
The policy statements in this post intentionally use human-readable values such as jane_doe and powercompany for the principal entity. This is useful when discussing general concepts but in production systems, customers should use unique and immutable values for entities. See Get the best out of Amazon Verified Permissions by using fine-grained authorization methods for more information.
Deploy the solution code from GitHub
Go to the GitHub repository to set up the Amplify web application. The repository Readme file provides detailed instructions on how to set up the web application. You will need your Verified Permissions policy store ID to deploy the application. For convenience, we’ve provided an onboarding script—deploy.sh—which you can use to deploy the application.
To deploy the application
- Close the repository.
- Deploy the application.
After the web dashboard has been deployed, you’ll create an IoT device using AWS IoT Core.
Create an IoT device and connect it to AWS IoT Core
With the users, policies, and templates, and the Amplify smart home application in place, you can now create a device and connect it to AWS IoT Core to complete the solution.
To create Thermostat1” device and connect it to AWS IoT Core
- From the left pane in the AWS IoT console, select Connect one device.

Figure 15: Connect device using AWS IoT console
- Review how IoT Thing works and then choose Next.

Figure 16: Review how IoT Thing works before proceeding
- Choose Create a new thing and enter Thermostat1 as the Thing name and choose next.
&bsp;
Figure 17: Create the new IoT thing
- Select Linux/macOS as the Device platform operating system and Python as the AWS IoT Core Device SDK and choose next.

Figure 18: Choose the platform and SDK for the device
- Choose Download connection kit and choose next.

Figure 19: Download the connection kit to use for creating the Thermostat1 device
- Review the three steps to display messages from your IoT device. You will use them to verify the thermostat1 IoT device connectivity to the AWS IoT Core platform. They are:
- Step 1: Add execution permissions
- Step 2: Run the start script
- Step 3: Return to the AWS IoT Console to view the device’s message

Figure 20: How to display messages from an IoT device
Solution validation
With all of the pieces in place, you can now test the solution.
Primary owner signs in to the web application to set Thermostat1 temperature to 82°F
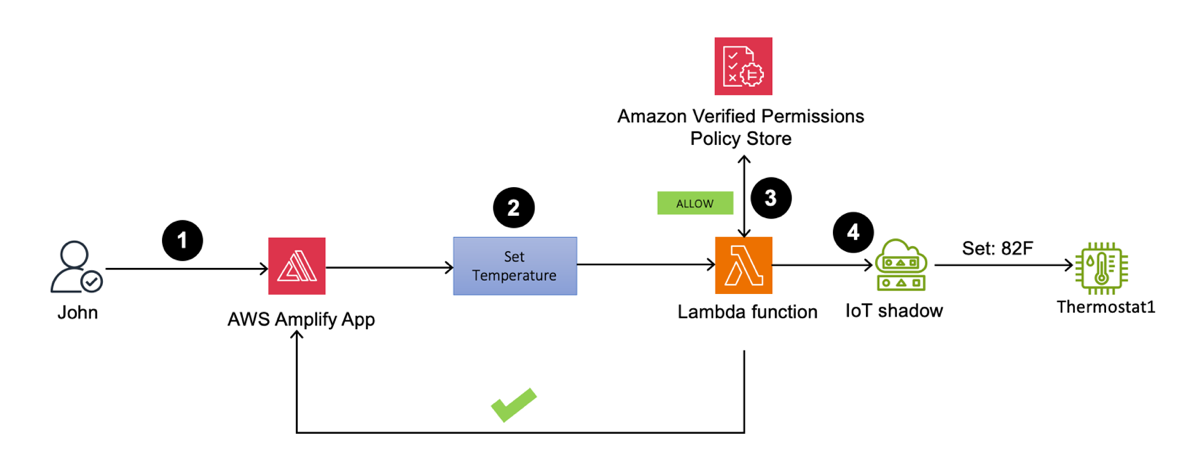
Figure 21: Thermostat1 temperature update by John
- Sign in to the Amplify web application as John. You should be able to view the Thermostat1 controller on the dashboard.
- Set the temperature to 82°F.
- The Lambda function processes the request and performs an API call to Verified Permissions to determine whether to ALLOW or DENY the action based on the policies. Verified Permissions sends back an ALLOW, as the policy that was previously set up allows unrestricted access for primary owners.
- Upon receiving the response from Verified Permissions, the Lambda function sends ALLOW permission back to the web application and an API call to the AWS IoT Device Shadow service to update the device (Thermostat1) temperature to 82°F.
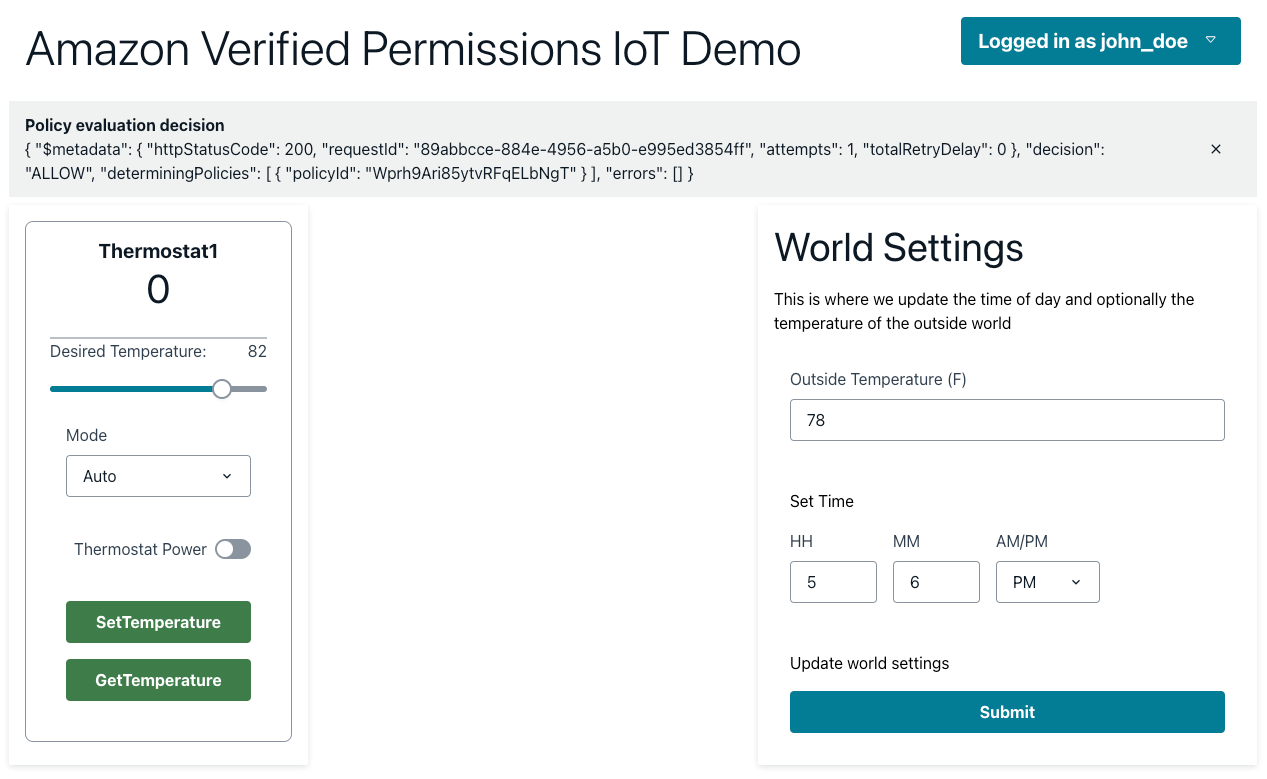
Figure 22: Policy evaluation decision is ALLOW when a primary owner calls SetTemperature
Guest user signs in to the web application to set Thermostat1 temperature to 80°F
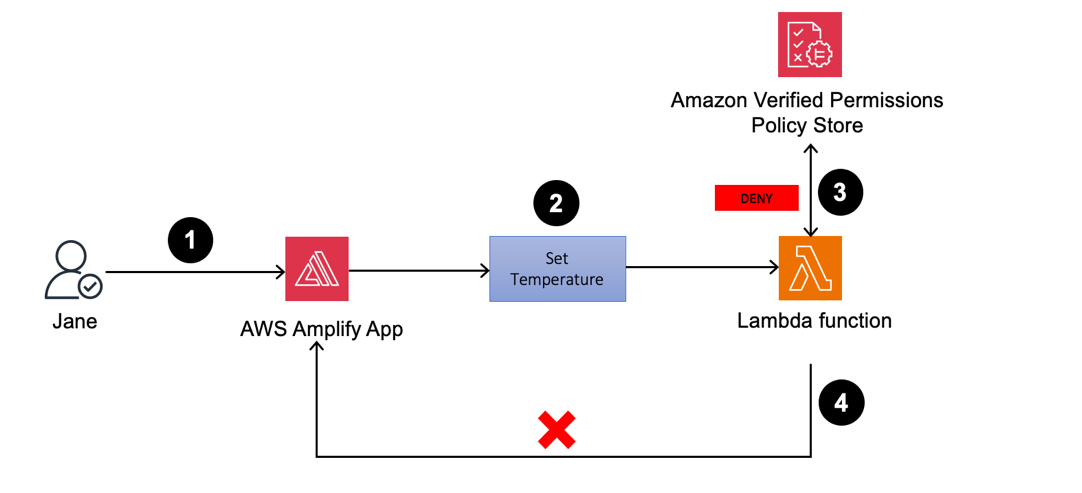
Figure 23: Thermostat1 temperature update by Jane
- If you sign in as Jane to the Amplify web application, you can view the Thermostat1 controller on the dashboard.
- Set the temperature to 80°F.
- The Lambda function validates the actions by sending an API call to Verified Permissions to determine whether to ALLOW or DENY the action based on the established policies. Verified Permissions sends back a DENY, as the policy only permits temperature adjustments between 72°F and 78°F.
- Upon receiving the response from Verified Permissions, the Lambda function sends DENY permissions back to the web application and an unauthorized response is returned.

Figure 24: Guest user jane_doe receives a DENY when calling SetTemperature for a desired temperature of 80°F
- If you repeat the process (still as Jane) but set Thermostat1 to 75°F, the policy will cause the request to be allowed.

Figure 25: Guest user jane_doe receives an ALLOW when calling SetTemperature for a desired temperature of 75°F
- Similarly, jane_doe is allowed run GetTemperature on the device Thermostat1. When the temperature is set to 74°F, the device shadow is updated. The IoT device being simulated by your AWS Cloud9 instance reads desired the temperature field and sets the reported value to 74.
- Now, when jane_doe runs GetTemperature, the value of the device is reported as 74 as shown in Figure 26. We encourage you to try different restrictions in the World Settings (outside temperature and time) by adding restrictions to the static policy that allows GetTemperature for guest user.

Figure 26: Guest user jane_doe receives an ALLOW when calling GetTemperature for the reported temperature
Power company signs in to the web application to set Thermostat1 to 78°F at 3.30 PM
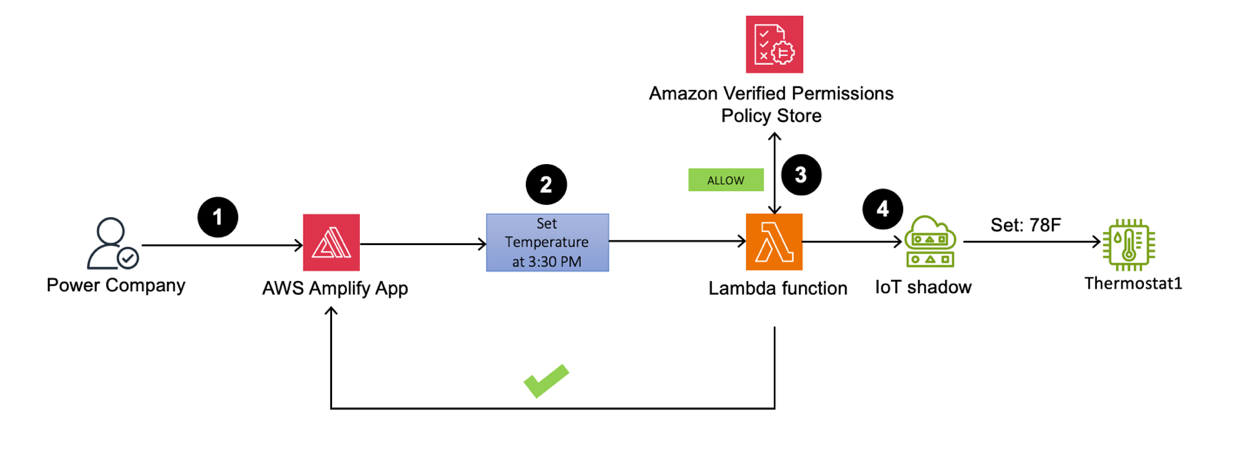
Figure 27: Thermostat1 temperature set to 78°F by powercompany user at a specified time
- Sign in as the powercompany user to the Amplify web application using an API. You can view the Thermostat1 controller on the dashboard.
- To test this scenario, set the current time to 3:30 PM, and try to set the temperature to 78°F.
- The Lambda function validates the actions by sending an API call to Verified Permissions to determine whether to ALLOW or DENY the action based on pre-established policies. Verified Permissions returns ALLOW permission, because the policy for powercompany permits device temperature changes between 2:00 PM and 5:00 PM.
- Upon receiving the response from Verified Permissions, the Lambda function sends ALLOW permission back to the web application and an API call to the AWS IoT Device Shadow service to update the Thermostat1 temperature to 78°F.

Figure 28: powercompany receives an ALLOW when SetTemperature is called with the desired temperature of 78°F
Note: As an optional exercise, we also made jane_doe a device owner for device Thermostat2. This can be observed in the users.json file in the Github repository. We encourage you to create your own policies and restrict functions for Thermostat2 after going through this post. You will need to create separate Verified Permissions policies and update the Lambda functions to interact with these policies.
We encourage you to create policies for guests and the power company and restrict permissions based on the following criteria:
- Verify Jane Doe can perform GetTemperature and SetTemperature actions on Thermostat2.
- John Doe should not be able to set the temperature on device Thermostat2 outside of the time range of 4:00 PM and 6:00 PM and outside of the temperature range of 68°F and 72°F.
- Power Company can only perform the GetTemperature operation, but there are no restrictions on time and outside temperature.
To help you verify the solution, we’ve provided the correct policies under the challenge directory in the GitHub repository.
Clean up
Deploying the Thermostat application in your AWS account will incur costs. To avoid ongoing charges, when you’re done examining the solution, delete the resources that were created. This includes the Amplify hosted web application, API Gateway resource, AWS Cloud 9 environment, the Lambda function, DynamoDB table, Cognito user pool, AWS IoT Core resources, and Verified Permissions policy store.
Amplify resources can be deleted by going to the AWS CloudFormation console and deleting the stacks that were used to provision various services.
Conclusion
In this post, you learned about creating and managing fine-grained permissions using Verified Permissions for different user personas for your smart thermostat IoT device. With Verified Permissions, you can strengthen your security posture and build smart applications aligned with Zero Trust principles for real-time authorization decisions. To learn more, we recommend:
- Getting started with Amazon Verified Permissions
- Best practices for defining authorization model with Amazon Verified Permissions
- Working with AWS IoT in AWS Cloud9 IDE
If you have feedback about this post, submit comments in the Comments section below. If you have questions about this post, contact AWS Support.