AWS Physical AI Blog
How to Host Cross-Platform XR Experiences on AWS

As a Spatial Computing Prototyping Architect at Amazon Web Services (AWS), I need to quickly build prototypes and proofs of concept to validate customer use cases. Whether I am building cross-platform Extended Reality (XR) experiences for meetings, for industrial training, or for multiplayer gaming, I can quickly provision AWS cloud resources on-demand to suit my workload’s requirements. What is a cross-platform XR experience? — it is an XR experience that runs on different hardware platforms, for example, an application designed for both Augmented Reality (AR) and Virtual Reality (VR) headsets.
In this blog post, I will show you how to build a cross-platform XR experience using a centralized Unity project, built from open-source and Unity Asset Store assets. The centralized project can build client applications for AR and VR headsets and Windows or Linux dedicated server applications. The term “dedicated server” is used throughout this blog to refer to the server in the client-server model, specifically the headless builds of the client Unity application.
The content of this blog post is directed towards readers with previous Unity XR development experience and who have a general understanding of the client-server networking model. This blog will highlight the details of integration of the larger components, but will provide external references for the details surrounding the setup of development environments or building prototype assets.
Overview of prototype
I selected the particular components used in this example based on the requirements of an AWS customer’s prototype use case. You can swap these components with other components to suit your requirements.
I’ll break down and describe the design in three parts:
- Cross-platform application development environment and software components
- AWS architecture for hosting the dedicated servers
- XR devices running the client applications
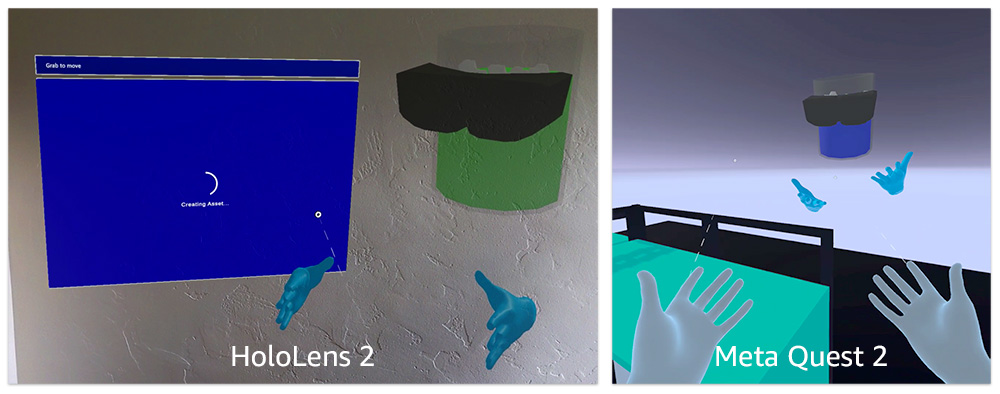
Screenshots from an XR cross-platform prototype
External Software Resources
Real-time development platform – Unity
Unity is a game engine that provides common building blocks frequently required for building 3D and 2D games and simulation applications. Unity supports cross-platform builds for Windows, Linux, Mac OS X, Android, iOS, Universal Windows Platform (UWP), and gaming consoles.
XR standard – OpenXR
OpenXR is an open standard developed by the Khronos Group consortium that provides access to a variety of XR device runtimes, including the HoloLens 2 and Quest headsets, and provides a standardized API for 3D spatial definition and XR user inputs.
XR interactions – Mixed Reality Toolkit
Mixed Reality Toolkit (MRTK) is an open-source project that provides robust XR user interface components and XR interaction features. It is compatible with a variety of devices, including the HoloLens 2 and Quest headsets.
Networking – Mirror Networking
Mirror Networking is an open source, MIT-licensed high level networking solution for Unity with origins derived from UNET, a legacy networking solution built and open-sourced by Unity. Mirror uses a server and client model originating from a centralized Unity project, automated serialization of variables, and Commands and Remote Procedure Calls. Mirror supports a variety of network transports options. KCP (reliable UDP) is the default and is the transport I use in this prototype. Mirror does not provide encryption – if required for production use, you will need to build in encryption.
(Optional) Voice Chat – Dissonance Voice Chat
Dissonance Voice Chat is a paid Unity asset for real-time Voice over IP (VoIP) for multiplayer games. It is compatible with Mirror Networking and is compatible with both HoloLens 2 and Quest headsets.
AWS architecture for hosting dedicated servers
Amazon Elastic Compute Cloud (Amazon EC2) instances offer secure and resizable virtual compute capacity which operate inside an Amazon Virtual Private Cloud (Amazon VPC). Choose from over 600 instance types to match the processor, storage, networking, operating system, and purchase model for your specific workload. For this prototype example, dedicated servers are hosted on Amazon EC2 instances, as shown in the reference architecture.
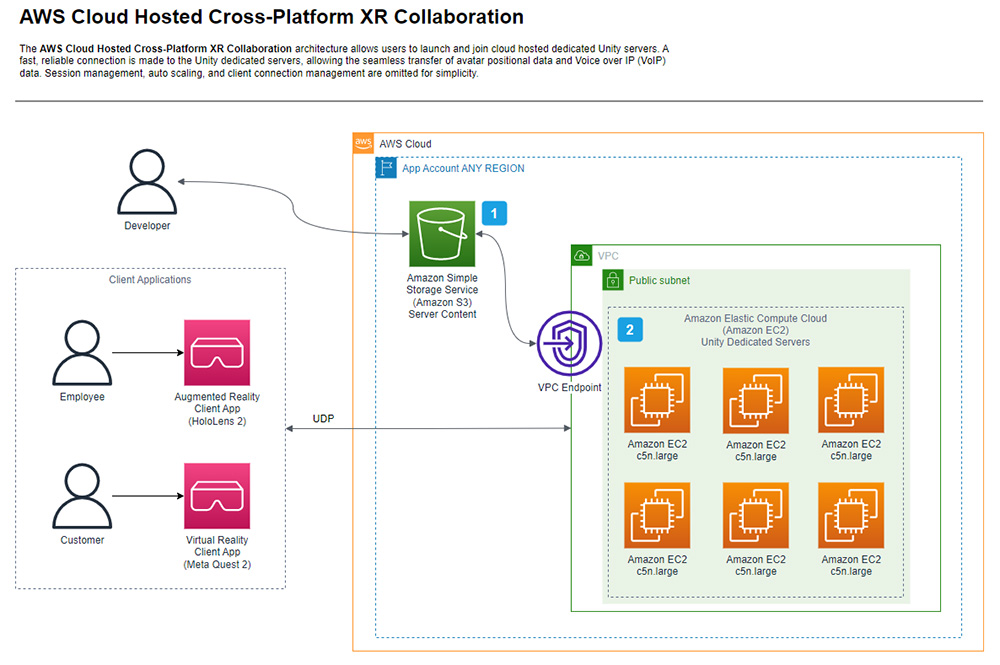
Reference Architecture for dedicated servers hosted on Amazon EC2
Client XR applications connect to an Amazon VPC containing one or many provisioned Amazon EC2 instances that are running a headless dedicated server build of the cross-platform application. The Amazon EC2 instances are ephemeral, meaning that they can be provisioned, started, stopped, and terminated on demand. An Amazon Simple Storage Service (Amazon S3) bucket stores the latest version of the Unity dedicated server application files for newly launched EC2 instances to download and run automatically.
XR Devices
I chose to build this example for AR and VR standalone devices, specifically the Microsoft HoloLens 2, Meta Quest 2, and Meta Quest Pro. If you do not have XR devices, you can follow along and still build a dedicated server, host it on AWS, and test connections within the Unity editor.
Project Setup
Prerequisites
For this project, you should have the following prerequisites:
- An AWS account with permissions to use Amazon S3, Amazon EC2, and Amazon VPC
- A local machine with Unity 2021+ with Android build, UWP build, and Linux or Windows dedicated server build modules installed
- A working knowledge of setting up Unity projects for OpenXR development
- A working knowledge of Unity
- An AR or VR headset that is configured for development; however, if you do not have XR devices, you can follow along and still build a dedicated server, host it on AWS, and test connections within the Unity editor
XR client application integration
Unity project
Unity is the integration software from which the XR clients (Android and UWP) and headless dedicated server application (Windows or Linux) are built. Unity allows switching between build targets while working within a centralized project, allowing you to build the XR clients and dedicated server from a single Unity project.
Create a new Unity 2021 Universal Render Pipeline (URP) project with the following modules installed:
- Android Build Support with Open JDK and Android SDK & NDK Tools — for Meta Quest
- Universal Windows Platform Build Support — for HoloLens 2
- Linux Dedicated Server Build Support — if using Linux Amazon EC2 instances
- Windows Dedicated Server Build Support — if using Windows Amazon EC2 instances
Using the XR Plug-in Management Project Settings menu, configure each build environment for the OpenXR features and user interaction profiles. This blog post will not go into detail on how to configure the Unity project for these features, but you can reference this OpenXR project configuration guide.
Import MRTK
MRTK provides an XR rig with a head-tracked camera and hand tracking, a hand gesture for player teleportation, and user interface components that respond to touch and hand ray interaction. To install and configure MRTK:
- Download and install the Mixed Reality Feature Tool
- Start the Mixed Reality Feature Tool and select the Unity project path
- Select and import the following MRTK features:
- Mixed Reality Toolkit Examples
- Mixed Reality Toolkit Extensions
- Mixed Reality Toolkit Foundation
- Mixed Reality Toolkit Standard Assets
- Mixed Reality OpenXR Plugin
Import Unity Packages
Unity has a Package Manager that facilitates importing external packages into the project from the Unity Asset Store, from disk, or from a Git URL. The following assets can be downloaded and/or purchased from the Unity Asset Store and should be imported into the Unity project:
- Mirror Networking — open-source networking solution used for this prototype
- Oculus Integration — integration asset required when using a Meta Quest device target
- Dissonance Voice Chat (optional) — voice over IP
- Dissonance for Mirror Networking (optional) — required when using Dissonance with Mirror Networking
Create networked XR avatar
Mirror synchronizes avatar transform information and game state variables across clients. Study the Mirror User Manual to learn about the basics of the Mirror networking system.
To create a networked avatar:
- Create a networked player prefab consisting of a head and two hands
- Attach a Mirror Network Identity component, and three Mirror Network Transform components configured for each tracked avatar part
- (Optional) Create and attach a custom Networked Player Controller component with custom avatar business logic, for example, setting player avatar color
Networked avatar prefab in Unity
Network Manager Configuration
Follow the Mirror Getting Started guide for help to set up the Network Manager and the required Lobby and Game scenes. To create a Network Manager:
- Create two new Scenes and name them
Lobbyand aGame - Create a new GameObject in the Lobby scene and name it
Network Manager - Attach a Network Manager component to the Network Manager GameObject
- Attach a transport component (e.g., KCP Transport) to the Network Manager GameObject
- Attach a Network Manager HUD component to the Network Manager GameObject
- Enable Don’t Destroy on Load on the Network Manager component
- Enable Auto Start Server Build on the Network Manager component
- Set the Scene Management Offline and Online Scene references to the Lobby and Game scenes respectively on the Network Manager component
- Set the Player Prefab reference on the Network Manager component
- Set the transport port (e.g., 7777) on the KCP Transport component
- Add the MRTK components to your Lobby and Game scenes by selecting Mixed Reality/Toolkit/Add to scene and configure – the MixedRealityToolkit, MixedRealityPlayspace, MixedRealitySceneContent, and AsyncCoroutineRunner GameObjects will be created
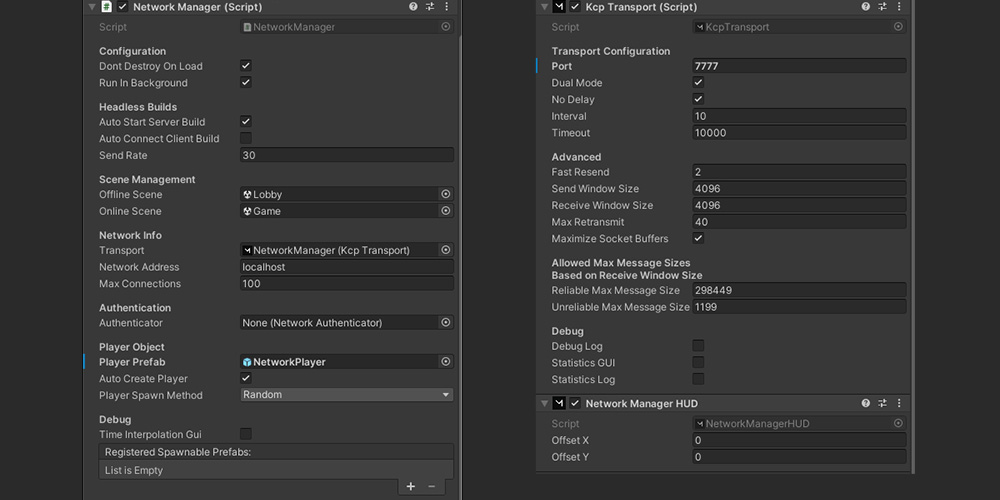
Network Manager GameObject configuration
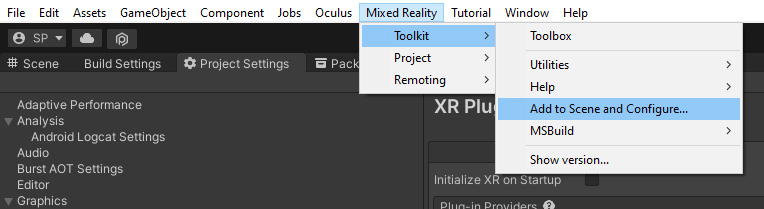
Add the MRTK components to the current scene

The created MRTK GameObjects in a Unity scene
Conditional AR and VR content
Assets for AR and VR are not always the same, and therefore a strategy is needed to load, or unload, assets depending on the platform the application is running on. The Mirror Network Manager requires a reference to a Lobby and Game scene, named Lobby and Game respectively, so the strategy I used for this prototype was to add all AR and VR GameObjects to the two scenes in the Unity Editor and then unload the unneeded GameObjects at runtime.
To do so, I created a component that destroys the GameObject that it is attached to if a platform condition is not met. The build platform can be determined from Unity’s conditional compilation directives.
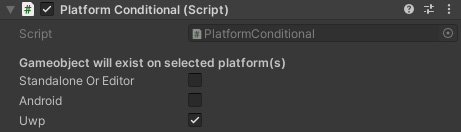
Platform Conditional Component
Building the applications
Now that the Unity project, Network Manager, player avatar, and scenes are configured, it is time to build the XR client applications and the Linux or Windows dedicated server.
Meta Quest 2 or Meta Quest Pro
To build for Meta Quest 2 or Meta Quest Pro:
- Go to File/Build Settings… and switch to Android build platform by selecting Android and selecting Switch Platform
- Follow the Meta Quest build documentation to build to your Meta Quest 2 or Meta Quest Pro headset
HoloLens 2
To build for HoloLens 2:
- Go to File/Build Settings… and switch to the Universal Windows Platform build platform by selecting Universal Windows Platform and selecting Switch Platform
- Follow the Microsoft HoloLens build documentation to build to your HoloLens 2 headset
Linux or Windows dedicated server
The decision to use a Windows or Linux dedicated server is based on your applications requirements. At the time of building this prototype, OpenXR does not support Linux dedicated server builds and must be disabled. Additionally, on-demand pricing for Linux Amazon EC2 instances is more cost efficient than equivalent Windows instances. Review Amazon EC2 On-Demand Pricing for more information.
- Go to File/Build Settings… and switch to the Dedicated Server build platform by selecting Dedicated Server and selecting Switch Platform
- (Windows only) Select Target Platform as Windows. Set Architecture to Intel 64-bit
- (Linux only) Select Target Platform as Linux
- (Linux only) Disable OpenXR in Project Settings / XR Plug-in Management in the Dedicated Server platform options

- Choose Build
Hosting dedicated servers on AWS
After logging into the AWS Management Console, create an Amazon Virtual Private Cloud with a single public subnet. You can follow the VPC with a single public subnet scenario, or follow these user guide steps:
- Create an Amazon VPC
- Create a subnet in your VPC
The Unity dedicated server (Linux or Windows) application files will be stored in Amazon S3:
- Create an Amazon S3 bucket to store the dedicated server files
- Upload the Unity dedicated server to the bucket
The dedicated server files will need to be retrieved at the time an Amazon EC2 instance is created. To do so without using the public internet, create an AWS PrivateLink Gateway endpoint for Amazon S3, and create an AWS Identity and Access Management (IAM) Role that provides access to Amazon S3:
- Create a gateway endpoint for Amazon S3
- Create an IAM Role named
S3ReadOnlyAccessand add the AWS managed policy called AmazonS3ReadOnlyAccess
Next, create an Amazon EC2 instance to host your application. Follow the Linux or Windows steps to suit your needs:
- Use the Guide for Linux Instances to create a Linux Amazon EC2 instance or the Guide for Windows Instances to create a Windows Amazon EC2 instance
- Choose an instance type. General purpose, free-tier, instances may work for your application. For this prototype, I chose to use a Compute Optimized C5n.large to take advantage of accelerated networking, but you are encouraged to experiment with different EC2 instance types to optimize performance for your application’s requirements
- In network settings, select your VPC and subnet, and ensure Auto-assign public IP is enabled
- Create a Security Group that allows incoming UDP traffic on the port specified in the Mirror Network Manager (e.g. 7777)

- (Linux only) If you need to Secure Shell (SSH) into your instance, add a line to the Security Group incoming rules that allows SSH traffic from your IP address on port 22. Alternatively, you can use AWS Systems Manager Session Manager to manage your instance.
- (Windows only) If you need to Remote Desktop (RDP) into your instance, add a line to the Security Group incoming rules that allows RDP traffic from your IP address on port 3389. Alternatively, you can use AWS Systems Manager Session Manager to manage your instance.
- In Advanced Settings, set the IAM Role to the S3ReadOnlyAccess Role that you created earlier
- (Linux only) Add the following User Data script to retrieve the Unity files from your S3 bucket and launch the Unity server. In the following example, replace
bucket-name,server-prefix, andserver-namewith your own information:#!/bin/bash aws s3 sync s3://bucket-name/server-prefix/ . chmod +x server-name.x86_64 /server-name.x86_64 - (Windows only) Add the following User Data script to retrieve the Unity files from your S3 bucket and launch the Unity server. In the following example, replace
port,bucket-name,server-prefix, andserver-namewith your own information:version: 1.0 tasks: - task: executeScript inputs: - frequency: once type: powershell runAs: localSystem content: |- New-NetFirewallRule -DisplayName "Mirror Networking" -Direction Inbound -LocalPort port -Protocol UDP -Action Allow Copy-S3Object -BucketName bucket-name -KeyPrefix server-prefix -LocalFolder c:\Users\Administrator\Desktop\UnityServer - task: executeProgram inputs: - frequency: always path: c:\Users\Administrator\Desktop\UnityServer\server-name.exe runAs: localSystem - Choose Launch instance
When the EC2 instance is first launched, the Unity dedicated server files are copied and then started. If you stop and restart Windows instances, the Unity dedicated server will automatically restart; however, the Unity dedicated server will not automatically restart on the Linux instances. This can be configured, but it is outside the scope of this blog because it requires modification of the User Data after the initial start. Alternatively, you can SSH into your Linux EC2 instance to manually start the Unity dedicated server, or more simply, terminate your Linux instances and recreate them when needed.
Connect the XR clients to the server
Now it is time to test the connection to your dedicated server! You will need to implement a user interface inside of your XR client applications that allows the user to input connection details; however, for this blog I will show you how to test directly from the Unity Editor.
Previously, you added a Network Manager HUD to the Network Manager GameObject in your Lobby scene. This allows you to input a target IP address and connect as a client directly inside the Unity Editor Game window.
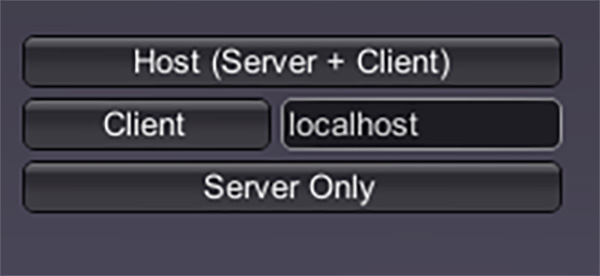
Network Manager HUD
- Go to the Amazon EC2 console and select the running instance
- Copy the public IP address for the instance from the Amazon EC2 dashboard
- Return to Unity and make sure the Lobby scene is active
- Press Play in Unity
- Paste the public IP address into the Network Manager HUD next to the Client button where it currently displays
localhost - Press the Client button to initiate a connection
- The Unity console will provide a successful connection status message
- (Optional) Dissonance Voice status messages are displayed on connection

Successful connection status messages
Congratulations, you successfully connected to your dedicated server! Now you can design and build your own XR client applications and host collaborative XR experiences.
Cleaning up
To avoid incurring future charges, delete the AWS resources:
- Delete the objects out of the Amazon S3 bucket and delete the bucket
- Terminate all Amazon EC2 instances
- Tear down the Amazon VPC
- Delete the Security Groups associated with the EC2 instances
- Remove the S3ReadOnlyAccess IAM Role
Conclusion
This blog showed you how to build a centralized development environment for cross-platform XR client and dedicated server applications, and how to host it on AWS. For additional blogs on spatial computing at AWS, visit the AWS Spatial Blog.