AWS Partner Network (APN) Blog
Enhance Customer Experience Through Real-Time Sentiment Analysis with Confluent on AWS
By Ahmed Saef Zamzam, Partner Solutions Architect – Confluent
By Weifan Liang, Sr. Partner Solutions Architect – AWS
 |
| Confluent |
 |
Businesses across sectors are leveraging social media feeds, reviews, and customer service call detail records (CDR) to extract a wealth of actionable insights on how customers perceive their products and services, and to continuously find ways to improve their business.
Traditionally, analyzing text data was a slow, manual, and batch process. Nowadays, businesses need a scalable solution to ingest, analyze, and visualize text data in real time. Doing this provides faster time to insights, which allows you to react more quickly and effectively.
For example, imagine you’re a retailer who has a one-day promotion on some of your products. Capturing and analyzing feedback in real time helps you tailor promotions throughout the day to suit the needs of customers. It also allows you to move from being reactive to proactive, as call centers can capture and analyze transcripts in real time and provide recommendations to agents while still speaking to the customer.
Finally, this approach allows you to provide faster services to customers. For example, you can use text analytics to identify the legitimacy of a review, and doing so in real time allows you to post the review quicker.
While batch analyzing text data has its own merits, in this post we will explore the option of doing so in real time.
Confluent, an AWS Data and Analytics Competency Partner, makes it easy to capture and process Gbps-scale data in real time and connect your applications, data systems, and entire organization with real-time data flows. It offers a resilient and scalable data streaming platform based on Apache Kafka, delivered as a fully managed service.
Real-Time Text Analytics
Now that you have the data, how can you analyze it in real time? Amazon Comprehend is a fully managed natural language processing (NLP) service that allows you to analyze, understand, and derive meaning from textual information in real time and batch.
You can use Amazon Comprehend to identify the language of the text, extract key phrases, places, people, brands, or events, understand sentiment about products or services, and identify the main topics from a library of documents. You can also train a custom classifier in Comprehend to classify data.
The final component we’ll discuss in this post is an integration layer that allows you to process and analyze textual data in Confluent using Amazon Comprehend in real time. This integration layer is also referred to as a “stream processor.”
Amazon Kinesis Data Analytics is a fully managed stream processing service that provides a mechanism to transform, analyze, and derive insights from data streams in real time with Apache Flink. It provides the underlying infrastructure for Apache Flink, and enables you to quickly build and run streaming applications with low operational overhead.
Solution Overview
Here, we will show you how to use Confluent Cloud with Amazon Comprehend to analyze textual data in real time. We’ll demonstrate an example of detecting sentiment from live social media feeds on a specific topic.
While this is an example, it could be applied to many use cases. For example, with a few code changes and by training a custom classifier in Comprehend, you can use the same setup to detect profanity in customer reviews. This prevents you from either waiting for a batch process before posting the review, or posting the review with the possibility of it containing profane language.
Moreover, we’ll show how to visualize processed data in real time and demonstrate how to use fully managed connectors provided by Confluent to sink and visualize sentiment results to Amazon OpenSearch Service. This is one example of how you can visualize textual data with Confluent, and the same applies to any visualization service you use, such as Amazon QuickSight.

Figure 1 – Solution architecture.
The data pipeline includes the following stages:
- Capturing live data: Twitter feed as an example.
- Real-time sentiment analysis: Core engine.
- [Optional] Real-time result visualization: Amazon OpenSearch Service as an example.
Prerequisites
This post assumes you already have the following prerequisites configured:
- Confluent Cloud cluster with textual data flowing into a topic.
- Confluent Cloud API key and secret that has access to input and output Kafka topics. Follow the documentation to create API keys.
- OpenSearch domain running.
Capturing Live Twitter Feed
We are using a simple Python script that uses the Twitter Filtered stream API to listen and filter (on specific topics) the real-time stream of public tweets, and to publish results to a Kafka topic in Confluent Cloud.
The published event has the following schema:
Having events conforming to the above schema is necessary for our downstream stream processing service to work.
If you don’t have an existing topic with textual data, or have a topic but it contains events not conforming to the above schema, you can create an input Kafka topic in Confluent Cloud and follow this GitHub repo to package and run the sample producer to publish live tweets to the topic you created.
Since the producer is a Python script, it could run anywhere as long as the machine that runs it has access to your Confluent Cloud cluster. Here, we are running the producer locally in a Docker container since the Confluent Cloud cluster is reachable over the internet. In a production setup, the producer would most likely run on its own infrastructure.
In addition to public connectivity, Confluent Cloud supports private networking solutions via AWS PrivateLink connections, virtual private cloud (VPC) peering, or AWS Transit Gateway. If your Confluent Cloud cluster is using any of these private connectivity options, run the producer in a network that has access to the cluster.
It’s important to note that this is just an example producer that captures live tweets and publishes them to Confluent. The same would apply for any textual data with any schema. The schema constraints here are only there because the downstream stream processing service listens to events with this schema and any changes to schema would break the application.
Real-Time Sentiment Analysis
To detect sentiment in real time from live tweets stored in Confluent, we need a stream processor that allows us to write custom logic to invoke Amazon Comprehend APIs and process each tweet individually. The good news is that both Confluent and AWS offer many choices to choose from.
One option is ksqlDB, a database purpose built for stream processing applications. It provides an easy way to get started with stream processing using standard SQL-like language. It’s also offered as a fully managed service on Confluent Cloud.
However, because we are invoking external APIs, we need to use user-defined functions (UDFs) which are currently not supported in the fully managed ksqlDB service. Alternatively, we can self-manage ksqlDB and create our own UDFs using Java hooks. This is not necessary as AWS offers a few other options that integrate with Confluent.
For stateless stream processing, AWS Lambda is a serverless compute service that allows you to run code without provisioning or managing infrastructure. It can run your code while taking care of everything else, such as scaling out the number of active instances when the load is high and determining the optimum amount of computing power needed for your code to get the job done.
There are two ways to integrate Lambda with Confluent Cloud. The native event source mapping uses Lambda to internally poll for new messages from the event source and then synchronously invoke the target Lambda function. In this mode, Lambda starts by allocating one Lambda consumer to process all partitions in the input Kafka topic. It then monitors the load through the consumer offset lag and automatically scales the number of consumers based on your workload.
The second option is using the fully managed AWS Lambda Sink Connector for Confluent Cloud. This allows you to invoke Lambda functions synchronously or asynchronously, which helps you prevent stalled partitions.
Although AWS Lambda fits our needs, we opted to use Amazon Kinesis Data Analytics, which supports stateless and stateful stream processing and uses checkpoints to provide fault tolerance and exactly-once semantics.
While both reasons might not be needed for our use case, we decided to use it here to show how it integrates with Confluent if any of these features are required.
Amazon Kinesis Data Analytics runs a PyFlink Table API code to do the following:
- Read raw live tweets from the input topic in Confluent Cloud.
- Invoke Amazon Comprehend detect sentiment of tweet.
- Write the results to an output topic in the Confluent Cloud.
The following is a snippet of the PyFlink code that reads events from the input Kafka topic in Confluent Cloud:
Confluent Cloud supports SASL/PLAIN and/or OAuth as authentication mechanisms. The out-of-the-box Kafka connector that Flink uses does not include any authentication modules, and thus cannot connect to Confluent.
Therefore, we have to create a fat jar to include the ```org.apache.kafka.common.security.plain.PlainLoginModule``` library in the connector and then pass the newly-created jar to Flink.
After reading the data, we use Flink UDF capabilities to invoke Comprehend APIs to detect sentiment of each individual tweet. The following is a snippet:
Note that the above code could be extended to perform other text analysis using Comprehend APIs like detect dominant language or text classification.
Finally, we write the results back to Confluent using the same fat jar we created earlier to read the data.
Deploy Amazon Kinesis Data Analytics
In this step, we’ll use AWS CloudFormation templates to create the Amazon Kinesis Data Analytics application.
Complete the following steps to deploy the application:
- Follow this GitHub repo to package and upload the solution artifacts.
- Download the CloudFormation template on your local computer
- Open the CloudFormation console to create a new stack. Make sure you are in the same region as your Confluent Cloud cluster.
- Choose Upload a template file and choose the file you downloaded in Step 2.
- Choose Next.
- For Stack name, enter a name for your stack. It must satisfy the regular expression pattern: [a-z][a-z0-9\-]+
- Enter the following parameters:
- BucketName: Enter the bucket name where the solution artifacts are stored.
- KafkaInputTopic: Enter the input Kafka topic name that contains your textual data.
- KafkaOutputTopic: Enter the Output Kafka topic name that will contain the results.
- BootstrapServers: Enter the Confluent Cloud Bootstrap server.
- ConfluentAPIKey: Enter the API Key of the Confluent Cloud Kafka cluster. Get it from here: https://confluent.cloud/go/clients
- ConfluentAPISecret: Enter the API secret of the Confluent Cloud Kafka cluster. Get it from here: https://confluent.cloud/go/clients
- Follow the wizard to create the stack.
Starting the Application
The above stack creates an Amazon Kinesis Data Analytics application and configures the runtime properties of the application with the necessary parameters to connect to Confluent Cloud.
If your Confluent Cloud cluster is provisioned in a private VPC, then Kinesis Data Analytics must be configured to run from inside a VPC that has access to your Confluent Cloud cluster. Changing the VPC configuration for the application could be done from the AWS Management Console or the AWS Command Line Interface (CLI).
After deploying the stack and changing the VPC configuration (if needed), we can start the Kinesis Data Analytics application by completing the following steps:
- On the CloudFormation console, navigate to the stack you deployed and choose the Outputs tab.
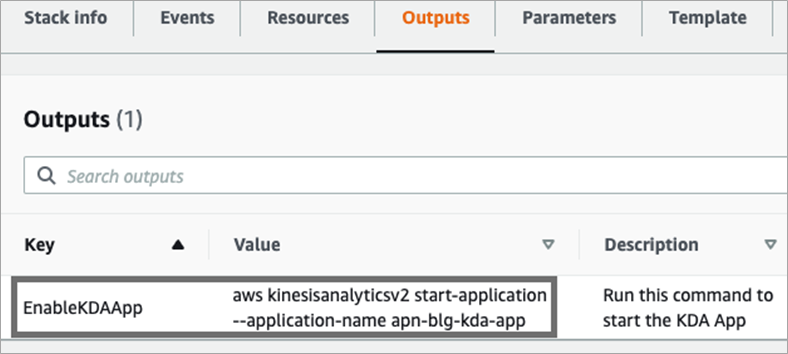
Figure 2 – Stack Outputs tab.
- Copy the value of the EnableKDAApp key and run it in your terminal. It should follow the following format:
We now have a fully functioning stream processing application that is doing real-time text analytics (sentiment detection) and writing the results back to Confluent Cloud.
Real-Time Result Visualization
Now that we have the results stored in Confluent, it could be consumed by multiple applications to power backend operations or rich frontend applications. You can also choose to visualize the results in real time.
Here, we chose to use an Amazon OpenSearch Service domain to do real-time visualization, but you can use Confluent’s rich ecosystem of connectors to sink the results to a datastore of your choice and connect the datastore to your existing visualization tool.
We will leverage the Confluent Elasticsearch Sink connector to sink the results to an OpenSearch Service domain.
If OpenSearch Service is provisioned in a private VPC, the Confluent Cloud cluster and connector should be deployed with private connectivity either using AWS Transit Gateway or VPC peering. In either case, the VPC containing OpenSearch needs to have connectivity to your Confluent Cloud network. If this cannot be done, you can run the connector inside your own VPC.
Luckily, we do have connectivity between Confluent and OpenSearch. All that’s left is to create the connector. Complete the following steps to create the connector:
- Download and install the Confluent CLI by following steps in the documentation.
- Create a
config.jsonfile with the following properties and replace:- <OpenSearch_URL> with OpenSearch domain endpoint.
- <OpenSearch_username> with OpenSearch username with permission to create indices and write data to indices.
- <OpenSearch_password> with password used to authenticate to OpenSearch.
- <KafkaOutputTopic> with the Confluent output topic that contains sentiment results.
- <ConfluentAPIKey> with Confluent API key with permission to read from the output topic.
- <ConfluentAPISecret> with Confluent API secret.
- Run the following command to deploy the connector:
That’s it! We are now writing the results to an OpenSearch index in real time. The next step is to visualize it.
When accessing OpenSearch dashboards, we see a new index processed.tweets which is named after the output topic.
With a few clicks in OpenSearch, we were able to create a sample dashboard.
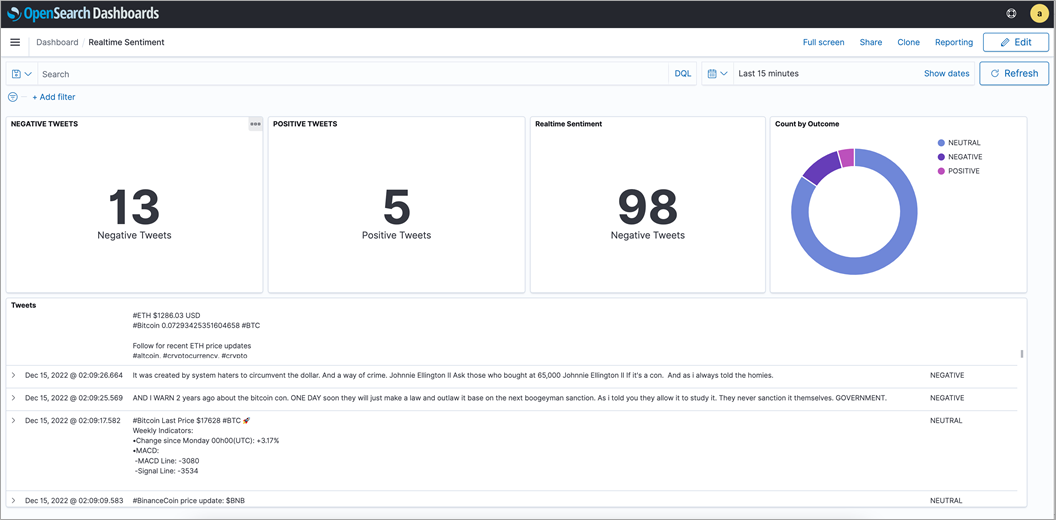
Figure 3 – OpenSearch sample dashboard.
Cleaning Up
To clean up after using this solution, delete the CloudFormation stack by running the following:
Conclusion
In this post, we showcased a simple, cost-effective, and efficient solution to analyze sentiment in real time. The solution is focused on building the core real-time analytics engine with Confluent Cloud, Amazon Kinesis Data Analytics, and Amazon Comprehend.
You can integrate this solution with your social media source of data feed and your choice of result visualization. This can be achieved by leveraging and modifying the source code available on GitHub.
Confluent Cloud offers elastic scaling and pricing that charges only for what you stream. If you would like to learn more about Confluent Cloud, sign up for an account and receive $400 USD to spend during your first 30 days.
.

.
Confluent – AWS Partner Spotlight
Confluent is an AWS Data and Analytics Competency Partner that was founded by the creators of Apache Kafka and enables organizations to harness business value from stream data.