AWS Partner Network (APN) Blog
How Capgemini Uses AWS IoT to Monitor Farmland Through Agricultural Insights
By Pete Moles, Partner Solutions Architect – AWS
By Charudath Doddanakatte, Director, Digital Customer Experience – Capgemini
By Ragavie Dakshinamoorthy, Technical Solution Architect – Capgemini
 |
The human population is predicted to reach around 10 billion by 2050. To sustain the exponential needs of this growth in terms of food and nutrition, our existing farming methods will be stressed to increase yields within the limited supply of available land.
Current methods to increase farming yields include the application of chemical fertilizers and the widespread use of pesticides. These methods have the advantage of increasing the quantity, but at the cost of adverse effects on the overall environment—destruction of biodiversity and contaminating ground water, soil and its fertility, and even the air.
Capgemini is an AWS Premier Consulting Partner and Managed Service Provider (MSP) with a multicultural team of 220,000 people in 40+ countries. Capgemini’s solution, outlined in this post, proposes an alternative method by using technology to manage moisture for optimum plant growth.
Capgemini believes in sustainable IT solutions, which refers to the application of IT practices and technologies for the benefit of customers and other stakeholders that ensure long-term well-being in economic, social, and environmental sustainability pillars.
Capgemini’s solution is called “Smart Hub Cropping” and checks precipitation in the farming fields, combines weather data from the government, and analyzes agricultural data to provide farmers with actionable insights and automation of the irrigation process. All of this is aligned to the most needed farmer experience of higher crop yield.
To achieve this outcome, Capgemini cloud technologies from Amazon Web Services (AWS) in areas like the Internet of Things (IoT), monitoring, insights, integration, and machine learning (ML).
Solution Overview
Capgemini’s Smart Hub Crop solution provides an interface for farmers that provides data and insights about the moisture levels in the fields within their farms. This is combined with weather data focusing on forecasted precipitation levels, and data provided by the Government of India’s Department of Agriculture, Cooperation & Farmers Welfare, which details the levels and types of crops harvested for the nation.
This combined dataset helps farmers understand which crop type to plant and in which area of the farm to do so. It also helps them maintain their crops to ensure productive growth.
Farmers register and authenticate through a mobile application to get access to their dataset, view data about their fields, weather forecast data for the forthcoming week, and see a graphical representation of moisture levels for their farmland.
Smart Hub Crop encompasses the following:
- Moisture sensor and GPS-enabled (IoT) device deployed to farmland.
- Central monitoring and analysis platform on AWS.
- Mobile application for insights and interactions on AWS.
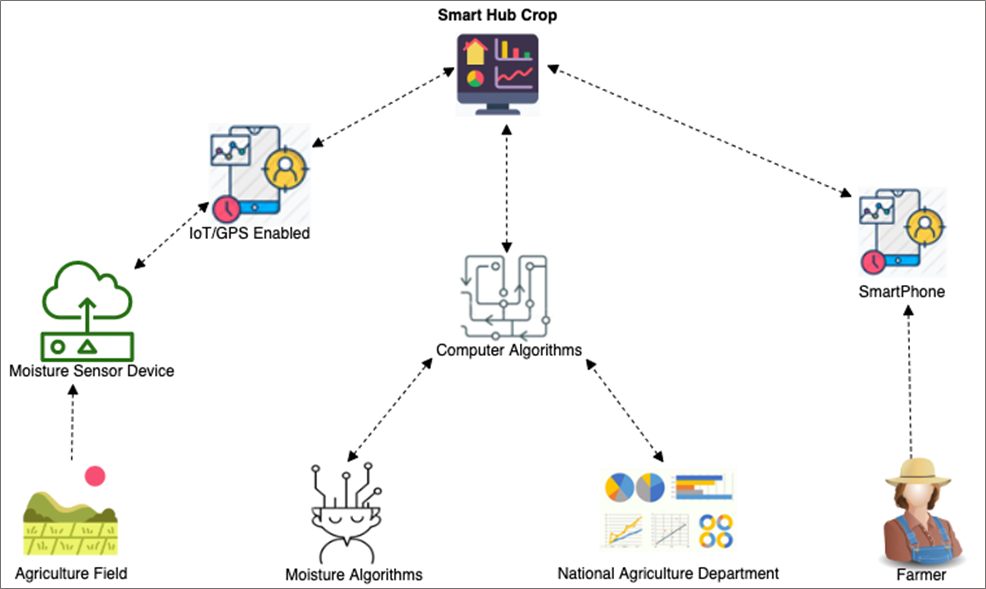
Figure 1 – High-level solution diagram.
The solution uses a moisture sensor which is connected to an Arduino electronics device. This provides the capability for sending moisture level data to the Smart Hub Crop core via a connected GPS interface.
The IoT device is set to periodically send data into the Smart Hub Crop service to be processed together with the soil type of the farmer’s fields by the moisture algorithms. This happens before being stored in the Smart Hub Crop database, along with the third-party environmental data received.
This information is made available to the farmer via the mobile application via web browser or mobile phone.

Figure 2 – High-level architecture diagram.
The AWS Toolbox
Capgemini developed the Smart Hub Crop solution using React Native, an open-source mobile application framework together with the AWS SDK for JavaScript. React primitives render the user interface (UI) and the application, via the AWS SDK, and uses the same native platform APIs to interact with AWS services.
The end user (farmers, in this case) use a mobile application interface as part of the solution. Users authenticate through the React application interface via Amazon Cognito and receives a JWT token. This token is used to authorize API calls from the application to AWS AppSync.
Once authenticated, the user retrieves the information from the Amazon DynamoDB table that holds the data that’s been provided by the IoT devices situated in the farmer’s fields.
Smart Hub Crop uses the following AWS services:
- AWS AppSync is a managed service that uses GraphQL to make it easy for applications to get exactly the data they need by letting you create a flexible API to securely access, manipulate, and combine data from one or more data sources.
- AWS Amplify Framework allows developers to create, configure, interact, and implement scalable mobile and web apps powered by AWS. Amplify seamlessly provisions and manages your mobile backend, and provides a simple framework to easily integrate your backend with iOS, Android, web, and React Native frontends. Amplify also automates the application release process of both your frontend and backend, allowing you to deliver.
- AWS Amplify CLI is a unified toolchain to create, integrate, and manage the AWS services for your app.
- Amazon Cognito is a user management service with rich support for users’ authentication and authorization. You can manage those users within Cognito or from other federated third-party identity providers (IdPs).
- Amazon DynamoDB is a key-value and document database that delivers single-digit millisecond performance at any scale.
- AWS IoT Core provides the cloud services that connect your IoT devices to other devices and AWS services.
Building the Solution
To implement the Smart Hub Crop solution, complete the following steps.
Step 1: Initialize the Project and Set Up AWS Amplify
To begin, you need to have installed and configured the AWS Command Line Interface (CLI), Amplify CLI, and NPM.
To create the React project, run the following command:
npx create-react-app farmhub-demo
This command creates a folder called farmhub-demo containing an empty React application.
Follow the instructions below to initialize an Amplify project within the React application:
- Switch to the project directory by typing cd farmhub-demo.
- Initialize an Amplify project by running the following command and answers to the prompts:
amplify init
- Enter a name for the project: farmhubdemo
- Enter a name for the environment: dev
- Choose your default editor: Visual Studio Code (or your choice of editor)
- Choose the type of app you’re building: JavaScript
- What JavaScript framework are you using: React
- Source directory path: src
- Distribution directory path: build
- Build command: npm run-script build
- Start command: npm run-script start
- Select the authentication method you want to use: AWS profile/AWS Keys
The amplify init command initialized a new project inside of the React site and deploys resources in the cloud with AWS CloudFormation stacks.
You’ll see a new folder called Amplify in the root of the project and a file called aws-exports.js in the src directory. This folder and files hold the Amplify project configuration.
Step 2: Configure Authentication for the Amplify Project
To add authentication to the application, use the following command:
amplify add auth
- Do you want to use default authentication and security configuration? Default configuration
- How do you want users to be able to sign in when using your Cognito User Pool? Username
- Do you want to configure advanced settings? No, I am done
Step 3: Configure the API in the Amplify Project
To add a GraphQL API to the application, use the following command:
amplify add api
- Select from one of the above mentioned services: GraphQL
- Provide API name: farmhubdemo
- Choose an authorization type for the API: Amazon Cognito User Pool
- Do you want to configure advanced settings for the GraphQL API? No, I’m done
- Do you have an annotated GraphQL schema? No
- Choose a schema template (use arrow keys): Single object with fields (e.g. “Todo” with ID, name, description)
- Do you want to edit the schema now? Yes
When prompted from your chosen code editor, replace any default text with the schema below:
This completes the configuration required for the Amplify project. To deploy the application, use the following command:
amplify push
- Are you sure you want to continue? Yes
- Do you want to generate code for your newly created GraphQL API? Yes
- Choose the code generation language target: JavaScript
- Enter the file name pattern of GraphQL queries, mutations and subscriptions: src/graphql/**/*.js
- Do you want to generate/update all possible GraphQL operations – queries, mutations and subscriptions? Yes
- Enter maximum statement depth: 2
Step 4: Configuring the Frontend React Application
The first thing to do is add the Amplify library to the project. This provide modules that simplify the code required to integrate with the AWS services.
Run the following command in the root of your project:
npm install -S aws-amplify && npm install -S aws-amplify-react
To configure the React application to be aware of the new AWS Amplify project, reference the auto-generated aws-exports.js file in the src folder, within the src/index.js file.
Open src/index.js and add the following code below the last import:
Now, add the code to the website that will be used to interact with the API. Open src/app.js and add the following code, replacing the default contents:
Feel free to add styling to this site if you wish. Use the following command to start the site on your local system:
yarn start
This command compiles the React site locally. You’ll be able to view and interact with the site on http://localhost:3000
Step 5: Testing the Frontend and API
Browse to the React site on your local system and follow the instructions to create and validate a new account. You’ll need to use a valid email address to receive the confirmation code.
Once you have registered an account and signed in, you’ll see a page with a hello message and a sign out button. Next, sign in to the AWS Management Console to test the API and add some data using a GraphQL mutation.
Open the AWS AppSync console and go into the farmhubdemo-dev API. On the left-hand side of the console, navigate to Queries.
The first thing to do is authenticate to Amazon Cognito. To do this, click Login with User Pools and enter the account information your used in the previous step, and then select Login.
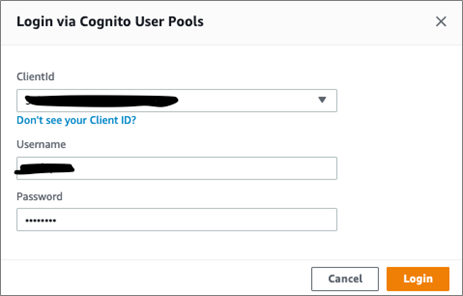
Figure 3 – Login screen for access to AppSync API via Amazon Cognito User Pool.
To add some data to the application, execute the following mutation and create a new moisture recording entry:
If successful, the right-hand side of the console will display the JSON record that’s been written to storage. To validate this, open the Amazon DynamoDB console and then the table that has the prefix of Farm- and select the Items tab. You should see one record:
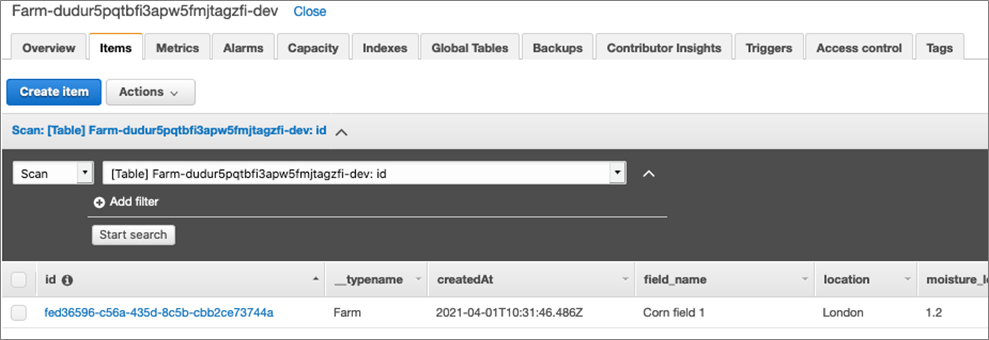
Figure 4 – Items in the Amazon DynamoDB table.
Make a note of the complete table name, as this will be used in the next section.
Lastly, refresh the React webpage to see the data displayed.
Setting Up the AWS IoT Core Components
AWS IoT enables internet-connected devices to connect to the AWS Cloud, allowing applications to interact with the physical devices, or to collect and process data from these devices.
This next section walks you through creating the logical IoT device in the IoT Core console, an IoT Rule used to take the data sent in by the IoT device, and add it to the DynamoDB table for our application.
Step 1: Create a “Thing” in AWS IoT Core
Open the AWS IoT console and expand Manage, and then select Things.
Choose Create (or Register a thing if you don’t have any things yet) and then Create a single thing. Specify moisture_thing as the name of your thing and select Next.
Note that you can apply a type to this thing, which simplifies management and provides consistent registry data for things that share a type. You can also add this thing to a group, which allows you to manage several things at once. For this walkthrough, we’ll not configure either of these.
Click Next, and then select the option to Create certificate. This will generate the X.509 certificates used to protect communication between your device and AWS IoT Core.
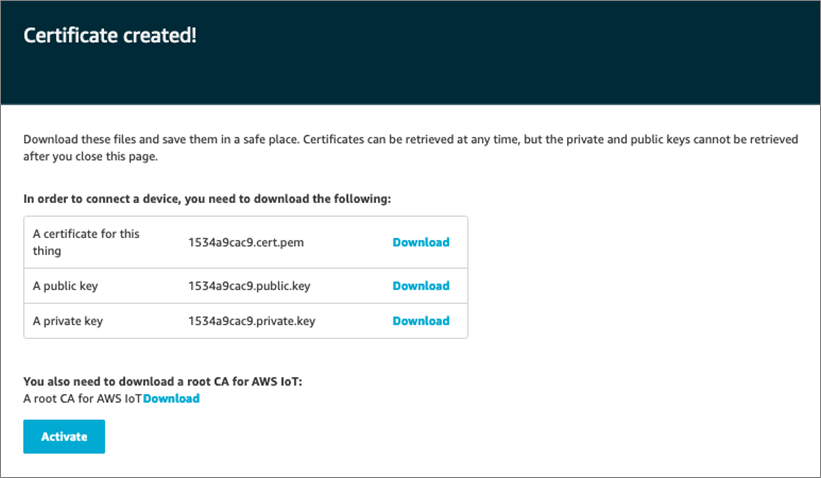
Figure 5 – Successful creation of IoT device certificate.
Download the certificates, and then choose Activate to activate the X.509 certificate. Finally, choose Attach a policy.
For testing, select the Default policy. Policies are used to provide your device authorization to perform AWS IoT operations, such as subscribing or publishing to a topic.
Next, select Register Thing.
Step 2: Set Up an IoT Rule for Moving Data to Your Storage
The next thing to do is configure a rule that takes the data sent to the thing and writes it to the DynamoDB table the API will interact with.
From the AWS IoT console, expand Act and then select Rules.
Choose Create a rule. Give the rule a name, moisture_rule, and a description. In the Rule query statement section, add the following IoT SQL statement:
This rule query statement listens to the topic farmhubcropping/moisture_thing defined using the FROM condition. This means every device that sends data to this topic will trigger the rule. When the rule triggers the SELECT clause, it extracts the information from the message.
Next, in the Set one or more actions section, choose Add action.
On the Select an action page, select Split message into multiple columns of a DynamoDB table (DynamoDBv2), and then choose Configure action.
Choose Create a resource and select the DynamoDB table that was created following the test mutation, starting with farm-
Then, choose Create Role to grant the rule the required access to the table. Finally, specify the name farmhub_dynamodb_rule_role and choose Create role.
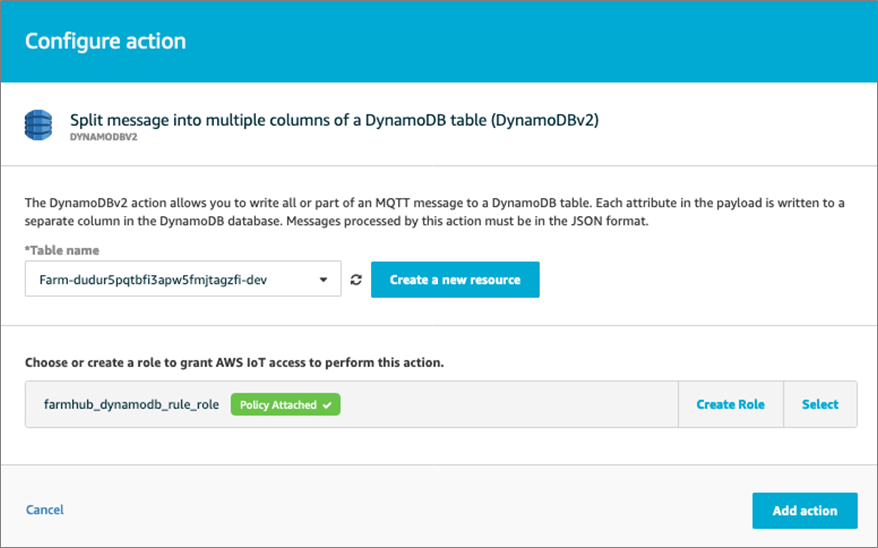
Figure 6 – IoT Configure Action screen with Table and Role configured.
Choose Add action to add this action to the rule, and then select Create a rule.
Step 3: Test the System
To test the system, create a simulated ‘thing’ using a Node.js script.
Open a terminal window and use the following command to create a new folder named iot_thing:
mkdir iot_thing
Inside the iot_thing folder, create a folder called certs to store the certificates downloaded previously, and the Node.js script that will be used to simulate our moisture IoT device:
cd iot_thing
mkdir certs
touch index.js
Copy the certificate files you downloaded previously to the iot_thing/cert directory. To make it simpler, rename the files as follows:
- File that ends with certificate.pem.crt to moisture_thing_crt.pem
- File that ends with private.pem.key to moisture_thing_key.pem
In the terminal, within the iot_thing directory, run the following command to download the Amazon root certificate authority (CA):
wget -O certs/rootCA.pem https://www.amazontrust.com/repository/AmazonRootCA1.pem
You should now have the following folders and files:
In the iot_thing, add the AWS IoT SDK using the following command:
npm i –save aws-iot-device-sdk
Copy the following code in to the index.js file in the iot_thing folder:
Within the index.js file, replace the variable “YOUR AWS IOT ENDPOINT” with your own IoT endpoint. This is your custom endpoint that allows you to connect to AWS IoT. Each of your things has a REST API available at this endpoint.
From the AWS IoT console, in the left navigation pane, choose Settings. Your endpoint will be listed in the Device data endpoint section at the top.
From the AWS IoT console, choose Test.
For Subscription topic, enter # and then choose Subscribe to topic. We are subscribing to all topics to check if your device is publishing.
In the iot_thing folder on your local system, launch the script index.js with the command:
node index.js
Back in the AWS IoT console, you’ll see the data being sent to the topic:

Figure 7 – Image showing the IoT console capturing incoming data.
As we have set up an IoT Rule, the data has also been added to the DynamoDB table. So, refreshing the website running on your localhost, you will now see a second entry.
Conclusion
With the “Smart Hub Cropping” IoT solution by Capgemini, farmers can get real-time status of agriculture fields, such as soil type and moisture levels, and monitor and execute operations from anywhere.
You can make it easy for farmers to securely share the status of their fields. This enables farmers to maintain their crops to ensure productive growth.
We look forward to seeing how you use this example to start building the future of Smart Hub Cropping with AWS IoT.
.

.
Capgemini – AWS Partner Spotlight
Capgemini is an AWS Premier Consulting Partner and MSP. With a multicultural team of 220,000 people in 40+ countries, Capgemini has more than 12,000 AWS accreditations and over 2,700 active AWS Certifications.
Contact Capgemini | Partner Overview
*Already worked with Capgemini? Rate the Partner
*To review an AWS Partner, you must be a customer that has worked with them directly on a project.