AWS Big Data Blog
Build a real-time streaming analytics pipeline with the AWS CDK
A recurring business problem is achieving the ability to capture data in near-real time to act upon any significant event close to the moment it happens. For example, you may want to tap into a data stream and monitor any anomalies that need to be addressed immediately rather than during a nightly batch. Building these types of solutions from scratch can be complex; you’re dealing with configuring a cluster of nodes as well as onboarding the application to utilize the cluster. Not only that, but maintaining, patching, and upgrading these clusters takes valuable time and effort away from business-impacting goals.
In this post, we look at how we can use managed services such as Amazon Kinesis to handle our incoming data streams while AWS handles the undifferentiated heavy lifting of managing the infrastructure, and how we can use the AWS Cloud Development Kit (AWS CDK) to provision, build, and reason about our infrastructure.
Overview of architecture
The following diagram illustrates our real-time streaming data analytics architecture.

This architecture has two main modules, a hot and a cold module, both of which build off an Amazon Kinesis Data Streams stream that receives end-user transactions. Our hot module has an Amazon Kinesis Data Analytics app listening in on the stream for any abnormally high values. If an anomaly is detected, Kinesis Data Analytics invokes our AWS Lambda function with the abnormal payload. The function fans out the payload to Amazon Simple Notification Service (Amazon SNS), which notifies anybody subscribed, and stores the abnormal payload into Amazon DynamoDB for later analysis by a custom web application.
Our cold module has an Amazon Kinesis Data Firehose delivery stream that reads the raw data off of our stream, compresses it, and stores it in Amazon Simple Storage Service (Amazon S3) to later run complex analytical queries against our raw data. We use the higher-level abstractions that the AWS CDK provides to help onboard and provision the necessary infrastructure to start processing the stream.
Before we begin, a quick note about the levels of abstraction the AWS CDK provides. The AWS CDK revolves around a fundamental building block called a construct. These constructs have three abstraction levels:
- L1 – A one-to-one mapping to AWS CloudFormation
- L2 – An intent-based API
- L3 – A high-level pattern
You can mix these levels of abstractions, as we see in the upcoming code.
Solution overview
We can accomplish this architecture with a series of brief steps:
- Start a new AWS CDK project.
- Provision a root Kinesis data stream.
- Construct our cold module with Kinesis Data Firehose and Amazon S3.
- Construct our hot module with Kinesis Data Analytics, Lambda, and Amazon SNS.
- Test the application’s functionality.
Prerequisites
For this walkthrough, you should have the following prerequisites:
- An AWS account
- Node.js installed on your development environment
- If using Yarn, have Yarn installed on your development environment
- AWS Identity and Access Management (IAM) admin credentials, which are needed for AWS CDK deployment
Start a new AWS CDK project
We can bootstrap an AWS CDK project by installing the AWS CDK CLI tool through our preferred node dependency manager.
- In your preferred terminal, install the AWS CDK CLI tool.
- For npm, run
npm install -g aws-cdk. - For Yarn, run
yarn global add aws-cdk.
- For npm, run
- Make a project directory with
mkdir <project-name>. - Move into the project with
cd <project-name>. - With the CLI tool installed, run
cdk init app --language [javascript|typescript|java|python|csharp|go].- For this post, we use Typescript (
cdk init app --language typescript).
- For this post, we use Typescript (
Following these steps builds the initial structure of your AWS CDK project.
Provision a root Kinesis data stream
Let’s get started with the root stream. We use this stream as a baseline to build our hot and cold modules. For this root stream, we use Kinesis Data Streams because it provides us the capability to capture, process, and store data streams in a reliable and scalable manner. Making this stream with the AWS CDK is quite easy. It’s one line of code:
It’s only one line because the AWS CDK has a concept of sensible defaults. If we want to override these defaults, we explicitly pass in a third argument, commonly known as props:
Construct a cold module with Kinesis Data Firehose and Amazon S3
Now that our data stream is defined, we can work on our first objective, the cold module. This module intends to capture, buffer, and compress the raw data flowing through this data stream into an S3 bucket. Putting the raw data in Amazon S3 allows us to run a plethora of analytical tools on top of it to build data visualization dashboards or run ad hoc queries.
We use Kinesis Data Firehose to buffer, compress, and load data streams into Amazon S3, which serves as a data store to persist streaming data for later analysis.
In the following AWS CDK code, we plug in Kinesis Data Firehose to our stream and configure it appropriately to load data into Amazon S3. One crucial prerequisite we need to address is that services don’t talk to each other without explicit permission. So, we have to first define the IAM roles our services assume to communicate with each other along with the destination S3 bucket.
iam.Role is an L2 construct with a higher-level concept of grants. Grants abstract IAM policies to simple read and write mechanisms with the ability to add individual actions, such as kinesis:DescribeStream, if the default read permissions aren’t enough. The grant family of functions allows us to strike a delicate balance between least privilege and code maintainability. Now that we have the appropriate permission, let’s define our Kinesis Data Firehose delivery stream.
By default, the AWS CDK tries to protect you from deleting valuable data stored in Amazon S3. For development and POC purposes, we override the default with cdk.RemovalPolicy.DESTROY to appropriately clean up leftover S3 buckets:
The Cfn prefix is a good indication that we’re working with an L1 construct (direct mapping to AWS CloudFormation). Because we’re working at a lower-level API, we should be aware of the following:
- It’s lengthier because there’s no such thing as sensible defaults
- We’re passing in Amazon Resource Names (ARNs) instead of resources themselves
- We have to ensure resources provision in the proper order, hence the
addDependency()function call
Because of the differences between working with L1 and L2 constructs, it’s best to minimize interactions between them to avoid confusion. One way of doing so is defining an L2 construct yourself, if the project timeline allows it. A template can be found on GitHub.
A general guideline for being explicit about what construct depends on others, like the preceding example, is to recognize where you ask for ARNs. ARNs are only available after a resource is provisioned. Therefore, you need to ensure that resource is created before using it elsewhere.
That’s it! We’ve constructed our cold pipeline! Now let’s work on the hot module.
Construct a hot module with Kinesis Data Analytics, Amazon SNS, Lambda, and DynamoDB
In the previous section, we constructed a cold pipeline to capture the raw data in its entirety for ad hoc visualizations and analytics. The purpose of the hot module is to listen to the data stream for any abnormal values as data flows through it. If an odd value is detected, we should log it and alert stakeholders. For our use case, we define “abnormal” as an unusually high transaction (over 9000).
Databases, and often what appears at the end of architecture diagrams, usually appear first in AWS CDK code. It allows upstream components to reference downstream values. For example, the database’s name is needed first before we can provision a Lambda function that interacts with that database.
Let’s start provisioning the web app, DynamoDB table, SNS topic, and Lambda function:
In the preceding code, we define our DynamoDB table to store the entire abnormal transaction and a table viewer construct that reads our table and creates a public web app for end-users to consume. We also want to alert operators when an abnormality is detected. We can do this by constructing an SNS topic with a subscription to example@amazon.com. This email could be your team’s distro. Lastly, we define a Lambda function that serves as the glue between our upcoming Kinesis Data Analytics application, the DynamoDB table and SNS topic. The following is the actual code inside the Lambda function:
The AWS CDK code is similar to the way we defined our Kinesis Data Firehose delivery stream because both CfnApplication and CfnApplicationOutput are L1 constructs. There is one subtle difference here and a core benefit of using the AWS CDK even for L1 constructs: for application code, we can read in a file and render it as a string. This mechanism allows us to separate application code from infrastructure code vs. having both in a single CloudFormation template file. The following is the SQL code we wrote:
That’s it! Now we move on to deployment and testing.
Deploy and test our architecture
To deploy our AWS CDK code, we can open up a terminal at the root of the AWS CDK project and run cdk deploy. The AWS CDK outputs a list of security-related changes that you can either confirm with a yes or no.
When the AWS CDK finishes deploying, it outputs the data stream name and the Amazon CloudFront URL to our web application. Open the CloudFront URL, the Amazon S3 console (specifically the bucket that our AWS CDK provisioned), and the Python file at scripts/producer.py. The following is the content of that Python file:
The Python script is relatively rudimentary. We take the data stream name as input, construct a Kinesis client, construct a random but realistic payload using the popular faker library, and send that payload to our data stream.
We can run this script by running Python scripts/producer.py. It boots up our Kinesis Data Analytics application if it hasn’t started already and prompts you for the data stream name. After you enter the name and press Enter, you should start seeing Kinesis’s responses in your terminal.
Make sure to use python3 instead of python if your default Python command defaults to version 2. You can check your version by entering python --version in your terminal.
Leave the script running until it randomly generates a couple of high transactions. After they’re generated, you can visit the web app’s URL and see table entries for all anomalies there (as in the following screenshot).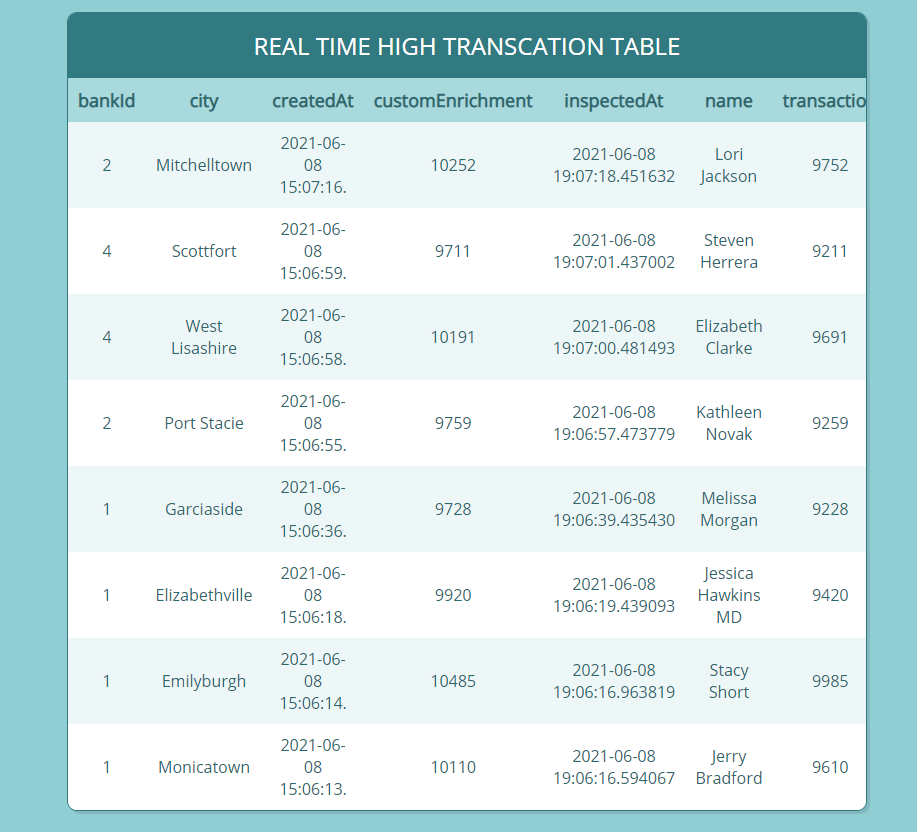
By this time, Kinesis Data Firehose has buffered and compressed raw data from the stream and put it in Amazon S3. You can visit your S3 bucket and see your data landing inside the destination path.

Clean up
To clean up any provisioned resources, you can run cdk destroy inside the AWS CDK project and confirm the deletion, and the AWS CDK takes care of cleaning up all the resources.
Conclusion
In this post, we built a real-time application with a secondary cold path that gathers raw data for ad hoc analysis. We used the AWS CDK to provision the core managed services that handle the undifferentiated heavy lifting of a real-time streaming application. We then layered our custom application code on top of this infrastructure to meet our specific needs and tested the flow from end to end.
We covered key code snippets in this post, but if you’d like to see the project in its entirety and deploy the solution yourself, you can visit the AWS GitHub samples repo .
About the Authors
 Cody Penta is a Solutions Architect at Amazon Web Services and is based out of Charlotte, NC. He has a focus in security and CDK and enjoys solving the really difficult problems in the technology world. Off the clock, he loves relaxing in the mountains, coding personal projects, and gaming.
 Michael Hamilton is a Solutions Architect at Amazon Web Services and is based out of Charlotte, NC. He has a focus in analytics and enjoys helping customers solve their unique use cases. When he’s not working, he loves going hiking with his wife, kids, and their German shepherd.