Business Productivity
Event-Based Amazon Chime Webhooks using AWS Lambda and Amazon EventBridge
As complexity in projects and workloads increases, there is a constant need to automate manual tasks to save teams and customers time and resources. Customers have used this automation to set up reminders for deployments, on-call rotations, and maintenance. Amazon Chime is a communication service used by organizations to connect teams. Amazon Chime offers webhooks as a feature that allow users to programmatically send messages to chat rooms. Amazon EventBridge can be used to connect services together to deliver messages or data to targets like AWS Lambda based on an event rule or a schedule. AWS Lambda is a compute service that runs your code in response to events. In this blog, you will need to have the following prerequisites to set up event-driven and scheduled Amazon Chime webhooks with AWS Lambda and Amazon EventBridge: an Amazon Chime account and an AWS account to access the AWS console.
Solution overview
In this blog post, we show you how you can use Amazon EventBridge with AWS Lambda and Amazon Chime webhooks to help reduce manual workloads by scheduling messages. Note: Deploying this demo and receiving traffic from the demo created in this post can incur AWS charges.
An Amazon EventBridge rule is triggered with a target of an AWS Lambda. The AWS Lambda is then invoked, which makes a POST request to the Amazon Chime webhook, which then delivers a message to the specified chat room.
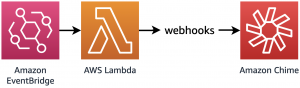
Figure 1: Example Solution Architecture
Prerequisites
- Amazon Chime account
- AWS account to access the console
Step 1: Setting up your Lambda function
- Set up your work environment by creating a directory by running the following command:
mkdir ~/myProject - Install Python 3.8 or greater for your respective platform. Follow the directions on the installation site here.
- Install Pipenv, a dependency manager for Python that simplifies management of dependencies. Install by running the following command:
pip3 install --user pipenv - Install the requests package using the following command:
pipenv install requests
NOTE: The Pipenv installation might require adding your user’s binary directory to your PATH. For linux, this is generally the fully expanded path of
~/.local/bin. You can check withpython3 -m site --user-baseand append “bin” to the end of the returned directory path. To ensure Pipenv is usable in your terminal every time it is reopened, add the following to your relevant shell file, i.e. .bashrc, .zshrc, etcif [ -d "$HOME/.local/bin" ] ; then PATH="$HOME/.local/bin:$PATH" fi - Save the Virtualenv location in your notepad.

Figure 2: Output after running
pipenv install requests
Step 2: Generate Amazon Chime webhook URL
- Install Amazon Chime.
- Create a chat room, by clicking “Rooms” at the top of the Amazon Chime Window.

Figure 3: Amazon Chime Rooms tab
- Click, “Create a chat room”.

Figure 4: Create a chat room
- Name your chat room and click “Create.” The next screen will allow you to add others to the chat room. After adding participants, the chat room is ready to be used.

Figure 5: Naming a chat room
- Add a webhook to the chat room by clicking the gear icon in the top right corner and click “Manage webhooks and bots”.

Figure 6: Manage webhooks and bots
- Click “Add webhook”.

Figure 7: Adding the webhook
- Name the webhook.

Figure 7: Naming the webhook
- Click “Copy URL” and save it.

Figure 8: Copying webhook URL
Step 3: Writing AWS Lambda Function
- Copy the contents of the following sample Python code and save it in a new file named
webhook.py. Replace the webhook URL and message where indicated.
import json
import requests

def lambda_handler(event, context):
    data = {"Content":"ReplaceWithMessage"}

    response = requests.post(
        url="ReplaceWithWebhookURL",
        json=data
    )
    return {
        "statusCode": response.status_code,
        "body": json.dumps("Hello from Lambda!")
    }
Step 4: Packaging AWS Lambda Code to Upload
- Replace the Virtualenv directory and Python file directory in the following commands with yours to zip the packages:
cd <venvDirectory>/lib/python3.X/site-packages/
zip -r <pythonFileDirectory>/packages.zip . - Navigate to your Python file directory and add your script to the root of packages.zip:
zip -g packages.zip webhook.py
Step 5: Create AWS Lambda function
- Navigate to the AWS Lambda console.
- Click “Create function”.

Figure 9: Creating AWS Lambda function
- Choose “Author from scratch”.
- Give your function the name “Chime_Webhook”.
- Choose your Python runtime, matching the version you used.
- Leave all other options as default.
- Click “Create function”.
Step 6: Upload to AWS Lambda console
- Click your newly created AWS Lambda function and click the “Upload from” button then select your zip file. Once the upload is successful, you’ll see a green banner stating “Successfully updated the function Chime_Webhook”.

Figure 10: Uploading AWS Lambda code
- In order for AWS Lambda to use our method, update the Handler in the runtime settings. Click “Edit” within “Runtime settings” and change the field to the Python file name and method name:
webhook.lambda_handler
Figure 11: Updating Handler
- Test the AWS Lambda by clicking the “Test” tab and create a new event from the “hello-world” template. Click “Test” and your message will be sent to the Amazon Chime chat room.

Figure 12: Testing the AWS Lambda function
Step 7: Setting up the Amazon EventBridge rule
- Navigate to the Amazon EventBridge console.
- Click “Create rule” and give it a name.
- Choose “Schedule” pattern, then “Cron expression”.
- We’ll use a cron expression for every Friday at 4pm PST:
0 23 ? * FRI *
Figure 13: Defining Amazon EventBridge pattern
- Select the previously-created AWS Lambda as the target for this rule and click “Create rule”.

Figure 14: Creating rule
You should now have set up an event-based Amazon Chime webhook using AWS Lambda and Amazon EventBridge.
Cleanup
For easy clean up, delete the AWS Lambda function, Amazon EventBridge rule, and Amazon Chime webhook.
Use the following steps to delete or disable an AWS Lambda function.
- Open the AWS Lambda console.
- Choose the name of the function to delete.
- Click “Actions” in the top right.
- Click “Delete function”.
- Click Delete.
Use the following steps to delete or disable an Amazon EventBridge rule.
- Open the Amazon EventBridge console.
- In the navigation pane, choose Rules.
- Under Event bus, select the event bus that is associated with the rule.
- Do one of the following:
a. To delete a rule, select the button next to the rule and click Delete.
b. To temporarily disable a rule, select the rule and choose Disable.
Open Amazon Chime and follow the steps below.
- Navigate to the “gear” icon on the top right.
- Click “Manage webhooks.”
- Select your webhook and click “Delete.”
Conclusion
In this blog, we’ve set up a pipeline that allows you to programmatically send messages to Amazon Chime chat rooms with the use of AWS Lambda and Amazon EventBridge. This process allows you to automate and trigger messages based on events which can help save you time on manual tasks.
For more information or related blogs visit:
Webhooks for Amazon Chime
Adding Webhooks to Chat Rooms
Amazon Chime Developer Guide
Amazon EventBridge User Guide