AWS Contact Center
Recommend nearby points of interest using a custom Contact Control Panel
In some scenarios, Amazon Connect agents may need to look up nearby point of interests quickly to assist their end customers. For example, in a car accident, the driver of the car might call into the auto insurance company for assistance and request contact information for a nearby repair shop or car rental company.
This blog shows how Amazon Connect Agents, using a custom Contact Control Panel (CCP), can leverage Amazon Location Service to find nearby point of interests in various scenarios and guide customers quickly in time of need. Locations are shown in a map on the CCP panel and also in a tabular format in the order of proximity of the caller for ease of use.
In this blog, you will deploy a serverless web application that contains an enhanced Contact Control Panel for Amazon Connect with quick lookup point of interests functionality. Using a CloudFormation template, you will deploy all of the necessary architecture to support the functionality of this new feature.
Solution Overview
This solution adds a new frame in a custom CCP to allow Amazon Connect agents to lookup nearby points of interest (POI) such as car rentals and car garages upon requests from callers. POI lists are presented in a map, along with details such as hours of operation and phone number for each location.
This solution is completely serverless and leverages Amazon S3 to store a static website that hosts the Administrator CCP and custom JavaScript to enable the rest of the requests. Amazon CloudFront serves as a content delivery network (CDN) to allow a PUBLIC frontend for the website. Amazon CloudFront is a fast content delivery network (CDN) service that securely delivers data, videos, applications, and APIs to customers globally with low latency, high transfer speeds, all within a developer-friendly environment. Please note: This is a sample project designed to be easily deployable for experimentation. The IAM policy permissions use least privilege, however the AWS CloudFront and API Gateway deployed will be publicly accessible. Please take the appropriate measures to secure your CloudFront distribution and API Gateway following the public documentation: https://docs.aws.amazon.com/AmazonCloudFront/latest/DeveloperGuide/SecurityAndPrivateContent.html and https://docs.aws.amazon.com/apigateway/latest/developerguide/security.html
The backend features Amazon API Gateway with HTTP routes for a Lambda function that allow the UI to query Amazon Location Service. UI captures caller’s current address, requested POI type and then pass those inputs to Lambda function. The Lambda function invokes Amazon Location Service API to convert caller’s current position to longitude and latitude, and find up to 10 nearby points of interest. A radius value (default of 0.0008) is used to create a polygon around caller’s current position to scope down the list. To change radius value, the Lambda function will need to be updated.
For each POI, the Lambda function finds corresponding phone number and hours of operation from Amazon DynamoDB. Amazon Location Service does not support such details of a POI at this time. The data used in DynamoDB is example data and is used to show conceptual integration possible now or in future so that architects might understand to how to integrate with other systems.
The project also uses a Cognito identity pool to allow access to Map resources. In this example we will allow guest access to our application. In a production scenario, permissions will vary by use case. Be sure to create your Identity Pool in the same region as the Map resources.
We recommend to integrating this application with your organization’s Identity Provider and authorize the API Gateway functions using the Identity Provider. The example solution implemented here is built with anonymous access so that it can be customized to meet your needs.

Prerequisites
For this walkthrough, you should have the following prerequisites:
- An AWS account
- An existing Amazon Connect instance
- Access to the AWS Management Console and access to Amazon Connect Service Interface (in AWS management console – see step 2) with permissions to execute CloudFormation Template including the following AWS Services: AWS API Gateway, AWS CloudFront, AWS IAM, AWS Lambda, AWS S3, AWS CloudFormation, Amazon DynamoDB, Amazon Location Service
- You will create a CloudFormation Template, which will automate the process of building all resources needed for this blog’s solution. Please be sure your Connect Instance is in the same Region where you will create your S3 bucket and launch your CloudFormation template.
Walkthrough
The solution has two sets of steps:
- Setting up the resources for the solution using AWS CloudFormation
- Configuring Amazon Connect to allow access from the Custom CCP, enabling agents to look up nearby up points of interest
Setting up CloudFormation template
- Download WebSite Helper code from following S3 location into your local machine: https://amazon-connect-blog-channel-artifact.s3.us-west-2.amazonaws.com/POIResultsUI.zip
- Download CloudFormation template from S3 location into your local machine:https://amazon-connect-blog-channel-artifact.s3.us-west-2.amazonaws.com/ConnectPoIBlog.yaml
- Create a new S3 bucket in your preferred region
- Create a new folder under this new bucket called custom-ccp-portal
- Upload WebSite Helper Zip file (downloaded in step 1) into the subfolder (custom-ccp-portal)
- Create a CloudFormation Stack using the template file downloaded in step 2
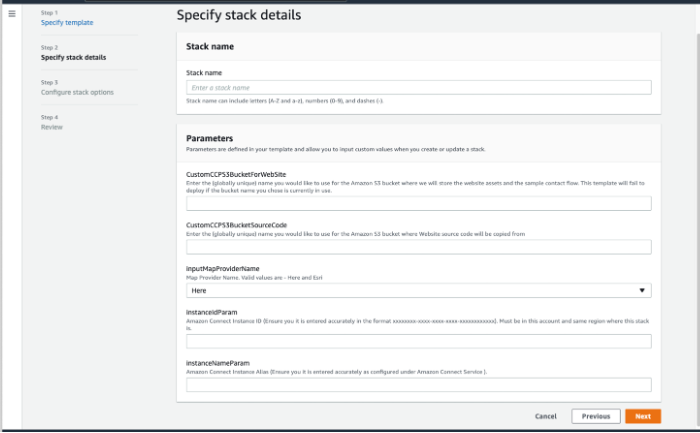
Fill in the stack using following details:
- Enter Stack name (e.g., ccp-poi parameters).
- CustomCCPS3BucketForWebSite – This bucket will be created by CloudFormation to store unzipped/extracted Custom CCP Code
- CustomCCPS3BucketSourceCode – This is an existing Bucket where Custom CCP UI source zip code is stored, downloaded in step 1
- InputMapProviderName – Map Provider Name. Valid values are Here and Esri
- InstanceIdParam – Amazon Connect Instance Id
- InstanceNameParam – Amazon Connect Instance Alias
To find Amazon Connect Instance ID and Amazon Connect Instance Name, please see the screenshot below on how to capture it:

- Click on ‘Next’ again
- Select the “I acknowledge that AWS CloudFormation might create IAM resources” option followed by clicking on ‘Create Stack’ button

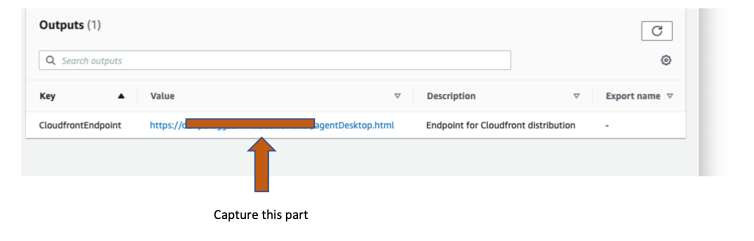
- When the CloudFormation stack has successfully run, click on the Outputs tab and Copy the URL for CloudFrontEndPoint (except agentDesktop.html part) as shown:
Connect Integration Steps:
-
- In the AWS Portal, go to Services, Amazon Connect
- Click on the Amazon Connect Alias you want to connect the Point of Interest solution
- Click on Approved Origins in the left hand navigation

- Click on the Add domain link as shown here:

- Copy the URL copied from the Outputs of the Stack and DELETE the /adminDesktop.html at the end as shown: (Note: The Add button will remain Gray until the URL is present. Including the /adminDesktop.html or a trailing slash will not allow you to continue

- Paste the full URL into an Amazon Connect supported browser to launch the Contact Control Panel (CCP) to demonstrate the functionality of this solution. You should see the following and be prompted to log in. After login, enter a sample caller’s address and requested type of location. Currently, there are three choices in the drop down list: Car Rental, Car Garage and Collision Center. Any new choice will require an update in CCP code.

Cleaning up
To avoid incurring future charges, delete the resources created for this blog.
- Delete your S3 bucket manually that you provided as input for CustomCCPS3BucketForWebSite
- Open the CloudFormation console
- Locate the stack (e.g., ccp-poi) you created
- Select the radio option next to it
- Select Delete
- Select Delete stack to confirm
Conclusion
In this blog, we walked through how to use the Amazon Connect APIs, AWS Lambda, Amazon DynamoDB, and Amazon Location Service to gather a caller’s nearby points of interest and present it to a contact center agent in a custom Contact Control Panel. This configuration provides a single location to view all related points of interest details for all agents in the system, increasing agents’ ease of access to relevant information on each call.