Containers
Deploy and scale Django applications on AWS App Runner
AWS App Runner is a fully managed container application service that lets you build, deploy, and run containerized web applications and API services without prior infrastructure or container experience. You can start with your source code or a container image, and AWS App Runner manages all infrastructure including servers, networking, and load balancing for your application.
Django is an open-source web application framework written in Python. Thanks to built-in features such as an object-relational mapper (ORM), URL routing, authentication system, templating system, and more, it is a popular choice for developing web applications and APIs.
AWS App Runner makes it easy to deploy Django applications directly from a source code repository or container image. AWS App Runner provisions resources, automatically scales the number of containers up or down to meet the needs of your application, and load balances traffic to ensure high availability.
Thanks to its integration with Amazon CloudWatch, AWS App Runner provides detailed metrics and logs without manual setup. AWS App Runner can communicate with other AWS services running in an Amazon Virtual Private Cloud (Amazon VPC) such as managed databases, caches, queues, and more.
This post shows how to deploy and scale a Django web application on AWS App Runner and how to securely connect to a managed database with Amazon Relational Database Service (Amazon RDS) for PostgreSQL.
Solution overview
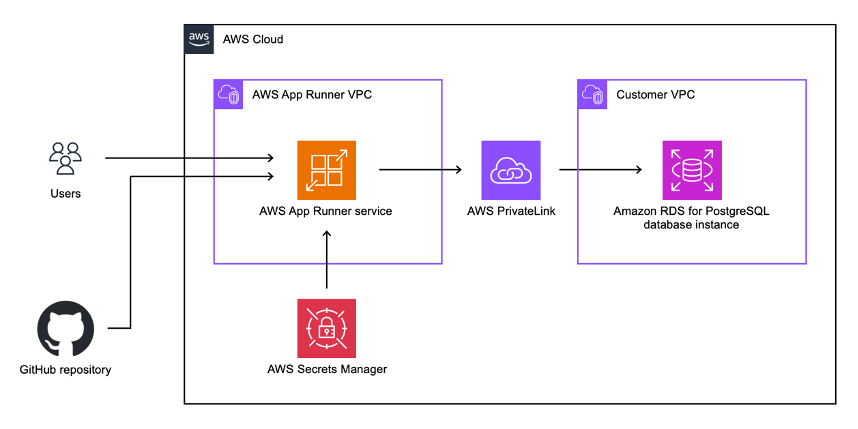
The solution you are going to set up as part of this walkthrough comprises the following elements as shown in the architecture diagram:
- An AWS App Runner service running your Django application in an AWS-managed VPC.
- An RDS for PostgreSQL database instance running in your own customer-managed VPC. App Runner privately connects to the RDS instance using AWS PrivateLink.
- AWS Secrets Manager to securely store and access the database secret from App Runner.
- A GitHub repository from which the Django application source code will be deployed.
Walkthrough
Prerequisites
- AWS account. The IAM user that you use must have sufficient permissions to make necessary AWS service calls and manage AWS resources.
- Python version >= 3.8
- Git
- GitHub account
- Basic knowledge of Amazon VPC and AWS Identity and Access Management (AWS IAM)
Setting up a sample Django project
To demonstrate the deployment process, we’re going to set up a sample Django project. As a first step, create a project directory and set up a Python virtual environment using the venv module:
mkdir django-apprunner
cd django-apprunner
python3 -m venv .venv
Next, activate the virtual environment and install Django:
source .venv/bin/activate
pip install django==4.2.2
From now on, make sure the virtual environment is activated when following this walkthrough.
Now you can start a new Django project using the django-admin command-line utility:
django-admin startproject myproject
cd myproject
At this point, your folder structure should look as follows:
.
└── django-apprunner
    ├── .venv
    └── myproject
        ├── manage.py
        └── myproject
            ├── __init__.py
            ├── asgi.py
            ├── settings.py
            ├── urls.py
            └── wsgi.py
Let’s test if our application runs correctly:
python manage.py runserverIf you visit http://127.0.0.1:8000 in a web browser, then you’ll see the default Django welcome screen:

Preparing the application for deployment
While runserver is great for local development, it’s not suitable for production environments due to performance and security limitations. Instead, Django recommends using a WSGI server such as gunicorn. Similarly, we can’t rely on runserver to serve our static files in production. Here, we can opt for WhiteNoise as a simple yet scalable option for serving static files.
Let’s install these two packages in our virtual environment:
pip install gunicorn==20.1.0 whitenoise==6.4.0Output all installed packages in a requirements file:
pip freeze > requirements.txtBefore you can deploy to AWS App Runner, you need to make some changes to the Django settings.py file located in django-apprunner/myproject/myproject/settings.py.
First we need to update the ALLOWED_HOSTS to allow AWS App Runner to serve the Django application:
ALLOWED_HOSTS = [".awsapprunner.com"]Next, update and add the STATIC_URL and STATIC_ROOT settings for AWS App Runner and define WhiteNoise as staticfiles storage by adjusting the STORAGES setting:
STATIC_URL = "static/"
STATIC_ROOT = BASE_DIR / "staticfiles"

STORAGES = {
    "default": {
        "BACKEND": "django.core.files.storage.FileSystemStorage",
    },
    "staticfiles": {
        "BACKEND": "whitenoise.storage.CompressedManifestStaticFilesStorage",
    },
}
Finally, add WhiteNoise to the middleware list:
MIDDLEWARE = [
    # ...
    "django.middleware.security.SecurityMiddleware",
    "whitenoise.middleware.WhiteNoiseMiddleware",
    # ...
]
Deploying to AWS App Runner
Configuring the deployment
AWS App Runner enables you to deploy from a GitHub repository or via a Docker image. In this walkthrough, you’ll use the code-based deployment from GitHub.
In case of AWS App Runner code-based deployments, you can define deployment configuration in the AWS Management Console or using a configuration file in your source code repository. When choosing the configuration file, any changes to the deployment options are tracked similarly to how changes to the source code are tracked.
Create an apprunner.yaml file in the django-apprunner/myproject directory to use the configuration file approach:
version: 1.0
runtime: python3
build:
  commands:
    build:
      - pip install -r requirements.txt
run:
  runtime-version: 3.8.16
  command: sh startup.sh
  network:
    port: 8000
To start our application, AWS App Runner must run a number of commands, such as collectstatic for serving static files and gunicorn for starting the WSGI server. Create a startup.sh file in the django-apprunner/myproject directory to list these commands:
#!/bin/bash
python manage.py collectstatic && gunicorn --workers 2 myproject.wsgi
Create a .gitignore file in the django-apprunner/myproject directory:
Initialize a new Git repository in the django-apprunner/myproject directory and push it to GitHub. Follow this guide for instructions on working with GitHub.
Creating and deploying the AWS App Runner service
- Navigate to the AWS App Runner service in the AWS Management Console and choose Create an App Runner service.
- For Source, choose Source code repository.
- Under Connect to GitHub, choose Add new and follow the instructions to connect to your GitHub account.
- For Deployment settings, choose Automatic.
- Choose Next.
- For Build settings, choose Use a configuration file. AWS App Runner automatically picks up the
apprunner.yamlfile stored in our repository. - Choose Next.
- For Service name, enter
django-apprunner. - Leave the remaining settings as per default for now and choose Next.
- Review the configuration and choose Create & deploy.
AWS App Runner will now pull your application source code from GitHub to build a container image and deploy it.
Observe the AWS App Runner event logs to track the status of the deployment. For detailed logs, select View in CloudWatch next to the App Runner event logs and Application logs. Once your service reaches the status Running, choose the default domain for your service to see the deployed website.

Connecting a PostgreSQL database with Amazon RDS
If your Django application persists data to a database, then you can choose one of the database backends supported by Django. Per default, Django uses the SQLite database, which stores its data directly on disk. However, as AWS App Runner doesn’t guarantee state persistence beyond the duration of processing a single incoming web request, you need to host a database separately, for instance PostgreSQL.
With Amazon RDS, you can deploy a scalable PostgreSQL database in minutes with cost-efficient and resizable hardware capacity. Amazon RDS manages complex and time-consuming administrative tasks such as PostgreSQL software installation and upgrades, storage management, replication for high availability and read throughput, and backups for disaster recovery.
Setting up an Amazon RDS for PostgreSQL database
- Go to the Amazon RDS console, choose Create database.
- For Choose a database creation method, choose Easy create.
- For Engine type, select PostgreSQL.
- For DB instance size, select Free tier. Learn more about the RDS Free Tier here.
- For DB instance identifier, input
django-apprunner-db. - Leave the initial username as
postgresand set an initial password. - Expand View default settings for Easy create and confirm the settings are the same as on the following image:

8. Choose Create database.
Preparing the PostgreSQL database for Django
To connect to your PostgreSQL database from the Django application, you should create a new database user and database just for Django. To do so, start at Amazon Elastic Compute Cloud (Amazon EC2) instance or AWS Cloud9 instance with an Amazon Linux 2023 AMI in the default VPC and with the default security group (the same you used for the database instance).
SSH into the instance, install PostgreSQL and connect to your Amazon RDS instance:
sudo yum install postgresql15 -y
psql -h <Your RDS endpoint> -p 5432 -U postgres -W
Create a new django database and user. Make sure to replace <Secure password> with an actual password:
CREATE DATABASE django;
CREATE USER django WITH PASSWORD '<Secure password>';
ALTER ROLE django SET client_encoding TO 'utf8';
ALTER ROLE django SET default_transaction_isolation TO 'read committed';
ALTER ROLE django SET timezone TO 'UTC';
GRANT ALL PRIVILEGES ON DATABASE django TO django;
While still in the psql shell, switch to the newly created Django database and update permissions for the public schema with the following commands. You’ll be asked to re-enter the password of the postgres user:
\connect django
GRANT ALL ON SCHEMA public TO django;
Your database is now ready to be used with Django.
Configuring the Django sample application for PostgreSQL
Install the psycopg package as Python database adapter for PostgreSQL. Also, install dj-database-url so that you can easily set up the database connection form an environment variable:
pip install psycopg2-binary==2.9.6 dj-database-url==1.3.0Update the requirements file to include these new dependencies:
pip freeze > requirements.txtLet’s update the settings.py to use PostgreSQL as well. First, adapt the imports as follows:
from pathlib import Path
import json
import dj_database_url
from os import environ
Next, replace the DATABASES setting so that SQLite can be used in development, but PostgreSQL is used if a DATABASE_SECRET is passed as environment variable:
if "DATABASE_SECRET" in environ:
    database_secret = environ.get("DATABASE_SECRET")
    db_url = json.loads(database_secret)["DATABASE_URL"]
    DATABASES = {"default": dj_database_url.parse(db_url)}
else:
    DATABASES = {"default": dj_database_url.parse("sqlite:///db.sqlite3")}
Finally, instruct AWS App Runner to run database migrations each time your application starts by editing startup.sh:
#!/bin/bash
python manage.py migrate && python manage.py collectstatic && gunicorn --workers 2 myproject.wsgi
Securely store the database secret in AWS Secrets Manager
AWS Secrets Manager helps you manage, retrieve, and rotate database credentials, API keys, and other secrets throughout their lifecycles. AWS App Runner allows us to inject secrets from AWS Secrets Manager during application runtime as environment variables. Follow this guide to create a new secret in AWS Secrets Manager.
For the secret’s key, input DATABASE_URL. For the value, define the database URL following the schema supported by dj-database-url as follows:
AWS Secrets Manager relies on AWS IAM to secure access to secrets. Therefore, you need to provide AWS App Runner the necessary permissions to access your newly created secret. AWS App Runner uses an instance role to provide permissions to AWS service actions that your service’s compute instances need. Follow this guide to create a new AWS IAM role in the AWS Management Console.
Add a trust policy that declares the AWS App Runner service principal tasks.apprunner.amazonaws.com as a trusted entity to the role:
{
  "Version": "2012-10-17",
  "Statement": [
    {
      "Effect": "Allow",
      "Principal": {
        "Service": "tasks.apprunner.amazonaws.com"
      },
      "Action": "sts:AssumeRole"
    }
  ]
}
As a best practice, limit the permissions afforded by the role to only the secret you created in AWS Secrets Manager identified by its Amazon Resource Name (ARN):
{
    "Version": "2012-10-17",
    "Statement": [
        {
            "Effect": "Allow",
            "Action": "secretsmanager:GetSecretValue",
            "Resource": "<Secret ARN>"
        }
    ]
}
Updating the AWS App Runner configuration
- Select your
django-apprunnerservice in the AWS App Runner console. Choose the Configuration - Next to Configure service, choose Edit.
- Under Security, for Instance role, select the
django-apprunner-roleAWS IAM role you created in the previous step. - Under Networking, for Outgoing network traffic, create a new VPC connector by choosing Add new.
- Select the default VPC and its subnets as well as the default security group. See Manage VPC access for details.
- Choose Save changes.
Your AWS App Runner service enters the Operation in progress state while the new configuration is being applied.
Once the service is back in the Running state, you can update apprunner.yaml to reference the secret stored in AWS Secrets Manager via its ARN (i.e., replace the ARN with your own value):
version: 1.0
runtime: python3
build:
  commands:
    build:
      - pip install -r requirements.txt
run:
  runtime-version: 3.8.16
  command: sh startup.sh
  network:
    port: 8000
  secrets:
    - name: DATABASE_SECRET
      value-from: "arn:aws:secretsmanager:eu-west-1:111122223333:secret:my-django-database-secret-kh2vEL"
Finally, push all updates to GitHub. Because you have automated deployments from GitHub enabled, AWS App Runner redeploys your service and your Django application connects to the PostgreSQL database.
Considerations for scaling Django on AWS App Runner
You have successfully deployed your Django application to an autoscaling compute layer with AWS App Runner and connected to a managed PostgreSQL database with Amazon RDS for PostgreSQL. Before beginning production use, consult the Django deployment checklist for guidance on further security and performance best practices that you must set up.
In addition, consider using Amazon Simple Storage Service (Amazon S3) for hosting static and media files, for example via the django-storages package. A content delivery network such as Amazon CloudFront enables you to securely deliver static content and media files with low latency and high transfer speeds to your users.
AWS App Runner automatically scales compute resources for your AWS App Runner service up and down based on its autoscaling configuration. This configuration defines the minimum and maximum number of provisioned instances for your service as the min size and max size. AWS App Runner increases and decreases the number of instances within this range based on the maximum number of concurrent requests per instance, the max concurrency. When the number of concurrent requests exceeds this limit, AWS App Runner scales up the service.
You can adjust the per-instance CPU and memory configuration for your AWS App Runner service from 0.25 vCPUs and 0.5 GB of RAM to 4 vCPUs and 12 GB of RAM, respectively. To run your application efficiently on AWS App Runner, adjust both the CPU and memory configuration and the max concurrency to fit your workload’s requirements and use load testing to validate your setup.
AWS App Runner uses AWS Fargate as the underlying compute engine to deploy instances of your application. Depending on how high you want to set the max size for your service, you need to adjust the Fargate On-Demand vCPU resource count quota via the Service Quotas console.
Cleaning up
To avoid incurring charges, delete any resources you created as part of this walkthrough that you no longer need:
- Delete the AWS App Runner service by selecting the
django-apprunnerservice in the AWS App Runner console. Choose Actions and Delete service. Confirm deletion. - Delete the Amazon RDS database instance by selecting the
django-apprunner-dbinstance in the Amazon RDS console. Choose Actions and Delete. Confirm deletion. - Delete the AWS Secrets Manager secret by selecting the
my-django-database-secretsecret in the AWS Secrets Manager console. Choose Actions and Delete secret. Confirm deletion. - Delete the AWS App Runner IAM role by selecting the
django-apprunner-rolerole in the IAM console. Choose Actions and Delete role. Confirm deletion.
Conclusion
In this post, we showed you how to deploy and scale a Django web application on AWS App Runner and how to securely connect to a managed database with Amazon RDS for PostgreSQL. AWS App Runner streamlines Django deployments from source code or container images by provisioning resources, auto-scaling containers to meet demand, and load balancing for high availability.
To learn more about managing AWS App Runner services, take a look at the AWS App Runner Developer Guide.
App Runner is constantly evolving based on your feedback. Consult the AWS App Runner roadmap on GitHub to see what we’re working on and keep an eye on the AWS Containers blog for news around AWS App Runner.