AWS Database Blog
Build microservices using Amazon Keyspaces and Amazon Elastic Container Service
In this post, we walk you through an example of how you can use Amazon Keyspaces (for Apache Cassandra) with Amazon Elastic Container Service (Amazon ECS) to modernize your existing Cassandra workloads. These services use open standards that allow customers to migrate their existing workloads to take advantage of these services’ fully managed capabilities and pay-per use pricing. By rehosting applications and leveraging current skillsets, organizations can improve return on investment for existing applications.
Further, Amazon Web Services (AWS) customers are increasingly interested in adopting cloud native architectures such as microservices to modernize their applications. Microservices are an architectural and organizational approach to software development in which software is composed of small, loosely coupled, independently deployable services that communicate over well-defined APIs. These services are typically owned by small, self-contained teams. Microservices architectures make applications easier to scale, reduce risk, and accelerate time-to-market for new features. Building microservices traditionally requires development and operations teams to build isolation between services through code or infrastructure. This can be a costly, complex, and time-consuming effort. For instance, to improve isolation, customers will separate large clusters that support multiple applications into smaller, separate clusters. This achieves isolation, but the utilization efficiency of a shared cluster is lost and custom software is needed to manage multiple clusters. This leads to the creation of centralized teams to manage and curate clusters, placing organizational dependencies on application development teams. Because of this complexity, not all teams that set out to build a microservices architecture achieve the desired results.
Amazon Keyspaces and Amazon ECS make it easier to build a microservices architecture and derive its benefits. Amazon Keyspaces and ECS provide granular levels of isolation through basic units of abstraction. Instead of shared resources pools like a cluster, you deploy independent tables and services that scale up and down automatically in response to application traffic. By migrating your workloads with Amazon Keyspaces and ECS, developers can focus on data models and access patterns rather than maintaining infrastructure.
Solution overview
The solution discussed in this post uses Amazon ECS with AWS Fargate to deploy microservices that read and write to Amazon Keyspaces tables. Amazon Keyspaces is a scalable, highly available, and managed Apache Cassandra-compatible database service used for data persistence at scale. Amazon ECS is a fully managed container orchestration service that you can use to deploy, manage, and scale containerized applications. Fargate is a serverless, pay-as-you-go compute engine that removes the need to own, run, and manage the lifecycle of a compute infrastructure so that you can focus on your applications.
By the end of this post, you will have an Amazon ECS Node.js application reading and writing to Amazon Keyspaces as shown in Figure 1 that follows.

Figure 1 – Application architecture
The application comprises a load-data task that is run once to load country data into an Amazon Keyspaces table at the start, and a query-api service that allows this data to be queried through a REST API. Access permissions for the load-data task and query-api service are controlled via ECS task roles that grant write and read access to Amazon Keyspaces.
To build the application, you start by deploying an ECS cluster and Amazon Keyspaces resources with AWS Cloud Formation. You then use Docker to build container images and upload them to Amazon Elastic Container Registry (Amazon ECR) repositories. Next, you run load-data as an ECS task to load the data. Finally, you deploy query-api as an ECS service, fronted by an Application Load Balancer.
Why use Amazon Keyspaces for microservices
With Amazon Keyspaces, you can run your Cassandra workloads on AWS with the same Cassandra application code and developer tools that you use today. Cassandra developers can use their skills to take advantage of a modern serverless architecture. In this solution, you use open source drivers to read, write, and create tables in Amazon Keyspaces.
Amazon Keyspaces, when used for microservices, has the benefit of table-level isolation and improved scale without losing efficiency. Traditionally, Apache Cassandra clusters deploy tables across a shared resource pool of cluster nodes. Deploying multiple tables in a single cluster improves efficiency by maintaining a steady and high rate of utilization. This presents a new challenge because a spike in traffic can impact the performance of neighboring tables. This means that teams must choose between efficiency and isolation when provisioning clusters. With Amazon Keyspaces, tables are independent, isolated resources that scale automatically in response to demand. A spike in traffic against an Amazon Keyspaces table won’t consume resources dedicated to other tables. Developers can create new tables in minutes without impacting existing production workloads. Additionally, Amazon Keyspaces is serverless, so you pay only for what you use. You can create tables as small or large as you need without losing efficiency. Teams can create and modify tables in a self-contained way without the heavy lifting of maintaining separate clusters. With improved table isolation, you can fully realize the benefits of building isolated microservices, allowing your teams to build more quickly with confidence.
Figure 2 that follows shows a comparison between a monolithic architecture on Apache Cassandra and a microservices architecture Amazon Keyspaces. On the left is a traditional Apache Cassandra deployment on Amazon Elastic Compute Cloud (Amazon EC2) using pooled resources to host multiple tables. On the right is the target state serverless model using Amazon Keyspaces and Amazon ECS running on Fargate to host multiple isolated microservices. The traditional model uses pooled resources and throughput is increased by scaling the number of instances in the groups and clusters. The target state uses a serverless approach that can scale ECS services and tables dynamically and independently with isolation.

Figure 2 – Comparison of Apache Cassandra application to an Amazon Keyspaces and ECS application
Getting started
Before you deploy the solution, you must have all of the necessary tools and have downloaded the sample project code.
Install prerequisite tools
Install the following tools on your workstation. These tools are used to build Docker images, create AWS resources, and deploy resources in the AWS Cloud.
- AWS Command Line Interface (AWS CLI) version 2. You’ll be using the AWS CLI with the profile and credentials for your AWS account. The credentials are used to access services used in the solution.
- Docker. Used to package applications as portable container images to publish to Amazon ECR.
- curl. A command line tool used to make REST calls to your microservice.
- Git. Get sample project code from the amazon-keyspaces-examples GitHub repository.
Download the sample project code
The sample project code is stored in the amazon-keyspaces-examples repository. This repository contains an official list of Amazon Keyspaces example code for many languages and implementation environments. The code for the solution in this post is stored in the nodejs/datastax-v4/ecs-sigv4 directory. To download the code, run the following command, which uses Git to clone the repository to your local host.
Deploy the CloudFormation template
Now that you’ve downloaded the sample project, you can deploy the AWS CloudFormation template located in cfn/Environment.yaml.
This CloudFormation template creates the following resources, shown in Figure 3 that follows:
- A virtual private cloud (VPC) with two public and two private subnets. The public subnets contain an Application Load Balancer while the private subnets host a private VPC endpoint for Amazon Keyspaces. Later in this post, you also use the private subnets to host your application’s Amazon ECS tasks.
- An ECS cluster into which the application tasks will be deployed. For this cluster, you will use Fargate serverless compute to deploy the tasks, so there’s no need to deploy any EC2 container instances for the cluster.
- Two AWS Identity and Access Management (IAM) roles with privileges for Amazon Keyspaces. One role is used to write to Amazon Keyspaces and the other role is used to read from Amazon Keyspaces. Later in the deployment, you attach these roles to ECS tasks with their respective responsibilities, so that each task demonstrates the principle of least privilege.
- An Amazon Keyspaces keyspace. A keyspace is a namespace that contains a collection of tables. Later in the deployment, you use an ECS task to dynamically create a table in this keyspace.
- Amazon Keyspaces VPC endpoint. Interface VPC endpoints enable private communication between your VPC and Amazon Keyspaces.

Figure 3 – Resources deployed by the CloudFormation template
You can use the AWS CLI to deploy a new stack with the provided template, and then use the CloudFormation console to monitor deployment of the stack.
To deploy the CloudFormation template
- Change the working directory to the
ecs-sigv4project - Run the following command from the root directory of the
ecs-sigv4project.
Note: The EnvironmentName parameter defines the Amazon ECS cluster name and the KeyspaceName parameter defines a new keyspace in Amazon Keyspaces. CAPABILITY_IAM is required when including AWS Identity and Access Management (IAM) resources in a CloudFormation template.
To monitor deployment of the stack
- Navigate to the CloudFormation console.
- Select the demo-infrastructure stack.
- Wait for the status to change to CREATE_COMPLETE.
- Select the Outputs pane to view the stack outputs. Your CloudFormation outputs pane should show the resources created by the CloudFormation template, as shown in Figure 4 that follows.

Define environment variables for working with ECS resources
You will need some of these stack outputs as you create, deploy, and test Amazon ECS resources. To make this easier, you can extract the stack outputs into environment variables.
To extract the stack outputs into environment variables
- Use the following AWS CLI command to retrieve the CloudFormation outputs into a text file named
cfn_vars.txt. The command contains a query that grabs the outputs and organizes them as a key-value pair. - The
cfn_vars.txtfile created in the previous step contains one stack output per line, with each line containing a key-value pair. Use the followingawkcommand line sequence to extract these outputs into environment variables. - Run the following command to add environment variables for your AWS Region and the account ID from your AWS configuration.
Note: Setting the AWS_PAGER environment variable to a blank string prints out the full output of the commands used in this post and automatically exits the AWS CLI.
Build and run the load-data ECS task
Now that you have your infrastructure deployed and environment variables set up, you can build and run the load-data task to create and populate a countries table in the geography_domain keyspace.
First, you create a Docker image using the Dockerfile in the sample project directory app/load-data. Then, you deploy this image to an Amazon ECR repository. Finally, you use the image to deploy a task to your Amazon ECS cluster using Fargate.
After being deployed, the task connects to Amazon Keyspaces using the open-source Node.js driver and the Amazon Keyspaces Sigv4 authentication plugin. The task then creates an Amazon Keyspaces table and watches for the table’s status to change to ACTIVE by periodically polling the system_schema_mcs.tables system table. When the table is active, the task inserts a few rows of data into the table. This data is then made available through the query_api service, which you deploy in a later step.
Build the load-data container image
The Dockerfile in app/load-data is reproduced below. As the application is written in Node.js, it uses node:bullseye-slim as a base image. It then copies in the application files, installs the required Node.js package dependencies, and copies in a root certificate, which is needed by the Cassandra driver.
You can use the Dockerfile to build a Docker image. You then need to push the image into a new ECR repository to make it available for use in your ECS cluster.
To build the load-data container image
- Run the following Docker command to build the Docker image. The -t parameter adds a tag name to the image when it is built.
- Run the following command to log in to ECR from the Docker CLI by fetching the current ECR credentials. This step enables you to push the images into the ECR repository created in the next step. This command uses the environment variables set up in the previous step.
- Run the following command to create a new ECR repository, add a tag, and push the container image to the ECR repository. The repository will hold your
load-datacontainer image.
Deploy an ECS task to Fargate
Now that you have the container image in an Amazon ECR repository, you can use the image when deploying an Amazon ECS task to your ECS cluster running on Fargate.
You first need to create a task definition file for the load-data container, and register the task definition with ECS. When done, you can reference this definition to deploy a load-data task in your ECS cluster.
To deploy the ECS task to Fargate
- Run the following
catcommand to create a new file namedload-data-taskdef.json. Note that the template below contains variables that are automatically substituted with values that were defined as environment variables in the previous procedure. - Run the following command to register the task definition based on the properties in the
load-data-taskdef.jsonfile created in the previous step. - Use the following command to run the task using Fargate.
Verify that the data has been created in Amazon Keyspaces
The load-data task creates a table named countries in the geography_domain keyspace, waits for table creation to complete, and populates it with some country data. You can monitor the progress of the task in the Amazon ECS console. When the task has completed, you can use the Amazon Keyspaces console to verify that the table exists and to query the table.
To query the table using the Amazon Keyspaces console
- Navigate to the Amazon Keyspaces service page in the AWS console.
- From the menu bar on the left, select CQL Editor.
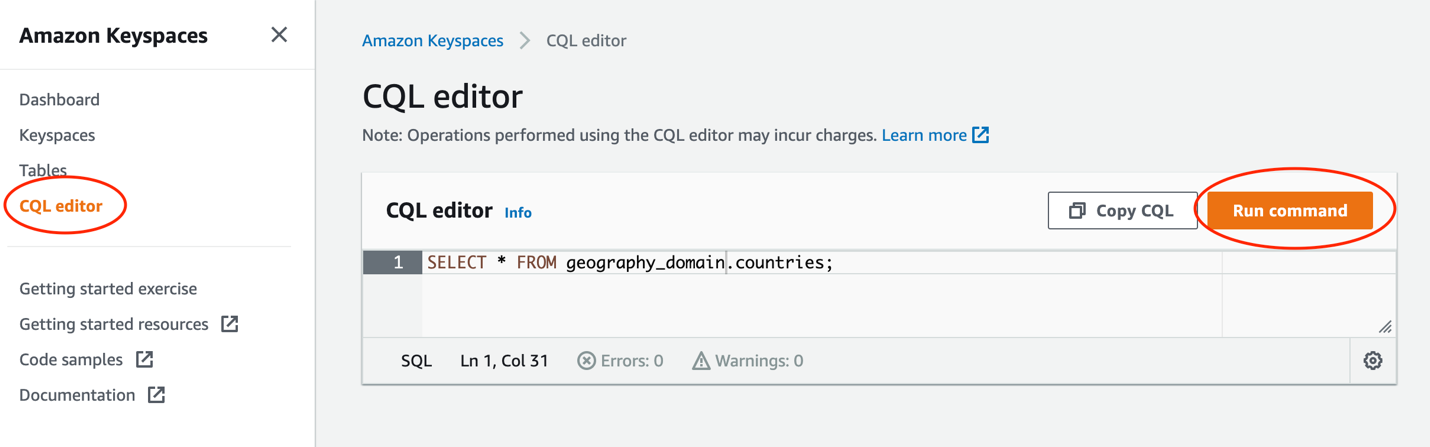
Figure 5 – CQL editor
- Enter
SELECT * FROM geography_domain.countriesin the CQL editor field and select Run command to view the table data. - Verify that five records are returned.

Figure 6 – Query results showing five records returned.
Build and run REST API server
With the data in place, you can now create a query-api service that makes the data available via a REST API.
First, you create a Docker image using the Dockerfile in the sample project directory app/query-api. You then deploy this image to an Amazon ECR repository and use it to deploy a query-api service to your Amazon ECS cluster using Fargate. Finally, you test the service by sending some HTTP requests to it.
After being deployed, the query-api service connects to Amazon Keyspaces using the Node.js Cassandra driver and the Amazon Keyspaces SigV4 authentication plugin. The service then runs an HTTP server to receive and respond to API requests.
query-api offers a REST API that can be used to query the countries table that you created previously. The service supports the following resource paths:
/ping: simple HTTP ping that can be used as a health check/countries: lists all countries in the table (in JSON)/countries/xx: shows details for country whose country code is xx (in JSON)
The optional query parameter ?pretty can be used to prettify the JSON output.
To build the query-api container image and push to ECR
- Run the following command to build the
query-apicontainer image: - Run the following command to create an ECR repo, and then tag and push the image:
Deploy query-api ECS service using Fargate
You can now use the query-api container image to deploy an Amazon ECS service to your ECS cluster running on Fargate. As before, you first need to create a task definition file for the query-api container, and register the task definition with ECS. After this is done, you can reference this definition to deploy a query-api service in your ECS cluster.
To deploy the query-api ECS service to Fargate
- Run the following
catcommand to create a new file namedapi-query-taskdef.json. Note that the template below contains variables which are automatically substituted with values that were defined as environment variables in an earlier step. The command line parameters supplied to the container (in thecommandattribute) include the region, keyspace name, and table name. - As before, after you’ve created the file
api-query-taskdef.json, you can register the task definition with ECS using the following command: - You can now run the service on Fargate using the
ecs create-servicecommand. The following command instructs ECS to run the service with two tasks. Thecreate-servicecall also assigns the application load balancer and the target subnets that were created earlier as part of the CloudFormation infrastructure stack. - It takes about 30 seconds for the service to be deployed. When deployment is complete, you can verify that the service is available by accessing the health-check endpoint using the following curl command. The
EXTERNAL_URLis an output of the CloudFormation stack and is the address of the application load balancer. Optionally, you can monitor the deployment of the ECS service through the ECS console.
Test the query-api service
After you’ve verified that the service is running, test the service endpoint using the following curl command. The command uses the REST service hosted from the query-api-server task. The task performs a query against the geography_domain.countries table for the rows where us is the primary key value.
To test the query-api service
- Start by running the following command.
- You should get the following JSON payload containing the row data for the
uspartition. - Return all of the rows in the table by running the following
RESTcall. This information should match the data viewed in the CQL editor in the previous steps.
Cleaning up
Make sure you don’t forget to delete the resources you’ve used when you’re done experimenting with the demo. You need to stop and remove all ECS services running in the ECS cluster and the ECR repositories that contain the Docker images used to package the applications. You must also remove the CloudFormation stack, which will remove the ECS cluster, Amazon Keyspaces keyspace, VPC, VPC endpoints, load balancer, and IAM roles.
To clean up
- Stop and remove all ECS services running in the ECS cluster.
- Delete the ECR repositories containing the Docker images used to package the application.
- Delete the demo-infrastructure CloudFormation stack.
Note: To provide an audit trail and to support security best practices, ECS task definitions are immutable. They can be deregistered but not deleted. You can deregister the ECS task definition from the ECS console. You are not charged for ECS task definitions.
Conclusion
In this post, we’ve shown how you can implement an isolated and scalable microservices pattern using Amazon Keyspaces and Amazon ECS. These fully managed services allow developers to offload the management, maintenance, and scaling activities of the underlying infrastructure, allowing them to focus on delivering differentiating features. With Amazon Keyspaces and ECS, you can use open standards to rehost existing applications, while using the service capabilities to modernize the applications and to realize the benefits of microservices architecture.
For further guidance on how to build microservices on AWS see AWS Microservices.
About the Authors
 Michael Raney is a Senior Specialist Solutions Architect based in New York and leads the field for Amazon Keyspaces. He works with customers to modernize their legacy database workloads to a serverless architecture. Michael has spent over a decade building distributed systems for high scale and low latency.
 Mike Rizzo is an AWS Senior Solutions Architect based in London, UK, where he works with digital-native businesses. He has a keen interest in microservices architectures and using containers and serverless technologies to realize these in the cloud. In his spare time, you’ll find him running and cycling around the Suffolk countryside, cooking Maltese food, and playing Fortnite!