AWS Database Blog
Performing analytics on Amazon Managed Blockchain
February 9, 2024: Amazon Kinesis Data Firehose has been renamed to Amazon Data Firehose. Read the AWS What’s New post to learn more.
August 30, 2023: Amazon Kinesis Data Analytics has been renamed to Amazon Managed Service for Apache Flink. Read the announcement in the AWS News Blog and learn more.
Data analytics is critical in making strategic decisions in your organization. You use data analytics in forecasting inventory levels, quarterly sales predictions, risk modelling, and more. With Amazon Managed Blockchain, blockchain goes further by providing trusted analytics, in which user activity is verifiable, secure, and immutable for all permissioned users on a network.
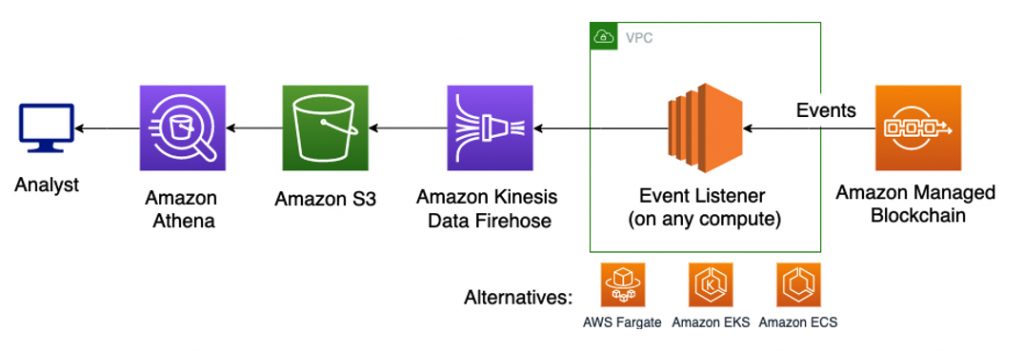
Managed Blockchain follows an event-driven architecture. We can open up a wide range of analytic approaches by streaming events to Amazon Kinesis. For instance, we could analyze events in near-real time with Kinesis Data Analytics, perform petabyte scale data warehousing with Amazon RedShift, or use the Hadoop ecosystem with Amazon EMR. This allows us to use the right approach for every blockchain analytics use case.
In this post, we show you one approach that uses Amazon Kinesis Data Firehose to capture, monitor, and aggregate events into a dataset, and analyze it with Amazon Athena using standard SQL.
After setting up the system, we show a SQL query in a simple banking use case to generate a ranking of accounts whose transaction exceeds $1M, but with an exclusion policy that cross-references an allowed “off-chain” database.
Solution overview
The following diagram illustrates an event-driven architecture that transforms data from a peer node that prepares a series of services for analytics.
Prerequisites
This post assumes that you’ve already built and deployed a Managed Blockchain application, and want to extend its capabilities to include analytics.
If you’re just getting started, our Track-and-Trace Blockchain Workshop or tutorial Build and deploy an application for Hyperledger Fabric on Amazon Managed Blockchain can teach you how to build a Managed Blockchain application step by step. This post focuses on work that’s critical in preparing a production application before you launch and go to market.
To complete this walkthrough, you need the following prerequisites:
- An AWS account
- An existing Managed Blockchain application configured with Hyperledger Fabric
- The following node.js libraries: aws-sdk (>= 2.580), fabric-client (^ 1.4)
- Basic knowledge of node.js and JavaScript, writing chaincode, setting up users with fabric-ca-client, and setting up any one of the Amazon compute services, such as the following:
- Amazon Elastic Compute Cloud (Amazon EC2)
- Amazon Elastic Container Service (Amazon ECS)
- Amazon Elastic Kubernetes Service (Amazon EKS)
Defining and sending events
Blockchain can be viewed as a new type of shared database without a central authority. Users interact via programs called smart contracts (or chaincode). You can query or invoke a chaincode on each call, or subscribe and receive streaming data under a single connection.
Blockchain networks send events for external programs to consume when activity occurs on the network. In Fabric, events are produced as new blocks are added into a channel’s ledger. You can process new blocks as one of three event types: block, transaction, or chaincode.
The event types compose each other. A block event is a deeply nested structure that contains a set of transactions and metadata. The transaction event composes a user-defined payload that makes up the chaincode event.
Chaincode events are useful in analytics application because it can include arbitrary information. This enables us to expose specific behaviors or values that we can use in off-chain analytics applications.
The following example code shows how user-defined payload is included in a chaincode event and sent out in a simple banking application involving payment:
After the contract is deployed, you can run any compute service (such as Amazon EC2, Amazon ECS, or Amazon EKS) to register your external programs to process events coming in.
These programs act as event listeners. Unlike what the name may suggest, it isn’t actively polling any events; it’s merely a function or method that is subscribed to an event. When the event occurs, the listener method gets called. This way, there’s no cost until the event actually occurs and we begin processing.
In this post, we show an example of this using a node.js program.
Processing events
To process events, we can use the libraries available under the Fabric SDK.
The Fabric SDK for Node.js has three libraries to interact with a peer node on a channel:
- fabric-network – The recommended API for applications where only submitting transactions and querying a peer node is enough.
- fabric-ca-client – Used to manage users and their certificates.
- fabric-client – Used to manage peer nodes on the channel and monitor events. We use this library to process events.
To batch events into a dataset for analytics, we use the AWS SDK to access the Kinesis Data Firehose APIs for aggregation into Amazon S3. Each library provides object interfaces—ChannelEventHub and Firehose, respectively—to perform the operation.
In the next few sections, we show you sample code that walks through three major steps. When complete, your architecture should look like the following diagram.
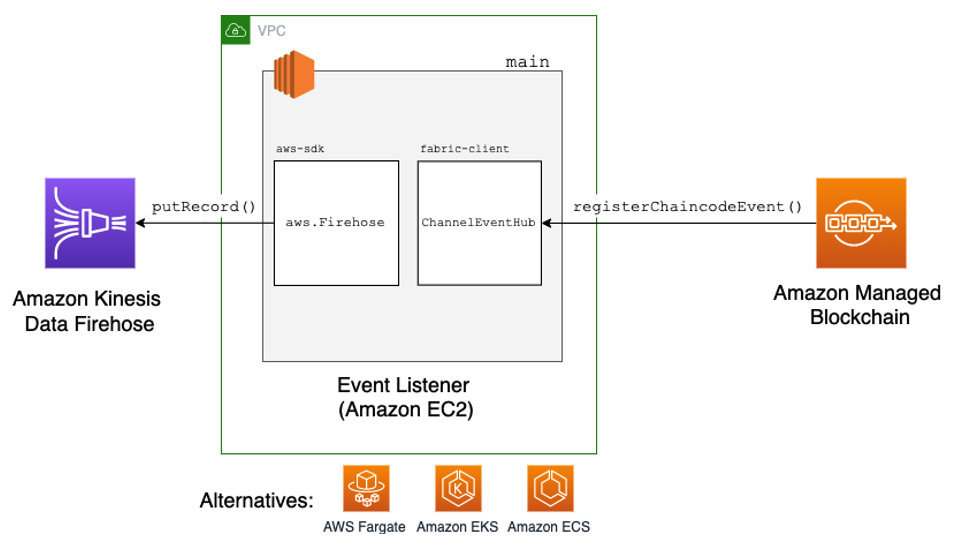
In this diagram, main represents our node.js program that’s receiving chaincode events from peer nodes on the channel. We use two libraries, aws-sdk and fabric-client, to import and instantiate two classes, Firehose and ChannelEventHub, to do the heavy lifting.
Initializing APIs from existing libraries
To access the ChannelEventHub, your node.js client must be able to interact with the network channel. You can do so through the Fabric client by loading up a connection profile. You can either use your existing connection profile (the one used for your end-user application) or create a new one that specifies which peer nodes to listen on.
The following code demonstrates how to set up your program with a logical gateway and extract the ChannelEventHub.
To authorize our client, you need to register and enroll a Fabric user with the permissions to access the network channel, otherwise getUserContext returns empty. You can do so with the fabric-ca-client CLI or use the fabric-client in the following code to do so:
In your connection profile, you must ensure that there are peers defined that can perform the eventSource role. See the following code:
In addition, we need access to Kinesis Data Firehose to deliver event streams to Amazon S3. We create another helper function to provide the API:
Now, on to the main function.
Establishing connection
In the next code example, we call on the ChannelEventHub to connect with the peer nodes on our network channel and specify what data we want to ingest. In Fabric, the client must specify whether to receive full or filtered blocks, which informs the peer node whether to drop or keep the payload field. For our use case, we want to ingest full blocks to process the payment details. See the following code:
Registering a chaincode event listener
Next, we transform the chaincode event into our desired input format. For this use case, we store the data in JSON format in Amazon S3, which Athena accepts as input. See the following code:
Using ChannelEventHub, we register an event listener that fires a callback function when a bank-payments event is sent from the LocalBank chaincode.
If your listener experiences downtime and you want to process missed events, you can replay blocks by reconfiguring the connection parameters. For more information, see fabric-client: How to use the channel-based event service.
The chaincode event structure looks like the following code:
To process the payload, we need to reverse the operations it came in. Then we format the data into an input for Kinesis Data Firehose to ingest.
Kinesis Data Firehose buffers records before delivering them to the destination. To disambiguate the data blobs at the destination, we use a newline (\n) as the delimiter.
Finally, we send records as they come using putRecord() and provide success and failure callbacks.
Creating a Kinesis Data Firehose delivery stream
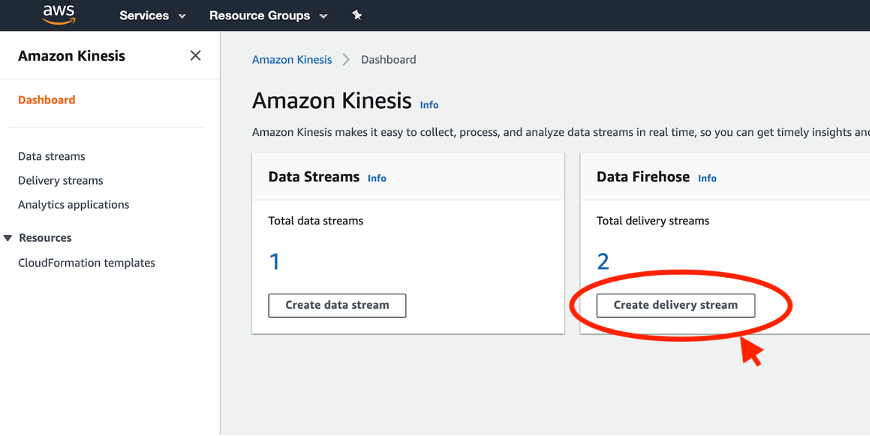
We can use Kinesis Data Firehose to deliver streaming events to an Amazon S3 destination without needing to write applications or manage resources. You can complete these steps either via the Kinesis console or AWS Command Line Interface (AWS CLI). For this post, we show you the process on the console.
- On the Kinesis console, under Data Firehose, choose Create delivery stream.
- For Delivery stream name, enter
bank-payments.
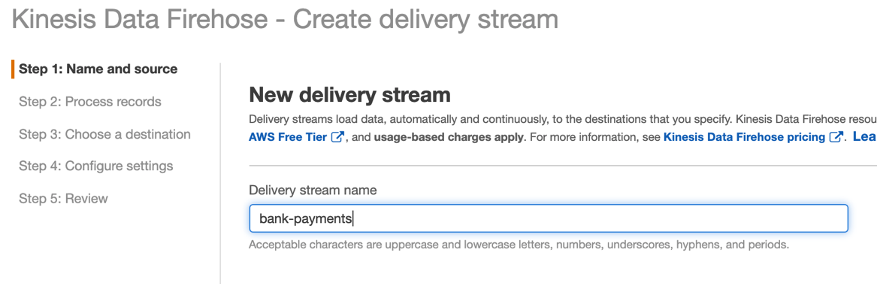
- For Source, select Direct PUT or other sources (we use the PUT APIs from the SDK).
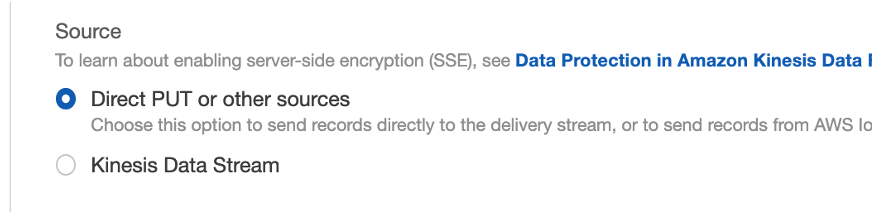
- As an optional choice, enable server-side encryption for source records in the delivery stream.
- Choose Next.
- As an optional choice, enable data transformation or record format conversion, if necessary.
- Choose Next.
- For Destination, select Amazon S3.
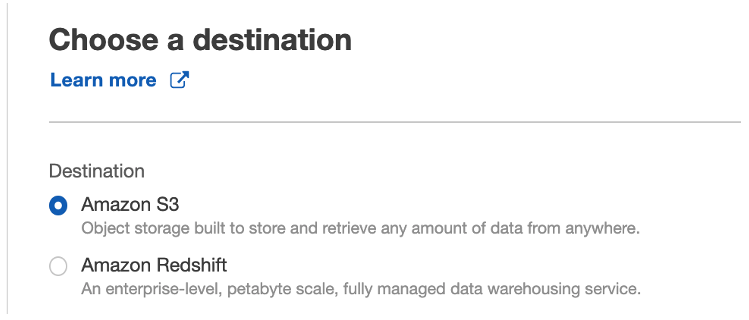
- For S3 bucket, enter or create a new S3 bucket to deliver our data to (for this post, we use
bank-payments-analytics).

- As an optional choice, demarcate your records with prefixes.
- Choose Next.
- Configure buffering, compression, logging, and AWS Identity and Access Management (IAM) role settings for your delivery stream.
- Choose Next.
- Choose Create delivery stream.
If all goes well, you should be able to invoke Pay transactions and see the traffic on the Kinesis Data Firehose console (choose the stream and look on the Monitoring tab). In addition, you should see the objects stored in your Amazon S3 destination.
Analyzing data with Athena
With data to work with, we can now analyze it using Athena by running ANSI SQL queries. SQL compatibility allows us to use a well-understood language that integrates with a wide range of tools, such as business intelligence (BI) and reporting. With Athena, we can also join the data we obtained from Managed Blockchain with off-chain data to gain insights.
To begin, we need to register Amazon S3 as our data source and specify the connection details.
- On the Athena console, choose Data sources.
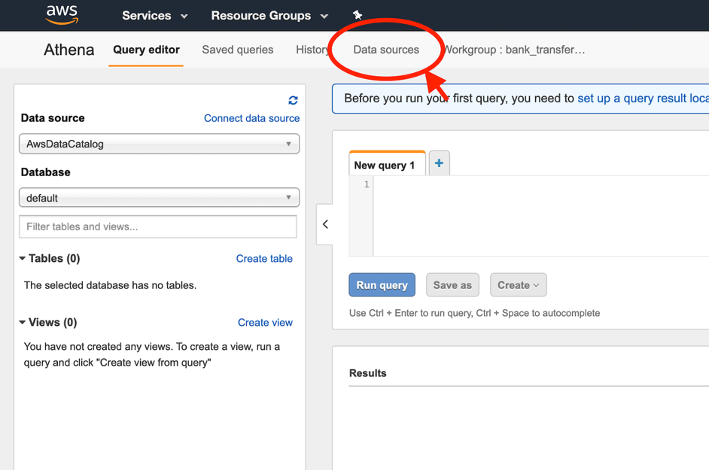
- Choose Query data in Amazon S3 for where the data is stored.
- Choose AWS Glue Data Catalog as the metadata catalog.
- Choose Next.
- For Connection Details, choose Add a table.
- Enter your schema information.
For large-scale data, it’s worth considering setting up a crawler instead.
- For Database, choose Create a new database.
- Name your database
LocalBank. - For Table Name, enter
bank_payments. - For Location of Input Data Set, enter
s3://bank-payments-analytics.

- Choose Next.
- For Data Format, choose JSON.
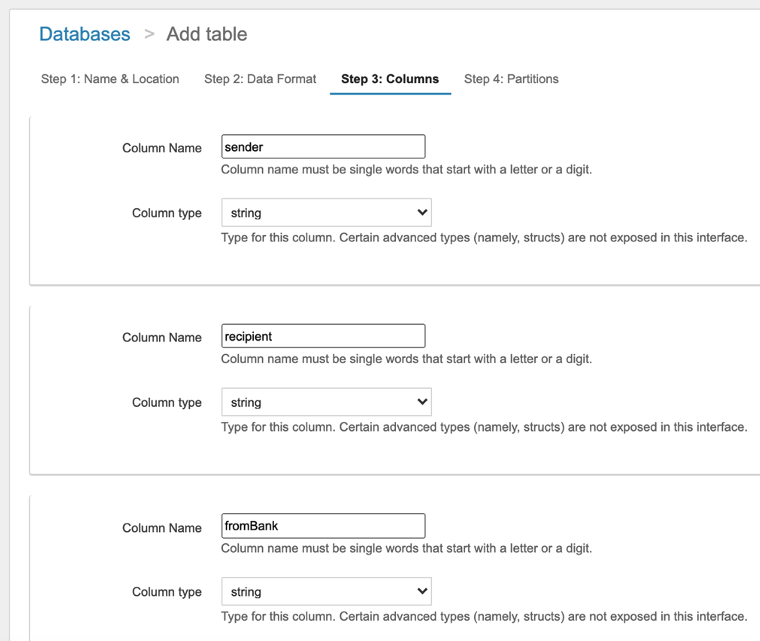
- For Column Name and Column type, define the schema for your data. For this post, we create the following columns with the string column type:
senderrecipientfromBank
- As an optional choice, add a partition (or virtual column) to your database.
- Choose Create table.
Before you run your first query, you may need to set up a query result location in Amazon S3. For instructions, see Working with Query Results, Output Files, and Query History. When that’s complete, on the Athena Query Editor, you can write SQL queries and run them against your Amazon S3 data source.
To show an example, let’s imagine we have an off-chain relational database (connected to Athena) called whitelist that contains an accounts table with column id matching those found in our bank_payments table.
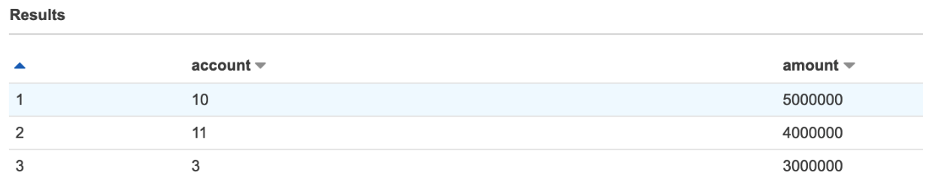
Our goal is to generate a ranking of accounts whose transaction exceeds $1M, but that also excludes those accounts listed in whitelist.
The following code is the example query:
To produce the collection of records only in localbank.bank_payments but not in whitelist.accounts, we perform a left outer join, then exclude the records we don’t want from the right side with a WHERE clause.
In a left outer join, a complete set of records is produced from bank_payments, with matching records (where available) in accounts. If there is no match, the right side contains null.
The following screenshot shows our results.
Summary
This post demonstrated how to build analytics for your Managed Blockchain data. We can easily capture, monitor, and aggregate the event stream with Kinesis Data Firehose, and use Athena to analyze the dataset using standard SQL.
Realistically, you need the ability to merge multiple data sources into a consolidated stream or single query. Kinesis Data Firehose provides additional features to run data transformations via Amazon Lambda, where additional calls can be made (and with error-handling). An analyst can also use federated queries in Athena to query multiple data sources (other than Amazon S3) with a single query. For more information, see Query any data source with Amazon Athena’s new federated query.
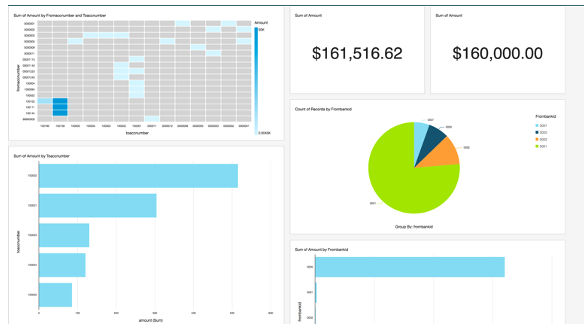
To visualize data, Amazon QuickSight also provides easy integration with Athena that you can access from any device and embed into your application, portals, and websites. The following screenshot shows an example of a QuickSight dashboard.
Please share your experiences of building on Managed Blockchain and any questions or feature requests in the comments section.
About the authors
 Kel Kanhirun is a Blockchain Architect at AWS based in Seattle, Washington. He’s passionate about helping creators build products that people love and has been in the software industry for over 5 years.
 Dr. Jonathan Shapiro-Ward is a Principal Solutions Architect at AWS based in Toronto. Jonathan has been with AWS for 3.5 years and in that time has worked helping customers solve problems including petabyte scale analytics and the adoption of ML, serverless, and blockchain. He has spoken at events across the world where he focused on areas of emerging technology. Jonathan has previously worked in a number of industries including gaming and fintech and has a background in academic research. He holds a PhD in distributed systems from the University of St Andrews.