Artificial Intelligence
Build an anomaly detection model from scratch with Amazon Lookout for Vision
A common problem in manufacturing is verifying that products meet quality standards. You can use manual inspection on a subset of the products, but it’s usually not scalable enough to meet demand as production grows. In this post, I go through the steps of creating an end-to-end machine vision solution that identifies visual anomalies in products using Amazon Lookout for Vision. I’ll show you how to train a model that performs anomaly detection, use the model in real-time, update the model when new data is available, and how to monitor the model.
Solution overview
Imagine a factory producing LEGO® bricks. The bricks are transported on a conveyor belt in front of a camera that determines if they meet the factory’s quality standards. When a brick on the belt breaks a light beam, the device takes a photo and sends it to Amazon Lookout for Vision for anomaly detection. If a defective brick is identified, it’s pushed off the belt by a pusher.
The following diagram illustrates the architecture of our anomaly detection solution, which uses Amazon Lookout for Vision, Amazon Simple Storage Service (Amazon S3), and a Raspberry Pi.

Amazon Lookout for Vision is a machine learning (ML) service that uses machine vision to help you identify visual defects in products without needing any ML experience. It uses deep learning to remove the need for carefully calibrated environments in terms of lighting and camera angle, which many existing machine vision techniques require.
To get started with Amazon Lookout for Vision, you need to provide data for the service to use when training the underlying deep learning models. The dataset used in this post consists of 289 normal and 116 anomalous images of a LEGO brick, which are hosted in an S3 bucket that I have made public so you can download the dataset.
To make the scenario more realistic, I’ve varied the lighting and camera position between images. Additionally, I use 20 test images and 9 new images to update the model later on with both normal and anomalous images. The anomalous images were created by drawing on and scratching the brick, changing the brick color, adding other bricks, and breaking off small pieces to simulate production defects. The following image shows the physical setup used when collecting training images.

Pre-requisites
To follow along with this post, you’ll need the following:
- An AWS account to train and use Amazon Lookout for Vision
- A camera (for this post, I use a Pi camera)
- A device that can run code (I use a Raspberry Pi 4)
Train the model
To use the dataset when training a model, you first upload the training data to Amazon S3 and create an Amazon Lookout for Vision project. A project is an abstraction around the training dataset and multiple model versions. You can think of a project as a collection of the resources that relate to a specific machine vision use case. For instance, in this post, I use one dataset but create multiple model versions as I gradually optimize the model for the use case with new data, all within the boundaries of one project.
You can use the SDK, AWS Command Line Interface (AWS CLI), and AWS Management Console to perform all the steps required to create and train a model. For this post, I use a combination of the AWS CLI and the console to train and start the model, and use the SDK to send images for anomaly detection from the Raspberry Pi.
To train the model, we complete the following high-level steps:
- Upload the training data to Amazon S3.
- Create an Amazon Lookout for Vision project.
- Create an Amazon Lookout for Vision dataset.
- Train the model.
Upload the training data to Amazon S3
To get started, complete the following steps:
- Download the dataset to your computer.
- Create an S3 bucket and upload the training data.
I named my bucket l4vdemo, but bucket names need to be globally unique, so make sure to change it if you copy the following code. Make sure to keep the folder structure in the dataset, because Amazon Lookout for Vision uses it to label normal and anomalous images automatically based on folder name. You could use the integrated labeling tool on the Amazon Lookout for Vision console or Amazon SageMaker Ground Truth to label the data, but the automatic labeler allows you to keep the folder structure and save some time.
Create an Amazon Lookout for Vision project
You’re now ready to create your project.
- On the Amazon Lookout for Vision console, choose Projects in the navigation pane.
- Choose Create project.
- For Project name, enter a name.
- Choose Create project.

Create the dataset
For this post, I create a single dataset and import the training data from the S3 bucket I uploaded the data to in Step 1.
- Choose Create dataset.
- Select import images from S3 bucket.
- For S3 URI, enter the URI for your bucket (for this post, s3://l4vdemo/, but make sure to use the unique bucket name you created).

- For Automatic labeling, select Automatically attach labels to images based on the folder name.
This allows you to use the existing folder structure to infer whether your images are normal or anomalous.
- Choose Create dataset.

Train the model
After we create the dataset, the number of labeled and unlabeled images should be visible in the Filters pane, as well as the number of normal and anomalous images.
- To start training a deep learning model, choose Train model.

Model training can take a few hours depending on the number of images in the training dataset.
- When training is complete, in the navigation pane, chose Models under your project.
You should see the newly created model listed with a status of Training complete.
- Choose the model to see performance metrics like precision, recall and F1 score, training duration, and more model metadata.

Use the model
Now that a model is trained, let’s test it on data it hasn’t seen before. To use the model, you must first start hosting it to provision all backend resources required to perform real-time inference.
When starting the model hosting, you pass both project name and model version as arguments to identify the model. You also need to specify the number of inference units to use; each unit enables approximately five requests per second.
To use the hosted model, use the detect-anomalies command and pass in the project and model version along with the image to perform inference on:
The dataset we use in this post contains 20 images, and I encourage you to test the model with different images.
When performing inference on an anomalous brick, the response could look like the following:
Keep in mind that you’re charged for the model as long as it’s running, so stop it when you no longer need it:
Update the model
As new data becomes available, you may want to maintain or update the model to accommodate for new types of defects and increase the model’s overall performance. The dataset contains nine images in the new-data folder, which I use to update the model. To update an Amazon Lookout for Vision model, you run a trial detection and verify the machine predictions to correct the model predictions, and add the verified images to your training dataset.
Run a trial detection
To run a trial detection, complete the following steps:
- On the Amazon Lookout for Vision console, under your model in the navigation pane, choose Trial detections.
- Choose Run trial detection.
- For Trial name, enter a name.
- For Import images, select Import images from S3 bucket.
- For S3 URI, enter the URI of the new-data folder that you uploaded in Step 1 of training the model

- Choose Run trial
Verify machine predictions
When the trial detection is complete, you can verify the machine predictions.
- Choose Verify machine predictions.
- Select either Correct or Incorrect to label the images

- When all the images have been labeled, choose Add verified images to dataset.
This updates your training dataset with the new data.
Retrain the model
After you update your training dataset with the new data, you can see that the number of labeled images in your dataset has increased, along with the number of verified images.
- Choose Train model to train a new version of the model.

- When the new model is training, on the Models page, you can verify that a new model version is being trained. When the training is complete, you can view model performance metrics on the Models page and start using the new version.

Anomaly detection application
Now that I’ve trained my model, let’s use it with the Raspberry Pi to sort LEGO bricks. In this use case, I’ve set up a Raspberry Pi with a camera that gets triggered whenever a break beam sensor senses a LEGO brick. We use the following code:
Monitoring the model
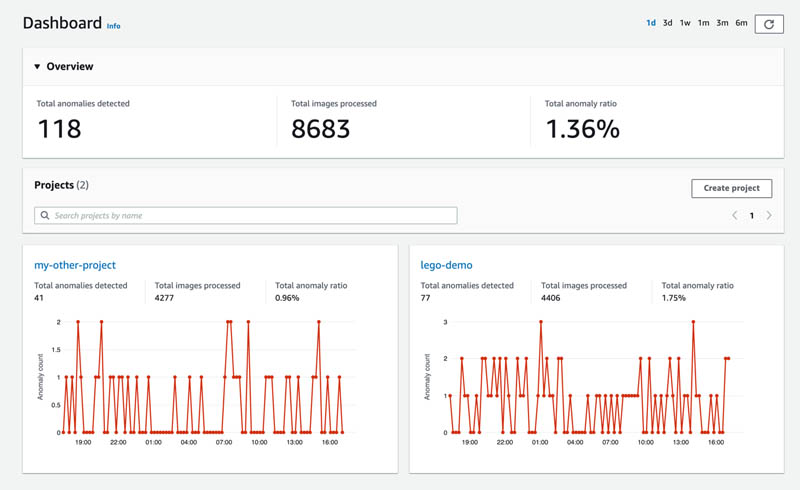
When the system is up and running, you can use the Amazon Lookout for Vision dashboard to visualize metadata from the projects you have running, such as the number of detected anomalies during a specific time period. The dashboard provides an overview of all current projects, as well as aggregated information like total anomaly ratio.
Pricing
The cost of the solution is based on the time to train the model and the time the model is running. You can divide the cost across all analyzed products to get a per-product cost. Assuming one brick is analyzed per second nonstop for a month, the cost of the solution, excluding hardware and training, is around $0.001 per brick, assuming we’re using 1 inference unit. However, if you increase production speed and analyze five bricks per second, the cost is around $0.0002 per brick.
Conclusion
Now you know how to use Amazon Lookout for Vision to train, run, update, and monitor an anomaly detection application. The use case in this post is of course simplified; you will have other requirements specific to your needs. Many factors affect the total end-to-end latency when performing inference on an image. The Amazon Lookout for Vision model runs in the cloud, which means that you need to evaluate and test network availability and bandwidth to ensure that the requirements can be met. To avoid creating bottlenecks, you can use a circuit breaker in your application to manage timeouts and prevent congestion in case of network issues.
Now that you know how to train, test and use and update an ML model for anomaly detection, try it out with your own data! To get further details about Amazon Lookout for Vision, please visit the webpage!
About the Authors
 Niklas Palm is a Solutions Architect at AWS in Stockholm, Sweden, where he helps customers across the Nordics succeed in the cloud. He’s particularly passionate about serverless technologies along with IoT and machine learning. Outside of work, Niklas is an avid cross-country skier and snowboarder as well as a master egg boiler.