Artificial Intelligence
How to run distributed training using Horovod and MXNet on AWS DL Containers and AWS Deep Learning AMIs
Distributed training of large deep learning models has become an indispensable way of model training for computer vision (CV) and natural language processing (NLP) applications. Open source frameworks such as Horovod provide distributed training support to Apache MXNet, PyTorch, and TensorFlow. Converting your non-distributed Apache MXNet training script to use distributed training with Horovod only requires 4-5 lines of additional code. Horovod is an open-source distributed deep learning framework created by Uber. It leverages efficient inter-GPU and inter-node communication methods such as NVIDIA Collective Communications Library (NCCL) and Message Passing Interface (MPI) to distribute and aggregate model parameters between workers. The primary use case of Horovod is to make distributed deep learning fast and easy: to take a single-GPU training script and scale it successfully to train across many GPUs in parallel. For those unfamiliar with using Horovod and Apache MXNet for distributed training, we recommend first reading our previous blog post on the subject before diving into this example.
MXNet is integrated with Horovod through the common distributed training APIs defined in Horovod. You can convert the non-distributed training script to a Horovod world by following the higher level code skeleton. This is a streamlined user experience where the user only has to add few lines of code to make it Horovod compatible. However, other pain points may still make distributed training not flow as smoothly as expected. For example, you may need to install additional software and libraries and resolve your incompatibilities to make distributed training works. Horovod requires a certain version of Open MPI, and if you want to leverage high-performance training on NVIDIA GPUs, you need to install a NCCL library. Another pain point you may encounter is when trying to scale up the number of training nodes in the cluster. You need to make sure all the software and libraries in the new nodes are properly installed and configured.
AWS Deep Learning Containers (AWS DL Containers) has greatly simplified the process of launching new training instances in a cluster, and the latest release includes all the required libraries to run distributed training using MXNet with Horovod. The AWS Deep Learning AMIs (DLAMI) comes with popular open-source deep learning frameworks and pre-configured CUDA, cuDNN, Open MPI, and NCCL libraries.
In this post, we demonstrate how to run distributed training using Horovod and MXNet via AWS DL Containers and the DLAMIs.
Getting started with AWS DL Containers
AWS DL Containers are a set of Docker images pre-installed with deep learning frameworks to make it easy to deploy custom machine learning (ML) environments quickly. The AWS DL Containers provide optimized environments with different deep learning frameworks (MXNet, TensorFlow, PyTorch), Nvidia CUDA (for GPU instances), and Intel MKL (for CPU instances) libraries, and are available in Amazon Elastic Container Registry (Amazon ECR). You can launch AWS DL Containers on Amazon Elastic Kubernetes Service (Amazon EKS), self-managed Kubernetes on Amazon Elastic Compute Cloud (Amazon EC2), and Amazon Elastic Container Service (Amazon ECS). For more information about launching AWS DL Containers, follow this link.
Training an MXNet model with Deep Learning Containers on Amazon EC2
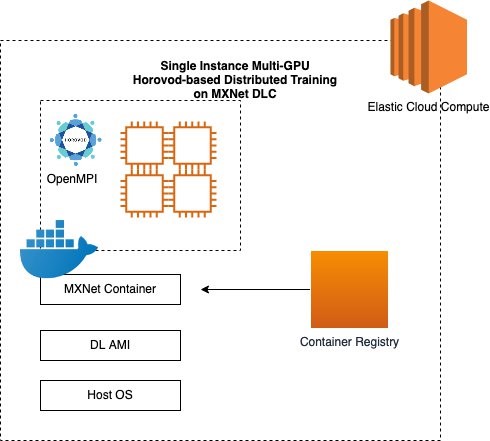
The MXNet Deep Learning Container comes with pre-installed libraries such as MXNet, Horovod, NCCL, MPI, CUDA, and cuDNN. The following diagram illustrates this architecture.
For instructions on setting up AWS DL Containers on an EC2 instance, see: Train a Deep Learning model with AWS Deep Learning Containers on Amazon EC2. For a hands-on tutorial running a Horovod training script, complete steps 1-5 of the preceding post. To use an MXNet framework, complete the following for step 6:
CPU:
- Download the Docker image from Amazon ECR repository.
- In the terminal of the container, run the following command to train the MNIST example.
- In the terminal of the container, run the following command to train the MNIST example.
If the final output looks like the following code, you successfully ran the training script:
For instructions on ending the EC2 instances, execute the step 7 of the preceding post. One can follow the same steps as described above for their own training script.
Training a MXNet model with Deep Learning Containers on Amazon EKS
Amazon EKS is a managed service that makes it easy for you to run Kubernetes on AWS without needing to install, operate, and maintain your own Kubernetes control plane or nodes. Kubernetes is an open-source system for automating the deployment, scaling, and management of containerized applications. In this post, we show you how to set up a deep learning environment using Amazon EKS and AWS DL Containers. With Amazon EKS, you can scale a production-ready environment for multiple-node training and inference with Kubernetes containers.
The following diagram illustrates this architecture:

For instructions on setting up a deep learning environment with Amazon EKS and AWS DL Containers, see Amazon EKS Setup. To set up an Amazon EKS cluster, use the open-source tool called eksctl. It is recommended to use an EC2 instance with the latest DLAMI. You can spin up a GPU cluster or CPU cluster based on your use case. For this post, follow the Amazon EKS Setup instructions until the Manage Your Cluster section.
When your Amazon EKS cluster is up and running, you can run the Horovod MXNet training on the cluster. For instructions, see MXNet with Horovod distributed GPU training, which uses a Docker image that already contains a Horovod training script and a three-node cluster with node-type=p3.8xlarge. This tutorial runs the Horovod example script for MXNet on an MNIST model. The Horovod examples directory also contains an Imagenet script, which you can run on the same Amazon EKS cluster.
Getting started with the AWS DLAMI
The AWS DLAMI are machine learning images loaded with deep learning frameworks and their dependent libraries such as NVIDIA CUDA, NVIDIA cuDNN, NCCL, Intel MKL-DNN, and many others. DLAMI is a one-stop shop for deep learning in the cloud. You can launch EC2 instances with Ubuntu or Amazon Linux. DLAMI comes with pre-installed deep learning frameworks such as Apache MXNet, TensorFlow, Keras, and PyTorch. You can train custom models, experiment with new deep learning algorithms, and learn new deep learning skills and techniques. The AMIs also offer GPU and CPU acceleration through pre-configured drivers, Anaconda virtual environments, and come with popular Python packages.
The DLAMI for Ubuntu and Amazon Linux now comes with pre-installed Horovod support with a MXNet backend. You can scale your ML model from a single GPU to multiple GPUs or a multi-node cluster using an EC2 GPU instance. You can also achieve greater scaling efficiency and higher multi-GPU training performance by using Horovod with MXNet as compared to native MXNet KVStore.
All versions of the DLAMI beginning with Ubuntu 18.04 v27.0, Amazon Linux v27.0, and Amazon Linux 2 v27.0 support Horovod with MXNet. You can use any AWS CPU or GPU machine to spin up the instance using deep learning images. It is recommended to use CPU instances of type C5, C5n, or C4 (optimized for high-performance, compute-intensive workloads) and GPU instances of type P2 and P3 (the latest generation of general-purpose GPU instances).
You can run Horovod training on a single-node or multi-node cluster. A single-node cluster consists of a single machine. A multi-node cluster consists of more than one homogeneous machine. In this post, we walk you through running Horovod multi-node cluster training using MXNet.
Creating a multi-node cluster using the DLAMI
You can spin up the EC2 instances with AWS CloudFormation templates, the AWS Command Line Interface (AWS CLI), or on the Amazon EC2 console. For this post, we use the Amazon EC2 console. We launch an identical number of EC2 instances with the same DLAMI. We spin up the instances in the same Region, placement group, and security zone because those factors play an important role in achieving high performance.
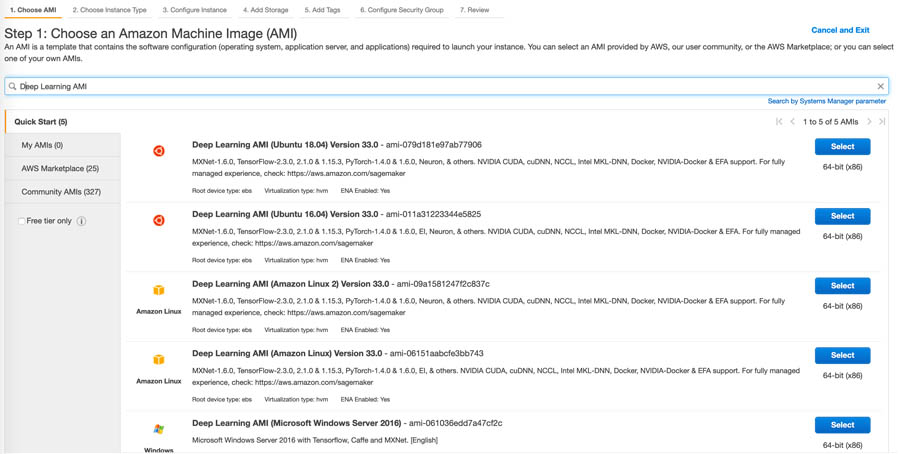
- On the Amazon EC2 console, search for
Deep Learning AMI. - Choose Select for any Deep Learning AMI (Ubuntu).
- You now have to choose the instance type.
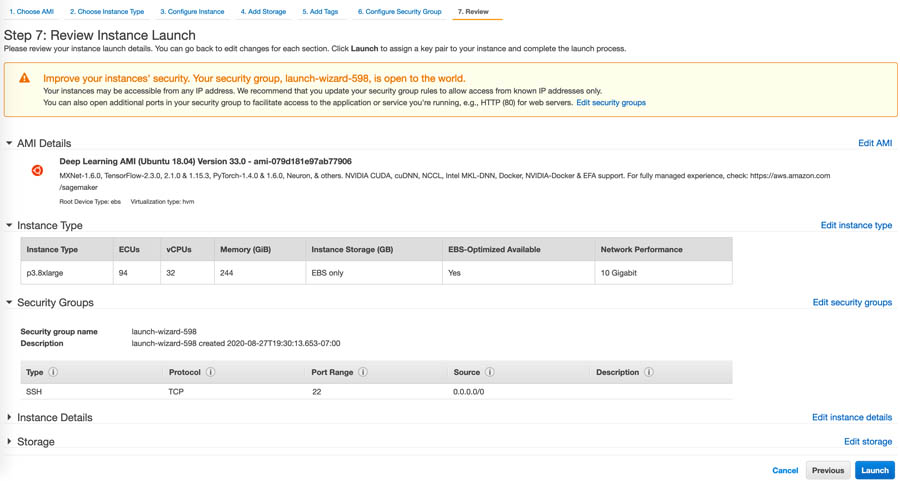
AWS supports various categories of instances. Based on your use case such as training time and cost, you can select General Purpose instances such as M5, Compute optimized instances such as C5, or GPU based instances such as family of P2 or P3. You can create a cluster of as many instances as possible based on your requirement. For this post, we select four p3.8xlarge instances with a total of 16 GPUs.

- Choose Next: Configure Instance Details.
Next, we need to configure the instances.
- For Number of instances, enter
4. - Enter your specific network, subnet, and placement group.
If you don’t have a placement group, you can create one.
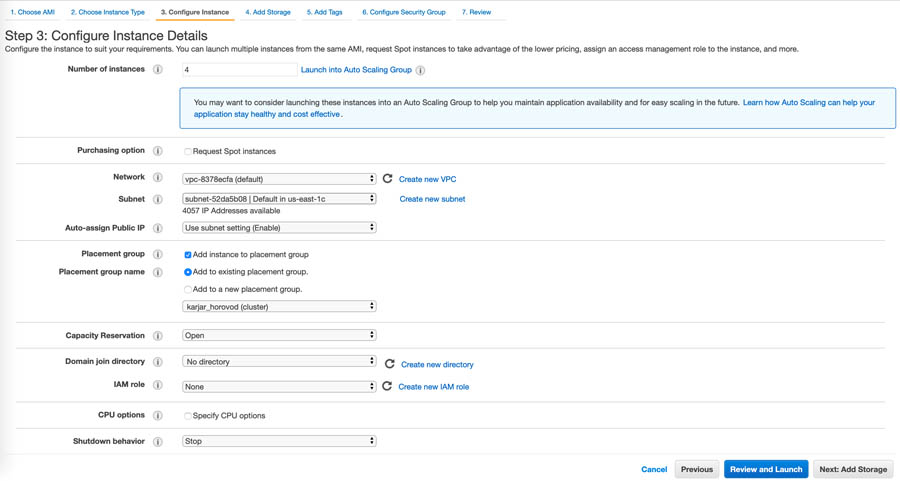
- Choose Next: Add Storage.
You can change this number based on your dataset size. For the demo purpose, we used the default value.

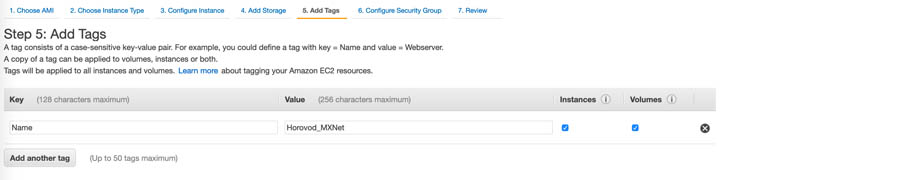
- Choose Next: Add Tags.
- For Key, enter
Name. - For Value, enter
Horovod_MXNet.
- Choose Next: Configure Security Group.
- Create your own security group or use the existing one.

- Choose Review and Launch.
- Review your instance launch details and choose Launch.
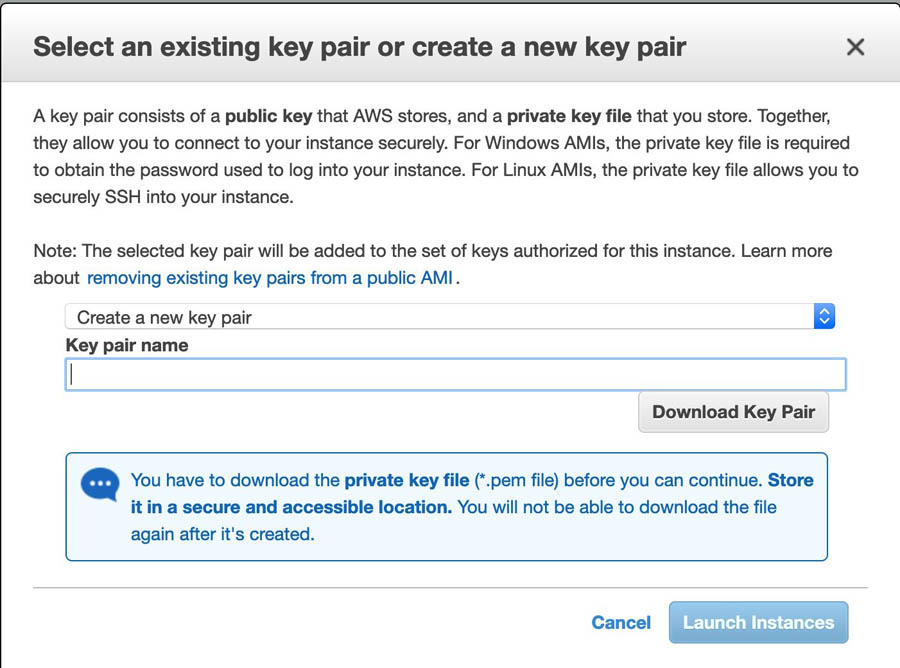
After you choose Launch, you’re asked to select an existing key pair or create a new one.
- For Key pair name, enter a key pair.
If you don’t have a key pair, choose Download Key Pair.
- Choose Launch Instances.
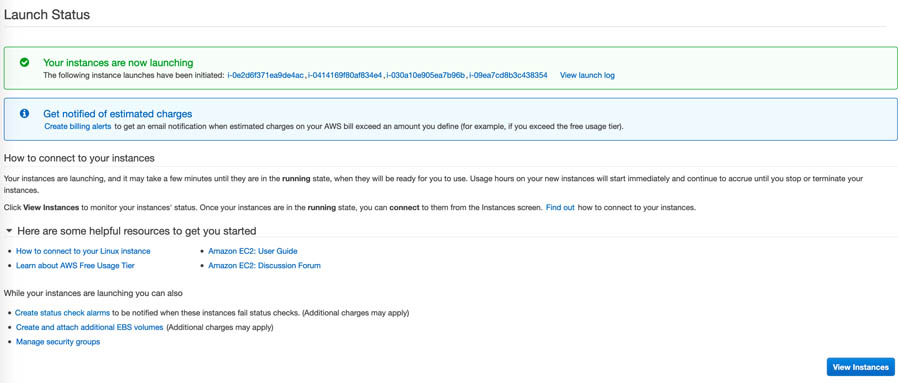
If you see a green banner message, you launched the instance successfully.
- Choose View Instances.
- Search for
horovod_MXNetto see the four instances you created.

We need to do one more step in our cluster setup. All the instances should be able to communicate with each other, so we have to add our security group ID to all the instances’ inbound rules.
- Select one instance from the four which you created.
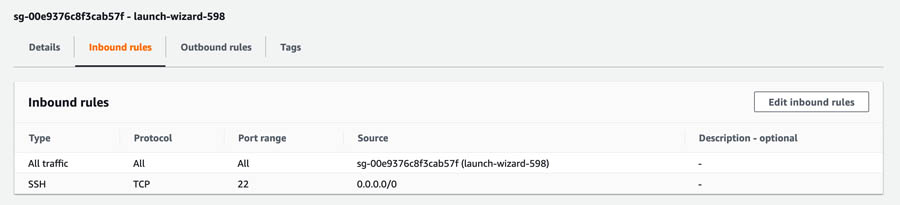
- On the Description tab, choose Security groups (for this post, launch-wizard-144).

- On the Inbound tab, copy the security group ID (
sg-00e9376c8f3cab57f). - Choose Edit inbound rules.
- Choose Add rule.
- Select All traffic and SSH.
- Choose Save rules.
You can now see your inbound rules listed.
- Repeat the process to add a security group in the inbound rules for all the instances so they can communicate with each other.
You are now done with setting up your cluster.
Horovod with MXNet training on a multi-node cluster
For Horovod with MXNet training on a multi-node cluster, complete the following steps:
- Copy your PEM key from your local machine to one of the EC2 instances (primary node):
- SSH into your primary node:
- Enable the passwordless SSHing between EC2 instances, without providing the PEM file. Enter the following command into your primary node:
- When you SSH or connect for the first time from one EC2 instance to another, you see the following message:
- Activate the CONDA environment:
- As an optional step, confirm Horovod is using MXNet on the backend by running the following command (as of this writing, the Horovod version is 0.19.5):
- We have provided a sample MNIST example for you to run the Horovod training.
For more information about the horovodrun command, see here.
The preceding code just shows how to run the Horovod training script on a multi-node EC2 instance. You can find the Horovod MXNet example script on the Horovod GitHub repo. Additionally, you can bring your own training script that’s compatible with Horovod and MXNet and train the model on a single node and multi-node cluster. To learn more about the performance comparison between Horovod and Parameter Server, this blog post illustrates the difference as ResNet50 scales from 1 to 64 GPUs.
When using Horovod, keep the following in mind:
- All your instances must be the same type
- All your instances must have the same environment
- The data should be stored in the same location across nodes.
- The training script should be in the same location across nodes.
Conclusion
In this post, we demonstrated how to run the distributed training using Horovod and MXNet on Amazon EC2 and Amazon EKS using AWS DL Containers and AWS DLAMI. Using Horovod, your Apache MXNet models can be distributed across a cluster of instances, providing a significant increase in performance with only minimal changes to your training script.
For more information about deep learning and MXNet, see the MXNet crash course and Dive into Deep Learning book. You can also get started on the MXNet website and MXNet GitHub examples directory.
If you are new to distributed training, we highly recommend reading the paper Horovod: fast and easy distributed deep learning inTensorFlow. You can also install Horovod, build Horovod with MXNet, and follow the MNIST or ImageNet use case. You can find more Horovod MXNet examples in GluonCV example and GluonNLP example on GitHub.
About the Authors
 Chaitanya Bapat is a Software Engineer with the AWS Deep Learning team. He works on Apache MXNet and integrating the framework with Sagemaker, DLC and DLAMI. In his spare time, he loves watching sports and enjoys reading books and learning Spanish.
 Karan Jariwala is a Software Development Engineer on the AWS Deep Learning team. His work focuses on training deep neural networks. Outside of work, he enjoys hiking, swimming, and playing tennis.