Artificial Intelligence
Reduce cost and development time with Amazon SageMaker Pipelines local mode
Creating robust and reusable machine learning (ML) pipelines can be a complex and time-consuming process. Developers usually test their processing and training scripts locally, but the pipelines themselves are typically tested in the cloud. Creating and running a full pipeline during experimentation adds unwanted overhead and cost to the development lifecycle. In this post, we detail how you can use Amazon SageMaker Pipelines local mode to run ML pipelines locally to reduce both pipeline development and run time while reducing cost. After the pipeline has been fully tested locally, you can easily rerun it with Amazon SageMaker managed resources with just a few lines of code changes.
Overview of the ML lifecycle
One of the main drivers for new innovations and applications in ML is the availability and amount of data along with cheaper compute options. In several domains, ML has proven capable of solving problems previously unsolvable with classical big data and analytical techniques, and the demand for data science and ML practitioners is increasing steadily. From a very high level, the ML lifecycle consists of many different parts, but the building of an ML model usually consists of the following general steps:
- Data cleansing and preparation (feature engineering)
- Model training and tuning
- Model evaluation
- Model deployment (or batch transform)
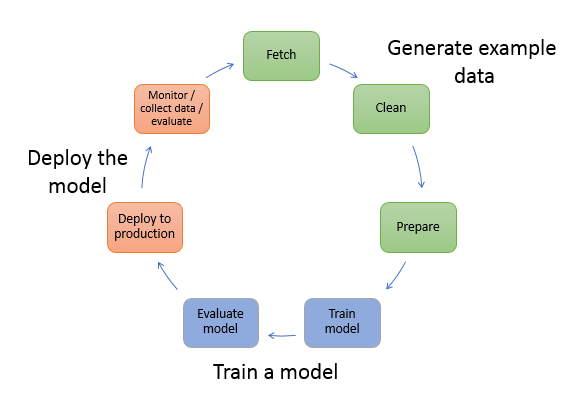
In the data preparation step, data is loaded, massaged, and transformed into the type of inputs, or features, the ML model expects. Writing the scripts to transform the data is typically an iterative process, where fast feedback loops are important to speed up development. It’s normally not necessary to use the full dataset when testing feature engineering scripts, which is why you can use the local mode feature of SageMaker Processing. This allows you to run locally and update the code iteratively, using a smaller dataset. When the final code is ready, it’s submitted to the remote processing job, which uses the complete dataset and runs on SageMaker managed instances.
The development process is similar to the data preparation step for both model training and model evaluation steps. Data scientists use the local mode feature of SageMaker Training to iterate quickly with smaller datasets locally, before using all the data in a SageMaker managed cluster of ML-optimized instances. This speeds up the development process and eliminates the cost of running ML instances managed by SageMaker while experimenting.
As an organization’s ML maturity increases, you can use Amazon SageMaker Pipelines to create ML pipelines that stitch together these steps, creating more complex ML workflows that process, train, and evaluate ML models. SageMaker Pipelines is a fully managed service for automating the different steps of the ML workflow, including data loading, data transformation, model training and tuning, and model deployment. Until recently, you could develop and test your scripts locally but had to test your ML pipelines in the cloud. This made iterating on the flow and form of ML pipelines a slow and costly process. Now, with the added local mode feature of SageMaker Pipelines, you can iterate and test your ML pipelines similarly to how you test and iterate on your processing and training scripts. You can run and test your pipelines on your local machine, using a small subset of data to validate the pipeline syntax and functionalities.
SageMaker Pipelines
SageMaker Pipelines provides a fully automated way to run simple or complex ML workflows. With SageMaker Pipelines, you can create ML workflows with an easy-to-use Python SDK, and then visualize and manage your workflow using Amazon SageMaker Studio. Your data science teams can be more efficient and scale faster by storing and reusing the workflow steps you create in SageMaker Pipelines. You can also use pre-built templates that automate the infrastructure and repository creation to build, test, register, and deploy models within your ML environment. These templates are automatically available to your organization, and are provisioned using AWS Service Catalog products.
SageMaker Pipelines brings continuous integration and continuous deployment (CI/CD) practices to ML, such as maintaining parity between development and production environments, version control, on-demand testing, and end-to-end automation, which helps you scale ML throughout your organization. DevOps practitioners know that some of the main benefits of using CI/CD techniques include an increase in productivity via reusable components and an increase in quality through automated testing, which leads to faster ROI for your business objectives. These benefits are now available to MLOps practitioners by using SageMaker Pipelines to automate the training, testing, and deployment of ML models. With local mode, you can now iterate much more quickly while developing scripts for use in a pipeline. Note that local pipeline instances can’t be viewed or run within the Studio IDE; however, additional viewing options for local pipelines will be available soon.
The SageMaker SDK provides a general purpose local mode configuration that allows developers to run and test supported processors and estimators in their local environment. You can use local mode training with multiple AWS-supported framework images (TensorFlow, MXNet, Chainer, PyTorch, and Scikit-Learn) as well as images you supply yourself.
SageMaker Pipelines, which builds a Directed Acyclic Graph (DAG) of orchestrated workflow steps, supports many activities that are part of the ML lifecycle. In local mode, the following steps are supported:
- Processing job steps – A simplified, managed experience on SageMaker to run data processing workloads, such as feature engineering, data validation, model evaluation, and model interpretation
- Training job steps – An iterative process that teaches a model to make predictions by presenting examples from a training dataset
- Hyperparameter tuning jobs – An automated way to evaluate and select the hyperparameters that produce the most accurate model
- Conditional run steps – A step that provides a conditional run of branches in a pipeline
- Model step – Using CreateModel arguments, this step can create a model for use in transform steps or later deployment as an endpoint
- Transform job steps – A batch transform job that generates predictions from large datasets, and runs inference when a persistent endpoint isn’t needed
- Fail steps – A step that stops a pipeline run and marks the run as failed
Solution overview
Our solution demonstrates the essential steps to create and run SageMaker Pipelines in local mode, which means using local CPU, RAM, and disk resources to load and run the workflow steps. Your local environment could be running on a laptop, using popular IDEs like VSCode or PyCharm, or it could be hosted by SageMaker using classic notebook instances.
Local mode allows data scientists to stitch together steps, which can include processing, training, and evaluation jobs, and run the entire workflow locally. When you’re done testing locally, you can rerun the pipeline in a SageMaker managed environment by replacing the LocalPipelineSession object with PipelineSession, which brings consistency to the ML lifecycle.
For this notebook sample, we use a standard publicly available dataset, the UCI Machine Learning Abalone Dataset. The goal is to train an ML model to determine the age of an abalone snail from its physical measurements. At the core, this is a regression problem.
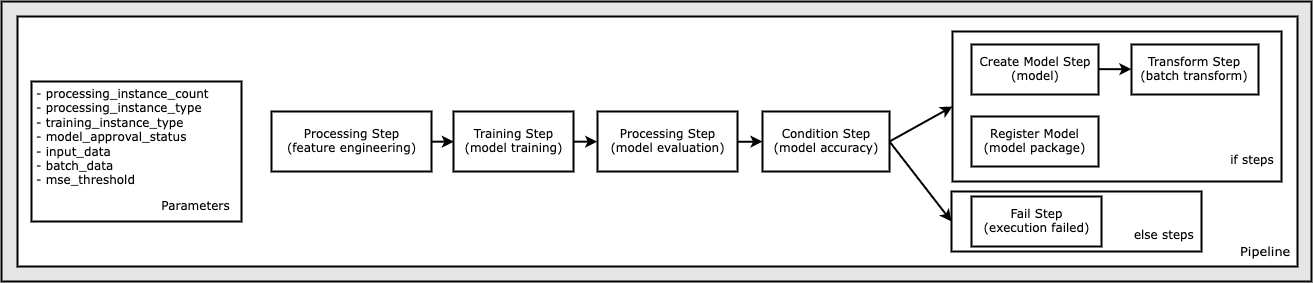
All of the code required to run this notebook sample is available on GitHub in the amazon-sagemaker-examples repository. In this notebook sample, each pipeline workflow step is created independently and then wired together to create the pipeline. We create the following steps:
- Processing step (feature engineering)
- Training step (model training)
- Processing step (model evaluation)
- Condition step (model accuracy)
- Create model step (model)
- Transform step (batch transform)
- Register model step (model package)
- Fail step (run failed)
The following diagram illustrates our pipeline.
Prerequisites
To follow along in this post, you need the following:
- An AWS account
- Valid AWS Identity and Access Management (IAM) credentials to access Amazon Simple Storage Service (Amazon S3), datasets, and more
docker-composeinstalled in the environment you’re using (for instructions, refer to Install Docker Compose)
After these prerequisites are in place, you can run the sample notebook as described in the following sections.
Build your pipeline
In this notebook sample, we use SageMaker Script Mode for most of the ML processes, which means that we provide the actual Python code (scripts) to perform the activity and pass a reference to this code. Script Mode provides great flexibility to control the behavior within the SageMaker processing by allowing you to customize your code while still taking advantage of SageMaker pre-built containers like XGBoost or Scikit-Learn. The custom code is written to a Python script file using cells that begin with the magic command %%writefile, like the following:
%%writefile code/evaluation.py
The primary enabler of local mode is the LocalPipelineSession object, which is instantiated from the Python SDK. The following code segments show how to create a SageMaker pipeline in local mode. Although you can configure a local data path for many of the local pipeline steps, Amazon S3 is the default location to store the data output by the transformation. The new LocalPipelineSession object is passed to the Python SDK in many of the SageMaker workflow API calls described in this post. Notice that you can use the local_pipeline_session variable to retrieve references to the S3 default bucket and the current Region name.
Before we create the individual pipeline steps, we set some parameters used by the pipeline. Some of these parameters are string literals, whereas others are created as special enumerated types provided by the SDK. The enumerated typing ensures that valid settings are provided to the pipeline, such as this one, which is passed to the ConditionLessThanOrEqualTo step further down:
mse_threshold = ParameterFloat(name="MseThreshold", default_value=7.0)
To create a data processing step, which is used here to perform feature engineering, we use the SKLearnProcessor to load and transform the dataset. We pass the local_pipeline_session variable to the class constructor, which instructs the workflow step to run in local mode:
Next, we create our first actual pipeline step, a ProcessingStep object, as imported from the SageMaker SDK. The processor arguments are returned from a call to the SKLearnProcessor run() method. This workflow step is combined with other steps towards the end of the notebook to indicate the order of operation within the pipeline.
Next, we provide code to establish a training step by first instantiating a standard estimator using the SageMaker SDK. We pass the same local_pipeline_session variable to the estimator, named xgb_train, as the sagemaker_session argument. Because we want to train an XGBoost model, we must generate a valid image URI by specifying the following parameters, including the framework and several version parameters:
We can optionally call additional estimator methods, for example set_hyperparameters(), to provide hyperparameter settings for the training job. Now that we have an estimator configured, we’re ready to create the actual training step. Once again, we import the TrainingStep class from the SageMaker SDK library:
Next, we build another processing step to perform model evaluation. This is done by creating a ScriptProcessor instance and passing the local_pipeline_session object as a parameter:
To enable deployment of the trained model, either to a SageMaker real-time endpoint or to a batch transform, we need to create a Model object by passing the model artifacts, the proper image URI, and optionally our custom inference code. We then pass this Model object to a ModelStep, which is added to the local pipeline. See the following code:
Next, we create a batch transform step where we submit a set of feature vectors and perform inference. We first need to create a Transformer object and pass the local_pipeline_session parameter to it. Then we create a TransformStep, passing the required arguments, and add this to the pipeline definition:
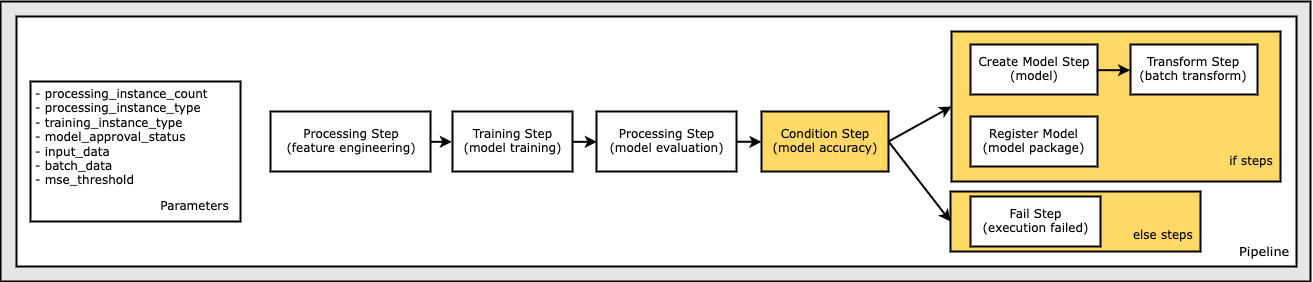
Finally, we want to add a branch condition to the workflow so that we only run batch transform if the results of model evaluation meet our criteria. We can indicate this conditional by adding a ConditionStep with a particular condition type, like ConditionLessThanOrEqualTo. We then enumerate the steps for the two branches, essentially defining the if/else or true/false branches of the pipeline. The if_steps provided in the ConditionStep (step_create_model, step_transform) are run whenever the condition evaluates to True.
The following diagram illustrates this conditional branch and the associated if/else steps. Only one branch is run, based on the outcome of the model evaluation step as compared in the condition step.
Now that we have all our steps defined, and the underlying class instances created, we can combine them into a pipeline. We provide some parameters, and crucially define the order of operation by simply listing the steps in the desired order. Note that the TransformStep isn’t shown here because it’s the target of the conditional step, and was provided as step argument to the ConditionalStep earlier.
To run the pipeline, you must call two methods: pipeline.upsert(), which uploads the pipeline to the underlying service, and pipeline.start(), which starts running the pipeline. You can use various other methods to interrogate the run status, list the pipeline steps, and more. Because we used the local mode pipeline session, these steps are all run locally on your processor. The cell output beneath the start method shows the output from the pipeline:
You should see a message at the bottom of the cell output similar to the following:
Pipeline execution d8c3e172-089e-4e7a-ad6d-6d76caf987b7 SUCCEEDED
Revert to managed resources
After we’ve confirmed that the pipeline runs without errors and we’re satisfied with the flow and form of the pipeline, we can recreate the pipeline but with SageMaker managed resources and rerun it. The only change required is to use the PipelineSession object instead of LocalPipelineSession:
from sagemaker.workflow.pipeline_context import LocalPipelineSession
from sagemaker.workflow.pipeline_context import PipelineSession
local_pipeline_session = LocalPipelineSession()
pipeline_session = PipelineSession()
This informs the service to run each step referencing this session object on SageMaker managed resources. Given the small change, we illustrate only the required code changes in the following code cell, but the same change would need to be implemented on each cell using the local_pipeline_session object. The changes are, however, identical across all cells because we’re only substituting the local_pipeline_session object with the pipeline_session object.
After the local session object has been replaced everywhere, we recreate the pipeline and run it with SageMaker managed resources:
Clean up
If you want to keep the Studio environment tidy, you can use the following methods to delete the SageMaker pipeline and the model. The full code can be found in the sample notebook.
Conclusion
Until recently, you could use the local mode feature of SageMaker Processing and SageMaker Training to iterate on your processing and training scripts locally, before running them on all the data with SageMaker managed resources. With the new local mode feature of SageMaker Pipelines, ML practitioners can now apply the same method when iterating on their ML pipelines, stitching the different ML workflows together. When the pipeline is ready for production, running it with SageMaker managed resources requires just a few lines of code changes. This reduces the pipeline run time during development, leading to more rapid pipeline development with faster development cycles, while reducing the cost of SageMaker managed resources.
To learn more, visit Amazon SageMaker Pipelines or Use SageMaker Pipelines to Run Your Jobs Locally.
About the authors
 Paul Hargis has focused his efforts on machine learning at several companies, including AWS, Amazon, and Hortonworks. He enjoys building technology solutions and teaching people how to make the most of it. Prior to his role at AWS, he was lead architect for Amazon Exports and Expansions, helping amazon.com improve the experience for international shoppers. Paul likes to help customers expand their machine learning initiatives to solve real-world problems.
 Niklas Palm is a Solutions Architect at AWS in Stockholm, Sweden, where he helps customers across the Nordics succeed in the cloud. He’s particularly passionate about serverless technologies along with IoT and machine learning. Outside of work, Niklas is an avid cross-country skier and snowboarder as well as a master egg boiler.
 Kirit Thadaka is an ML Solutions Architect working in the SageMaker Service SA team. Prior to joining AWS, Kirit worked in early-stage AI startups followed by some time consulting in various roles in AI research, MLOps, and technical leadership.