AWS for M&E Blog
Amazon Transcribe and email integration
Amazon Transcribe makes it easy for developers to add speech to text capabilities (also known as ASR) to their applications. Audio data is virtually impossible for computers to search and analyze. Therefore, recorded speech needs to be converted to text before it can be used by business intelligence applications. This post shows how an audio file can be converted to text using an email workflow. A user records audio on their smartphone and then sends it to an email inbox as an attachment. A backend service monitoring service gets an “email-received” notification and sends the audio file to Amazon Transcribe for transcription. Once the ASR process completes, the response text file is then emailed as an attachment to the sender.
Time to read – 45 minutes
Time to complete – 120 minutes
Learning level – Advanced (300)
Services used –
Amazon Transcribe
Amazon DynamoDB
Amazon Simple Storage Service (Amazon S3)
AWS Lambda
Amazon WorkMail
Amazon Simple Email Service
Languages/SDK used –
AWS SDK for Java
Java 8
Python 3.8.0
Build tools used –
AWS CLI
Gradle
Maven (optional)
Shell Script
Overview of solutionThe following is a high-level design defining all major components/services and their interactions.
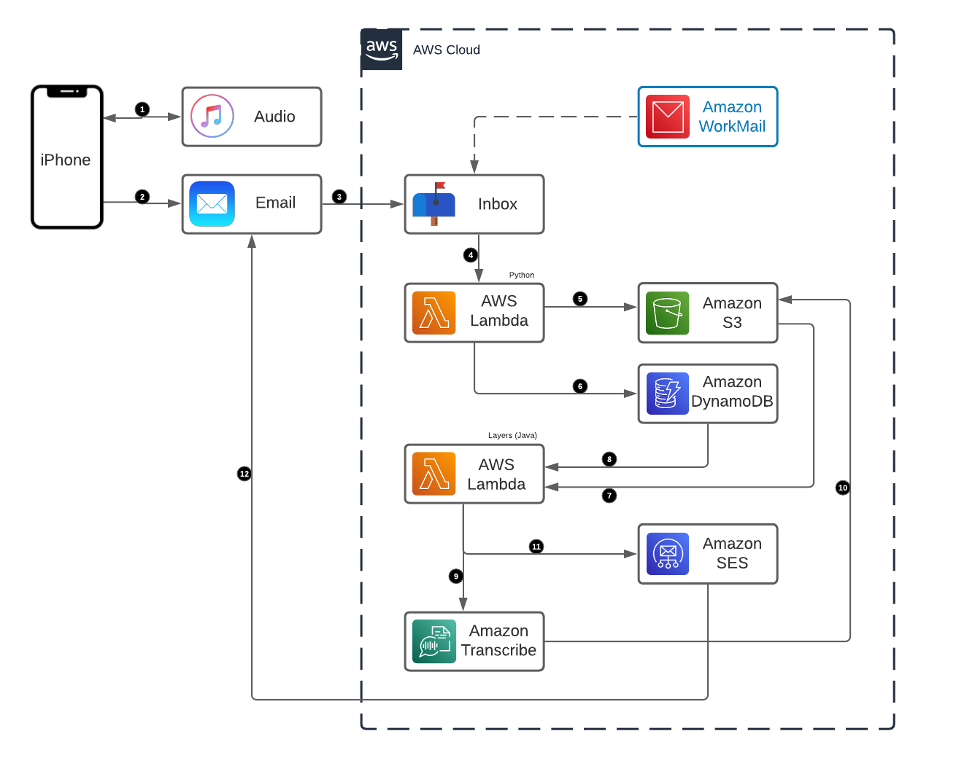
Steps
- Create and save an audio recording on a smartphone using a native app
- Send the audio file to an email inbox (managed by WorkMail) as an attachment
- Configure a WorkMail email rule to invoke a Lambda function when a new item arrives
- The Lambda function extracts the attachment and stores the audio file in a bucket on Amazon S3 and stores email metadata (like sender email address and message ID etc.) into a DynamoDB table
- The upload the audio file to Amazon S3 triggers an event and calls another Lambda function
- The Lambda function calls Amazon Transcribe using Java SDK and provides the Amazon S3 URL of the audio blob
- Transcribe service runs as a job, and when complete, it sends the response (text output file) back to Lambda
- The Lambda function retrieves the output text from Amazon S3 and the email metadata from DynamoDB and sends the email back to the sender using Amazon SES
GitHub repo
https://github.com/aws-samples/amazon-transcribe-email-workflow
Prerequisites
For this tutorial, you need:
Tutorial
Follow the steps to install, configure, deploy, and test the application.
- Clone the repo (using following command in a terminal) git clone https://github.com/aws-samples/amazon-transcribe-email-workflow.git
- Create an Organization in WorkMail. Follow this link to create an Organization. Select the “Free test domain” option for the email Domain.
- Add a user. Follow this link to add a user to the newly created Organization. Your WorkMail console should look like this.

- Create a Lambda function
a) Follow this link to create a Lambda function with the AWS Management Console (with default function code).
b) Use Python 3.8 as the runtime, and replace the default code with the content of file “EmailProcessorLambda.py” located under “src/main/python” directory of the project.
c) Create a new role that has access to Amazon S3, DynamoDB and WorkMail, and assign this to the Execution Role for the Lambda function.
d) Modify the TableName and DynamoRegion properties in the function accordingly.
e) Update Timeout setting of this function to 5 minutesPlease note this code inside the “lambda_handler” where boto3 library is retrieving the raw message from the email body.raw_msg = workmail.get_raw_message_content(messageId=msg_id)
mail = email.message_from_bytes(raw_msg['messageContent'].read())After saving the function the Configuration tab screen should look as follows:
- Create an Inbound WorkMail rule
a) Go to WorkMail console –> Organization Settings –> Inbound Rules
b) Set Action to Run Lambda and specify name of Lambda function created in earlier step
c) Specify domain/email address for the filtering so that emails received from these addresses could be forwarded to Lambda for the processing
d) The WorkMail –> Organization settings screen should look as follows:
- Go to DynamoDB Console and create a Table (“Transcribe”) with MSG_ID (String) as the Partition Key
- Update “create-bucket” shell script
#!/bin/bash BUCKET_ID=$(dd if=/dev/random bs=8 count=1 2>/dev/null | od -An -tx1 | tr -d ' \t\n') BUCKET_NAME=some_name echo $BUCKET_NAME > bucket-name.txt aws s3 mb s3://$BUCKET_NAME - Update “Constants.java” file
- Update “template.yml” file (optional – to change Lambda Layer Name and Content URI etc.)
- Execute “create-bucket.sh” script

- If you receive a “bucket already exists” error, change the bucket name in ALL create-bucket.sh, Constants.java, and Python Lambda code (stored in a variable) – they should all be the same.
- Execute “build-layer.sh” scriptUpon successful Gradle package – the Java Lambda Layers artifact (in a zip format) is created under the build directory of the project.
- Execute “deploy.sh” scriptUpon successful Gradle build and CloudFormation execution, the Lambda Layer are deployed and the Terminal should look as follows:

Lambda Functions console shows the newly created Java-based function with runtime v8.
Clicking on s3-java-function-<some_id> should show as follows:
Assign Amazon S3, DynamoDB, Amazon SES and Transcribe permissions to the role used by this lambda function, and confirm that the Amazon S3 event trigger is configured correctly. - Go to Lambda Console and add an Amazon S3 event trigger with following configurations: Bucket: “transcribe-email”, Event Type: “All Object Create Events”, Prefix: “audio/”
- Validate “email address” in Amazon SESGo to Amazon SES in the AWS Management Console and validate the email addresses to be used for testing (this is required if the Amazon SES account is a Sandbox account).Use this link to learn more about how to verify a new email in Amazon SES.
- Test the appSend an email to the WorkMail inbox with an audio file attachment (WAV/M4A/MP3/MP4).
 The NoSQL Workbench for DynamoDB shows an entry into the “Transcribes” table.
 The Transcribe job status launched by Lambda processor can be viewed on the Transcribe console.
 The Audio File file will be written to the Amazon S3 bucket.
 And, finally in few minutes (from the time the email was sent) you should receive an email like this with the transcribed file attached in it.
Clean up
To avoid incurring future charges, delete following resources:
- S3 Bucket
- WorkMail Organization
- WorkMail User
- Lambda Function (Python)
- Lambda Function (Java)
- DynamoDB Table
- Amazon SES Emails
Conclusion
In this post, I showed you how to perform speech to text conversion using Amazon Transcribe through a simple email workflow. I also showed you how to create a Lambda function using console, in addition to as how to ete a Java bundle (using Gradle and CloudFormation) and deploy it as a Lambda Layer through CLI. To learn more about how to integrate Amazon Transcribe from within a custom application, please visit Transcribe API.