AWS for M&E Blog
Create super resolution for legacy media content at scale with generative AI and AWS
Introduction
Today, media and entertainment companies own a large number of legacy media content that was created in low or standard resolutions before high-resolution technology was available—for instance, movies, television shows, music videos, and sports highlight clips. Given today’s advancements in display technology, it’s common for audiences to demand video content to be delivered in high definition, such as HD or 4K, for an enhanced viewing experience on larger screens. There is an opportunity to increase revenue by making the legacy media assets available in higher resolutions (HD, 4K, or higher).
Recent advancements in deep learning and generative AI models have made it possible to dramatically enhance images through techniques like super resolution. Super resolution increases an image’s pixel density so it appears much sharper and contains more detail. These AI are trained with millions of images to boost image quality at scale through single pass without additional steps such as denoising filters, which are common in typical super resolution workflows. Unlike traditional techniques such as bilinear or bicubic interpolation that simply estimate new pixels based on fixed mathematical formulas, generative AI techniques, such as Generative Adversarial Networks (GANs), Vision Transformers, and Diffusion Models (such as Stable Diffusion), learn to intelligently fill in details, textures, and edges while preserving fine details and reducing artifacts like jagged edges.
In this blog post, we propose an end-to-end solution that uses Real-ESRGAN and SwinIR coupled with AWS services to orchestrate a workflow that could take low-resolution videos as input to produce 4x resolution videos . For instance, we could upscale a one hour animation movie in less than 60 minutes. The solution could be used to automate the process of super resolution for media contents at scale.
Architecture
The solution is built using native AWS services focused on the following main components:
- A user interface that allows users to upload standard resolution videos
- Event driven processes that perform video analysis and frame extractions
- Apply AI image upscaling in parallel by invoking API endpoints built using SageMaker Inference toolkit
- Final video construction using the upscaled images and the audio extracted from the original media.
Given the possibility of producing large number of frames from the input, the video upscaling workflow is designed with scalability and performance as top priorities. In this blog post, we use an HPC approach to address these challenges.
First, we use an AWS ParallelCluster to support the compute infrastructure for an end-to-end video super resolution workflow. AWS ParallelCluster is an AWS service that allows users to rapidly build HPC applications in the Cloud. For storage layer, we use an Amazon FSx For Lustre as a shared file system mounted across all compute nodes. Amazon FSx for Lustre provides sub-millisecond latencies, up to hundreds of GBps of throughput, and up to millions of IOPS that optimizes the I/O throughput for video frame analysis and processing.
For AI video super resolution task, we leverage custom docker containers built using Amazon SageMaker inference toolkit, an open source machine learning inference framework on the GPU-based compute nodes. All Amazon SageMaker endpoints are integrated with the given FSx for Lustre file system to achieve high throughput and low latency parallel image generation. Finally, we provide a user interface that allows user to upload videos that triggers the workflow which automates the video super resolution process end to end.
The following architecture diagram depicts our workflow in greater detail:
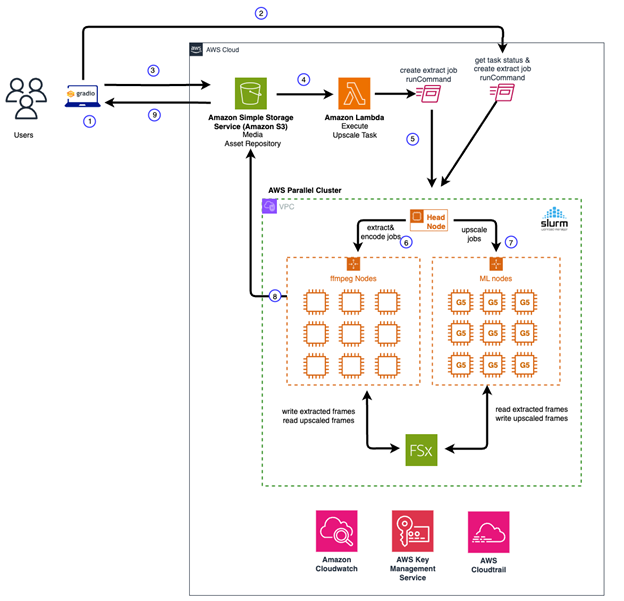
Figure 1. Video Super Resolution Architecture Diagram
Solution walkthrough
In the following section, we walkthrough deploying the video super resolution workflow at a high level.
Prerequisites
- Development environment with docker installed. (Note: This solution has been tested in a SageMaker notebook with ml.g5.2xlarge instance type)
- AWS Identity and Access Management (IAM) with access to Amazon Elastic Container Registry (Amazon ECR) with create repository and push docker images to the registry
- Amazon Virtual Private Cloud (Amazon VPC) with at least two private subnets and one public subnet
- Amazon Simple Storage Service (Amazon S3) bucket for storing media content and relevant scripts required for the workflow
- Key pair for accessing ParallelCluster head node via SSH: https://docs.aws.amazon.com/parallelcluster/latest/ug/set-up-keypair.html
Model Deployment
To maintain high fidelity in the upscaled images, we tested several image upscaling models and observed the results. Based on our evaluation, we found Real-ESRGAN and SwinIR both achieved excellent quality in removing artifacts and restoring texture details. For model evaluation and techniques, we recommend reading these papers related to Real-ESRGAN paper and SwinIR paper.
Real-ESRGAN Model
Through based on image structural quality and model latency, we identified that the Real-ESRGAN model achieves superior quality super resolution for images at low latency, especially for animation and anime media content. Compared with other generative AI solutions such as Stable Diffusion, we found the model achieves better generation consistency while maintaining high fidelity without introducing artifacts. Our solution leverages this model for upscaling animated videos. We built a docker container with SageMaker Pytorch Inference toolkit that takes an image frame as input. The inference code snippet that handles animation frames is shown as followed:
Swin2SR Model Our approach to video super resolution is to provide the best model for upscaling the video in the given genre. Through evaluation metrics on image quality and structural consistency, we adopt a second generative model that’s based on Vision Transformer called Swin2SR for upscaling the real images. This model is ideal for upscaling content, including music videos, movies, TV shows, and sports clips. Similar, we built a docker container with the SageMaker Pytorch Inference toolkit to perform real-time inference. The inference code snippet that handles real image frames is shown as follows:
The complete code samples for building, publishing of these models to the ECR registry, and to deploy the models for inference can be found in the github repository.
AWS ParallelCluster
There are several methods that you can use to deploy and manage ParallelCluster in AWS. These include ParallelCluster CLI, ParallelCluster API, ParallelCluster UI, Python API or Cloudformation Custom Resources. In this blog post, we leverage ParellelCluster CLI to manage the lifecycle of a ParallelCluster with a Slurm scheduler for our workflow. Slurm is a system for managing and scheduling Linux clusters. It is open source, fault tolerant and scalable, suitable for clusters of various sizes. At a high level, our ParallelCluster consists of the following components:
- A head node that orchestrates the scaling of the cluster and attaching new nodes to Slurm scheduler.
- A Slurm scheduler for launching and monitoring jobs across compute nodes in the cluster. It also manages the job queue and schedule jobs to be on the appropriate node based on configuration and capacity in runtime.
- Compute nodes that performs video analysis, frame extractions and video encoding tasks. This group of compute nodes are CPU bound.
- Compute nodes that perform image super resolution task. This group compute node is GPU memory bound.
- Shared file system as the storage layer using FSx for Lustre for reading and writing image frames and video pre/post processing.
The following yaml template file shows an example of the cluster configuration:
To create a ParallelCluster with the configuration above, run the following CLI command:
pcluster create-cluster —cluster-name <name of the cluster> —cluster-configuration <cluster config yaml>
The cluster setup process takes about 30 minutes. You can check the status of the cluster by running the following CLI command:
pcluster describe-cluster --cluster-name <name of the cluster>
The following message snippet shows the cluster was created successfully.
Custom Bootstrap actions
In the process of provisioning the head node and compute nodes, ParallelCluster can execute arbitrary code after a node starts, or after the node configuration is correctly completed. The code is provided as shell scripts located in a given S3 location, configured in the cluster configuration yaml as shown above. Here we leverage a custom bootstrap script to configure the head node and the compute nodes. For the head node, we install the required scripts to be invoked by the ParallelCluster scheduler when jobs are scheduled. An example of a bootstrap script is shown in the following:
Similar to the head-node, we use a shell script to bootstrap the GPU compute nodes to create additional resources, such as custom Amazon CloudWatch metrics, local SageMaker endpoints via docker-compose command, and run tests against these endpoints for readiness before a job can be scheduled for upscaling images via API calls. An example of a bootstrap script for GPU based compute node is shown in the following:
In addition to the image upscaling task, we provision a set of CPU bound compute nodes for video encoding and decoding tasks. We install the dependencies using the bootstrap approach similar to the script used for bootraping the GPU based compute nodes. The complete detail can be found in the GitHub repository.
Workflow Orchestration
The video super resolution workflow implements an event driven architecture. The workflow orchestration is initiated when a user uploads a video to a given S3 location, where an AWS Lambda function is triggered to schedule a series of batch jobs through the head node. The following figure (Figure 2) shows the sequential steps that performs the upscaling process using Slurm scheduler in Parallel Cluster:

Figure 2 – Sequential steps for video super resolution workflow
The main scripts involved in each of the process above are summarized as followed:
- create_extract_job_full.sh – Triggered as an SSM RunCommand from a lambda function to initiate the video super resolution workflow.
- extract_frame_audio.sh – Extracts images and audio components from the original video. The output is written to a specified directory in FSx for Lustre file system. After the extraction process is complete, a Slurm batch array job is triggered to performs AI super resolution inference for each frame. This step runs in a CPU bound compute nodes in the ParallelCluster.
- frame-super-resolution-array.sh – This script is invoked upon the frame extraction step is complete. It Invokes the corresponding SageMaker endpoint for image upscaling task. This job is scheduled in the GPU bound compute nodes. Based on the available GPU resources, multiple jobs can be scheduled on the same compute node to achieve better throughput using the available resources. In addition, these jobs are automatically scheduled across the compute nodes to achieve horizontal scalability. The number of nodes that the cluster scales out to is configured in the ParallelCluster configuration file. The throughput scales linearly with the number of compute nodes available for the workflow.
- encode-new-movie.sh – A script that encodes a new movie after all the frames are upscaled successfully. The script encodes both the images and the audio using ffmpeg, scheduled on a CPU compute node. The new video is uploaded to the specified S3 location. This job completes the video super resolution workflow.
Putting everything together
To demonstrate the end video super resolution workflow, we built a user interface component to make it easier for you to get started with the solution. The UI is built as a Gradio application, an open source python UI framework for machine learning. All the dependencies are packaged in a single docker image. The docker container can be run locally, or scheduled as an Amazon ECS Fargate serverless solution in the .
Here’s a screenshot of the video super resolution UI in action. Following video segments demonstrates our video super resolution results. The standard resolution video (left) and the upscaled video (right) using our super resolution workflow.
Sample Video

Clean up
If you decide that you no longer want to keep the Parallel Cluster running, you can use the ParallelCluster CLI ‘delete-cluster’ command to remove the cluster completely. Here’s an example:
pcluster delete-cluster -n <name of the cluster> -r <AWS region>
Conclusion
In this post, we demonstrated an end-to-end ML workflow that performs video super resolutions at scale using Parallel Cluster, Fsx for Lustre, and Amazon SageMaker local endpoints. We started by building the required Docker containers with and SwinIR2 models to support efficient inferences for video frames, followed by provisioning a Parallel Cluster using CLI with customizations to orchestrate the video super resolution workflow. Finally, we show a UI workflow that allows users to upload videos in standard resolution, triggers the video transformation workflow, and displays the upscaled videos when the workflow is complete. Go ahead and give it a try today, and we’d love to hear your feedback in the comments.