Networking & Content Delivery
Tag-based invalidation in Amazon CloudFront
Update (May 2026): Amazon CloudFront now natively supports tag-based cache invalidation — no additional infrastructure required. You can tag cached objects via origin response headers or S3 metadata and invalidate them by tag directly through the CloudFront API. For details, see the CloudFront Developer Guide and the launch blog post. If you are starting fresh, we recommend using the native feature instead of the solution described in this post.
In this post, we demonstrate how to implement tag-based invalidation in Amazon CloudFront with Lambda@Edge, Amazon DynamoDB, AWS Lambda, and AWS Step Functions. This post provides you with a reference architecture and sample code artifacts to help you deploy and test tag-based invalidation.
Let’s look at some use cases where tagging pages together might be useful.
- Brand pages – Direct-to-consumer companies organize information about their brands and products on websites and mobile applications for easy discovery by consumers and search engine bots. Typically, they are hierarchically organized with brand pages followed by product listing pages and finally the product specification pages. These could be connected to auxiliary pages, such as category pages, pre-built search term pages, etc. These are all connected and sensitive to updates to either the brand or product specification. For example, an auto maker may want to group its brand, model listing and detailed specification pages together using a brand and product code.
- News portals – Websites with live coverage of events like breaking news, sporting events, and press announcements require frequent updates to pages with rich multimedia content including photos, videos, score tickers, scoreboards, and statistics. Invalidating all of the assets related to the event allows viewers to access fresh content as soon as it is available.
- Images with multiple renditions – Rich media content, such as images, are optimized based on device characteristics leading to several renditions of the same content. For example, an image can be rendered as thumbnails and different dimensions in responsive design. Updates to the original image should result in updates to all of its renditions, and it’s easier if they are grouped.
In all of these scenarios, you can group content based on one or more tags, and then invalidate their cache based on the tag instead of the individual files. By bringing additional intelligence to the invalidation workflow, you can improve operational efficiency for use cases where multiple files must be refreshed at the cache as and when content updates occur.
CloudFront offers four event triggers to process information (from a request or response) as viewers interact with your application backend. You utilize this feature along with a few AWS services to implement the tag-based invalidation workflow. To learn more about CloudFront event triggers refer here.
Solution overview
The solution consists of two components:
- Tag ingestion workflow: responsible for ingest and persistence of mapping between a tag and content. Each content URL can supply one or more tags in a pre-defined response header.
- Tag invalidation workflow: responsible for carrying out invalidations based on one or more tags. This system is responsible for reading the tag to content mapping, de-duplicating, and carrying out invalidations in a controlled way to stay within CloudFront invalidation API limits.
Let’s dive into each component’s implementation details.
Tag ingestion workflow
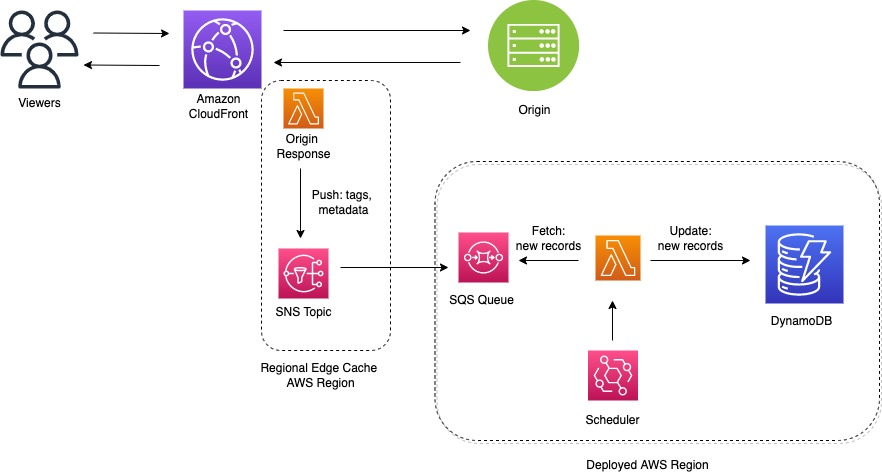
Figure 1: Tag ingest workflow
As part of the tag ingestion workflow, we setup a listener to intercept response headers coming from your application backend. The application is responsible for sending one or more tags into a pre-defined response header. This additional metadata is used to maintain mapping between a URL and one or more tags.
The following is an example view of response headers as seen from Chrome developer tools. Note the ‘Edge-Cache-Tag’, which holds the three-tag level information and is delimited by a comma. You can customize the specific response header to look for and choose to delimit tags either using a comma or a space. Note that these are headers from the origin response, and so the Lambda@Edge function will remove these headers once processed.
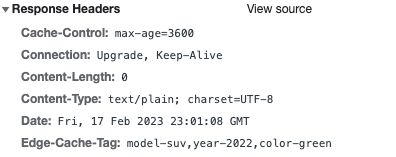
Figure 2: Origin response header example with cache tags
In the tag ingestion workflow:
- A Lambda@Edge Function is associated with the ‘Origin-Response’ event trigger of the cache behavior. The function is executed only on Cache Misses and just before CloudFront receives a response from the origin. This makes it the ideal event trigger to capture the mapping between tag and content without overloading downstream tag ingestion systems with redundant information.
- A regional Amazon Simple Notification Service (Amazon SNS) topic is created in every Regional Edge Cache (REC) where Lambda@Edge executions occurs. This is done to minimize the latency when the function captures the tags and associated URLs and relays the information to be persisted.
- A Amazon Simple Queue Service (Amazon SQS) deployed in a single AWS Region of your choice subscribes to the regional Amazon SNS topic described previously. This lets us collect tag information from different Regions into a central location.
- A regional Lambda function that wakes up on a schedule: this fetches any messages from the Amazon SQS queue and persists them to a DynamoDB table.
Note that the Lambda@Edge function executes even if an error is returned from the origin for the requested URL. You can incorporate additional checks in source code for HTTP status code if you want to filter and act only on HTTP 200 OK.
Tag invalidation workflow
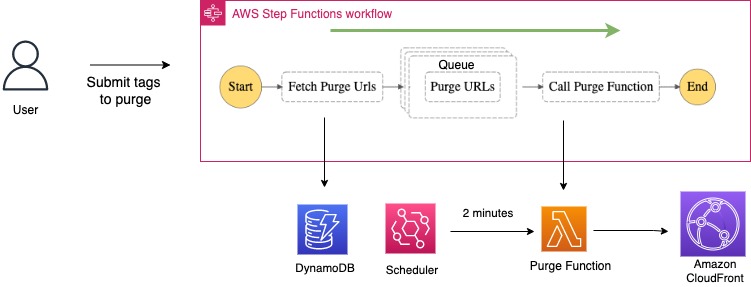
Figure 3: Tag invalidation workflow
To trigger a tag-based invalidation workflow, a privileged user:
- Submits a JSON payload with one or more tags to be invalidated from the CloudFront distribution ID.
- The Step Functions workflow first retrieves the mapped URLs from a DynamoDB table and posts them to a purge queue.
- A schedule-based Purge Lambda function monitors the number of active invalidations submitted to CloudFront and messages the purge queue. It submits newer URLs to the CloudFront invalidation API, staying within the allowed invalidation API limits.
Reference solution
Here is the GitHub repository for the reference solution.
Prerequisites
To deploy the reference solution, you need:
- Backend application (Origin) that sends tags in a pre-defined response header (default ‘Edge-Cache-Tag’).
- AWS credentials that provide the necessary permissions to create the resources using AWS Cloud Development Kit (AWS CDK).
- CloudFront distribution to test the solution.
Testing the solution
Deploying and testing the reference solution includes five main steps:
- Deploy the solution with instructions from GitHub repository.
- Associate the Lambda@Edge origin response function to a CloudFront distribution and test.
- Go to the newly created DynamoDB table to confirm that the tags are being ingested.
- Submit invalidation requests for tags using the Step Functions workflow.
- Confirm invalidation of the tagged URLs from the CloudFront console.
Step 1: Deploy the solution with instructions from our GitHub repository
You can find the reference solution from the GitHub repository along with instructions on how to build the project. Look at the ‘Steps to Build’ section for parameters that you can configure to deploy the solution. This solution will deploy a Lambda@Edge function for receiving the tags from the origin response. The solution only needs to be deployed once and you can associate the Lambda@Edge function with different CloudFront behavior using an origin response trigger. You can specify parameters for the solution, such as the cache tag header and tag delimiter in the env.sh file. As a default, the solution will use the “Edge-Cache-Tag” response header to receive cache tags from the origin, and you can specify multiple tags delimited by a comma.
Optionally, in addition to the previously mentioned parameters, to prevent the accumulation of older records in the DynamoDB table, you can specify a Time-To-Live (TTL) for each tag. The “TAG_TTL_NAME” specifies the origin response header that contains the TTL in seconds. The default header name is “tag-ttl” and the header value must be specified by the origin when returning a response. The “TAG_TTL_DEFINED_BY” in the env.sh file specifies which response header takes precedence in TTL calculation. For example, if you specify “TAG_TTL_DEFINED_BY=tag-ttl”, then first precedence is given to the value set in the ‘tag-ttl’ header followed by the ‘Cache-Control’ header and vice-versa. If you want to turn-off TTL completely, then specify an empty value for “TAG_TTL_DEFINED_BY”.
Note that the Lambda@Edge function is deployed in the us-east-1 Region, while other artifacts are deployed in multiple Regions. The DynamoDB tables and a Step Functions workflow will be deployed in the region specified as the primary region in the configuration file. Other Regions where regional stacks are deployed include: us-east-2, use-west-2, ap-south-1, ap-northeast-1, ap-northeast-2, ap-southeast-1, ap-southeast-2, eu-central-1, eu-west-1, eu-west-2, and sa-east-1.
For more information on Amazon CloudFront regional edge caches, refer here.
Step 2: Associate the Lambda@Edge origin response function to a CloudFront distribution and test
- Once the deployment is completed, the AWS CDK will output the ARN of the Lambda@Edge function for ingesting tags. Copy the ARN to associate the function with a CloudFront cache behavior.

Figure 4: Output ARN for tag ingest Lambda@Edge function
- Go to the Amazon CloudFront console and select or create a CloudFront distribution with an origin that returns tags in the origin response. In the “Behavior” tab, choose a cache behavior(s) to associate the tag-ingest Lambda@Edge function and select “Edit”.

Figure 5: Selecting cache behaviors for tag-based invalidation
- In the behavior rules setting, scroll to the “Function associations” section. Select Lambda@Edge for the Origin response trigger and paste the Function ARN from the AWS CDK output and save changes.

Figure 6: Associating tag ingestion Lambda@Edge function
- Invalidate the cache before testing. Confirm the distribution domain name and download content through CloudFront to populate the cache and ingest tags from the origin. The “x-cache” response header value should be “Miss from cloudfront” for the first request, and “Hit from cloudfront” for subsequent requests.

Figure 7: Confirm caching in CloudFront response header
Step 3: Go to the newly created DynamoDB table to confirm tag ingest
- Go to the DynamoDB console in the Region that you selected for deploying the solution. Navigate to “Tables” then “Explore items” to find a new table created with the name “TagPrimaryStack-{distributionID}” where {distributionID} is the distribution ID of the CloudFront distribution used in the previous step.Note that if you want to test on a staging distribution with the CloudFront continuous deployment feature, you must also configure the staging distribution as described in Step 2. This will create a separate DynamoDB table with the staging CloudFront distribution ID.
- You can confirm that the table is populated with entries that include the cache tag and the tagged URIs for the cached content in CloudFront. The example in the following figure shows an example with tags for the year, model, and color for different cars.

Figure 8: Confirming population of tag/URL entries in DynamoDB
- From the table entries, choose a tag to use for invalidation in the next step, and note the URIs associated with the tag.
Step 4: Submit invalidation requests for tags using the Step Functions workflow
- Go to the Step Functions console in the Region that you selected for deploying the solution to find the state machine “TagPrimaryStackPurgeWorkflow” from the list of state machines. Select the state machine and select “View details”.
- In the “Executions” tab of the details screen, select “Start execution” to create a new execution to invalidate by tags.
- In the “Start execution” screen, enter the following payload into the “Input” section after specifying the CloudFront distribution ID and the tags that you want to use for invalidation. Then, select “Start execution”. Note that multiple tags are evaluated separately as in an OR statement.
{ "distributionId": "CLOUDFRONT_DISTRIBUTION_ID", "tags": ["TAG1","TAG2"] } - In this example, the tags “year-2021” and “model-suv” are used to invalidate content.

Figure 9: Example execution payload for tag-based invalidation
- In the execution Details tab, confirm that the “Execution Status” is “Succeeded”.

Figure 10: Confirming execution status
Step 5: Confirm invalidation of the tagged URLs from the CloudFront console
- Go to the CloudFront console, and select the CloudFront distribution that you’re using. Then navigate to the “Invalidations” tab to view the list of invalidations.
- From the list of invalidation IDs, find and select the submitted invalidation request and select “View details”.
- In the “Invalidation details” screen, confirm that the status is “Completed” and that the “Object paths” include the URIs that are tagged with the tag values that you submitted in the invalidation request.

Figure 11: Confirm invalidation of tagged URIs
The estimate cost of running the solution and breakup by different AWS Service components is available in the ‘Pricing Calculation’ section in the repository.
For troubleshooting, refer to the ‘Troubleshooting’ section in the repository.
Clean up
After you’ve completed testing, you can delete the solution to avoid any costs associated with the resources created by the AWS CDK project by running the destroy.sh script in the “cdk” directory. Before running the script, make sure that the Lambda@Edge functions are disassociated from all CloudFront behavior rules, and termination protection is disabled for the CloudFormation stacks created by AWS CDK. After the AWS CDK project is destroyed, the DynamoDB tables must also be deleted manually. The script won’t delete the AWS CDK bootstrap CloudFormation stacks and Amazon Simple Storage Service (Amazon S3) buckets, which you can use for other AWS CDK projects. You can remove the stacks and buckets manually if you don’t plan to use them as well.
Conclusion
To summarize, you learned scenarios when tag-based invalidations could be used, followed by how to implement the reference tag-based invalidation solution for Amazon CloudFront using services that include AWS Lambda, Lambda@Edge, Amazon DynamoDB, AWS Step Functions, Amazon Simple Notification Service (SNS), and Amazon Simple Queue Service (SQS). With this solution, you can group cached content based on one or more tags, and then invalidate them based on a tag instead of a path or file. By bringing additional intelligence to the invalidation workflow, you can improve operational efficiency for use cases where multiple cached files must be refreshed on content updates.

Jaiganesh Girinathan
Jaiganesh Girinathan is a Senior Edge Specialist Solutions Architect focused on content delivery networks and edge computing capabilities with AWS. He has worked with several media customers globally over the last two decades, helping organizations modernize & scale their platforms. He is passionate about building solutions to address key customer needs. Outside of work, you can usually find Jaiganesh star gazing!

Takuya Miyake
Takuya Miyake is a Senior Edge Specialist Solutions Architect based in Seattle. His main focus is helping customers optimize their online content delivery in a secure and reliable way with AWS Edge Services.