AWS Security Blog
Mitigate data leakage through the use of AppStream 2.0 and end-to-end auditing
Customers want to use AWS services to operate on their most sensitive data, but they want to make sure that only the right people have access to that data. Even when the right people are accessing data, customers want to account for what actions those users took while accessing the data.
In this post, we show you how you can use Amazon AppStream 2.0 to grant isolated access to sensitive data and decrease your attack surface. In addition, we show you how to achieve end-to-end auditing, which is designed to provide full traceability of all activities around your data.
To demonstrate this idea, we built a sample solution that provides a data scientist with access to an Amazon SageMaker Studio notebook using AppStream 2.0. The solution deploys a new Amazon Virtual Private Cloud (Amazon VPC) with isolated subnets, where the SageMaker notebook and AppStream 2.0 instances are set up.
Why AppStream 2.0?
AppStream 2.0 is a fully-managed, non-persistent application and desktop streaming service that provides access to desktop applications from anywhere by using an HTML5-compatible desktop browser.
Each time you launch an AppStream 2.0 session, a freshly-built, pre-provisioned instance is provided, using a prebuilt image. As soon as you close your session and the disconnect timeout period is reached, the instance is terminated. This allows you to carefully control the user experience and helps to ensure a consistent, secure environment each time. AppStream 2.0 also lets you enforce restrictions on user sessions, such as disabling the clipboard, file transfers, or printing.
Furthermore, AppStream 2.0 uses AWS Identity and Access Management (IAM) roles to grant fine-grained access to other AWS services such as Amazon Simple Storage Service (Amazon S3), Amazon Redshift, Amazon SageMaker, and other AWS services. This gives you both control over the access as well as an accounting, via Amazon CloudTrail, of what actions were taken and when.
These features make AppStream 2.0 uniquely suitable for environments that require high security and isolation.
Why SageMaker?
Developers and data scientists use SageMaker to build, train, and deploy machine learning models quickly. SageMaker does most of the work of each step of the machine learning process to help users develop high-quality models. SageMaker access from within AppStream 2.0 provides your data scientists and analysts with a suite of common and familiar data-science packages to use against isolated data.
Solution architecture overview
This solution allows a data scientist to work with a data set while connected to an isolated environment that doesn’t have an outbound path to the internet.
First, you build an Amazon VPC with isolated subnets and with no internet gateways attached. This ensures that any instances stood up in the environment don’t have access to the internet. To provide the resources inside the isolated subnets with a path to commercial AWS services such as Amazon S3, SageMaker, AWS System Manager you build VPC endpoints and attach them to the VPC, as shown in Figure 1.
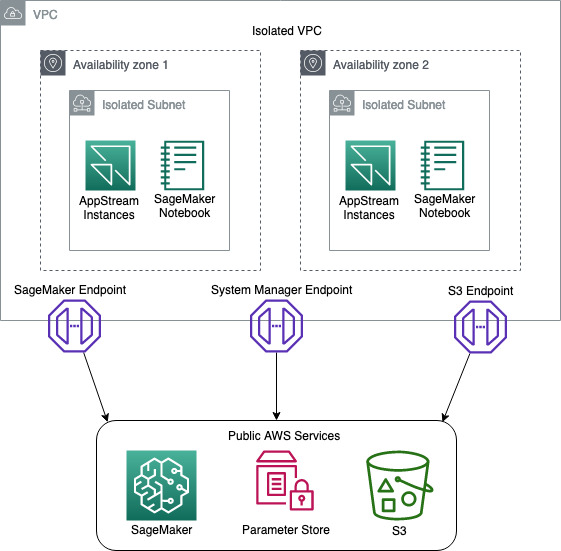
Figure 1: Network Diagram
You then build an AppStream 2.0 stack and fleet, and attach a security group and IAM role to the fleet. The purpose of the IAM role is to provide the AppStream 2.0 instances with access to downstream AWS services such as Amazon S3 and SageMaker. The IAM role design follows the least privilege model, to ensure that only the access required for each task is granted.
During the building of the stack, you will enable AppStream 2.0 Home Folders. This feature builds an S3 bucket where users can store files from inside their AppStream 2.0 session. The bucket is designed with a dedicated prefix for each user, where only they have access. We use this prefix to store the user’s pre-signed SagaMaker URLs, ensuring that no one user can access another users SageMaker Notebook.
You then deploy a SageMaker notebook for the data scientist to use to access and analyze the isolated data.
To confirm that the user ID on the AppStream 2.0 session hasn’t been spoofed, you create an AWS Lambda function that compares the user ID of the data scientist against the AppStream 2.0 session ID. If the user ID and session ID match, this indicates that the user ID hasn’t been impersonated.
Once the session has been validated, the Lambda function generates a pre-signed SageMaker URL that gives the data scientist access to the notebook.
Finally, you enable AppStream 2.0 usage reports to ensure that you have end-to-end auditing of your environment.
To help you easily deploy this solution into your environment, we’ve built an AWS Cloud Development Kit (AWS CDK) application and stacks, using Python. To deploy this solution, you can go to the Solution deployment section in this blog post.
Note: this solution was built with all resources being in a single AWS Region. The support of multi Region is possible but isn’t part of this blog post.
Solution requirements
Before you build a solution, you must know your security requirements. The solution in this post assumes a set of standard security requirements that you typically find in an enterprise environment:
- User authentication is provided by a Security Assertion Markup Language (SAML) identity provider (IdP).
- IAM roles are used to access AWS services such as Amazon S3 and SageMaker.
- AWS IAM access keys and secret keys are prohibited.
- IAM policies follow the least privilege model so that only the required access is granted.
- Windows clipboard, file transfer, and printing to local devices is prohibited.
- Auditing and traceability of all activities is required.
Note: before you will be able to integrate SAML with AppStream 2.0, you will need to follow the AppStream 2.0 Integration with SAML 2.0 guide. There are quite a few steps and it will take some time to set up. SAML authentication is optional, however. If you just want to prototype the solution and see how it works, you can do that without enabling SAML integration.
Solution components
This solution uses the following technologies:
- Amazon VPC – provides an isolated network where the solution will be deployed.
- VPC endpoints – provide access from the isolated network to commercial AWS services such as Amazon S3 and SageMaker.
- AWS Systems Manager – stores parameters such as S3 bucket names.
- AppStream 2.0 – provides hardened instances to run the solution on.
- AppStream 2.0 home folders – store users’ session information.
- Amazon S3 – stores application scripts and pre-signed SageMaker URLs.
- SageMaker notebook – provides data scientists with tools to access the data.
- AWS Lambda – runs scripts to validate the data scientist’s session, and generates pre-signed URLs for the SageMaker notebook.
- AWS CDK – deploys the solution.
- PowerShell – processes scripts on AppStream 2.0 Microsoft Windows instances.
Solution high-level design and process flow
The following figure is a high-level depiction of the solution and its process flow.
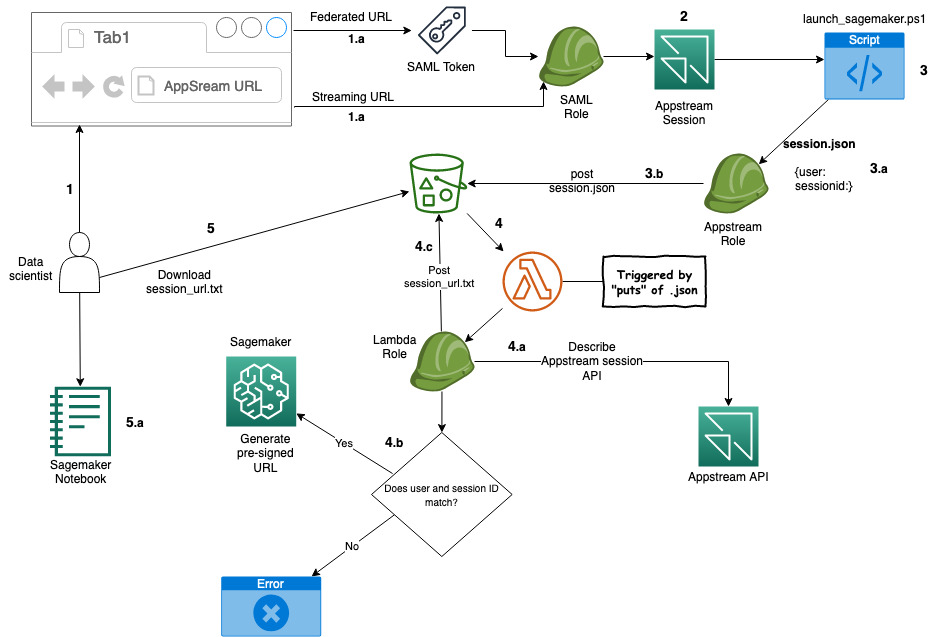
Figure 2: Solution process flow
The process flow—illustrated in Figure 2—is:
- A data scientist clicks on an AppStream 2.0 federated or a streaming URL.
- If it’s a federated URL, the data scientist authenticates using their corporate credentials, as well as MFA if required.
- If it’s a streaming URL, no further authentication is required.
- The data scientist is presented with a PowerShell application that’s been made available to them.
- After starting the application, it starts the PowerShell script on an AppStream 2.0 instance.
- The script then:
- Downloads a second PowerShell script from an S3 bucket.
- Collects local AppStream 2.0 environment variables:
- AppStream_UserName
- AppStream_Session_ID
- AppStream_Resource_Name
- Stores the variables in the session.json file and copies the file to the home folder of the session on Amazon S3.
- The PUT event of the JSON file into the Amazon S3 bucket triggers an AWS Lambda function that performs the following:
- Reads the session.json file from the user’s home folder on Amazon S3.
- Performs a describe action against the AppStream 2.0 API to ensure that the session ID and the user ID match. This helps to prevent the user from manipulating the local environment variable to pretend to be someone else (spoofing), and potentially gain access to unauthorized data.
- If the session ID and user ID match, a pre-signed SageMaker URL is generated and stored in session_url.txt, and copied to the user’s home folder on Amazon S3.
- If the session ID and user ID do not match, the Lambda function ends without generating a pre-signed URL.
- When the PowerShell script detects the session_url.txt file, it opens the URL, giving the user access to their SageMaker notebook.
Code structure
To help you deploy this solution in your environment, we’ve built a set of code that you can use. The code is mostly written in Python and for the AWS CDK framework, and with an AWS CDK application and some PowerShell scripts.
Note: We have chosen the default settings on many of the AWS resources our code deploys. Before deploying the code, you should conduct a thorough code review to ensure the resources you are deploying meet your organization’s requirements.
AWS CDK application – ./app.py
To make this application modular and portable, we’ve structured it in separate AWS CDK nested stacks:
- vpc-stack – deploys a VPC with two isolated subnets, along with three VPC endpoints.
- s3-stack – deploys an S3 bucket, copies the AppStream 2.0 PowerShell scripts, and stores the bucket name in an SSM parameter.
- appstream-service-roles-stack – deploys AppStream 2.0 service roles.
- appstream-stack – deploys the AppStream 2.0 stack and fleet, along with the required IAM roles and security groups.
- appstream-start-fleet-stack – builds a custom resource that starts the AppStream 2.0 fleet.
- notebook-stack – deploys a SageMaker notebook, along with IAM roles, security groups, and an AWS Key Management Service (AWS KMS) encryption key.
- saml-stack – deploys a SAML role as a placeholder for SAML authentication.
PowerShell scripts
The solution uses the following PowerShell scripts inside the AppStream 2.0 instances:
- sagemaker-notebook-launcher.ps1 – This script is part of the AppStream 2.0 image and downloads the sagemaker-notebook.ps1 script.
- sagemaker-notebook.ps1 – starts the process of validating the session and generating the SageMaker pre-signed URL.
Note: Having the second script reside on Amazon S3 provides flexibility. You can modify this script without having to create a new AppStream 2.0 image.
Deployment Prerequisites
To deploy this solution, your deployment environment must meet the following prerequisites:
- A machine with Python, Git, and AWS Command Line interface (AWS CLI) installed, to be used for the deployment.
- Download the solution code from Github.
- (Optional) A SAML federation solution that’s tied to your corporate directory.
Note: We used AWS Cloud9 with Amazon Linux 2 to test this solution, as it comes preinstalled with most of the prerequisites for deploying this solution.
Deploy the solution
Now that you know the design and components, you’re ready to deploy the solution.
Note: In our demo solution, we deploy two stream.standard.small AppStream 2.0 instances, using Windows Server 2019. This gives you a reasonable example to work from. In your own environment you might need more instances, a different instance type, or a different version of Windows. Likewise, we deploy a single SageMaker notebook instance of type ml.t3.medium. To change the AppStream 2.0 and SageMaker instance types, you will need to modify the stacks/data_sandbox_appstream.py and stacks/data_sandbox_notebook.py respectively.
Step 1: AppStream 2.0 image
An AppStream 2.0 image contains applications that you can stream to your users. It’s what allows you to curate the user experience by preconfiguring the settings of the applications you stream to your users.
To build an AppStream 2.0 image:
-
Build an image following the Create a Custom AppStream 2.0 Image by Using the AppStream 2.0 Console tutorial.
Note: In Step 1: Install Applications on the Image Builder in this tutorial, you will be asked to choose an Instance family. For this example, we chose General Purpose. If you choose a different Instance family, you will need to make sure the appstream_instance_type specified under Step 2: Code modification is of the same family.
In Step 6: Finish Creating Your Image in this tutorial, you will be asked to provide a unique image name. Note down the image name as you will need it in Step 2 of this blog post.
- Copy notebook-launcher.ps1 to a location on the image. We recommend that you copy it to C:\AppStream.
- In Step 2—Create an AppStream 2.0 Application Catalog—of the tutorial, use C:\Windows\System32\Windowspowershell\v1.0\powershell.exe as the application, and the path to notebook-launcher.ps1 as the launch parameter.
Note: While testing your application during the image building process, the PowerShell script will fail because the underlying infrastructure is not present. You can ignore that failure during the image building process.
Step 2: Code modification
Next, you must modify some of the code to fit your environment.
Make the following changes in the cdk.json file:
- vpc_cidr – Supply your preferred CIDR range to be used for the VPC.
Note: VPC CIDR ranges are your private IP space and thus can consist of any valid RFC 1918 range. However, if the VPC you are planning on using for AppStream 2.0 needs to connect to other parts of your private network (on premise or other VPCs), you need to choose a range that does not conflict or overlap with the rest of your infrastructure.
- appstream_Image_name – Enter the image name you chose when you built the Appstream 2.0 image in Step 1.a.
- appstream_environment_name – The environment name is strictly cosmetic and drives the naming of your AppStream 2.0 stack and fleet.
- appstream_instance_type – Enter the AppStream 2.0 instance type. The instance type must be part of the same instance family you used in Step 1 of the To build an AppStream 2.0 image section. For a list of AppStream 2.0 instances, visit https://aws.amazon.com/appstream2/pricing/.
- appstream_fleet_type – Enter the fleet type. Allowed values are ALWAYS_ON or ON_DEMAND.
- Idp_name – If you have integrated SAML with this solution, you will need to enter the IdP name you chose when creating the SAML provider in the IAM Console.
Step 3: Deploy the AWS CDK application
The CDK application deploys the CDK stacks.
The stacks include:
- VPC with isolated subnets
- VPC Endpoints for S3, SageMaker, and Systems Manager
- S3 bucket
- AppStream 2.0 stack and fleet
- Two AppStream 2.0 stream.standard.small instances
- A single SageMaker ml.t2.medium notebook
Run the following commands to deploy the AWS CDK application:
- Install the AWS CDK Toolkit.
- Create and activate a virtual environment.
- Change directory to the root folder of the code repository.
- Install the required packages.
- If you haven’t used AWS CDK in your account yet, run:
- Deploy the AWS CDK stack.
Step 4: Test the solution
After the stack has successfully deployed, allow approximately 25 minutes for the AppStream 2.0 fleet to reach a running state. Testing will fail if the fleet isn’t running.
Without SAML
If you haven’t added SAML authentication, use the following steps to test the solution.
- In the AWS Management Console, go to AppStream 2.0 and then to Stacks.
- Select the stack, and then select Action.
- Select Create streaming URL.
- Enter any user name and select Get URL.
- Enter the URL in another tab of your browser and test your application.
With SAML
If you are using SAML authentication, you will have a federated login URL that you need to visit.
If everything is working, your SageMaker notebook will be launched as shown in Figure 3.
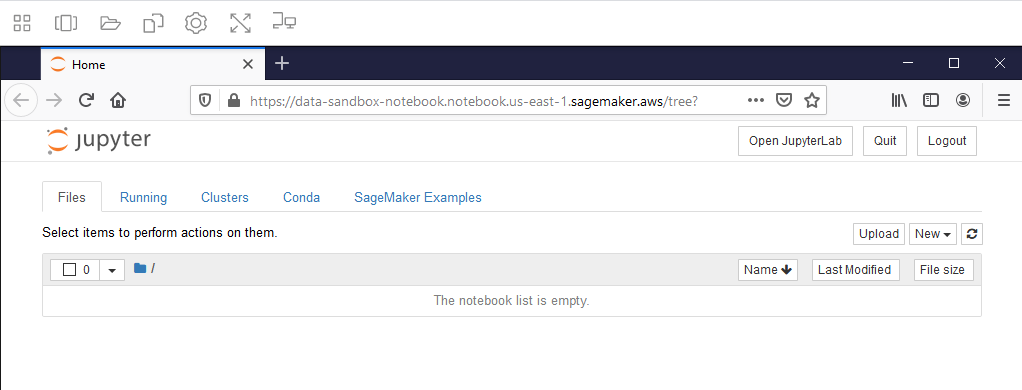
Figure 3: SageMaker Notebook
Note: if you receive a web browser timeout, verify that the SageMaker notebook instance “Data-Sandbox-Notebook” is currently in InService status.
Auditing
Auditing for this solution is provided through AWS CloudTrail and AppStream 2.0 Usage Reports. Though CloudTrail is enabled by default, to collect and store the CloudTrail logs, you must create a trail for your AWS account.
The following logs will be available for you to use, to provide auditing.
- Login – CloudTrail
- User ID
- IAM SAML role
- AppStream stack
- S3 – CloudTrail
- IAM role
- Source IP
- S3 bucket
- Amazon S3 object
- AppStream 2.0 instance IP address – AppStream 2.0 usage reports
- User ID
- Session ID
- Elastic network interface
Connecting the dots
To get an accurate idea of your users’ activity, you have to correlate some logs from different services. First, you collect the login information from CloudTrail. This gives you the user ID of the user who logged in. You then collect the Amazon S3 put from CloudTrail, which gives you the IP address of the AppStream 2.0 instance. And finally, you collect the AppStream 2.0 usage report which gives you the IP address of the AppStream 2.0 instance, plus the user ID. This allows you to connect the user ID to the activity on Amazon S3. For auditing & controlling exploration activities with SageMaker, please visit this GitHub repository.
Though the logs are automatically being collected, what we have shown you here is a manual way of sifting through those logs. For a more robust solution on querying and analyzing CloudTrail logs, visit Querying AWS CloudTrail Logs.
Costs of this Solution
The cost for running this solution will depend on a number of factors like the instance size, the amount of data you store, and how many hours you use the solution. AppStream 2.0 is charged per instance hour and there is one instance in this example solution. You can see details on the AppStream 2.0 pricing page. VPC endpoints are charged by the hour and by how much data passes through them. There are three VPC endpoints in this solution (S3, System Manager, and SageMaker). VPC endpoint pricing is described on the Privatelink pricing page. SageMaker Notebooks are charged based on the number of instance hours and the instance type. There is one SageMaker instance in this solution, which may be eligible for free tier pricing. See the SageMaker pricing page for more details. Amazon S3 storage pricing depends on how much data you store, what kind of storage you use, and how much data transfers in and out of S3. The use in this solution may be eligible for free tier pricing. You can see details on the S3 pricing page.
Before deploying this solution, make sure to calculate your cost using the AWS Pricing Calculator, and the AppStream 2.0 pricing calculator.
Conclusion
Congratulations! You have deployed a solution that provides your users with access to sensitive and isolated data in a secure manner using AppStream 2.0. You have also implemented a mechanism that is designed to prevent user impersonation, and enabled end-to-end auditing of all user activities.
To learn about how Amazon is using AppStream 2.0, visit the blog post How Amazon uses AppStream 2.0 to provide data scientists and analysts with access to sensitive data.
If you have feedback about this post, submit comments in the Comments section below.
Want more AWS Security how-to content, news, and feature announcements? Follow us on Twitter.