AWS Storage Blog
Moving external site data to AWS for file transfers with AWS Transfer Family
Managing a strong, cohesive relationship with third-party vendors and outside partners involves transferring data back-and-forth to facilitate projects and workloads. Transferring data between separate organizations can be challenging, with different infrastructures, policies, and protocols to reconcile.
AWS Transfer Family offers fully managed support for transferring files over SFTP, FTPS, and FTP directly into and out of Amazon S3. Customers like Discover Financial use Transfer Family to move secure file transfers between their on-premises data storage and AWS environments in a scalable and highly available manner. Transfer Family gives you an inbound endpoint that your partners can connect to and push or pull files bi-directionally to your storage in AWS. But what if your partners want you to do the same using a server endpoint that they provide? How can you connect to these external endpoints securely and automatically?
When working with outside partners, contractors, or associates, AWS Transfer Family makes sharing files easy. In this post, I demonstrate using AWS Fargate as an outbound connector to pull data from an external SFTP server and place those files into Amazon S3. These files are then available for your users through Transfer Family using SFTP, FTPS, or FTP. By leveraging the secure, highly available, and scalable Transfer Family service, you can focus on populating your data lake, letting AWS handle the undifferentiated heavy lifting of managing your SFTP, FTPS, or FTP server.
Solution architecture overview
In this section, I provide an overview of the solution, depicted in the following architecture diagram:

Figure 1: Architecture diagram showing AWS Fargate as an outbound connector to pull data from an external SFTP server and place those files into Amazon S3.
A container image stored on Amazon Elastic Container Registry (Amazon ECR) defines the business logic required to authenticate and pull files from an external SFTP server. You execute a Fargate task within an Amazon ECS cluster using this container definition to run on demand. Fargate retrieves credentials from AWS Secrets Manager and performs the task.
Once Fargate places files in Amazon S3, your users and applications can then access those files securely into and out of Amazon S3 over SFTP using Transfer Family. Amazon S3 ensures that the files are durable, highly available, and secure.
For this demonstration, I provide an AWS CloudFormation template that deploys the following resources:
- An Amazon S3 bucket as the domain for Transfer Family
- An SFTP Transfer Family server with a test user
- A secret name in Secrets Manager containing SFTP server hostname/IP address, user name, and password as secret values
- A Fargate task placed across two public subnets in an Amazon Virtual Private Cloud (Amazon VPC)
- The necessary AWS Identity and Access Management (IAM) roles
Additionally, I use a publicly accessible Amazon EC2 instance acting as an external SFTP server. I use the public address for the Amazon EC2 instance as the server host IP address in addition to user name and password for authentication. You can use any external SFTP server for which you have authorized credentials. You will specify these as parameters before deploying the CloudFormation template.
Setting up
First, you’ll clone the Git repository containing the Dockerfile and Python code to create a container. You’ll then push this container image to Amazon ECR.
You must install Git, install Docker, and have the latest version of the AWS Command Line Interface (CLI) installed on your machine.
1. Run the following command to copy the Git repository, and navigate to the folder aws-fargate-outbound-connector-transfer-family.
git clone https://github.com/aws-samples/aws-fargate-outbound-connector-transfer-family.git2. Navigate to the Amazon ECR console.
3. Create a private repository and give your repository a name.
4. Leave the other settings as their default, and select Create repository.

5. In the repository you just created, select View push commands.
6. Follow the four steps to push the Docker image to your repository in your environment by running the commands in your command line.
7. Copy the Image URI (Uniform Resource Identifier) once pushed to your repository. You will use this URI in the next section.

Deploying the CloudFormation template
To deploy your resources, complete the following steps:
1. Deploy the CloudFormation stack in your desired Region (for this post, we use us-east-1; check the AWS Regional Services List).
2. For Stack name, enter a name.
3. Enter the following Parameters:
-
- Server host for the external SFTP server as a hostname or an IP address
- User name and password credentials for authentication
- Directory path where files in the SFTP are located
- Container image URI (paste value from preceding section)
4. Choose Next.

5. Proceed through the steps and acknowledge that AWS CloudFormation might create IAM resources with custom names, then select Create stack.

CloudFormation deploys all necessary resources within 7 minutes. You can check deployment status in the Events tab within the CloudFormation console.
Running the AWS Fargate task
For demonstration, I’ve placed both text and zip files within a directory path on my Amazon EC2 instance, which is acting as an external SFTP server. I’ll use the Fargate task to pull those files in and place them in the Amazon S3 bucket created by CloudFormation.
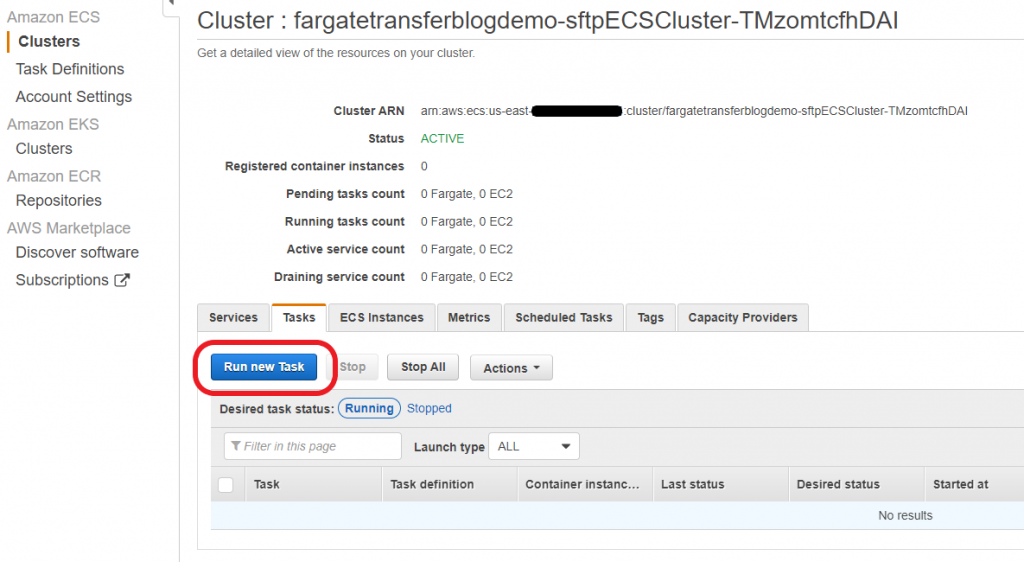
To see the task in action, you can manually trigger the Fargate task in the Amazon ECS console.
1. Select the ECS cluster created by CloudFormation and select Run new Task in the Tasks.
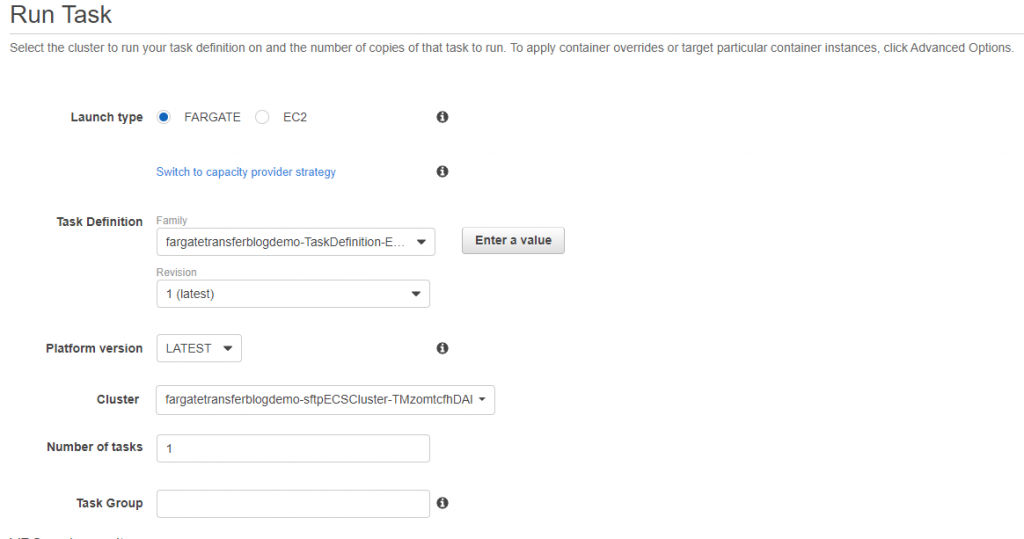
2. Select Fargate as the Launch type.
3. Select the Task Definition created by CloudFormation.
4. Select the Cluster created by CloudFormation.
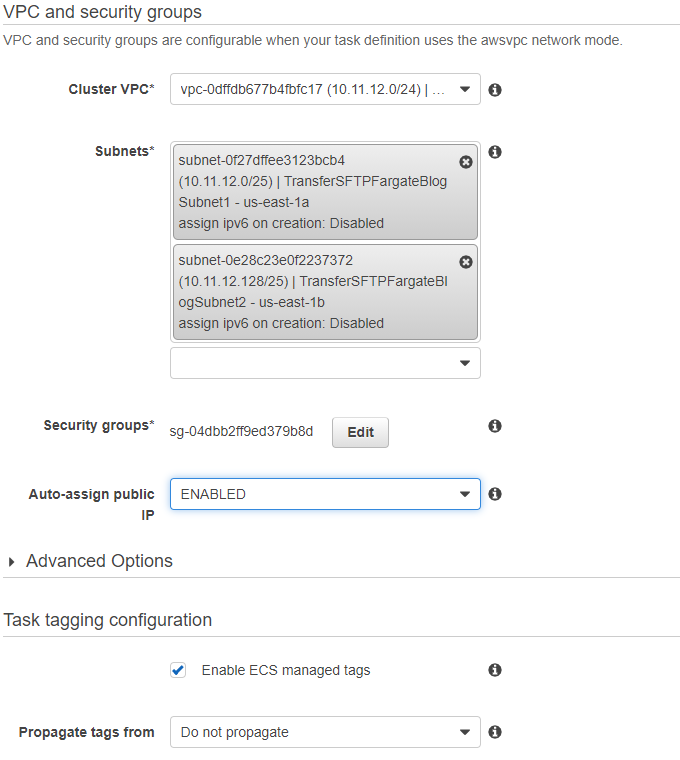
5. Select the Cluster VPC, Subnets, and Security groups created by CloudFormation.
6. Select ENABLED for Auto-assign public IP.
7. Leave all others as default and choose Run Task.
Fargate automatically provisions the compute resources needed to the run the task without requiring you to think about server boundaries. The task securely retrieves the secrets you provided during the CloudFormation stack creation from Secrets Manager to authenticate as the user. It then pulls the files from the external site, unzips them (if necessary), and places them into the Amazon S3 bucket. If the file size exceeds a certain threshold (for example, 100 MB) the task uploads via multipart upload.
Once the task is complete, you will see the files in the S3 bucket. This results in users gaining access to those files using Transfer Family.

Editing container definitions
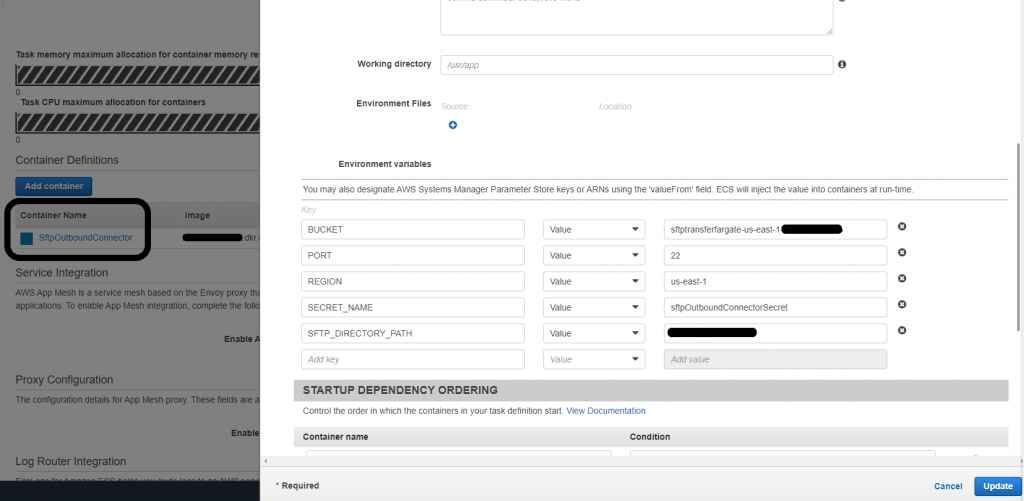
You can edit the task’s environment variables if you must change the Amazon S3 bucket, Region, port, directory path, or secret values.
1. Select Create new revision when you have selected the task definition name.

2. Scroll down and select the container name.
3. An embedded page will appear. Scroll down to the Environment variables section where you can edit/add values to fit your use case.
Accessing files with AWS Transfer Family
Files in the Amazon S3 bucket are accessible via AWS Transfer Family using the supported SFTP call.
The CloudFormation template created two outputs. First an SFTP server that is publicly accessible and second, a service-managed user, named ‘testuser.’ The service-managed user is permitted to view and retrieve the files in the S3 bucket and uses an SSH public-private key for authentication. If you prefer to authenticate your users using a password policy, you can alternatively enable password authentication.
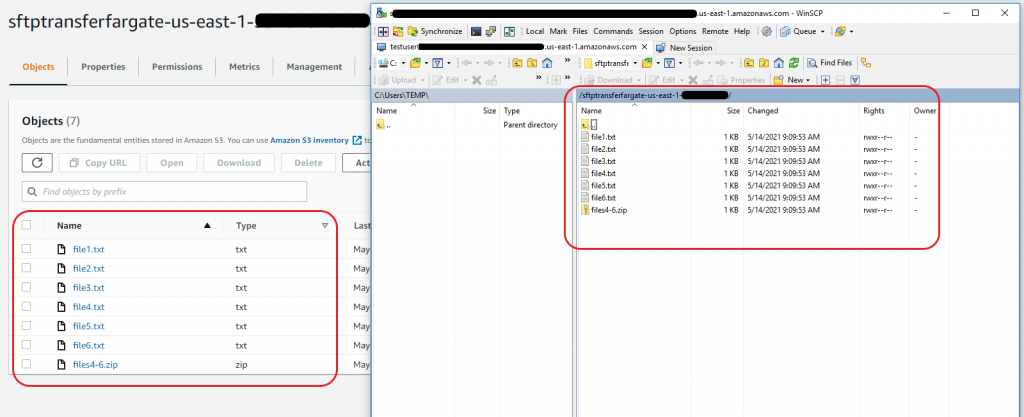
You can use your favorite SFTP client to connect to the Transfer Family server. For example, I use WinSCP. I connect to the Transfer Family server’s hostname on port 22. I log in as ‘testuser’ and provide the necessary credentials. I used SFTP but this can be easily extended to enable FTPS and/or FTP.
![]()
Once authenticated, you can view the files in the Amazon S3 bucket with the SFTP protocol. You can see a side-by-side comparison of the files in Amazon S3 and using the WinSCP client.
Cleaning up
To avoid incurring future charges, delete the files in your Amazon S3 bucket.
Also, delete the AWS CloudFormation stack. With the AWS Transfer Family, you only pay for the protocols you have enabled for access to your endpoint, and the amount of data transferred over each of the protocols. Deleting the CloudFormation stack will delete the AWS Transfer Family SFTP instance.
Conclusion
In this post, I discussed how to use AWS Fargate as an outbound connector to pull data from an external SFTP site and place that data into an Amazon S3 bucket. Once the objects are in Amazon S3, they can then be accessed by provisioned users through AWS Transfer Family. This solution can easily be modified to fit your exact use case because containers allow flexibility. For instance, you can use other Python libraries to communicate over different ports or add logic to transform the data before placing them in an Amazon S3 bucket.
I hope this blog post provided some helpful guidance on using AWS Transfer Family and other AWS services to build data lake workflows that gather data from different sources for processing and analysis. Using the solution provided, you can automatically and seamlessly facilitate data transfers with external partners seeking to incorporate their own data into projects and workloads ran through your data lake. With simplified file transfers and transfer management using AWS Transfer Family, you can focus on using the data in your data lake to optimize projects and workloads without having to spend time and resources on managing servers or data intake from external sources.
Thanks for reading this blog post! If you have any comments or questions, don’t hesitate to leave them in the comment section.