AWS Partner Network (APN) Blog
How to Integrate AWS Client VPN with Azure Active Directory
By Steven Harper, Engineering Practice Lead at Infinity Works
 |
One of our clients at Infinity Works was migrating their call center to Amazon Connect when the recent lockdowns hit. Originally, the call center agents required access to systems that were not publicly accessible on the internet, but ran within private subnets of Amazon Virtual Private Clouds (VPCs).
When working within their offices, they used AWS site-to-site VPNs to gain this access, but more recently, the agents have needed to access these private VPNs from home.
It’s well known that IT departments prefer authentication integration into existing identity providers (IdPs) such as Azure Active Directory to reduce operational overhead and the attack surface of IT systems. We had to find a solution that provided access from home but integrated into Active Directory.
As it turned out, Amazon Web Services (AWS) had announced federated authentication support for AWS Client Virtual Private Network (VPN) in May 2020. This support requires integration with a SAML 2.0 provider, such as Azure Active Directory. We were in luck!
In this post, I will show you how to integrate AWS Client VPN with an Azure Active Directory. By connecting to the AWS Client VPN using a browser-based authentication provided by Azure, this approach gives remote users access to Amazon VPC. This has the advantage of using the existing MFA used for all Azure access.
Infinity Works is an AWS Advanced Consulting Partner with the AWS DevOps Competency and broad experience in government, finance, retail, health, and other sectors.
Solution Overview
As shown in Figure 1 below, the solution is an AWS Control Tower-generated structure, with an AWS Transit Gateway hub-and-spoke network that controls access between attached VPCs. An Amazon Route 53 resolver provides external connections with a fully recursive DNS solution that has DNS zones for the AWS part of the solution.

Figure 1 – Solution overview.
Clients connect to a separate VPC in the transit account. The IDs of the Azure Active Directory group a user belongs to are exposed to the AWS Client VPN. Using rules configured in the AWS console, routes are assigned to the connected client granting them access to other VPCs through AWS Transit Gateway.
Clients use this solution as a split VPN—only configured routes provide services over this connection. Traffic that resolves to other routes use the local network to reach the internet, with all DNS resolution happening on the Route 53 resolver.
How to Set Up Federated Authentication
This walkthrough shows you how to:
- Create a new enterprise application in Azure, configure it to work with the AWS Client VPN, add users, and then download the Federation Metadata XML.
- Set up a new IAM identity provider in AWS, and go on to create the Client VPN and configure it.
- Download the VPN connection configuration, connect to the new VPN, and demonstrate the observability of connections and logs.
Prerequisites
- AWS account.
- Amazon VPC with some private services.
- Transit network (optional).
- Azure account, with rights to create a new Enterprise Application in Active Directory.
- Experience with the AWS console.
Azure Preparation
To prepare Azure, follow these steps:
- Create an enterprise application.
- Modify basic SAML configuration.
- Change user attributes and claims.
- Adjust signing options in the SAML signing certificate.
- Change Reply URL back to HTTP.
- Add users and groups.
- Download federation metadata XML.
Step 1: Create an Enterprise Application
Azure will be the identity provider in this case. Log in to Azure and, within the portal, create a new enterprise application named AWS Client VPN.

Figure 2 – In Azure, create application named AWS Client VPN.
Step 2: Modify the Basic SAML Configuration
Following these instructions, modify the basic SAML configuration to these values:
- Identifier (Entity ID) − urn:amazon:webservices:clientvpn
- Reply URL (Assertion Consumer Service URL) − https://127.0.0.1:35001
Note that Azure only allows HTTPS as the value of the Reply URL, whereas AWS requires HTTP. You will fix this in Step 5.
Step 3: Change User Attributes and Claims
Change user attributes and claims to the following values. They create the SAML response payload that the AWS Client VPN software will pass onto AWS when the authentication is made.
- nameidentifier − Source attribute : user.userprincipalname
- **CLEAR ALL CLAIMS
- **CASE SENSITIVE
- Add new claim − Name : FirstName Source attribute user.givenname
- Add new claim − Name : LastName Source attribute user.surname
- Add a group claim − Name : memberOf Source attribute user.groups AllGroups (groupId)
Step 4: Adjust Signing Option in SAML Signing Certificate
Change the Signing Option to Sign SAML response and assertion.
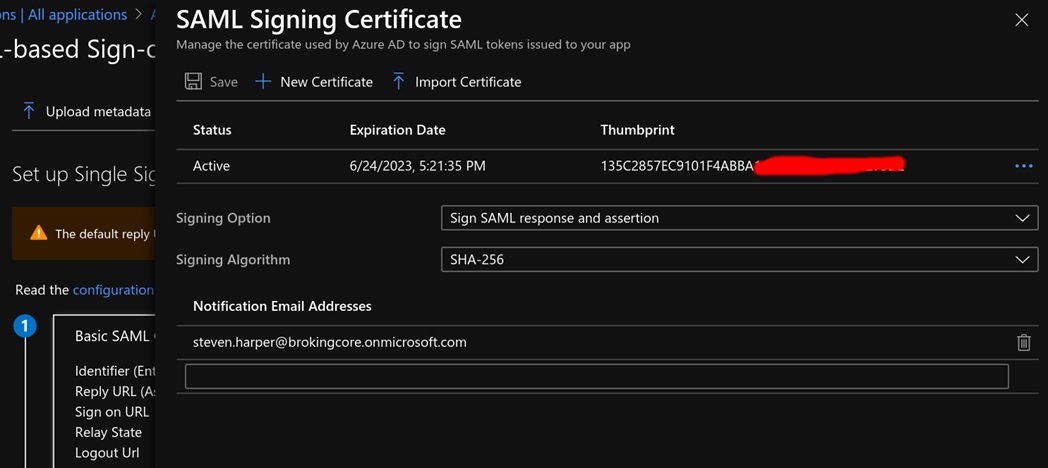
Figure 3 – Adjusted signing options in SAML Signing Certificate.
Step 5: Change Reply URL Back to HTTP
Change the Reply URL (Assertion Consumer Service URL) back to HTTP. You can do this by adjusting the Applications manifest in the App registrations part of Azure Portal.
Modify the XML to have the HTTP value and save it

Figure 4 – Adjusted signing options in SAML Signing Certificate.
Step 6: Add Users and Groups
The SAML 2.0 identity provider is now configured as expected by AWS Client VPN. To add users to this application in Azure, you can to so either by individual user assignment or by adding groups.
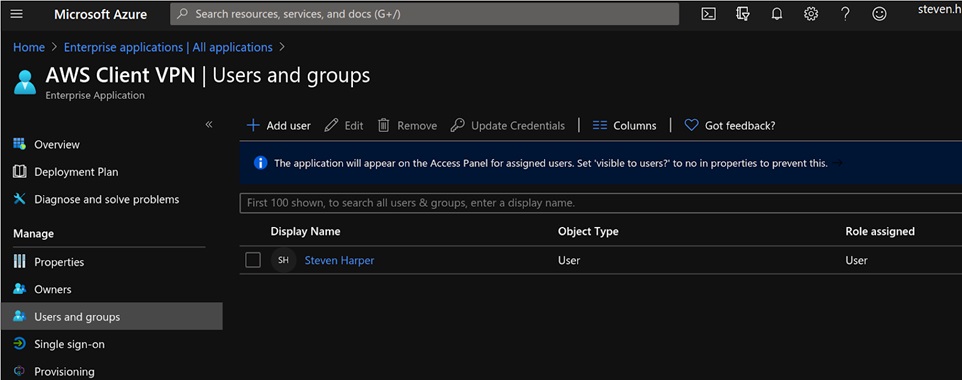
Figure 5 – Adding users and groups.
Step 7: Download Federation Metadata XML
In the Enterprise application section, select Azure, then Enterprise Apps, and then Download XML. You’ll need this file to create the IAM identity provider in AWS.
AWS Preparation
To prepare AWS, follow these steps:
- Create a new IAM identity provider.
- Upload metadata XML.
- Create the AWS client VPN.
- Associate subnets.
- Authorize access.
- Add routes.
- Download the client configuration file.
Step 1: Create a New IAM Identity Provider
Create the new IAM identity provider in the AWS Transit account.

Figure 6 – Creating a new IAM identity provider.
Step 2: Upload Metadata XML
Select Upload metadata and upload the XML file you downloaded from Azure.
You can use a self-generated private certificate, but this example uses a certificate generated by AWS Certificate Manager, proving ownership by adding a CNAME into its Amazon Route 53 DNS.
Step 3: Create the AWS Client VPN
In the AWS Transit account, select new Client VPN Endpoint.
The Client IPv4 CIDR (10.148.0.0/16) is a network that AWS will be creating. Clients get assigned IPs in this range and will be assigned routes out of that VPC depending on what we authorize them to do.
You already created a VPC (as part of the prerequisites) and attached it to the AWS Transit Network.
Now complete the form, selecting the server certificate ARN, SAML Provider ARN, and VPC from selectable drop-downs. Note the security group is the default one for the VPC.
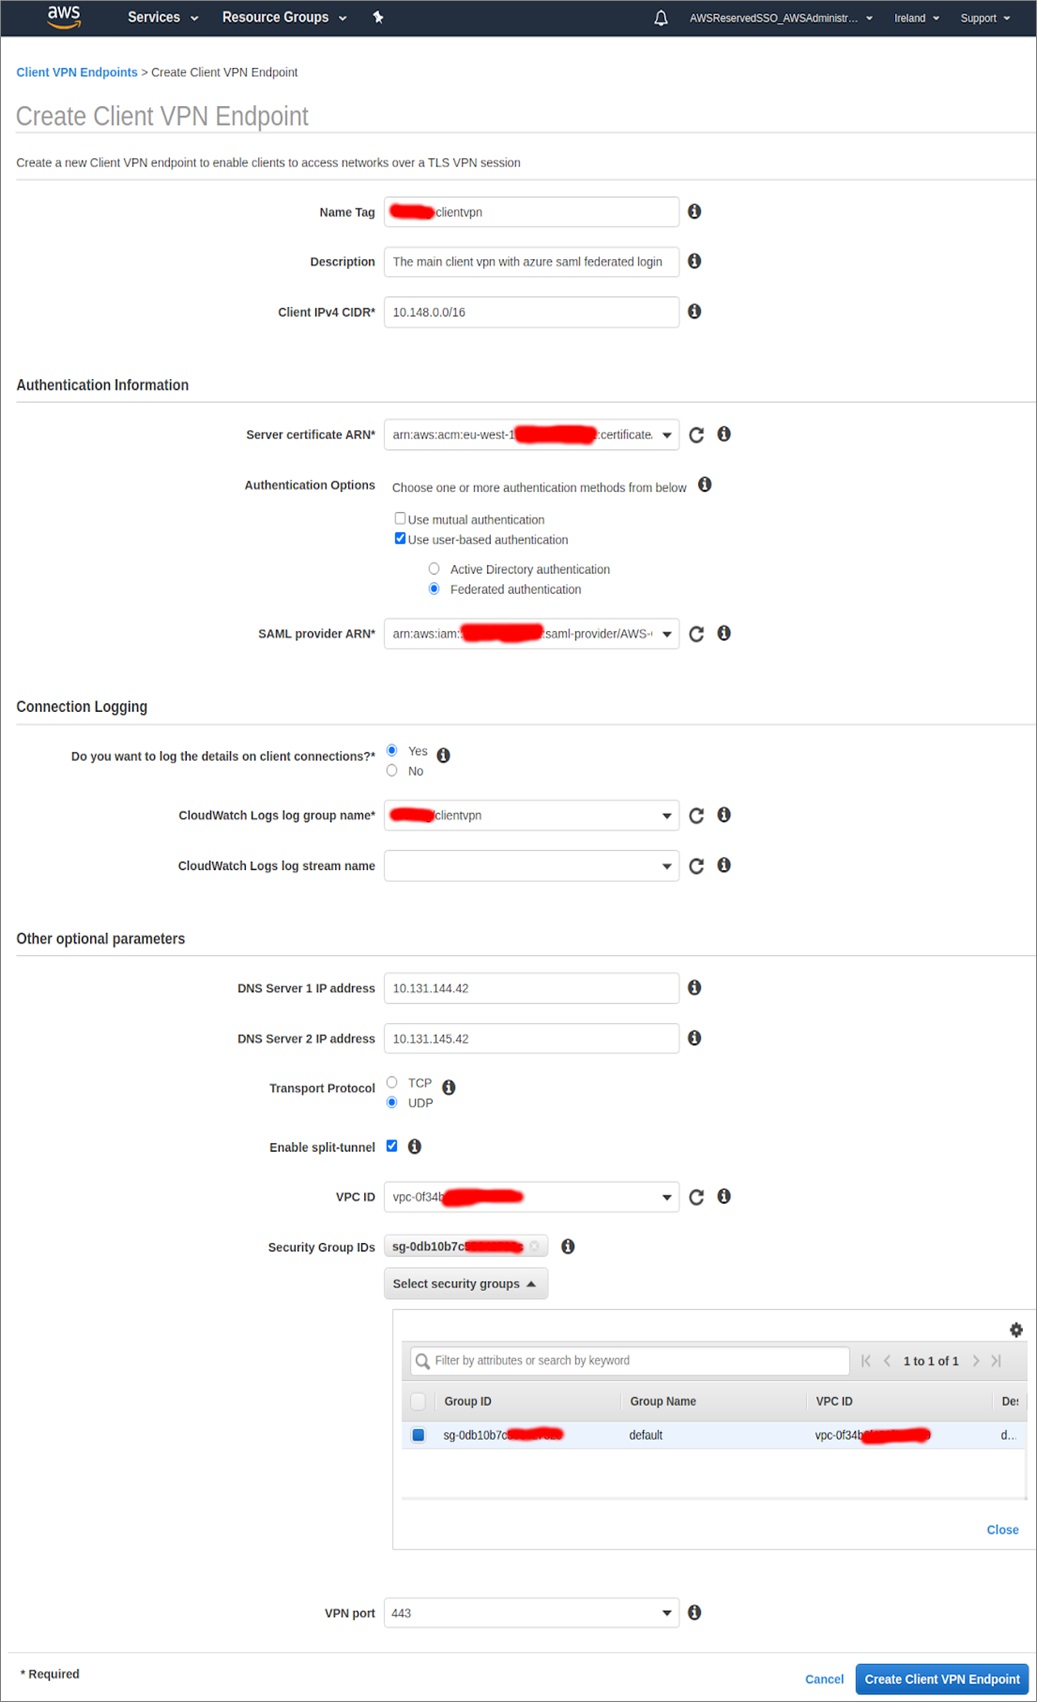
Figure 7 – Creating the AWS client VPN.
Step 4: Associate the Subnets
After a short period, the AWS Client VPN is created. You can then associate the two subnets in your VPC to the VPN-managed VPC, providing AWS Availability Zone redundancy for the users.

Figure 8 – Association of subnets.
Step 5: Authorize Access
Now, you must authorize the destinations you need for VPN users. Your users need DNS traffic and access to the build account, so add them. Later you may want to add rules here (based on Azure Active Directory group IDs) to allow certain users to reach the product VPCs.
- Destination network to enable – 10.154.0.0/16
- Grant access to – Allow access to all users
- Description – build
- Destination network to enable – 10.131.128.0/19
- Grant access to – Allow access to all users
- Description – transit-dns

Figure 9 – Authorizing access.
Step 6: Add Routes
Add one route for each of the subnets to the Routes table. There will be two routes created automatically when you associate the subnets, and you need to add the routes for the DNS VPC and build VPC. In the future, you may want to add routes for your products VPCs.

Figure 10 – Adding routes to the Routes table.
Wait for all of these routes to turn green and display a state of Active.
Step 7: Download the Client Configuration File
Select the Download Client Configuration button.

Figure 11 – Downloading Client Configuration.
Connecting with the AWS VPN Client
To connect with the AWS VPN Client, follow these steps:
- Download and install the AWS VPN Client.
- Change its configuration.
- Import the configuration.
- Connect.
Step 1: Download and Install the AWS VPN Client
First, download the AWS Client VPN software. It currently supports two operating systems:
- Apple OSX
- Microsoft Windows
Step 2: Change the Configuration
There are some changes to the downloaded configuration file that are needed for the VPN client to work. Because you used an AWS Certificate, you must change the Certificate Authority (CA) chain.
Open the configuration file in a text editor and change the final certificate with the following block:
Step 3: Import the Configuration
Start the AWS VPN Client software on an agent’s laptop and import the configuration file.
When you import the configuration, the AWS Client VPN keeps its own copy. Adjusting the original copy will not update the AWS Client VPN version, so if you modify it, be sure to re-import it.
Step 4: Connect
When you select Connect, a login journey with Azure will begin in your default browser. You will go through any MFA configured in your Azure Active Directory. After authentication, the browser is redirected to http://127.0.0.1:35001.
This request is delivering the SAML response payload to the AWS Client VPN software that is listening on port 35001.
The following page indicates a successful login:

Figure 12 – Successful login.
Results
The AWS VPN Client should show you your statistics.
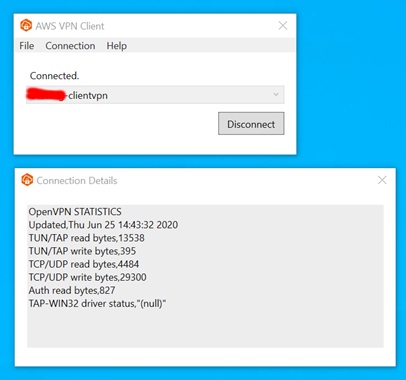
Figure 13 – VPN Client statistics.
If you want to see the SAML exchange that happened in the browser, you can install a SAML tracer and re-connect to view the exchange.
You can see the payloads and requests; the plugin base64-decodes them for you.
Description of DNS and IP Assignment
The agent’s DNS requests are now being resolved by the Amazon Route 53 resolver. Routes have been added to the system for 10.131.128.0/19 (DNS) and 10.154.0.0/16 (Build account). The VPN connection will have a local IP in the 10.148.0.0/16 range.
If you type a URL into the browser that’s in one of your hosted zones in Route 53, the traffic will go through the VPN connection, into the 10.148.0.0/16 VPC, into the Transit-connected VPC, and across the Transit network to the build VPC.
For this to work, you MUST put the return routes to the 10.148.0.0/16 in the build VPC or the traffic will not come back through the transit network. You will also need to adjust your security groups for the build server to allow traffic from your new range of 10.148.0.0/16.
Observing Connected Clients in AWS Console
Observe the connected clients in the AWS console:

Figure 14 – Observe connected clients in the AWS console.
Viewing Logs in Amazon CloudWatch
You can also see details in Amazon CloudWatch.

Figure 15 – Viewing Logs in Amazon CloudWatch.
Costs
Because you are using AWS Transit Gateway, you only need two associated subnets. This VPN is running 24/7, with 50 users connected for 40 hours a week.
| AWS Client VPN endpoint association | $0.10 per hour |
| AWS Client VPN connection | $0.05 per hour |
| 2 associations for 24 hours a day (30 days) | $0.10 * 2 * 24 * 30 = $144 |
| 50 users, connected 40 hours a week, 4 weeks | $0.05 * 50 * 40 * 4 = $400 |
That’s $544 per month.
Conclusion
In this post, I have shown you how AWS Client VPN can be integrated with Azure Active Directory using a SAML IdP.
Your VPN users’ traffic for specific routes goes over the VPN while internet traffic goes over the agent’s normal internet connection. You could add a NAT onto your transit network and route all traffic over the VPN for a more secure environment in which all traffic is monitored (at an additional traffic cost).
Learn more about how Infinity Works can help you deliver technological innovation, streamlined product delivery, and organizational transformation.
The content and opinions in this blog are those of the third-party author and AWS is not responsible for the content or accuracy of this post.
.

.
Infinity Works – AWS Partner Spotlight
Infinity Works is an AWS Advanced Consulting Partner that has broad experience in government, finance, retail, health, and other sectors.
Contact Infinity Works | Partner Overview
*Already worked with Infinity Works? Rate the Partner
*To review an AWS Partner, you must be a customer that has worked with them directly on a project.