Category: Elastic Load Balancing
New – AWS Application Load Balancer
We launched Elastic Load Balancing (ELB) for AWS in the spring of 2009 (see New Features for Amazon EC2: Elastic Load Balancing, Auto Scaling, and Amazon CloudWatch to see just how far AWS has come since then). Elastic Load Balancing has become a key architectural component for many AWS-powered applications. In conjunction with Auto Scaling, Elastic Load Balancing greatly simplifies the task of building applications that scale up and down while maintaining high availability.
On the Level
Per the well-known OSI model, load balancers generally run at Layer 4 (transport) or Layer 7 (application).
A Layer 4 load balancer works at the network protocol level and does not look inside of the actual network packets, remaining unaware of the specifics of HTTP and HTTPS. In other words, it balances the load without necessarily knowing a whole lot about it.
A Layer 7 load balancer is more sophisticated and more powerful. It inspects packets, has access to HTTP and HTTPS headers, and (armed with more information) can do a more intelligent job of spreading the load out to the target.
Application Load Balancing for AWS
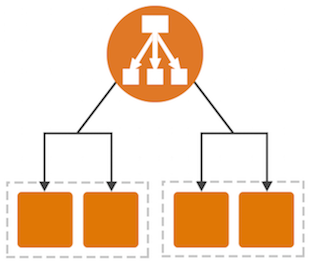 Today we are launching a new Application Load Balancer option for ELB. This option runs at Layer 7 and supports a number of advanced features. The original option (now called a Classic Load Balancer) is still available to you and continues to offer Layer 4 and Layer 7 functionality.
Application Load Balancers support content-based routing, and supports applications that run in containers. They support a pair of industry-standard protocols (WebSocket and HTTP/2) and also provide additional visibility into the health of the target instances and containers. Web sites and mobile apps, running in containers or on EC2 instances, will benefit from the use of Application Load Balancers.
Let’s take a closer look at each of these features and then create a new Application Load Balancer of our very own!
Content-Based Routing
An Application Load Balancer has access to HTTP headers and allows you to route requests to different backend services accordingly. For example, you might want to send requests that include /api in the URL path to one group of servers (we call these target groups) and requests that include /mobile to another. Routing requests in this fashion allows you to build applications that are composed of multiple microservices that can run and be scaled independently.
As you will see in a moment, each Application Load Balancer allows you to define up to 10 URL-based rules to route requests to target groups. Over time, we plan to give you access to other routing methods.
Support for Container-Based Applications
Many AWS customers are packaging up their microservices into containers and hosting them on Amazon EC2 Container Service. This allows a single EC2 instance to run one or more services, but can present some interesting challenges for traditional load balancing with respect to port mapping and health checks.
The Application Load Balancer understands and supports container-based applications. It allows one instance to host several containers that listen on multiple ports behind the same target group and also performs fine-grained, port-level health checks
Better Metrics
Application Load Balancers can perform and report on health checks on a per-port basis. The health checks can specify a range of acceptable HTTP responses, and are accompanied by detailed error codes.
As a byproduct of the content-based routing, you also have the opportunity to collect metrics on each of your microservices. This is a really nice side-effect that each of the microservices can be running in its own target group, on a specific set of EC2 instances. This increased visibility will allow you to do a better job of scaling up and down in response to the load on individual services.
The Application Load Balancer provides several new CloudWatch metrics including overall traffic (in GB), number of active connections, and the connection rate per hour.
Support for Additional Protocols & Workloads
The Application Load Balancer supports two additional protocols: WebSocket and HTTP/2.
WebSocket allows you to set up long-standing TCP connections between your client and your server. This is a more efficient alternative to the old-school method which involved HTTP connections that were held open with a “heartbeat” for very long periods of time. WebSocket is great for mobile devices and can be used to deliver stock quotes, sports scores, and other dynamic data while minimizing power consumption. ALB provides native support for WebSocket via the ws:// and wss:// protocols.
HTTP/2 is a significant enhancement of the original HTTP 1.1 protocol. The newer protocol feature supports multiplexed requests across a single connection. This reduces network traffic, as does the binary nature of the protocol.
The Application Load Balancer is designed to handle streaming, real-time, and WebSocket workloads in an optimized fashion. Instead of buffering requests and responses, it handles them in streaming fashion. This reduces latency and increases the perceived performance of your application.
Creating an ALB
Let’s create an Application Load Balancer and get it all set up to process some traffic!
The Elastic Load Balancing Console lets me create either type of load balancer:
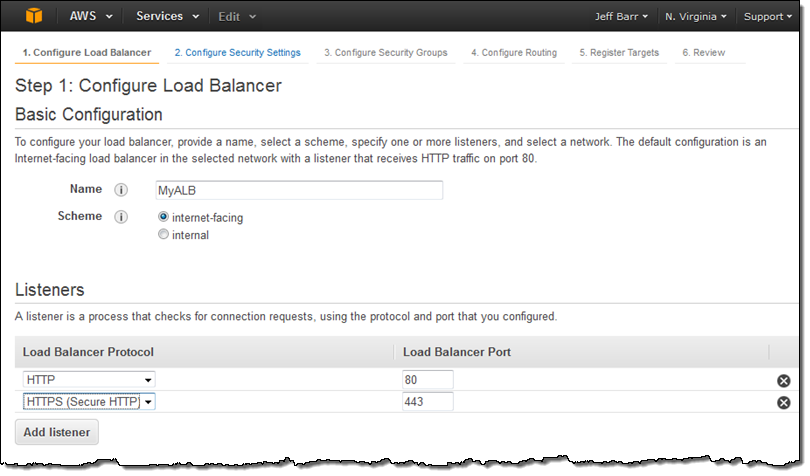
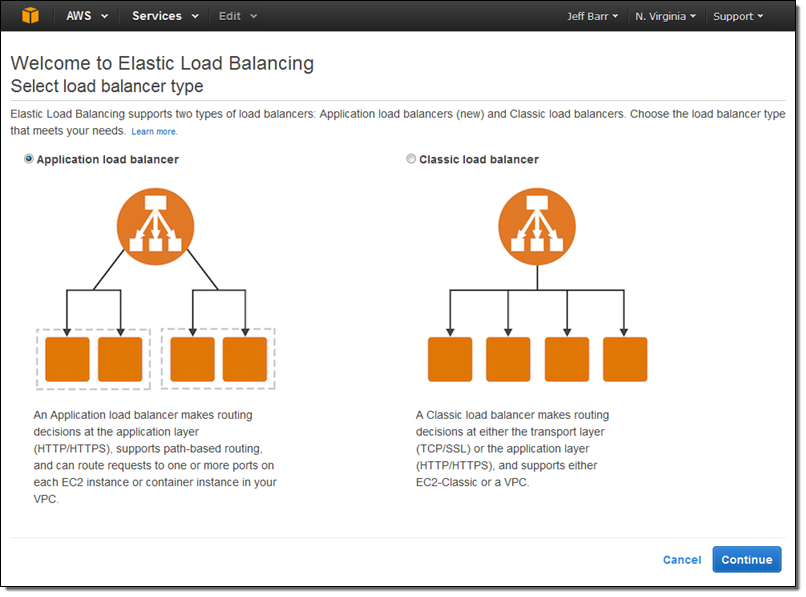 I click on Application load balancer, enter a name (MyALB), and choose internet-facing. Then I add an HTTPS listener:
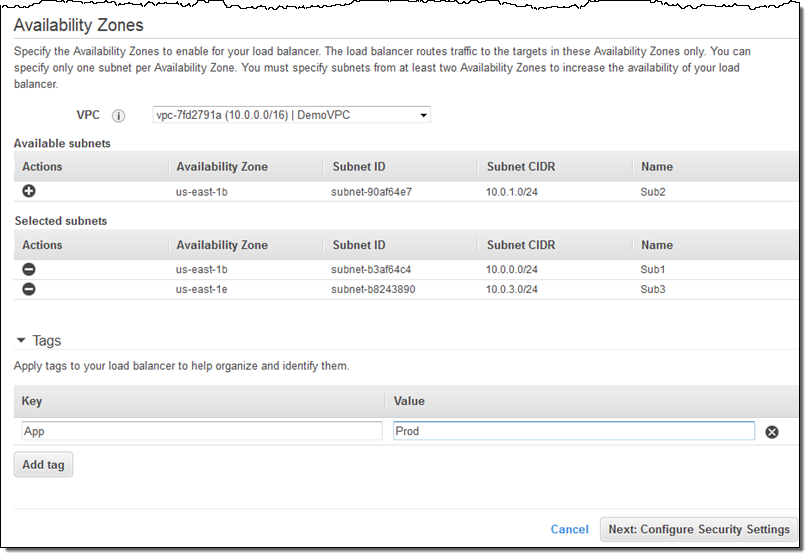
On the same screen, I choose my VPC (this is a VPC-only feature) and one subnet in each desired Availability Zone, tag my Application Load Balancer, and proceed to Configure Security Settings:
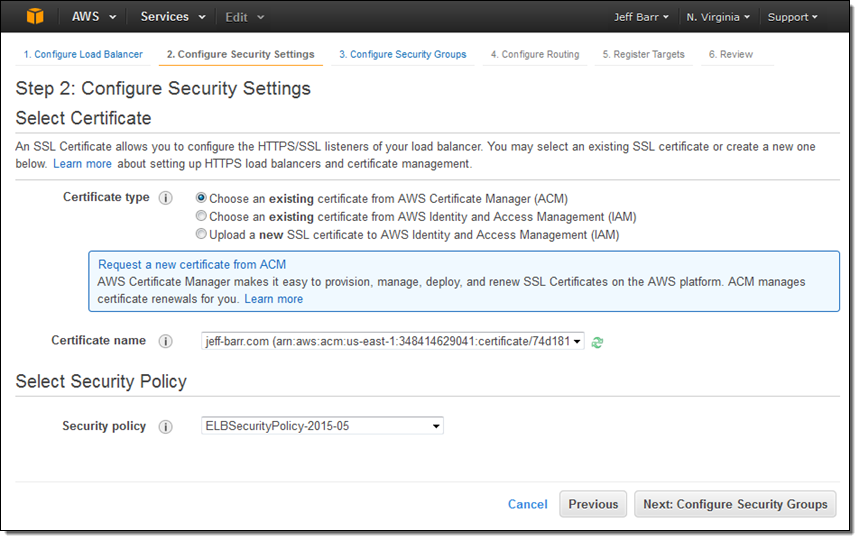
Because I created an HTTPS listener, my Application Load Balancer needs a certificate. I can choose an existing certificate that’s already in IAM or AWS Certificate Manager (ACM), upload a local certificate, or request a new one:
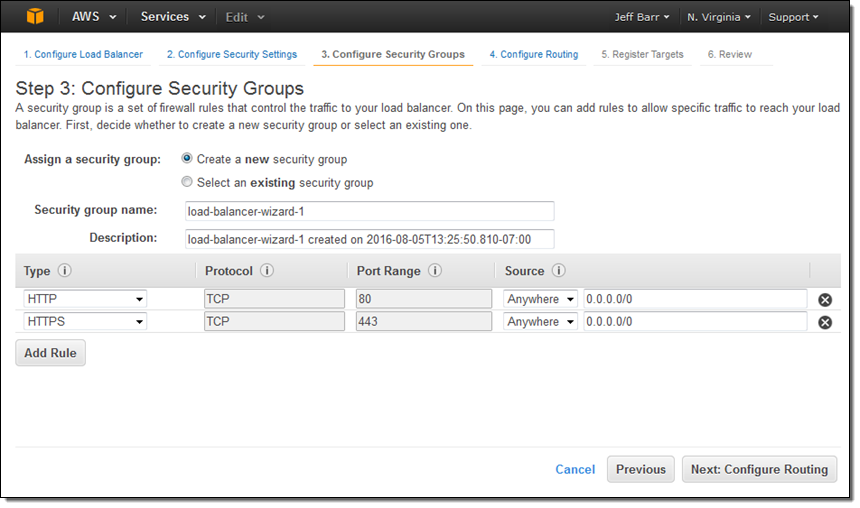
Moving right along, I set up my security group. In this case I decided to create a new one. I could have used one of my existing VPC or EC2 security groups just as easily:
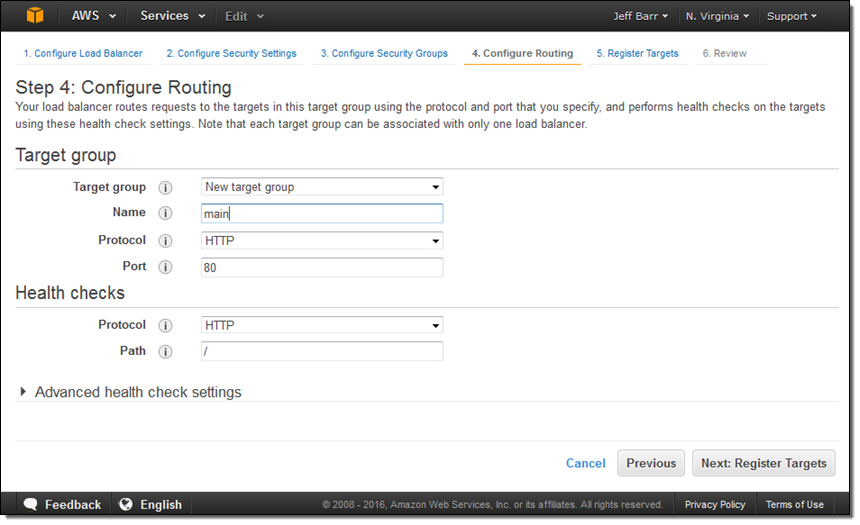
The next step is to create my first target group (main) and to set up its health checks (I’ll take the defaults):
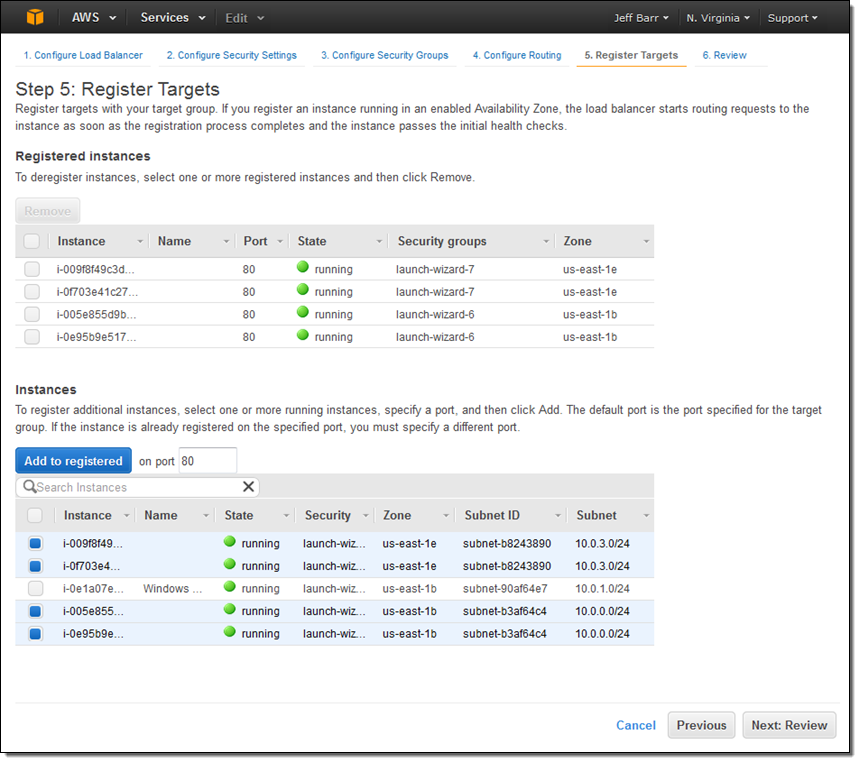
Now I am ready to choose the targets—the set of EC2 instances that will receive traffic through my Application Load Balancer. Here, I chose the targets that are listening on port 80:
The final step is to review my choices and to Create my ALB:
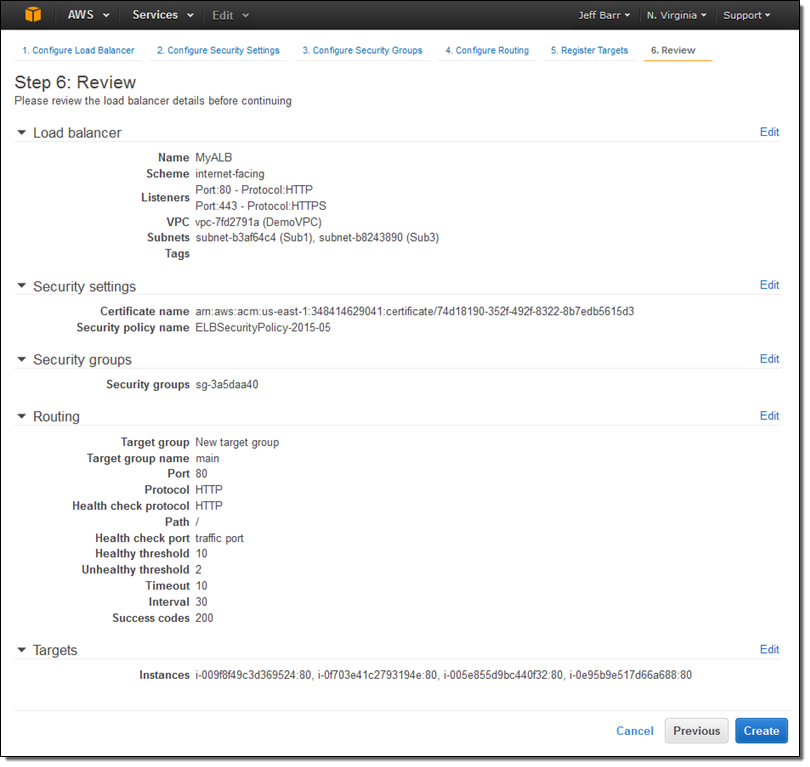
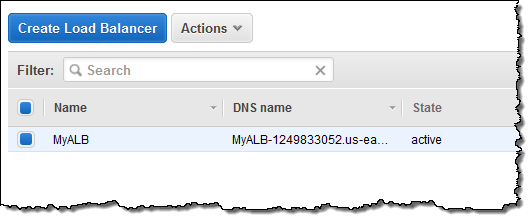
After I click on Create the Application Load Balancer is provisioned and becomes active within a minute or so:
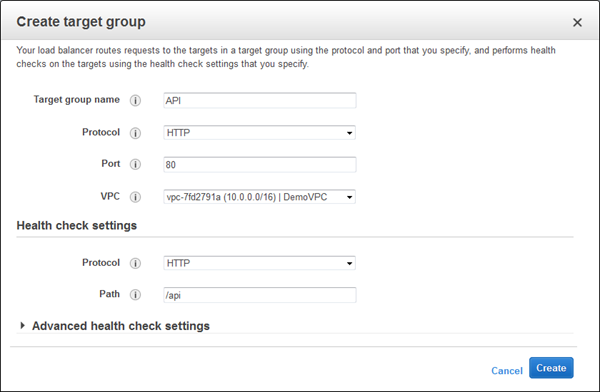
I can create additional target groups:
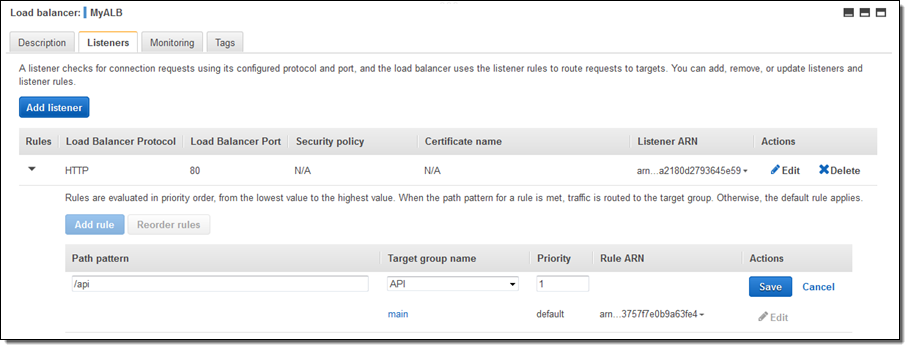
And then I can add a new rule that routes /api requests to that target:
Application Load Balancers work with multiple AWS services including Auto Scaling, Amazon ECS, AWS CloudFormation, AWS CodeDeploy, and AWS Certificate Manager (ACM). Support for and within other services is in the works.
Moving on Up
If you are currently using a Classic Load Balancer and would like to migrate to an Application Load Balancer, take a look at our new Load Balancer Copy Utility. This Python tool will help you to create an Application Load Balancer with the same configuration as an existing Classic Load Balancer. It can also register your existing EC2 instances with the new load balancer.
Availability & Pricing
The Application Load Balancer is available now in all commercial AWS regions and you can start using it today!
The hourly rate for the use of an Application Load Balancer is 10% lower than the cost of a Classic Load Balancer.
When you use an Application Load Balancer, you will be billed by the hour and for the use of Load Balancer Capacity Units, also known as LCU’s. An LCU measures the number of new connections per second, the number of active connections, and data transfer. We measure on all three dimensions, but bill based on the highest one. One LCU is enough to support either:
- 25 connections/second with a 2 KB certificate, 3,000 active connections, and 2.22 Mbps of data transfer or
- 5 connections/second with a 4 KB certificate, 3,000 active connections, and 2.22 Mbps of data transfer.
Billing for LCU usage is fractional, and is charged at $0.008 per LCU per hour. Based on our calculations, we believe that virtually all of our customers can obtain a net reduction in their load balancer costs by switching from a Classic Load Balancer to an Application Load Balancer.
— Jeff;
Attach and Detach Elastic Load Balancers from Auto Scaling Groups
I enjoy reading the blog posts that I wrote in the early days of AWS. Way back in 2009, I wrote a post to launch Elastic Load Balancing, Auto Scaling, and Amazon CloudWatch. Here’s what I said at the time:
“As soon as you launch some EC2 instances, you want visibility into resource utilization and overall performance. You want your application to be able to scale on demand based on traffic and system load. You want to spread the incoming traffic across multiple web servers for high availability and better performance.”
All of these requirements remain. In the six years since that blog post, we have added many features to each of these services. Since this post focuses on Elastic Load Balancing and Auto Scaling, I thought I’d start with a quick recap of some of the features that we have recently added to those services.
- Elastic Load Balancing has been enhanced with tagging, connection timeout management, and support for Proxy Protocol.
- Auto Scaling has been updated to include lifecycle management, a standby state, and the ability to attach and detach instances from an auto scaling group. Earlier, we added new APIs and console support.
Many of these features were added in response to customer feedback (we love to hear from you; don’t be shy). Today’s feature is no exception!
Attach and Detach Load Balancers
You can now attach and detach elastic load balancers from auto scaling groups. This gives you additional operational flexibility. Attaching a load balancer to an auto scaling group allows the load balancer to send traffic to the EC2 instances in the group. Detaching a load balancer from a group stops it from sending traffic.
The ability to easily attach and detach load balancers from your auto scaling groups will simplify your fleet management tasks. For example, you can do blue-green deployments and upgrade SSL certificates more easily and with less downtime.
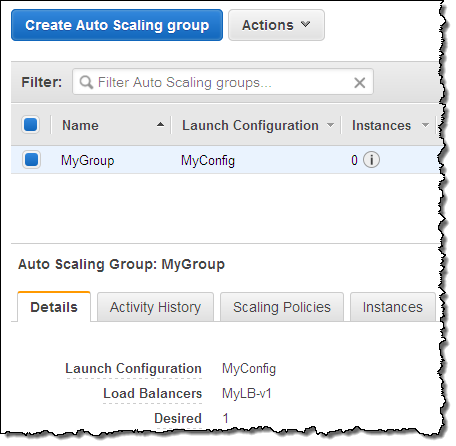
You can access this feature from the AWS Management Console, AWS Command Line Interface (CLI), AWS Tools for Windows PowerShell, and the EC2 API. Let’s take a look at the console. I have two load balancers:

Initially, the first load balancer (MyLB-v1) is attached to my auto scaling group:
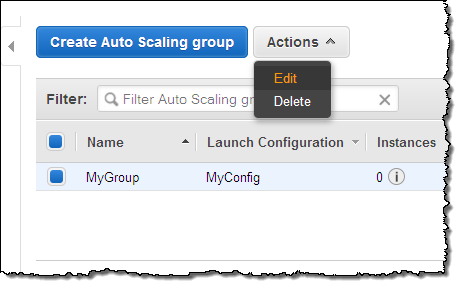
To make a change, I simply select the auto scaling group, and click on the Edit action in the menu:
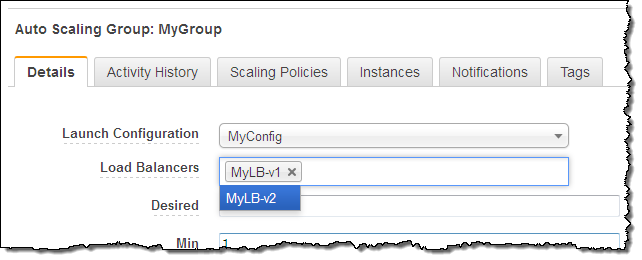
Then I make any desired changes, and click on Save:
The changes take effect within a minute or so. You can check the Activity History to confirm that the change is complete:

This feature is available now and you can start using it today in all public AWS regions (support for AWS GovCloud (US) is on the way).
— Jeff;
Tag Your Elastic Load Balancers
 Elastic Load Balancing helps you to build applications that are resilient and easy to scale. You can create both public-facing and internal load balancers in the AWS Management Console with a couple of clicks.
Today we are launching a helpful new feature for Elastic Load Balancing. You can now add up to ten tags (name/value pairs) to each of your load balancers. You can add tags to new load balancers when you create them. You can also add, remove, and change tags on existing load balancers. Tag names can consist of up to 128 Unicode characters; values can have up to 256.
Tags can be used for a number of different purposes including tracking of identity, role or owner. Tagging items also allows them to be grouped and segregated for billing and cost tracking. Once you tag your load balancers, you can visualize your spending patterns and analyze costs by tags using the Cost Explorer in the AWS Management Console.
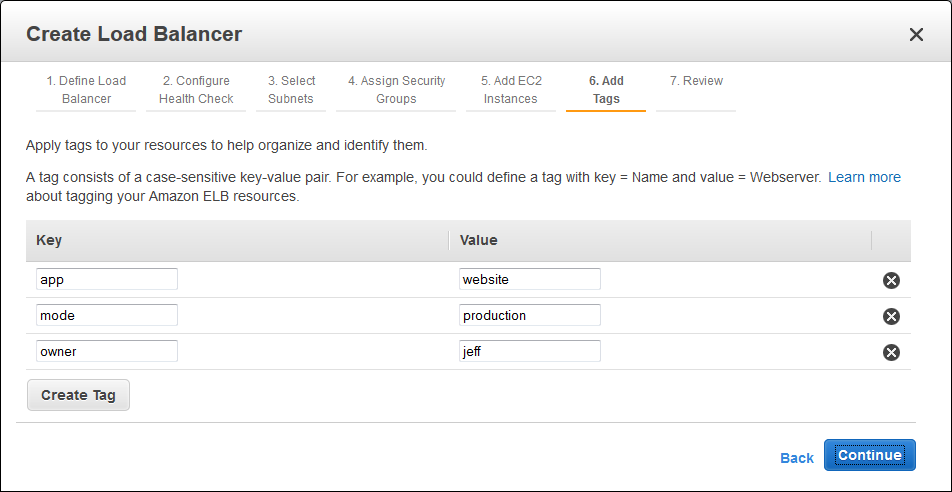
You can manage tags from the AWS Management Console, Elastic Load Balancing API , or the AWS Command Line Interface (CLI). Here’s how you add tags from the Console when you create a new Elastic Load Balancer:
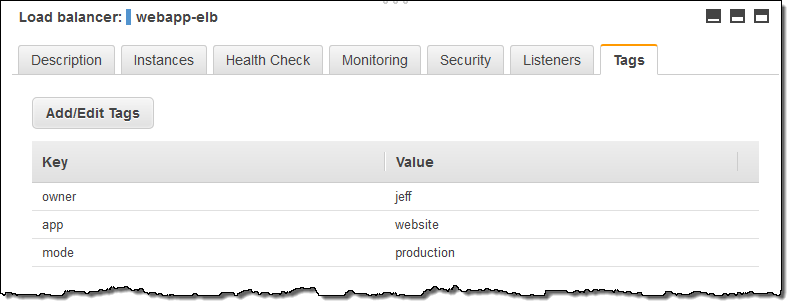
You can see the tags on each of your Elastic Load Balancers at a glance:
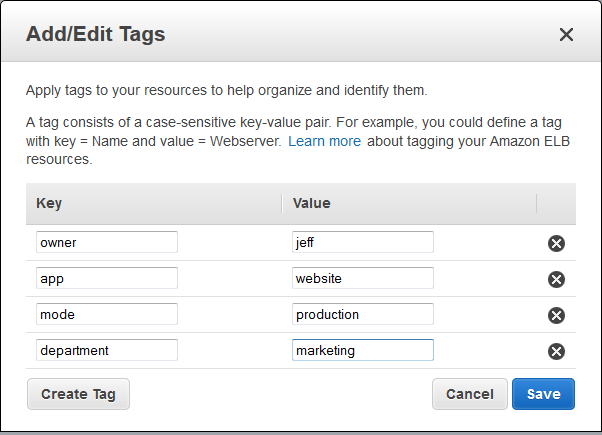
You can edit (add, remove, and change) tags just as easily:
This new feature is available now and you can start using it today. To learn more, read about ELB Tagging in the Elastic Load Balancing Developer Guide.
— Jeff;
Elastic Load Balancing Connection Timeout Management
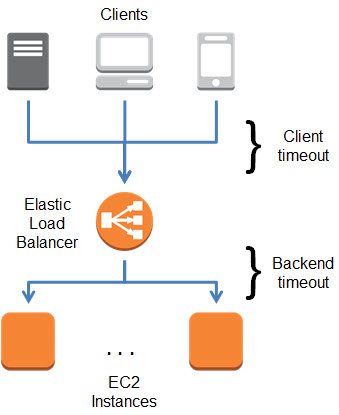
When your web browser or your mobile device makes a TCP connection to an Elastic Load Balancer, the connection is used for the request and the response, and then remains open for a short amount of time for possible reuse. This time period is known as the idle timeout for the Load Balancer and is set to 60 seconds. Behind the scenes, Elastic Load Balancing also manages TCP connections to Amazon EC2 instances; these connections also have a 60 second idle timeout.
In most cases, a 60 second timeout is long enough to allow for the potential reuse that I mentioned earlier. However, in some circumstances, different idle timeout values are more appropriate. Some applications can benefit from a longer timeout because they create a connection and leave it open for polling or extended sessions. Other applications tend to have short, non- recurring requests to AWS and the open connection will hardly ever end up being reused.
In order to better support a wide variety of use cases, you can now set the idle timeout for each of your Elastic Load Balancers to any desired value between 1 and 3600 seconds (the default will remain at 60). You can set this value from the command line or through the AWS Management Console.
Here’s how to set it from the command line:
$ elb-modify-lb-attributes myTestELB --connection-settings "idletimeout=120" --headers
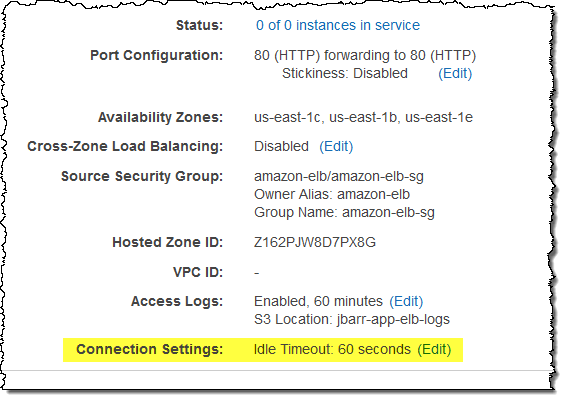
And here is how to set it from the AWS Management Console:
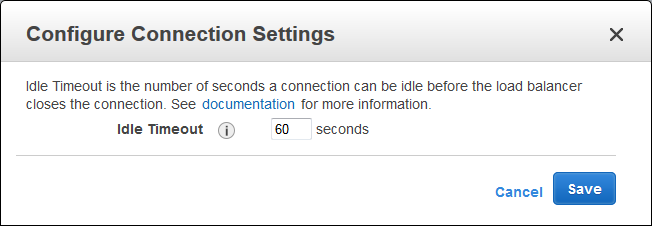
This new feature is available now and you can start using it today! Read the documentation to learn more.
— Jeff;
AWS CloudTrail Update – Seven New Services & Support From CloudCheckr
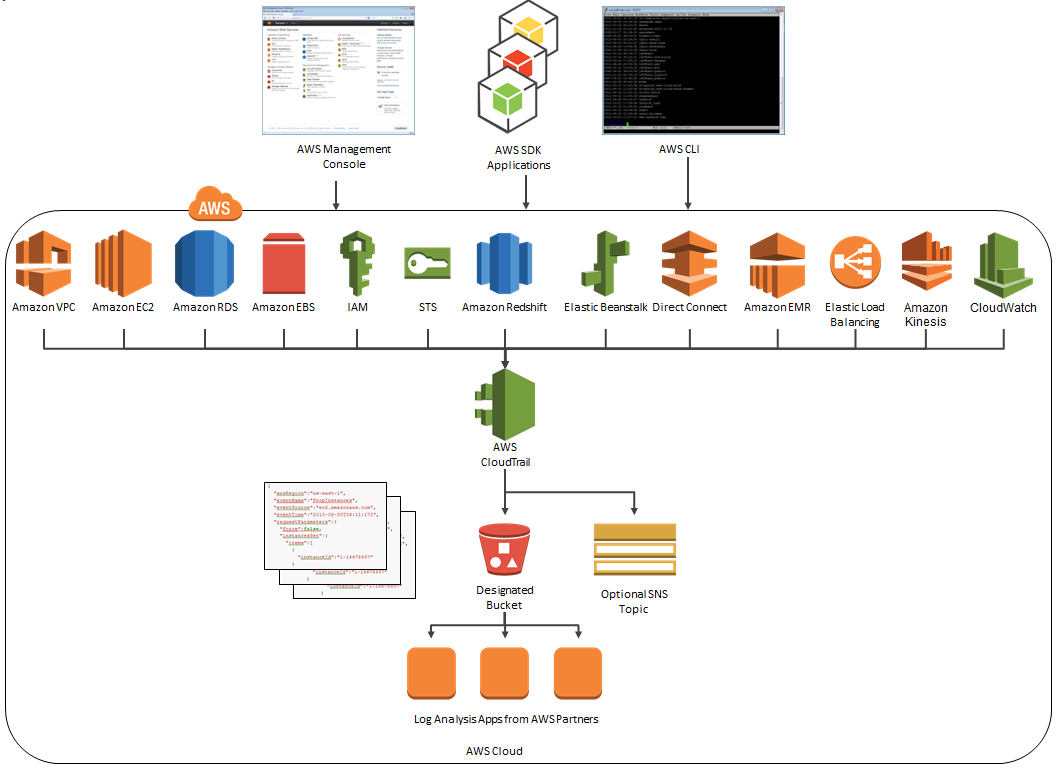
AWS CloudTrail records the API calls made in your AWS account and publishes the resulting log files to an Amazon S3 bucket in JSON format, with optional notification to an Amazon SNS topic each time a file is published.
Our customers use the log files generated CloudTrail in many different ways. Popular use cases include operational troubleshooting, analysis of security incidents, and archival for compliance purposes. If you need to meet the requirements posed by ISO 27001, PCI DSS, or FedRAMP, be sure to read our new white paper, Security at Scale: Logging in AWS, to learn more.
Over the course of the last month or so, we have expanded CloudTrail with support for additional AWS services. I would also like to tell you about the work that AWS partner CloudCheckr has done to support CloudTrail.
New Services
At launch time, CloudTrail supported eight AWS services. We have added support for seven additional services over the past month or so. Here’s the full list:
- Amazon EC2
- Elastic Block Store (EBS)
- Virtual Private Cloud (VPC)
- Relational Database Service (RDS)
- Identity and Access Management (IAM)
- Security Token Service (STS)
- Redshift
- CloudTrail
- Elastic Beanstalk – New!
- Direct Connect – New!
- CloudFormation – New!
- Elastic MapReduce – New!
- Elastic Load Balancing – New!
- Kinesis – New!
- CloudWatch – New!
Here’s an updated version of the diagram that I published when we launched CloudTrail:
News From CloudCheckr
CloudCheckr (an AWS Partner) integrates with CloudTrail to provide visibility and actionable information for your AWS resources. You can use CloudCheckr to analyze, search, and understand changes to AWS resources and the API activity recorded by CloudTrail.
Let’s say that an AWS administrator needs to verify that a particular AWS account is not being accessed from outside a set of dedicated IP addresses. They can open the CloudTrail Events report, select the month of April, and group the results by IP address. This will display the following report:
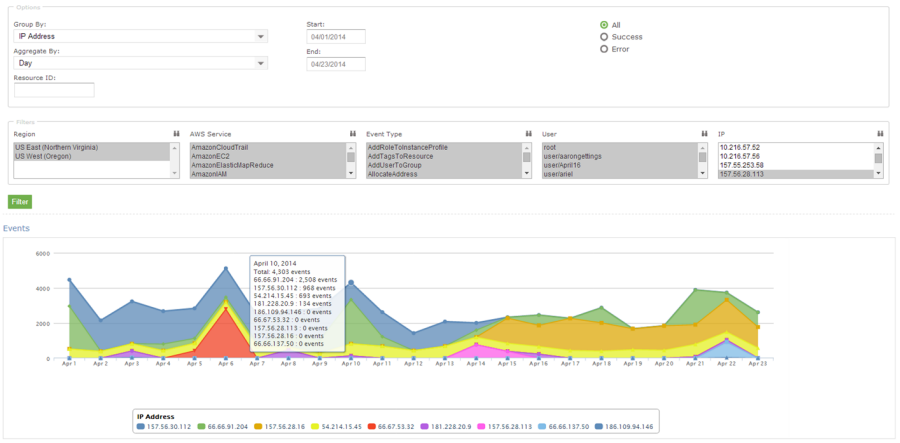
As you can see, the administrator can use the report to identify all the IP addresses that are being used to access the AWS account. If any of the IP addresses were not on the list, the administrator could dig in further to determine the IAM user name being used, the calls being made, and so forth.
CloudCheckr is available in Freemium and Pro versions. You can try CloudCheckr Pro for 14 days at no charge. At the end of the evaluation period you can upgrade to the Pro version or stay with CloudCheckr Freemium.
— Jeff;
Elastic Load Balancing adds Support for Proxy Protocol
My colleague Lesley Mbogo is a Senior Product Manager on the Elastic Load Balancing team. She sent along the post below to tell you all about an important new feature — support for the Proxy Protocol.
— Jeff;
Starting today, Elastic Load Balancing (ELB) supports Proxy Protocol version 1. You can now identify the originating IP address of a client connecting to your servers using TCP load balancing. Client connection information, such as IP address and port, is typically lost when requests are proxied through a load balancer. This is because the load balancer sends requests to the server on behalf of the client, making your load balancer appear as though it is the requesting client. Having the originating client IP address is useful if you need more information about visitors to your applications. For example, you may want to gather connection statistics, analyze traffic logs, or manage whitelists of IP addresses.
Until today, ELB allowed you to obtain the clients IP address only if you used HTTP(S) load balancing, which adds this information in the X-Forwarded-For headers. Since X-Forwarded-For is used in HTTP headers only, you could not obtain the clients IP address if the ELB was configured for TCP load balancing. Many of you told us that you wanted similar functionality for TCP traffic, so we added support for Proxy Protocol. It simply prepends a human readable header with the clients connection information to the TCP data sent to your server. The advantage of Proxy Protocol is that it can be used with any protocol layer above TCP, since it has no knowledge of the higher-level protocol that is used on top of the connection. Proxy Protocol is useful when you are serving non-HTTP traffic. Alternatively, you can use it if you are sending HTTPS requests and do not want to terminate the SSL connection on the load balancer. For more information, please visit the Elastic Load Balancing Guide.
Creating a Simple Web Application Running Behind an ELB with Proxy Protocol
Id like to show you how we can use the Proxy Protocol feature in a simple Node.js application running behind an ELB. This application retrieves the client IP address and port number from the Proxy Protocol header in the TCP connection and outputs the information in an HTML response.
Well use AWS Elastic Beanstalk to quickly deploy and manage the application. Elastic Beanstalk automatically provisions an environment that includes Elastic Load Balancing, a set of EC2 instances with all the necessary software, and more. Elastic Beanstalk supports many languages and platforms; for this example, we chose to use Node.js.
Our sample application (elb-pp-app.zip, click to download) is a simple Node.js server bundled in a zip archive. Inside elb-pp-app.zip youll find the following files:
- server.js a simple Node.js server that receives and responds to TCP connections from the ELB.
- package.json declares the node-proxy-protocol package dependency that parses the Proxy Protocol header inserted by the ELB. Elastic Beanstalk installs these dependencies automatically.
- .ebextensions/ – a directory containing two YAML files that we created to customize our environment. Elastic Beanstalk automatically detects these files and applies the customizations.
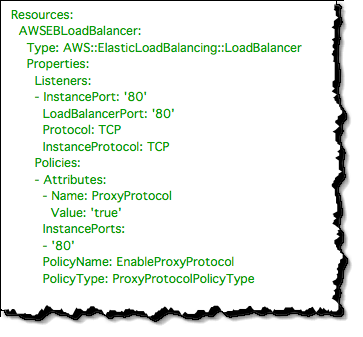
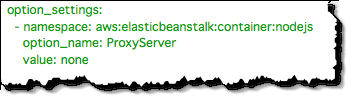
The first file, .ebextensions/01_elb.config, configures the ELB to listen for TCP connections on port 80 and forward requests to back-end instances on port 80, and finally enables Proxy Protocol. To enable Proxy Protocol for an existing ELB in your account, please see the Elastic Load Balancing Guide.
The second file, .ebextensions/02_container.config, customizes Node.js to listen to requests directly on port 80. The Node.js container can be configured to proxy traffic locally through Apache or Nginx before sending requests to our application. Weve however chosen to disable this feature and allow our Node.js application to act as the server because neither Apache nor Nginx currently support the Proxy Protocol header inserted by the ELB. To learn more about customizing your environment resources, visit the Elastic Beanstalk Developer Guide.
We are now ready to deploy the sample application to Elastic Beanstalk using the AWS Management Console.
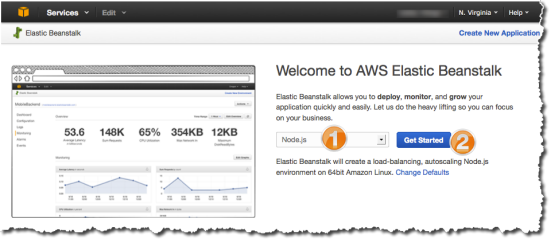
- Log into the Elastic Beanstalk Console, choose Node.js, and then click Get Started.
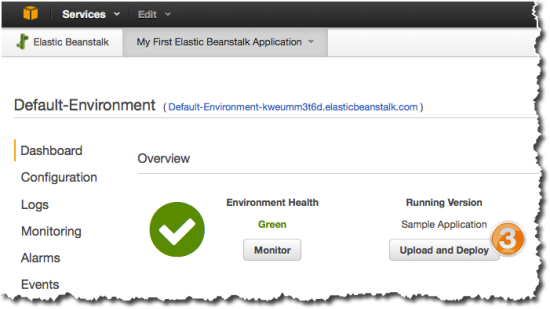
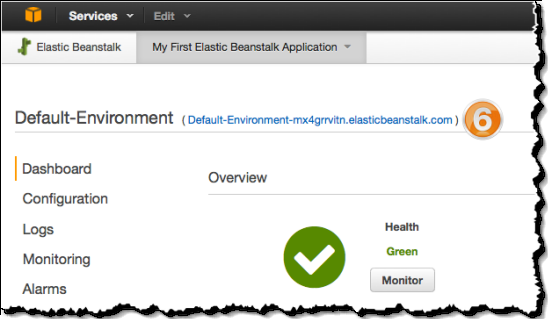
- Wait for the default environment to spin up and turn green, then click Upload and Deploy to upload the Node.js application. (Beanstalk creates a sample application in the default environment, so we need to upload our new version).
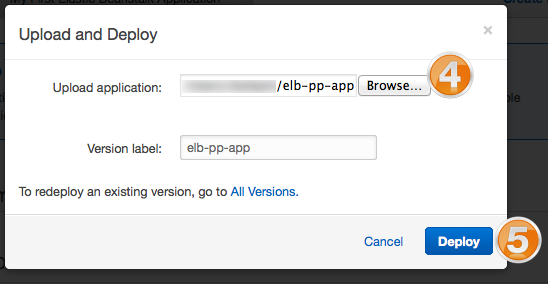
- Choose the elb-pp-app.zip file that you downloaded, and deploy the new version in the default environment.
- Wait for the application to deploy and for the default environment to update. When the environment turns green, click the environments URL to access the Node.js application.
- The Node.js application parses the Proxy Protocol data from the ELB and responds with HTML output showing your original Source IP and Port, as well as the IP of the ELB that proxied the request to the application.

I hope that you find this useful. If you have any feature requests for Elastic Load Balancing, please leave a note in the EC2 forum.
