Category: EC2
New – AWS Application Load Balancer
We launched Elastic Load Balancing (ELB) for AWS in the spring of 2009 (see New Features for Amazon EC2: Elastic Load Balancing, Auto Scaling, and Amazon CloudWatch to see just how far AWS has come since then). Elastic Load Balancing has become a key architectural component for many AWS-powered applications. In conjunction with Auto Scaling, Elastic Load Balancing greatly simplifies the task of building applications that scale up and down while maintaining high availability.
On the Level
Per the well-known OSI model, load balancers generally run at Layer 4 (transport) or Layer 7 (application).
A Layer 4 load balancer works at the network protocol level and does not look inside of the actual network packets, remaining unaware of the specifics of HTTP and HTTPS. In other words, it balances the load without necessarily knowing a whole lot about it.
A Layer 7 load balancer is more sophisticated and more powerful. It inspects packets, has access to HTTP and HTTPS headers, and (armed with more information) can do a more intelligent job of spreading the load out to the target.
Application Load Balancing for AWS
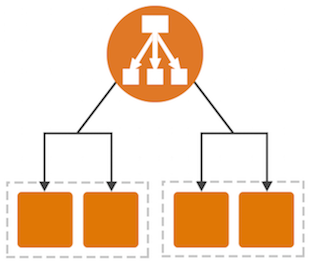 Today we are launching a new Application Load Balancer option for ELB. This option runs at Layer 7 and supports a number of advanced features. The original option (now called a Classic Load Balancer) is still available to you and continues to offer Layer 4 and Layer 7 functionality.
Application Load Balancers support content-based routing, and supports applications that run in containers. They support a pair of industry-standard protocols (WebSocket and HTTP/2) and also provide additional visibility into the health of the target instances and containers. Web sites and mobile apps, running in containers or on EC2 instances, will benefit from the use of Application Load Balancers.
Let’s take a closer look at each of these features and then create a new Application Load Balancer of our very own!
Content-Based Routing
An Application Load Balancer has access to HTTP headers and allows you to route requests to different backend services accordingly. For example, you might want to send requests that include /api in the URL path to one group of servers (we call these target groups) and requests that include /mobile to another. Routing requests in this fashion allows you to build applications that are composed of multiple microservices that can run and be scaled independently.
As you will see in a moment, each Application Load Balancer allows you to define up to 10 URL-based rules to route requests to target groups. Over time, we plan to give you access to other routing methods.
Support for Container-Based Applications
Many AWS customers are packaging up their microservices into containers and hosting them on Amazon EC2 Container Service. This allows a single EC2 instance to run one or more services, but can present some interesting challenges for traditional load balancing with respect to port mapping and health checks.
The Application Load Balancer understands and supports container-based applications. It allows one instance to host several containers that listen on multiple ports behind the same target group and also performs fine-grained, port-level health checks
Better Metrics
Application Load Balancers can perform and report on health checks on a per-port basis. The health checks can specify a range of acceptable HTTP responses, and are accompanied by detailed error codes.
As a byproduct of the content-based routing, you also have the opportunity to collect metrics on each of your microservices. This is a really nice side-effect that each of the microservices can be running in its own target group, on a specific set of EC2 instances. This increased visibility will allow you to do a better job of scaling up and down in response to the load on individual services.
The Application Load Balancer provides several new CloudWatch metrics including overall traffic (in GB), number of active connections, and the connection rate per hour.
Support for Additional Protocols & Workloads
The Application Load Balancer supports two additional protocols: WebSocket and HTTP/2.
WebSocket allows you to set up long-standing TCP connections between your client and your server. This is a more efficient alternative to the old-school method which involved HTTP connections that were held open with a “heartbeat” for very long periods of time. WebSocket is great for mobile devices and can be used to deliver stock quotes, sports scores, and other dynamic data while minimizing power consumption. ALB provides native support for WebSocket via the ws:// and wss:// protocols.
HTTP/2 is a significant enhancement of the original HTTP 1.1 protocol. The newer protocol feature supports multiplexed requests across a single connection. This reduces network traffic, as does the binary nature of the protocol.
The Application Load Balancer is designed to handle streaming, real-time, and WebSocket workloads in an optimized fashion. Instead of buffering requests and responses, it handles them in streaming fashion. This reduces latency and increases the perceived performance of your application.
Creating an ALB
Let’s create an Application Load Balancer and get it all set up to process some traffic!
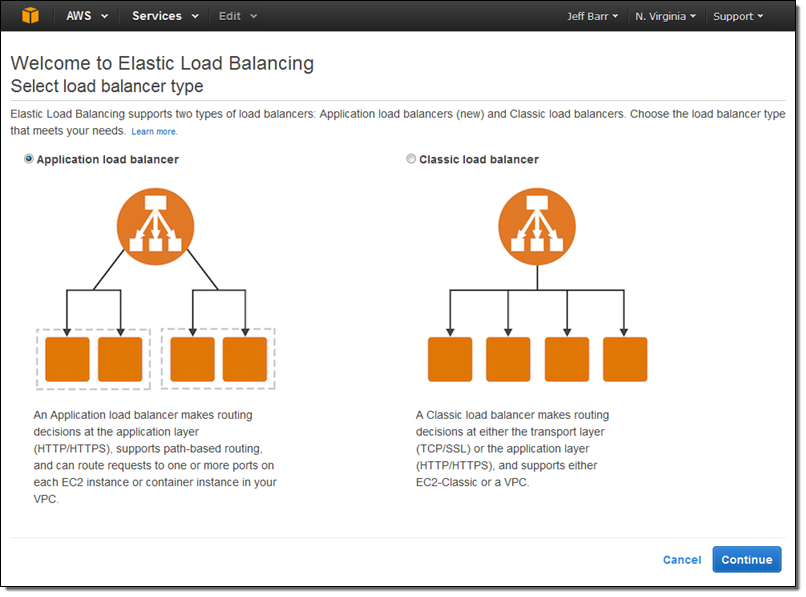
The Elastic Load Balancing Console lets me create either type of load balancer:
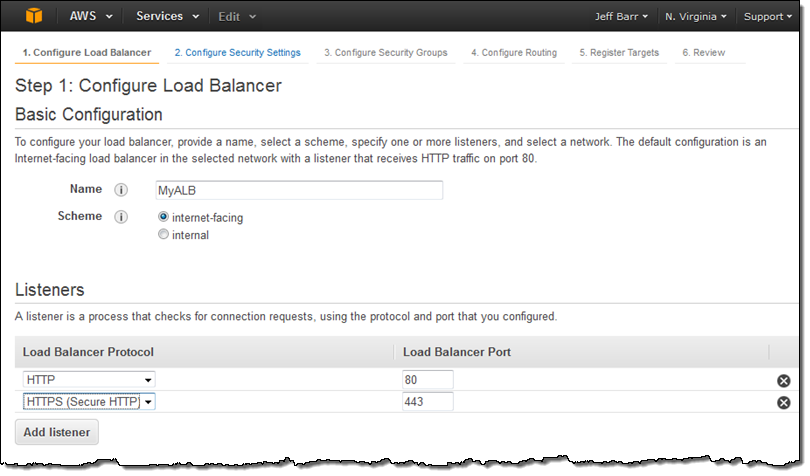
 I click on Application load balancer, enter a name (MyALB), and choose internet-facing. Then I add an HTTPS listener:
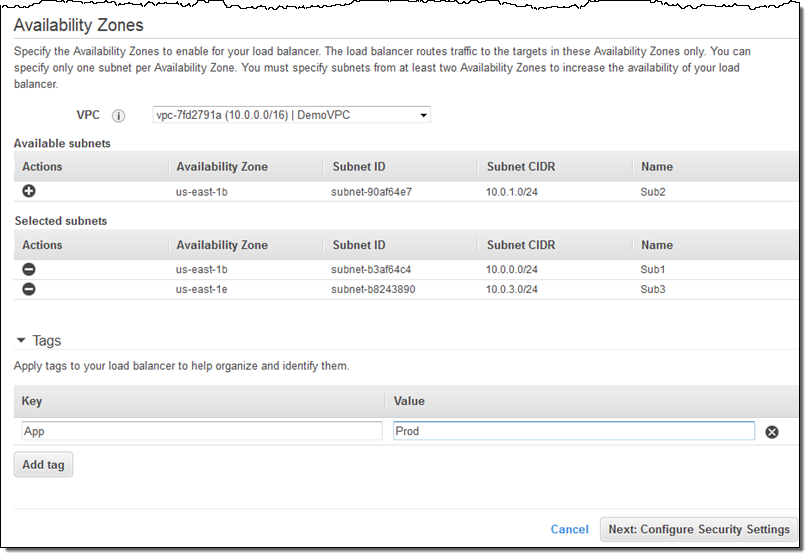
On the same screen, I choose my VPC (this is a VPC-only feature) and one subnet in each desired Availability Zone, tag my Application Load Balancer, and proceed to Configure Security Settings:
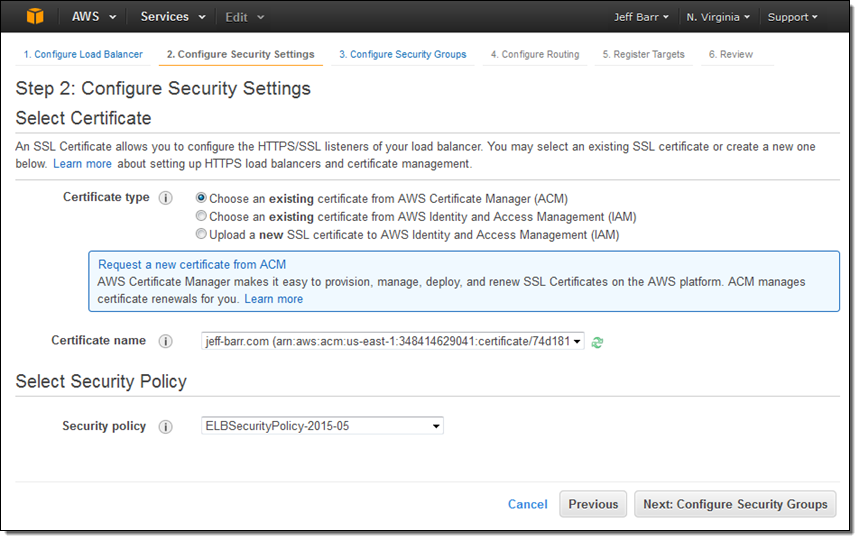
Because I created an HTTPS listener, my Application Load Balancer needs a certificate. I can choose an existing certificate that’s already in IAM or AWS Certificate Manager (ACM), upload a local certificate, or request a new one:
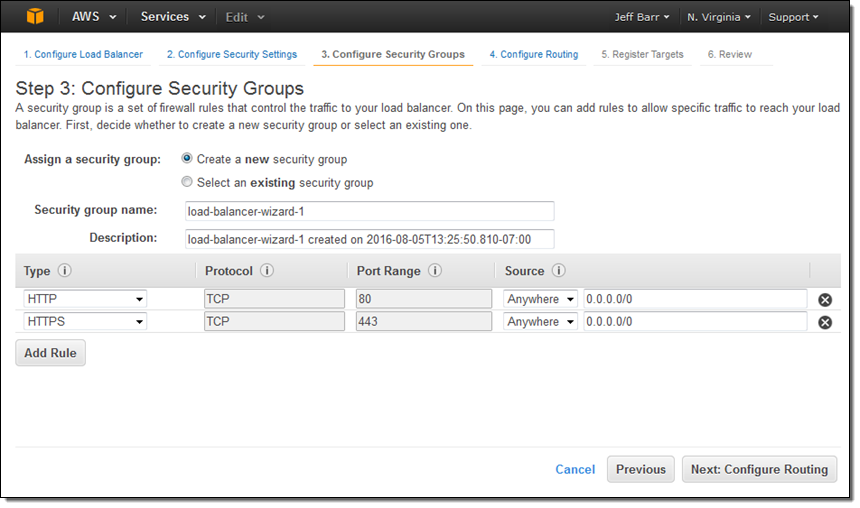
Moving right along, I set up my security group. In this case I decided to create a new one. I could have used one of my existing VPC or EC2 security groups just as easily:
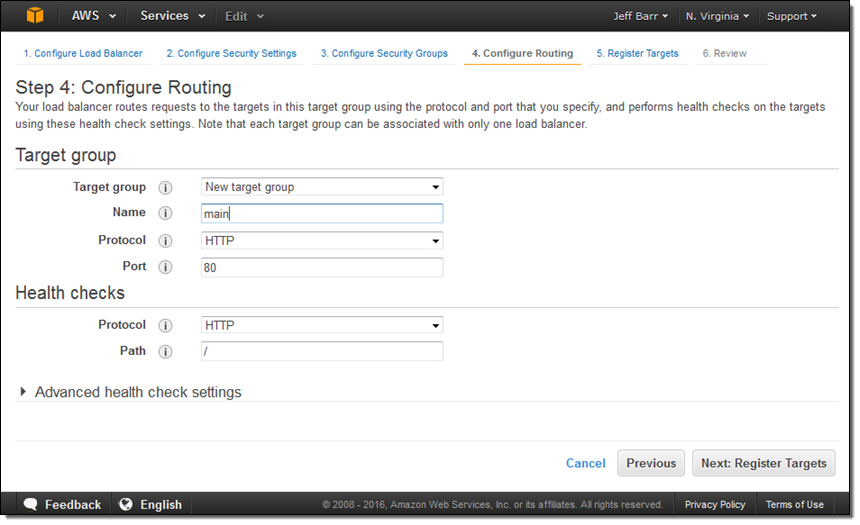
The next step is to create my first target group (main) and to set up its health checks (I’ll take the defaults):
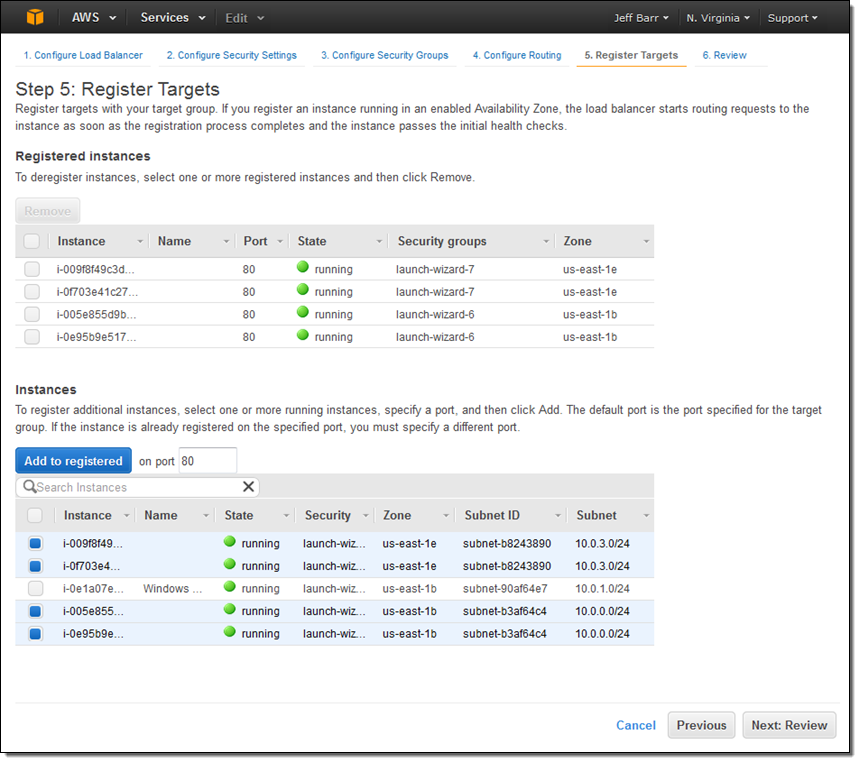
Now I am ready to choose the targets—the set of EC2 instances that will receive traffic through my Application Load Balancer. Here, I chose the targets that are listening on port 80:
The final step is to review my choices and to Create my ALB:
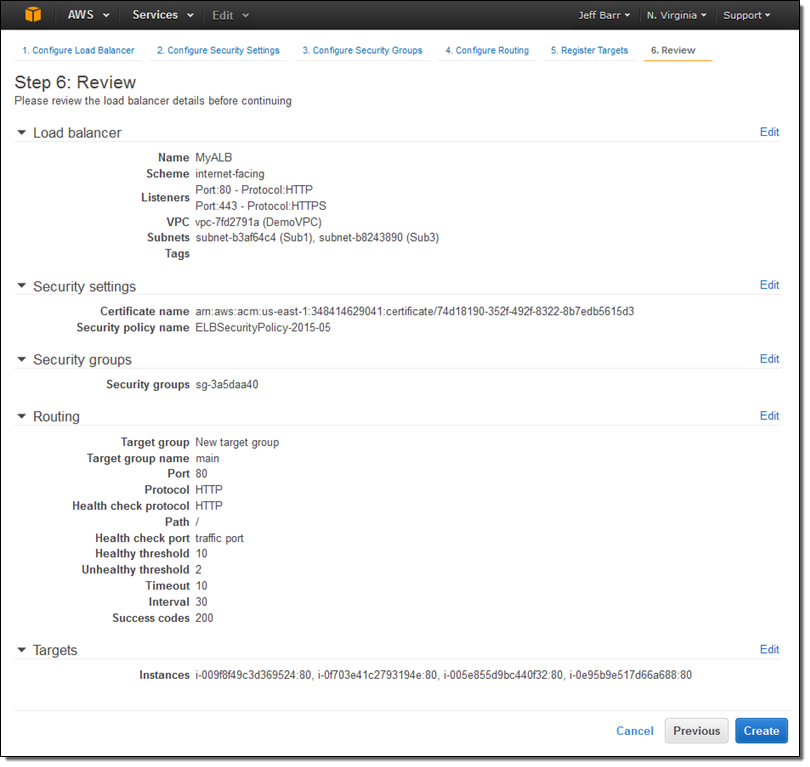
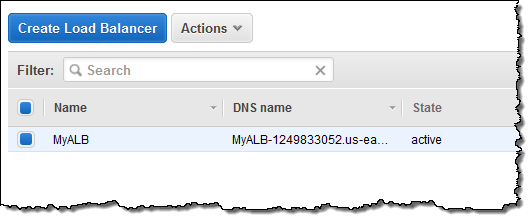
After I click on Create the Application Load Balancer is provisioned and becomes active within a minute or so:
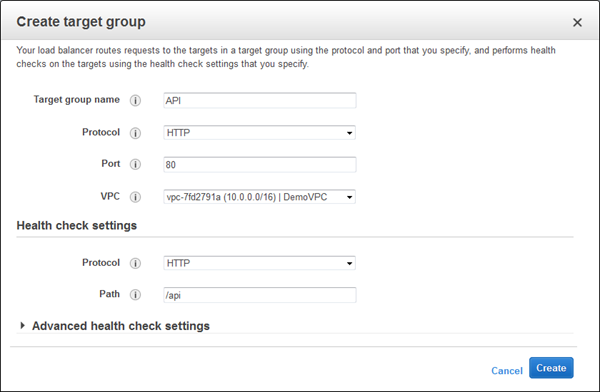
I can create additional target groups:
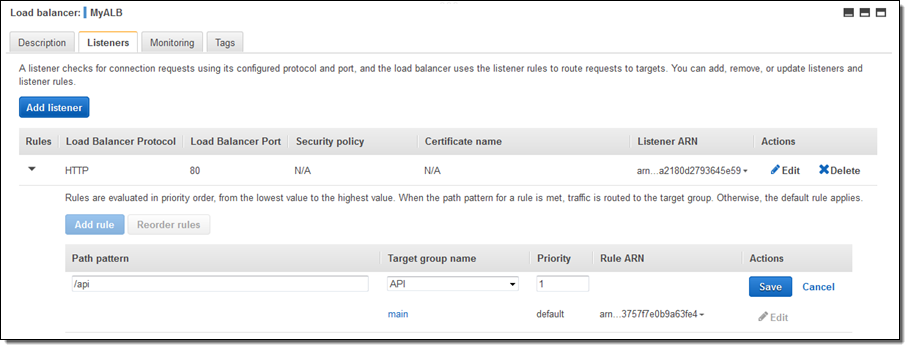
And then I can add a new rule that routes /api requests to that target:
Application Load Balancers work with multiple AWS services including Auto Scaling, Amazon ECS, AWS CloudFormation, AWS CodeDeploy, and AWS Certificate Manager (ACM). Support for and within other services is in the works.
Moving on Up
If you are currently using a Classic Load Balancer and would like to migrate to an Application Load Balancer, take a look at our new Load Balancer Copy Utility. This Python tool will help you to create an Application Load Balancer with the same configuration as an existing Classic Load Balancer. It can also register your existing EC2 instances with the new load balancer.
Availability & Pricing
The Application Load Balancer is available now in all commercial AWS regions and you can start using it today!
The hourly rate for the use of an Application Load Balancer is 10% lower than the cost of a Classic Load Balancer.
When you use an Application Load Balancer, you will be billed by the hour and for the use of Load Balancer Capacity Units, also known as LCU’s. An LCU measures the number of new connections per second, the number of active connections, and data transfer. We measure on all three dimensions, but bill based on the highest one. One LCU is enough to support either:
- 25 connections/second with a 2 KB certificate, 3,000 active connections, and 2.22 Mbps of data transfer or
- 5 connections/second with a 4 KB certificate, 3,000 active connections, and 2.22 Mbps of data transfer.
Billing for LCU usage is fractional, and is charged at $0.008 per LCU per hour. Based on our calculations, we believe that virtually all of our customers can obtain a net reduction in their load balancer costs by switching from a Classic Load Balancer to an Application Load Balancer.
— Jeff;
AWS GovCloud (US) Update – AWS Key Management Service Now Available
 The AWS Key Management Service (KMS) provides you with seamless, centralized control over your encryption keys. As I noted when we launched the service (see my post, New AWS Key Management Service, for more information), this service gives you a new option for data protection and relieves you of many of the more onerous scalability and availability issues that inevitably surface when you implement key management at enterprise scale. KMS uses Hardware Security Modules to protect the security of your keys. It is also integrated with AWS CloudTrail for centralized logging of all key usage.
AWS GovCloud (US), as you probably know, is an AWS region designed to allow U.S. government agencies (federal, state, and local), along with contractors, educational institutions, enterprises, and other U.S. customers to run regulated workloads in the cloud. AWS includes many security features and is also subject to many compliance programs. AWS GovCloud (US) allows customers to run workloads that are subject to U.S. International Traffic in Arms Regulations (ITAR), the Federal Risk and Authorization Management Program (FedRAMPsm), and levels 1-5 of the Department of Defense Cloud Security Model (CSM).
KMS in GovCloud (US)
Today we are making AWS Key Management Service (KMS) available in AWS GovCloud (US). You can use it to encrypt data in your own applications and within the following AWS services, all using keys that are under your control:
- Amazon EBS volumes.
- Amazon S3 objects using Server-Side Encryption (SSE-KMS) or client-side encryption using the encryption client in the AWS SDKs.
- Output from Amazon EMR clusters to S3 using the EMRFS client.
To learn more, visit the AWS Key Management Service (KMS) page. To get started in the AWS GovCloud (US) region, contact us today!
— Jeff;
VM Import Update – Faster and More Flexible, with Multi-Volume Support
Enterprise IT architects and system administrators often ask me how to go about moving their existing compute infrastructure to AWS. Invariably, they have spent a long time creating and polishing their existing system configurations and are hoping to take advantage of this work when they migrate to the cloud.
We introduced VM Import quite some time ago in order to address this aspect of the migration process. Since then, many AWS customers have used it as part of their migration, backup, and disaster recovery workflows.
Even Better
Today we are improving VM Import by adding new ImportImage and ImportSnapshot functions to the API. These new functions are faster and more flexible than the existing ImportInstance function and should be used for all new applications. Here’s a quick comparison of the benefits of ImportImage with respect to ImportInstance:
| ImportInstance | ImportImage | |
| Source | S3 manifest + objects
(usually uploaded from an on-premises image file) |
Image file in S3 or an EBS Snapshot |
| Destination | Stopped EC2 instance | Amazon Machine Image (AMI) |
| VM Complexity | Single volume, single disk | Multiple volume, multiple disk |
| Concurrent Imports | 5 | 20 |
| Operating Systems | Windows Server 2003, Windows Server 2008, Windows Server 2012, Red Hat Enterprise Linux (RHEL), CentOS, Ubuntu, Debian. | |
| VM Formats | VMDK, VHD, RAW | VMDK, VHD, RAW, OVA |
Because ImportImage and ImportSnapshot use an image file in S3 as a starting point, you now have several choices when it comes to moving your images to the cloud. You can use the AWS Management Console, AWS Command Line Interface (CLI), AWS Tools for Windows PowerShell, or custom tools built around the S3 API (be sure to take advantage of multipart uploads if you do this). You can also use AWS Import/Export to transfer your images using physical devices.
The image file that you provide to ImportImage will typically be an OVA package, but other formats are also supported. The file contains images of one or more disks, a manifest file, certificates, and other data associated with the image.
As noted in the table above ImportImage accepts image files that contain multiple disks and/or multiple disk volumes. This makes it a better match for the complex storage configurations that are often a necessity within an enterprise-scale environment.
ImportImage generates an AMI that can be launched as many times as needed. This is simpler, more flexible, and easier to work with than the stopped instance built by ImportInstance. ImportSnapshot generates an EBS Snapshot that can be used to create an EBS volume.
Behind the scenes, ImportImage and ImportSnapshot are able to distribute the processing and storage operations of each import operation across multiple EC2 instances. This optimization speeds up the import process and also makes it easier for you to predict how long it will take to import an image of a given size.
In addition to building your own import programs that make use of ImportImage and ImportSnapshot (by way of the AWS SDK for Java and the AWS SDK for .NET), you can also access this new functionality from the AWS Command Line Interface (CLI).
To learn more, read the API documentation for ImportImage and ImportSnapshot.
Available Now
This new functions are available now in all AWS regions except China (Beijing) and AWS GovCloud (US).
— Jeff;
New – EC2 Spot Instance Termination Notices
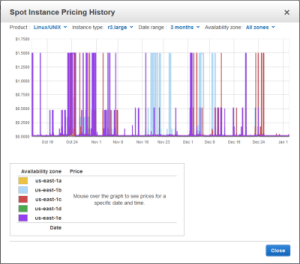 When potential users of AWS ask me about ways that it differs from their existing on-premises systems, I like to tell them about EC2 Spot Instances and the EC2 Spot Market. When they learn that they can submit bids for spare EC2 instances at the price of their choice, their eyes widen and they start to think about the ways that they can put this unique, powerful, and economical feature to use in their own applications.
Before we dive in, let’s review the life cycle of a Spot Instance:
- You (or an application running on your behalf) submits a bid to run a desired number of EC2 instances of a particular type. The bid includes the price that you are willing to pay to use the instance for an hour.
- When your bid price exceeds the current Spot price (which varies based on supply and demand), your instances are run.
- When the current Spot price rises above your bid price, the Spot instance is reclaimed by AWS so that it can be given to another customer.
New Spot Instance Termination Notice
Today we are improving the reclamation process with the addition of a two-minute warning, formally known as a Spot Instance Termination Notice. Your application can use this time to save its state, upload final log files, or remove itself from an Elastic Load Balancer. This change will allow more types of applications to benefit from the scale and low price of Spot Instances.
The Termination Notice is accessible to code running on the instance via the instance’s metadata at http://169.254.169.254/latest/meta-data/spot/termination-time. This field will become available when the instance has been marked for termination (step 3, above), and will contain the time when a shutdown signal will be sent to the instance’s operating system. At that time, the Spot Instance Request’s bid status will be set to marked-for-termination. The bid status is accessible via the DescribeSpotInstanceRequests API for use by programs that manage Spot bids and instances.
We recommend that interested applications poll for the termination notice at five-second intervals. This will give the application almost two full minutes to complete any desired processing before it is reclaimed. Here’s a timeline to help you to understand the termination process (the “+” indicates a time relative to the start of the timeline):
- +00:00 – Your Spot instance is marked for termination because the current Spot price has risen above the bid price. The bid status of your Spot Instance Request is set to
marked-for-terminationand the/spot/termination-timemetadata is set to a time precisely two minutes in the future. - Between +00:00 and +00:05 – Your instance (assuming that it is polling at five-second intervals) learns that it is scheduled for termination.
- Between +00:05 and +02:00 – Your application makes all necessary preparation for shutdown. It can checkpoint work in progress, upload final log files, and remove itself from an Elastic Load Balancer.
- +02:00 – The instance’s operating system will be told to shut down and the bid status will be set to
instance-terminated-by-price(be sure to read the documentation on Tracking Spot Requests with Bid Status Codes before writing code that depends on the values in this field).
Spot Instances in Action
Many AWS customers are making great use of Spot Instances and I’d like to encourage you to do the same! Here are a couple of examples:
- Last November, AWS Partner Cycle Computing announced that they had used Spot Instances to launch a 70,000 core compute environment across three AWS Regions at a total cost of $5,594. This cluster was used to run one million simulations of a new head design for a Western Digital hard drive.
- AWS customer Novartis used 10,600 Spot Instances (about 87,000 cores) to conduct 39 years of computational chemistry in 9 hours at a cost of $4,232. During that time they screened 10 million compounds against a common cancer target.
- AWS customer Honda Motors use of a combination of Spot and On-Demand Instances resulted in a cost savings of 70% when compared to an earlier implementation that used only On-Demand Instances. To learn more about this and other HPC use cases, watch the Finding High Performance in the Cloud for HPC panel session from AWS re:Invent.
Available Now
This feature is available now and you can start using it today! There is no charge for the HTTP requests that you will use to retrieve the instance metadata or for the calls to the DescribeSpotInstanceRequests API.
— Jeff;
EC2 Maintenance Update II
I’d like to give you an update on the EC2 Maintenance announcement that I posted last week. Late yesterday (September 30th), we completed a reboot of less than 10% of the EC2 fleet to protect you from any security risks associated with the Xen Security Advisory (XSA-108).
This Xen Security Advisory was embargoed until a few minutes ago; we were obligated to keep all information about the issue confidential until it was published. The Xen community (in which we are active participants) has designed a two-stage disclosure process that operates as follows:
- Early disclosure to select organizations (a list maintained and regularly evaluated by the Xen Security Team based on a set of public criteria established by the Xen Project community) with a limited time to make accommodations and apply updates before it becomes widely known.
- Full disclosure to everyone on the public disclosure date.
Because our customers security is our top priority and because the issue was potentially harmful to our customers, we needed to take fast action to protect them. For the reasons mentioned above, we couldnt be as expansive as wed have liked on why we had to take such fast action.
The zone by zone reboots were completed as planned and we worked very closely with our customers to ensure that the reboots went smoothly for them.
We’ll continue to be vigilant and will do our best to protect all AWS customers from similar issues in the future. As an AWS user, you may also want to take this opportunity to re-examine your AWS architecture to look for possible ways to make it even more fault-tolerant. Here are a few suggestions to get you started:
- Run instances in two or more Availability Zones.
- Pay attention to your Inbox and to the alerts on the AWS Management Console. Make sure that you fill in the “Alternate Contacts” in the AWS Billing Console.
- Review the personalized assessment of your architecture in the Trusted Advisor, then open up AWS Support Cases to get engineering assistance as you implement architectural best practices.
- Use Chaos Monkey to induce various kinds of failures in a controlled environment.
- Examine and consider expanding your use of Amazon Route 53 and Elastic Load Balancing checks to ensure that web traffic is routed to healthy instances.
- Use Auto Scaling to keep a defined number of healthy instances up and running.
You should also consult our Overview of Security Practices whitepaper for more information around AWS and security.
— Jeff;
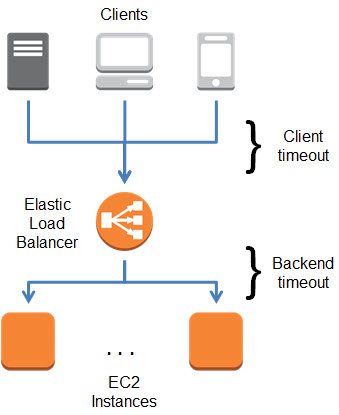
Elastic Load Balancing Connection Timeout Management
When your web browser or your mobile device makes a TCP connection to an Elastic Load Balancer, the connection is used for the request and the response, and then remains open for a short amount of time for possible reuse. This time period is known as the idle timeout for the Load Balancer and is set to 60 seconds. Behind the scenes, Elastic Load Balancing also manages TCP connections to Amazon EC2 instances; these connections also have a 60 second idle timeout.
In most cases, a 60 second timeout is long enough to allow for the potential reuse that I mentioned earlier. However, in some circumstances, different idle timeout values are more appropriate. Some applications can benefit from a longer timeout because they create a connection and leave it open for polling or extended sessions. Other applications tend to have short, non- recurring requests to AWS and the open connection will hardly ever end up being reused.
In order to better support a wide variety of use cases, you can now set the idle timeout for each of your Elastic Load Balancers to any desired value between 1 and 3600 seconds (the default will remain at 60). You can set this value from the command line or through the AWS Management Console.
Here’s how to set it from the command line:
$ elb-modify-lb-attributes myTestELB --connection-settings "idletimeout=120" --headers
And here is how to set it from the AWS Management Console:
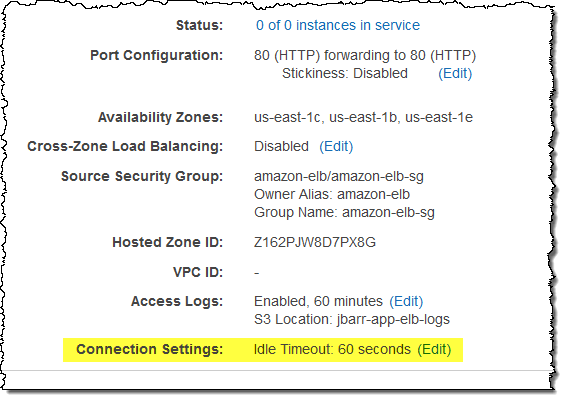
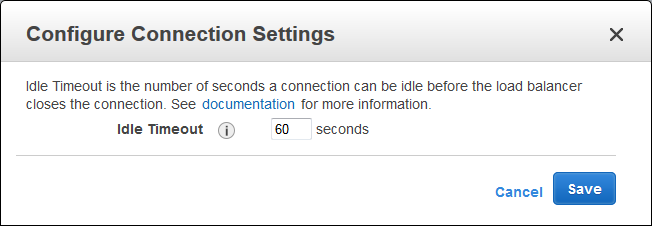
This new feature is available now and you can start using it today! Read the documentation to learn more.
— Jeff;
New AWS Management Portal for vCenter
IT Managers and Administrators working within large organizations regularly tell us that they find the key AWS messages — fast and easy self-service provisioning, exchange of CAPEX for OPEX, and the potential for cost savings — to be attractive and compelling. They want to start moving into the future by experimenting with AWS, but they don’t always have the time to learn a new set of tools and concepts.
![]() In order to make AWS more accessible to this very important audience, we are launching the new AWS Management Portal for vCenter today!
In order to make AWS more accessible to this very important audience, we are launching the new AWS Management Portal for vCenter today!
If you are already using VMware vCenter to manage your virtualized environment, you will be comfortable in this new environment right away, even if you are new to AWS, starting with the integrated sign-on process, which is integrated with your existing Active Directory.
The look-and-feel and the workflow that you use to create new AWS resources will be familiar and you will be launching EC2 instances before too long. You can even import your existing “golden” VMware images to EC2 through the portal (this feature makes use of VM Import).
I believe that IT Managers will find this blend of centralized control and cloud power to be a potent mix. vCenter Administrators can exercise full control over hybrid IT environments (both on-premises and EC2 instances) using a single UI. They have full control over cloud-based resources, and can dole out permissions to users on a per-environment basis, all coupled with single sign-on to existing Active Directory environments.
Visual Tour
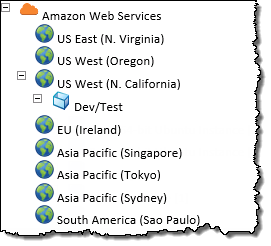
Let’s take a tour of the AWS Management Portal for vCenter, starting with the main screen. As you can see, there’s an AWS Management Portal icon in the Inventory section:

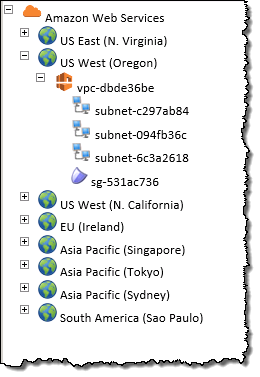
The portal displays all of the public AWS Regions in tree form:

Administrative users have the power to control which environments are visible to each non-administrative user. For example, this user can see nothing more than the Dev/Test environment in the US West (Northern California) Region:
This user has access to the Prod environment in that Region, and to additional environments in other Regions:

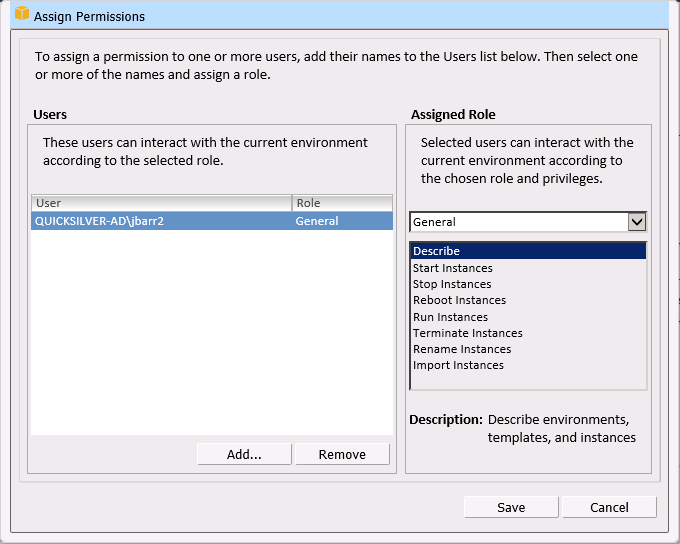
Permissions are managed from within the Portal:
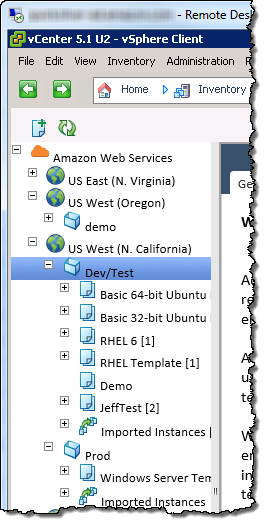
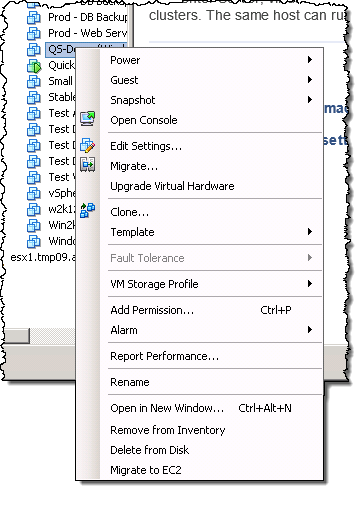
Each Region can be expanded in order to display the vSphere environments, templates, and the EC2 instances within the Region:
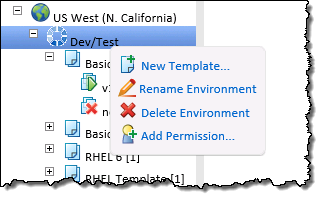
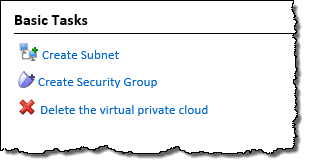
You can right-click on an environment to delete or modify it, create new templates, or add permissions:
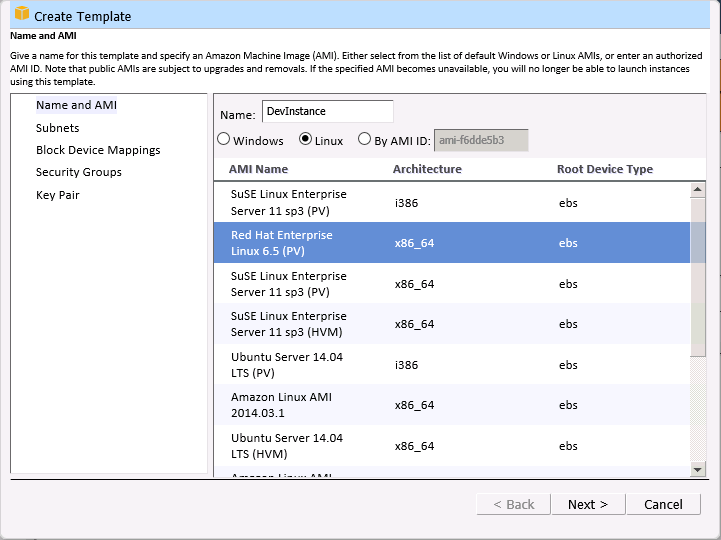
You can create a template and then use it to launch any number of EC2 instances, all configured in the same way. You can create templates for your users and lock them down for governance and management purposes.
You start by naming the template and choosing an AMI (Amazon Machine Image):
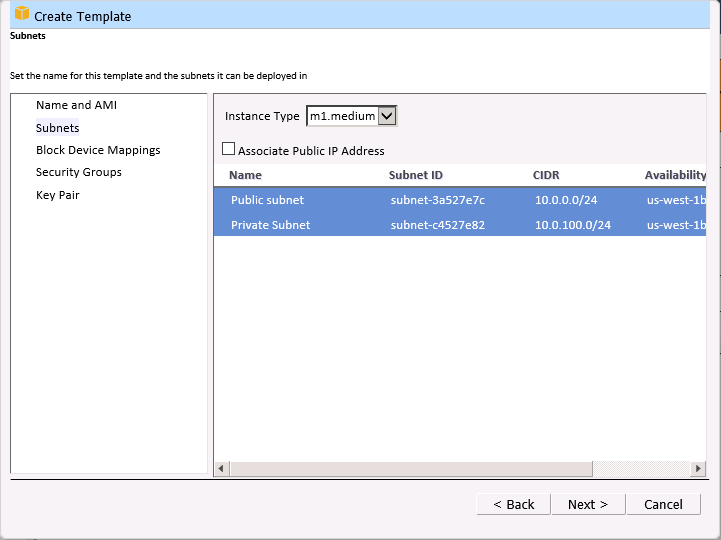
Then you select the instance type and the allowable network subnets. EC2 has a wide variety of instance types. You can choose the number of vCPUs, the amount of RAM, local disk storage, and so forth). There are also compute-optimized, memory-optimized, and storage-optimized instances. The network subnets are a feature of the Amazon Virtual Private Cloud and provide you with full control over your network topology.
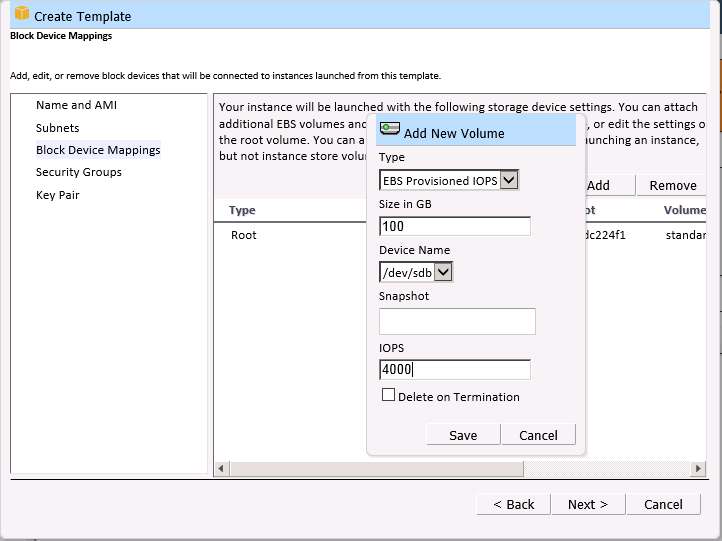
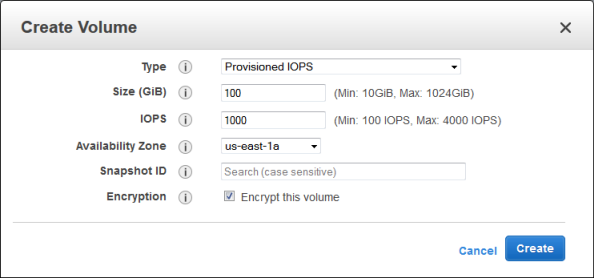
Next, you can choose to provision Elastic Block Store (EBS) volumes as part of the template. The volumes can range in size from 1 GB to 1 TB, and will be created and attached to the instance each time the template is used:
You can also choose the security groups (firewall rules) that control traffic to and from the instances:
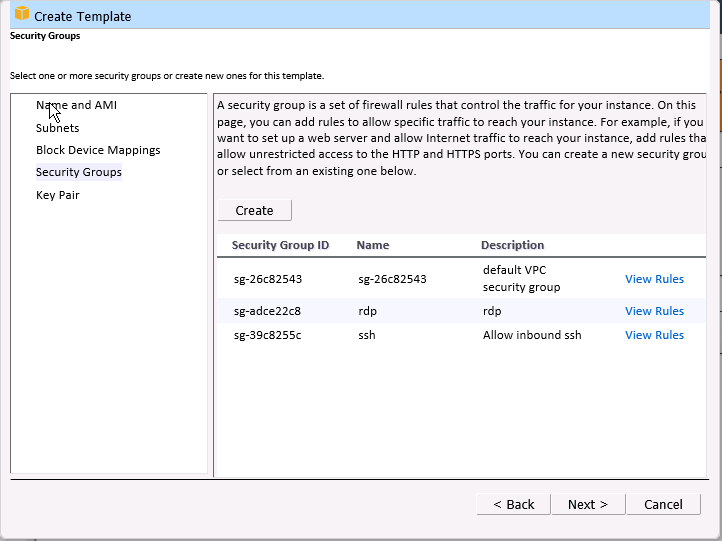
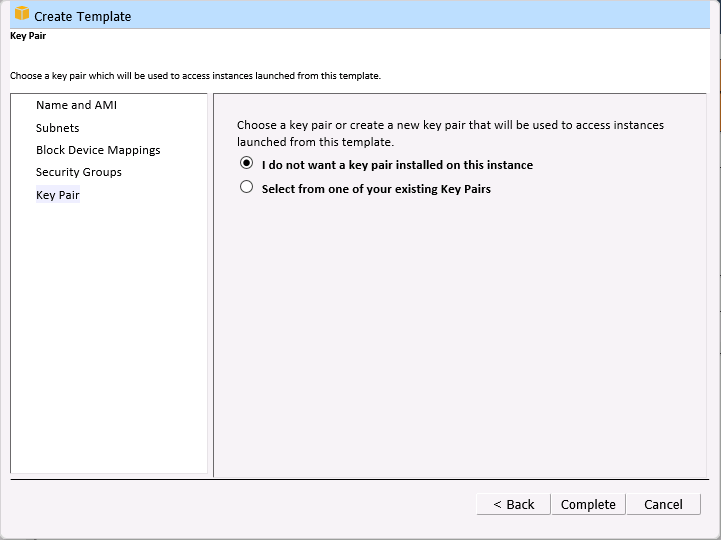
Finally, you choose the key pair that will be used for SSH access to the instance. You can also configure an instance without a key pair.
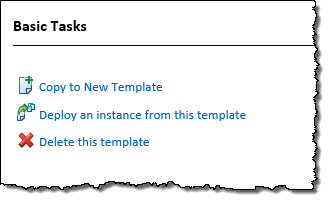
You can right-click on a template to copy it, deploy instances, or to delete it:
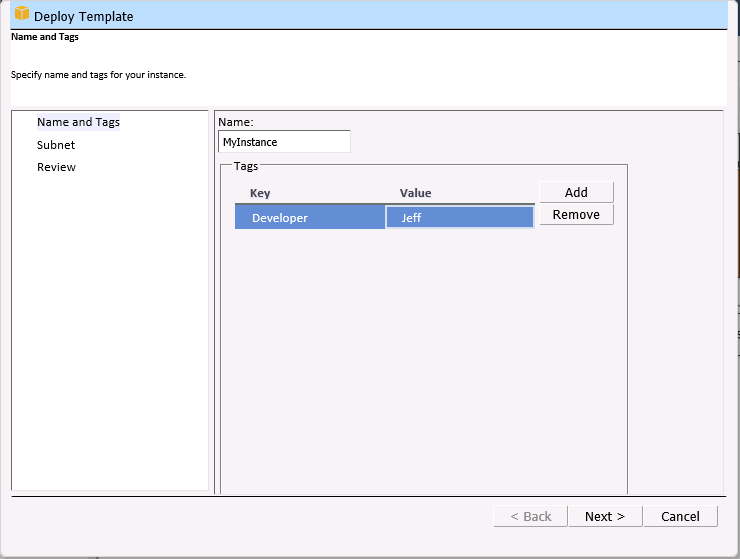
When you deploy an instance, you can use EC2’s tagging feature to attach one or more key/value pairs to the instance:
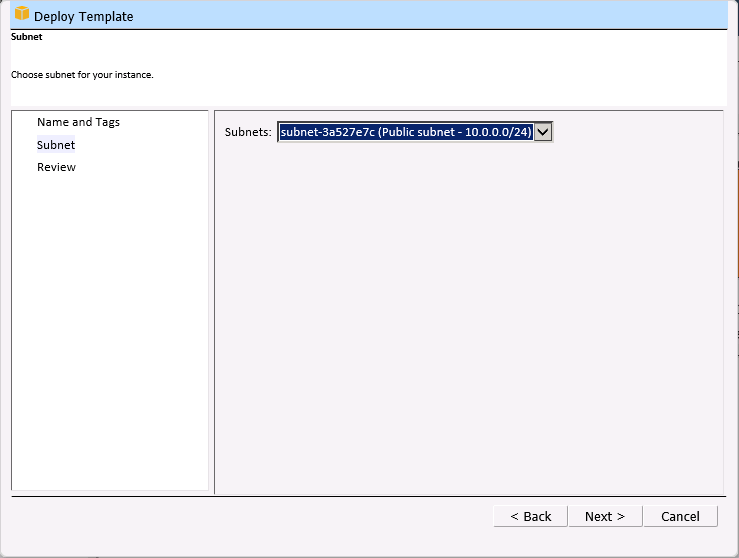
You can also choose the subnet for the instance:
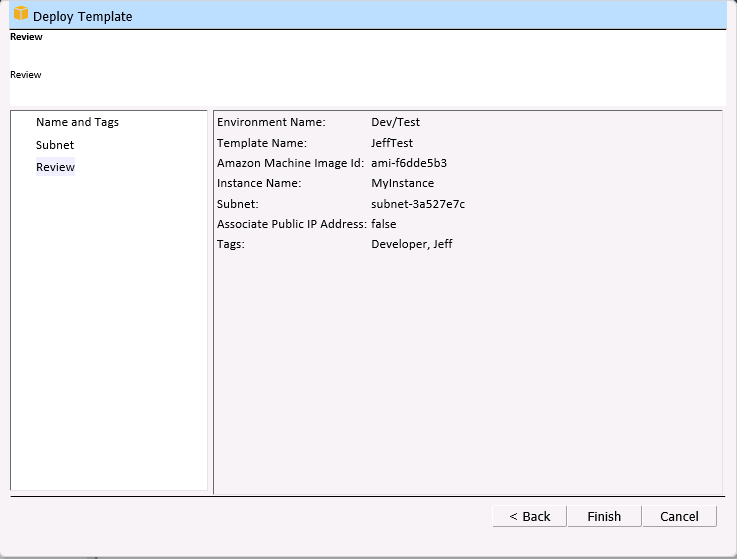
The instance will be launched after you review your choices:
You can also manage your VPC subnets and security groups:
As I mentioned earlier, you can import an existing virtual machine into EC2 with a couple of clicks:
Getting Started
You can download the AWS Management Portal for vCenter today and install it into your existing vSphere Client.
— Jeff;
New EBS Encryption for Additional Data Protection
We take data protection very seriously! Over the years we have added a number of security and encryption features to various parts of AWS. We protect data at rest with Server Side Encryption for Amazon S3 and Amazon Glacier, multiple tiers of encryption for Amazon Redshift, and Transparent Data Encryption for Oracle and SQL Server databases via Amazon RDS. We protect data in motion with extensive support for SSL/TLS in CloudFront, Amazon RDS, and Elastic Load Balancing.
Today we are giving you yet another option, with support for encryption of EBS data volumes and the associated snapshots. You can now encrypt data stored on an EBS volume at rest and in motion by setting a single option. When you create an encrypted EBS volume and attach it to a supported instance type, data on the volume, disk I/O, and snapshots created from the volume are all encrypted. The encryption occurs on the servers that host the EC2 instances, providing encryption of data as it moves between EC2 instances and EBS storage.
Enabling Encryption
You can enable EBS encryption when you create a new volume:
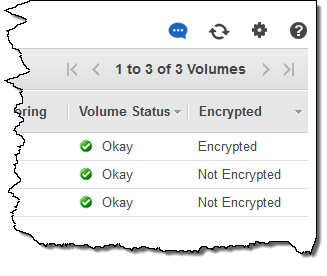
You can see the encryption state of each of your volumes from the console:
Important Details
Adding encryption to a provisioned IOPS (PIOPS) volume will not affect the provisioned performance. Encryption has a minimal effect on I/O latency.
The snapshots that you take of an encrypted EBS volume are also encrypted and can be moved between AWS Regions as needed. You cannot share encrypted snapshots with other AWS accounts and you cannot make them public.
As I mentioned earlier, your data is encrypted before it leaves the EC2 instance. In order to be able to do this efficiently and with low latency, the EBS encryption feature is only available on EC2’s M3, C3, R3, CR1, G2, and I2 instances. You cannot attach an encrypted EBS volume to other instance types.
Also, you cannot enable encryption for an existing EBS volume. Instead, you must create a new, encrypted volume and copy the data from the old one to the new one using the file manipulation tool of your choice. Rsync (Linux) and Robocopy (Windows) are two good options, but there are many others.
Each newly created volume gets a unique 256-bit AES key; volumes created from encrypted snapshots share the key. You do not need to manage the encryption keys because they are protected by our own key management infrastructure, which implements strong logical and physical security controls to prevent unauthorized access. Your data and associated keys are encrypted using the industry-standard AES-256 algorithm.
Encrypt Now
EBS encryption is available now in all eight of the commercial AWS Regions and you can start using it today! There is no charge for encryption and it does not affect the published EBS Service Level Agreement (SLA) for availability.
— Jeff;
EC2 Expansion – G2 and C3 Instances in Additional Regions
I’ll be brief! We are making two types of Amazon EC2 instances available in even more AWS Regions.
G2 Expansion
 EC2’s g2 instances are designed for applications that require 3D graphics capabilities. Each instance includes an NVIDIA GRID™ GPU with 1,536 parallel processing cores and 4 Gigabytes of RAM and hardware-powered video encoding. The g2.2xlarge instances also use high frequency Intel Xeon E5-2670 processors, and include 15 GiB of RAM, and 60 GB of SSD-based storage.
Today we are making the G2 instances available in the Asia Pacific (Sydney) and Asia Pacific (Singapore) Regions and you can start using them now.
C3 Expansion
EC2’s c3 instances are designed for CPU-bound scale out applications and compute-intensive HPC work. They are available in five sizes (c3.large, c3.xlarge, c3.2xlarge, c3.4xlarge, and c3.8xlarge), all with Intel Xeon E5-2680 v2 processors, 3.75 to 60 GiB of RAM, and 32 to 640 GB of SSD-based storage.
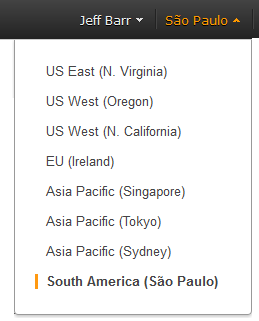
Today we are making all five sizes of c3 instances available in the South America (São Paulo) Region. C3 instances are currently available in a single Availability Zone in this Region. To launch C3 instances in this Region, we recommend you to not specify an Availability Zone preference during the instance launch process.
— Jeff;
Amazon WorkSpaces Now Available in Europe
 Amazon WorkSpaces provides a desktop computing environment in the cloud. It gives enterprise IT the power to meet the needs of a diverse user base by providing them with the ability to work wherever and whenever they want, while using the desktop or mobile device of their choice.
Today we are bringing Amazon WorkSpaces to Europe, with immediate availability in the EU (Ireland) Region. This new Region joins the existing US East (Northern Virginia) and US West (Oregon) Regions.
The Amazon WorkSpaces Administration Guide contains the information that you need to have to get started as quickly and efficiently as possible. Within this guide you’ll find a Getting Started Guide, documentation for WorkSpaces administrators, and WorkSpaces Client Help.
— Jeff;
