AWS Partner Network (APN) Blog
Deploying DevSecOps on Amazon EKS with Aqua Security – Part 2
Editor’s note: This is the second of a two-part series with Aqua Security. Read Part 1 >>
By Irshad A. Buchh, Sr. Partner Solutions Architect at AWS
By Manasi Prabhavalkar, Cloud Integration Architect at Aqua Security
 |
In our first post on Deploying DevSecOps on Amazon EKS with Aqua Security, we showed you how to secure DevSecOps pipelines and production workloads by deploying Aqua Platform and Aqua Enforcers on Amazon EKS clusters.
In this post, we dive deeper to show you how to implement a secure application development lifecycle for Amazon Elastic Kubernetes Service (Amazon EKS), from the build stage to production.
We’ll show you how to use static application security testing (SAST) and dynamic application security testing (DAST) patterns, and discuss the technical details of setting up the DevSecOps pipeline using AWS CodePipeline and Aqua Security.
Aqua Security is an AWS Advanced Technology Partner with the AWS Containers Competency.
Recap of Aqua Security Solutions
The purpose of DevSecOps is to integrate security best practices into a DevOps pipeline instead of bolting them on at the end. Aqua Security provides two DevSecOps solutions.
Aqua Platform secures existing workflows and workloads, facilitates regulatory compliance, enforces immutability, and captures security data for forensics.
For greater flexibility, Aqua Platform relies on Aqua Enforcers, installed closer to the running applications, to monitor the runtime activity of containers and enable runtime security enforcement.
In addition to workload protection, Aqua Cloud Security Posture Management (Aqua CSPM) ensures continuous, correct, and compliant cloud configuration and identification of excessive risk.
Aqua Platform, Aqua CSPM, and Aqua Enforcers integrate with AWS managed services such as Amazon EKS.
Together, Aqua and Amazon EKS provide a highly controlled environment that greatly reduces the attack surface before your application is even deployed, and automatically detects and responds to anomalies during runtime.
Expanded Solution Architecture
In Part 1 of our series, we described our solution architecture; Figure 1 shows a slightly expanded version.

Figure 1 – Expanded DevSecOps pipeline architecture.
The expanded architecture creates an AWS CodePipeline pipeline with two stages:
- Source — Entry point of the pipeline; triggered when you push a change to the source Git repository branch.
- Build — Builds the project using AWS CodeBuild, which uses a
buildspec.ymlfile with five individual phases: install, pre_build, build, post_build, and artifacts.
How to Implement the Architecture
Follow these steps to implement the architecture:
- Set up DevSecOps using AWS CodePipeline.
- Set up Static Application Security Testing (SAST).
- Set up Dynamic Application Security Testing (DAST).
- Clean up.
Step 1: Set Up DevSecOps Using AWS CodePipeline
Due to their immutable nature, container workloads are most likely an output of a CI/CD pipeline, where code flows only in one direction, from artifacts to full-fledged workloads running in production. DevSecOps incorporates “security as code” in your DevOps workflows, to uncover security issues at the inception of the application.
To help us in this regard, we use AWS CodePipeline. It automates the build, test, and deploy phases of your release process every time there’s a code change, based on the release model you define. With AWS CodePipeline, you only pay for what you use. There are no upfront fees or long-term commitments.
The workload-cluster (left side of Figure 1) serves as the target cluster for AWS CodePipeline.
Configure AWS CodePipeline for Aqua DevSecOps
To set up DevSecOps using AWS CodePipeline, perform these steps:
- Verify the cluster context.
- Create an identity and access management (IAM) role for the Amazon EKS cluster.
- Configure AWS CodePipeline for the AWS Go application.
- Enable automated static scanning of the build artifacts.
1a: Verify the cluster context
Verify you have set the right cluster context before proceeding with the pipeline setup. Inside the AWS Cloud9 integrated development environment (IDE) that you set up in Part 1, run the following commands in sequence:
1b: Create an IAM role for the Amazon EKS cluster
AWS CodeBuild is a fully managed continuous integration service that compiles source code, runs tests, and produces software packages that are ready to deploy. With AWS CodeBuild, you don’t need to provision, manage, and scale your own build servers. You are charged by the minute only for the compute resources you use.
To set up AWS CodeBuild to work with the Amazon EKS cluster, you need the AWS AccountID to modify aws-auth configmap. First, export the AccountID as an environment variable using this command:
AWS CodeBuild requires an IAM role capable of deploying to the Workload EKS cluster. Create the IAM role like this:
cd ~/environment

TRUST="{ \"Version\": \"2012-10-17\", \"Statement\": [ { \"Effect\": \"Allow\", \"Principal\": { \"AWS\": \"arn:aws:iam::${ACCOUNT_ID}:root\" }, \"Action\": \"sts:AssumeRole\" } ] }"

echo '{ "Version": "2012-10-17", "Statement": [ { "Effect": "Allow", "Action": "eks:Describe*", "Resource": "*" } ] }' > /tmp/iam-role-policy

aws iam create-role --role-name EksWorkshopCodeBuildKubectlRole --assume-role-policy-document "$TRUST" --output text --query 'Role.Arn'

aws iam put-role-policy --role-name EksWorkshopCodeBuildKubectlRole --policy-name eks-describe --policy-document file:///tmp/iam-role-policy
Finally, modify the aws-auth configmap to map the IAM role in the kubeconfig file:
1c: Configure AWS CodePipeline for the sample Go application
We have provided a sample Go application and the AWS CloudFormation template you need for the next steps in our sample GitHub repository. Fork this sample repository using your GitHub account, and create a GitHub access token.
Select this Launch Stack icon:
![]()
It creates the AWS CodePipeline for the sample Go application.
Fill in the parameters indicated in Figure 2.

Figure 2 – Enter values for AWS CodePipeline stack.
Be sure to fill in these parameters:
- GitHub username
- GitHub access token
- GitHub repository
- CodeBuild IAM role (EksWorkshopCodeBuildKubectlRole)
- Aqua console URL
- Aqua console password
1d: Enable automated static scanning of the build artifacts
scannercli is an Aqua binary that scans the image locally as soon as it’s built, and then communicates back to the Aqua Platform server to compare the findings with Aqua’s CyberCenter. Pertaining to the security tolerance level, the build can be passed or failed based on the scanning results.
The reports are stored as an AWS CodePipeline artifact in the Amazon Simple Storage Service (Amazon S3) bucket, and can be easily retrieved from the AWS Management Console itself.
To enable automated static scanning of the build artifacts, scannercli is used in the buildspec.yml in the build stage as shown here:
Step 2: Set Up Static Application Security Testing (SAST)
Vulnerabilities and malware are identified by Aqua’s CyberCenter, a cloud-based cyber-intelligence knowledge base that aggregates and correlates multiple feeds from the National Vulnerability Database, various vendor advisories, and proprietary research.
To implement security thoroughly, Aqua uses both static and dynamic scanning.
About Static Scanning
Aqua Platform scans all build artifacts against its CyberCenter to generate a comprehensive report describing the image layers, package versions installed, the vulnerabilities found, and fixes, if any.
Aqua scans can also track the provenance of the images and code that make up your application, and evaluate them along with the overall security posture of the application. After the scan, Aqua provides actionable security advice based on a structured decision workflow: Remediate, Mitigate, or Accept.
Aqua’s research team also consults the cloud-based cyber-intelligence knowledge base to create vShield, which are compensatory controls that allow you to mitigate vulnerabilities by creating a safety shield in front of the workload, safeguarding it from being exploited. This feature is especially useful for unpatched vulnerabilities or as a virtual patch for the vulnerabilities that do not have a fix yet.
About Dynamic Scanning
Unfortunately, static scanning has some blind spots when it comes to multi-stage attacks and malicious polymorphic code. To remedy these blind spots, Aqua Dynamic Threat Analysis (DTA) outsmarts evasive malware techniques and uncovers malicious behavior by running your container in an isolated sandbox environment.
DTA dynamically assesses known and unknown risks in container images, before they hit the production environments.
How to Set Up Static Scanning
Instructions for setting up dynamic scanning appear in Step 3. To set up static application security testing (SAST), follow these steps:
- Create an assurance policy for SAST.
- Trigger a new pipeline.
- Examine the output.
- Temporarily disable Fail Aqua Step in CI/CD.
2a: Create an assurance policy for SAST
Once the images are scanned and the risk assessment is completed, you must decide whether the images are safe enough to run in production; in other words, they are in compliance. Assurance policies allow you to create a compliance gate, to make sure only clean artifacts are generated and allowed in the production environment.
It’s easy to create a sound assurance policy, in accordance with security best practices, by combining the various security controls provided by Aqua Platform.
In the Aqua Platform console, go to the Policies tab on the left and select Assurance Policies. In the screen that appears, select Default policy of type Image.
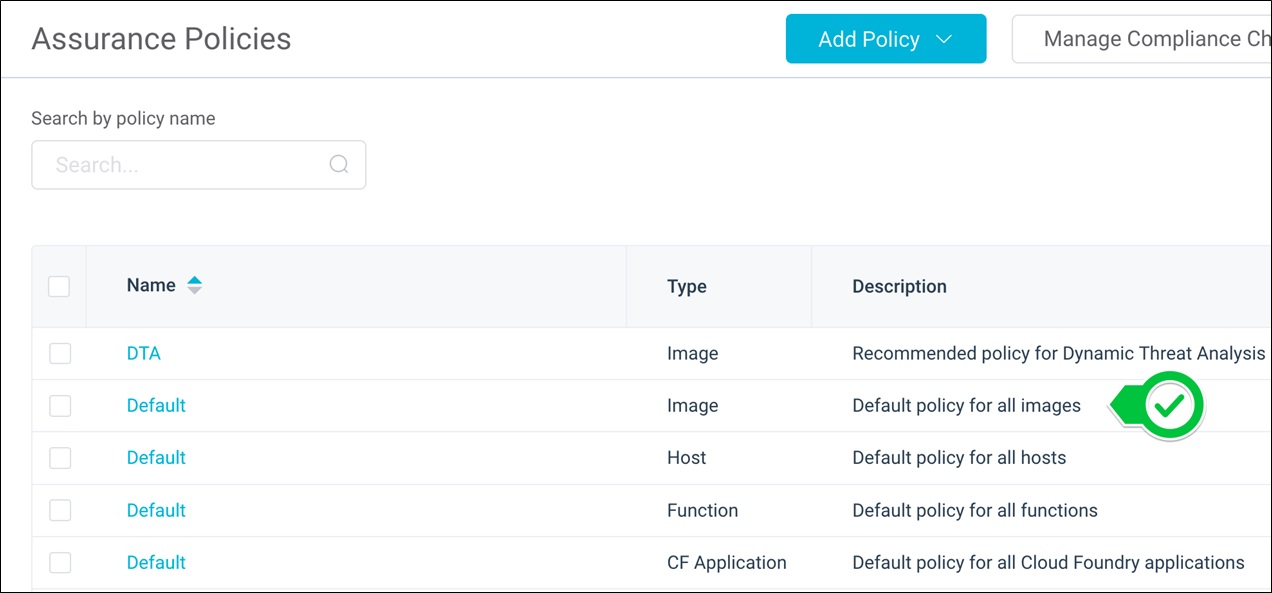
Figure 3 – In the Assurance Policies window, select Image as the default policy for all images.
Once inside the policy, add the controls indicated in Figure 4.

Figure 4 – Add the assurance policy controls for SAST.
The superuser control inspects whether the images are configured to run as a root user or superuser, and prohibits them from making it to production. The superuser is the most privileged account in Linux and, if an attacker happens to gain access to such a container, they can wreak havoc on your environment.
The Vulnerability Severity control allows you to set a vulnerability tolerance specific to your security requirements, restricting highly exploitable code from being deployed.
Together these granular security controls can provide you with strong and automated compliance criteria, improving the security posture of your environment.
For Aqua to serve as a security hook in the build pipeline, ensure the Fail Aqua step in CI/CD under Actions is checked.

Figure 5 – Configure the CI/CD control in the assurance policy.
This causes AWS CodePipeline to fail if the image does not comply with the controls set in this policy. If you choose to uncheck the Fail the Aqua step in CI/CD field, then Aqua does not fail the build, but marks the image as non-compliant.
2b: Trigger a new pipeline
From the AWS console, trigger the pipeline by selecting the Release change button in the AWS CodePipeline service. Notice the pipeline fails during the Build phase because of the Aqua scanner step.
2c: Examine the output
You can view the output of the automated scanning you enabled in Step 1d by retrieving the aqua.html artifact from the Amazon S3 instance. Aqua provides an HTML output outlining the root cause of pipeline failure based on the assurance policies you defined in Step 2a.

Figure 6 – Root cause of pipeline failure based on assurance policies you defined.
The output also shows the various vulnerabilities, malware, and sensitive data that were detected in the image, and whether a fix is available.

Figure 7 – Other image vulnerabilities detected.
2d: Temporarily disable Fail Aqua Step in CI/CD
For the build stage to pass as part of this setup process, navigate to the Assurance Policy you set up in Step 2a, uncheck the Fail Aqua step in CI/CD in Figure 5. Then select Save.
You can also go to the Aqua console for more meaningful insights into the image layers, audit trail, and vShield availability. It also displays risk-based insights, which prioritize risks specifically pertaining to how your environment is set up.
Step 3: Set Up Dynamic Application Security Testing (DAST)
This step shows you how to set up security measures to check your application while it’s running. First, we’ll summarize some of the controls, and then we’ll walk you through the procedure. At the end, we’ll introduce you to Aqua’s Risk Explorer.
About Runtime Enforcement
Aqua provides various runtime enforcement controls to ensure a strong security posture in production when the build artifacts are converted into running workloads.
You can use runtime policies to monitor and enforce controls at runtime, according to your organization’s security requirements. These controls range from blocking unregistered images to detecting drift in a container, as well as granularly blocking certain behavior during runtime.
A runtime policy has three parts:
- Scope — You can create a blanket policy that can be applied to the entire environment. You can also use granular scoping mechanisms based on image attributes, container attributes, or even Kubernetes constructs like pods, deployments, etc.
- Enforcement Mode — You can apply the policy in an Audit mode for current state assessment of your environment, which allows you to perform discovery and provides deeper insight into cloud-native workloads. Switch to the Enforcement mode for actively blocking or enforcing the specified policies.
- Controls — These are security-related tests that are conducted by the Aqua Enforcer while the workload is running.
How to Enable Runtime Policies
Runtime policies are listed under Policies in the Aqua Platform console. To enable them, carry out these steps:
- Integrate with Amazon CloudWatch.
- Block unregistered images.
- Register images you don’t want blocked.
- Enable drift prevention.
3a: Integrate with Amazon CloudWatch
Aqua Platform provides multiple integrations with logging services for forensics that you can use to run root cause analysis (RCA) on intrusion attempts or just to audit for security risk management and compliance.
To create an integration with Amazon CloudWatch on the Aqua Platform console, follow these steps:
- Select Integrations in the left navigation bar.
- In the Log Management tab, select the Amazon CloudWatch tile.
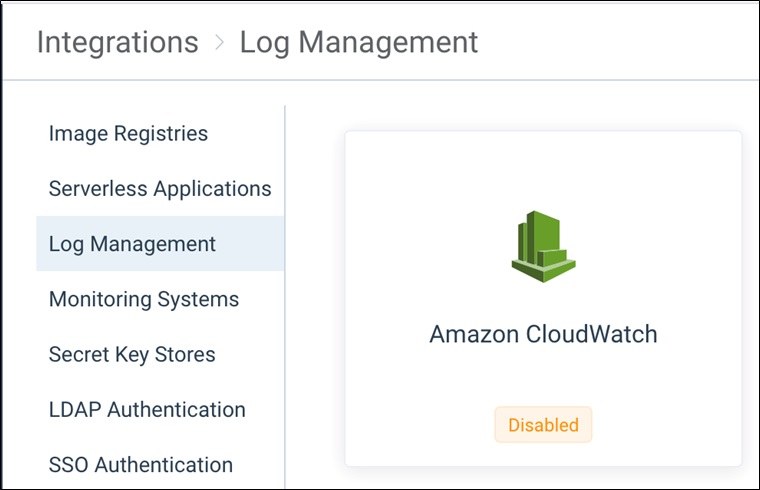
Figure 8 – Select the Amazon CloudWatch tile to create an integration.
- Connect to Amazon CloudWatch using your AWS credentials.
- Specify the LogGroup to be used.
- Select Test Connection to verify connectivity.

Figure 9 – Configuring Amazon CloudWatch integration.
Now that you are connected to Amazon CloudWatch, let’s take a closer look at the different runtime controls and how to use them.
3b: Block unregistered images
This policy prevents the container from running if the underlying image is not registered in Aqua Platform. These could be images that were pulled to a host from outside of Aqua, or before Aqua was installed on the host.
To block unregistered images:
- Select Runtime Policies under the Policies tab on the left navigation bar.
- Select Add Policy in the upper right corner.
- Select the Container Runtime option.
- Set the blanket scope as shown in Figure 10.
![]()
Figure 10 – Setting the blanket scope on the RunTime policies.
- Switch the Enforcement Mode to Enforce.
- Enable the control by selecting it from the list of controls and select Save on the runtime policy.

Figure 11 – Enabling runtime policy control for unregistered images.
Once the policy is enabled, any pods trying to run an unregistered image enter into a RunContainerError state.
In Amazon CloudWatch, you can see the audit message being logged for the block event in the LogGroup you specified earlier while setting up the integration.

Figure 12 – The blocked event appears in the Amazon CloudWatch log.
3c: Register images you don’t want blocked
In addition to its integration with Amazon CloudWatch, Aqua Security integrates with Amazon Elastic Container Registry (Amazon ECR). It’s a fully-managed Docker container registry that makes it easy to store, manage, and deploy Docker container images. You pay only for the amount of data you store in your repositories and data transferred to the internet.
You can register an image by using this Amazon ECR integration, and it works just like the Amazon CloudWatch integration. Once the integration is complete, you can register an image through the Aqua Platform console.
Follow these steps:
- Select the Images tab.
- Select the Add Images button.
- In the drop-down menu for Registry, select ECR, and then add in the search term for your image.
- Select the appropriate image tag and then Add.
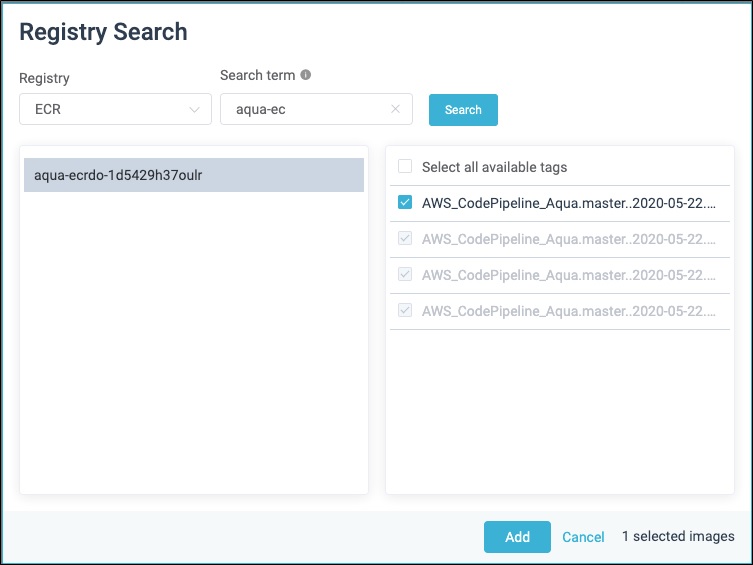
Figure 13 – Registering an image with Amazon ECR integration.
- Select Scan Queue to check the progress of the image scan.

Figure 14 – Select Scan Queue to check the progress of the image scan.
Once the scan is completed, Aqua generates a comprehensive report of all the security risks found, and includes detailed and actionable information of the various vulnerabilities, malware, and any embedded sensitive data in the image.
Now that the image is registered, any subsequent pods using that image will not be blocked, and will spin up successfully.
3d: Enable drift prevention
By definition, cloud-native workloads are immutable in nature. This immutability principle is heavily leveraged for defining the cloud-native security strategy in the form of drift prevention.
Drift Prevention prohibits run files that are not a part of the original image from running, ensuring no changes are made to the image after it is instantiated into a container. This prevents hackers from downloading new malicious code to the running container.
To enable drift prevention:
- Create a new runtime policy with a blanket scope, but this time leave it in Audit mode. You can also choose to edit the previously created policy and add the following controls.
.
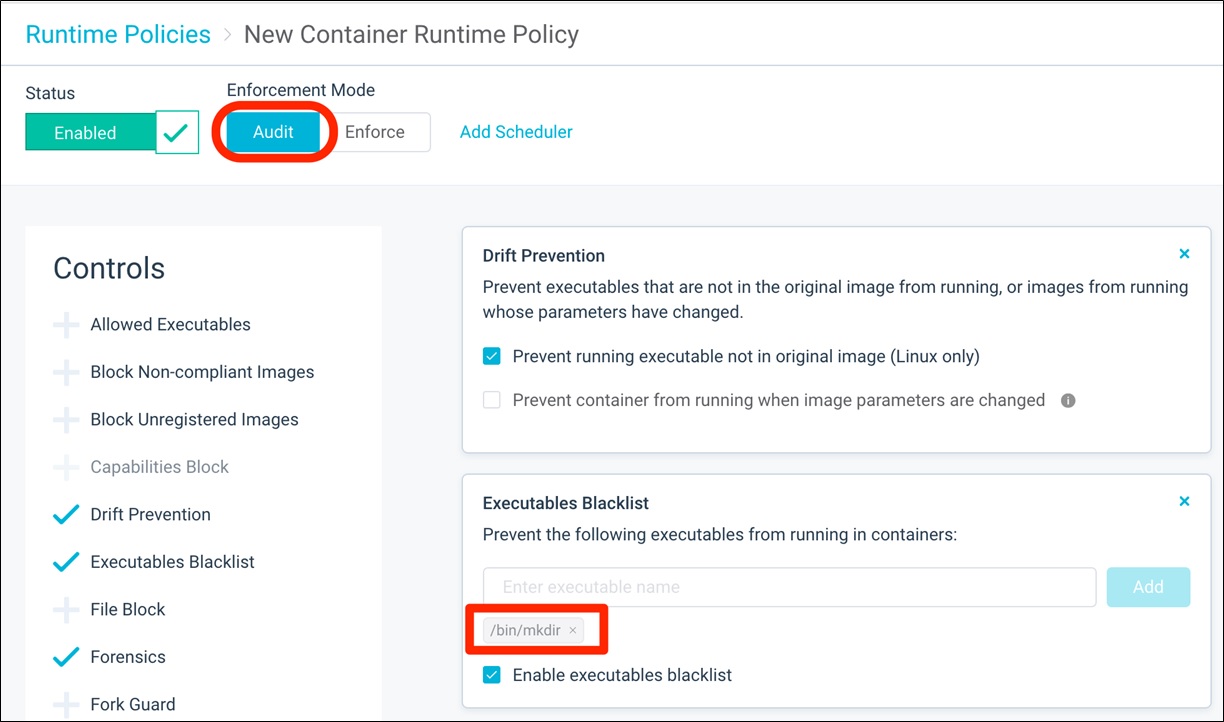
Figure 15 – Enabling Drift Prevention with a runtime policy control.
You can simulate an attack to test drift prevention:
-
- Perform an
execinto one of the pods of the DevSecOps application. - Introduce drift by copying the
lsbinary to a new one.
- Perform an
You can also try to create a new directory by using the blocked executable command mkdir. These commands will work because the Aqua policy is set to Audit mode, but it still leaves an audit trail of an unauthorized attempt for forensics purposes.
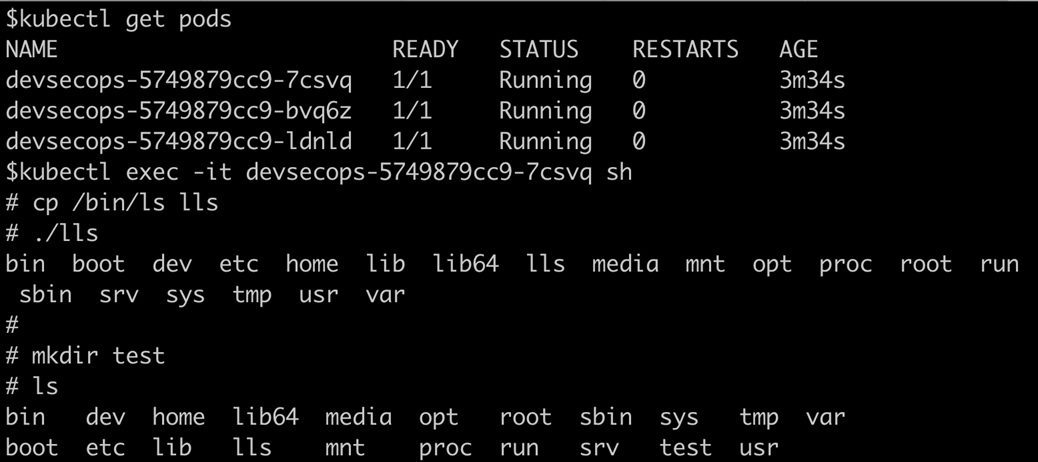
Figure 16 – Runtime enforcement in Audit mode.
- Switch the policy mode to Enforce and select Save.

Figure 17 – Switch to Enforce mode for runtime policy.
This policy immediately starts securing your applications actively without requiring a restart of any kind.
- Test this by executing the
./llsandmkdircommands:

Figure 18 – Runtime enforcement in Enforce mode.
These commands fail with Permission denied.
- You can look for more comprehensive logging in the Aqua console by clicking on the Audit tab on the left.
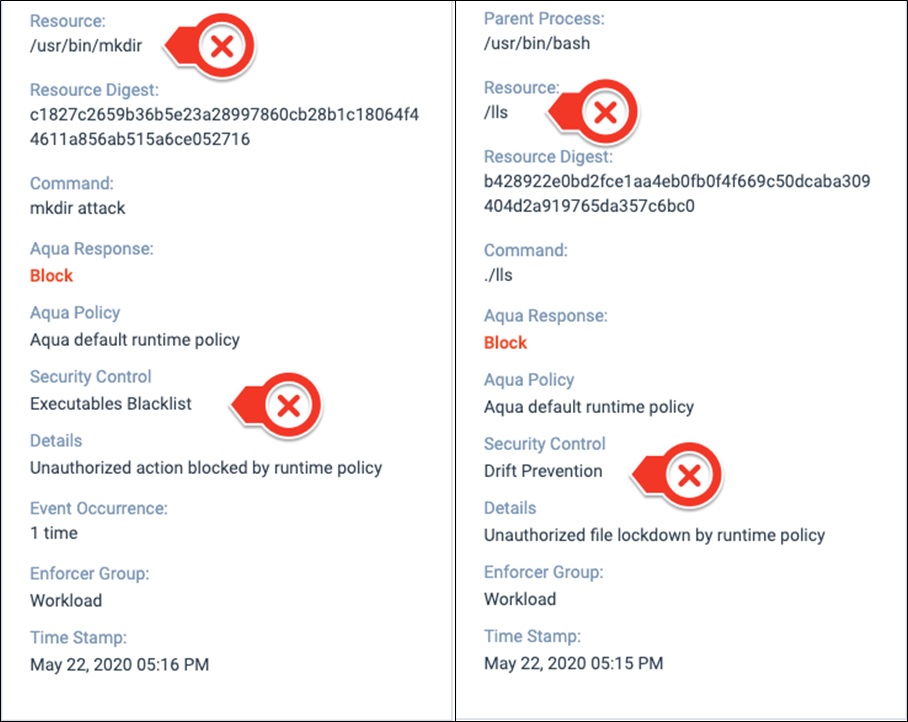
Figure 19 – Audit logs in Aqua Platform portal
About Aqua Risk Explorer
The biggest challenge in a distributed environment is obscured visibility and context required to analyze a potential risk. Automated risk analysis and prioritization can go a long way in enhancing the security posture of your cloud-native environment.
Aqua Risk Explorer performs automated discovery and risk assessment of the assets in your environment. This single-pane view provides insights into the associativity of your assets. You can drill down into any of them, making it easy to identify potential entry points to the environment.

Figure 20 – Aqua Risk Explorer.
Step 4: Clean Up
To remove the Amazon RDS for PostgreSQL database, run the following commands inside the AWS Cloud9 IDE:
aws rds delete-db-instance \
--db-instance-identifier aquadb \
--delete-automated-backups
--skip-final-snapshot
To remove the Amazon EKS clusters, run the following commands inside the AWS Cloud9 IDE:
Conclusion
Aqua Security was built to redefine security and help you address the security skills gap in a rapidly evolving cloud-native landscape, automating security controls at the speed of DevOps.
Unlike traditional security, cloud-native security cannot adopt a one-size-fits-all approach. It has to be seamlessly integrated with the existing processes, organizational culture as well as the technology.
This post showed you how to implement a DevSecOps pipeline using AWS CodePipeline and Aqua Platform. We also laid out the setup of Static Application Security Testing (SAST) and Dynamic Application Security Testing (DAST) patterns.
Be sure to read our first post on Deploying DevSecOps on Amazon EKS with Aqua Security.
For more information, contact Aqua Security.
.

.
Aqua Security – AWS Partner Spotlight
Aqua Security is an AWS Competency Partner. They have formulated a security portfolio that provides coverage throughout the application development lifecycle while also securing the underlying infrastructure.
Contact Aqua Security | Solution Overview | AWS Marketplace
*Already worked with Aqua Security? Rate this Partner
*To review an APN Partner, you must be an AWS customer that has worked with them directly on a project.