AWS Partner Network (APN) Blog
Implementing Multi-Factor Authentication in React Using Auth0 and AWS Amplify
By Roy Rodan, Partner Solutions Architect – AWS
By Mark Kriaf, Partner Solutions Architects – AWS
By Michele Riso, AWS Certified Solutions Architect Professional
 |
This post showcases the simplicity of adding Multi-Factor Authentication (MFA) to a React Single-Page Application (SPA) using Auth0 and AWS Amplify.
AWS Amplify is a set of tools and services that can be used, together or on their own, to help frontend web and mobile developers build scalable full stack applications.
With Amplify, you can configure app backends and connect your app in minutes, deploy static web apps in a few clicks, and easily manage app content outside the AWS Management Console.
Auth0 is an AWS ISV Partner with Competency designations in Security and Mobile. Auth0 helps developers secure their application by providing an easy-to-implement, adaptable authentication and authorization platform.
Benefits of Integrating Auth0 with AWS Amplify
Auth0 helps developers implement user authentication in any type of client, SPA, and native mobile or desktop applications. Auth0 also makes it easier to implement and enable MFA as part of the user authentication flow in any of your apps.
AWS Amplify helps developers put their applications in the cloud in record time. It makes it easier to build, deploy, and host an application on Amazon Web Services (AWS).
Prerequisites
This tutorial requires familiarity with React and the AWS Command Line Interface (CLI). You should also have the following software set up in your local machine:
- Node.js v10.x or later
- npm v5.x or later
- AWS CLI v2.x
- Git
- AWS Amplify (See the Get Started on AWS doc and make sure to configure AWS Amplify)
Auth0 Configuration
You can get up and running with Auth0 by following these steps:
- Sign up for a free Auth0 account.
- Visit the Application sections of the Auth0 dashboard.
- Click on the Create Application button.
- In the dialog that comes up, give your application a Name, such as “AWS Amplify Sample” and choose Single Page Web Applications as its type.
- Click the Create button.
Once done, your Auth0 application page will load up. You can click on the Settings tab to access the values you’ll need to integrate Auth0 with React, such as the Auth0 Domain and the Auth0 Client ID.
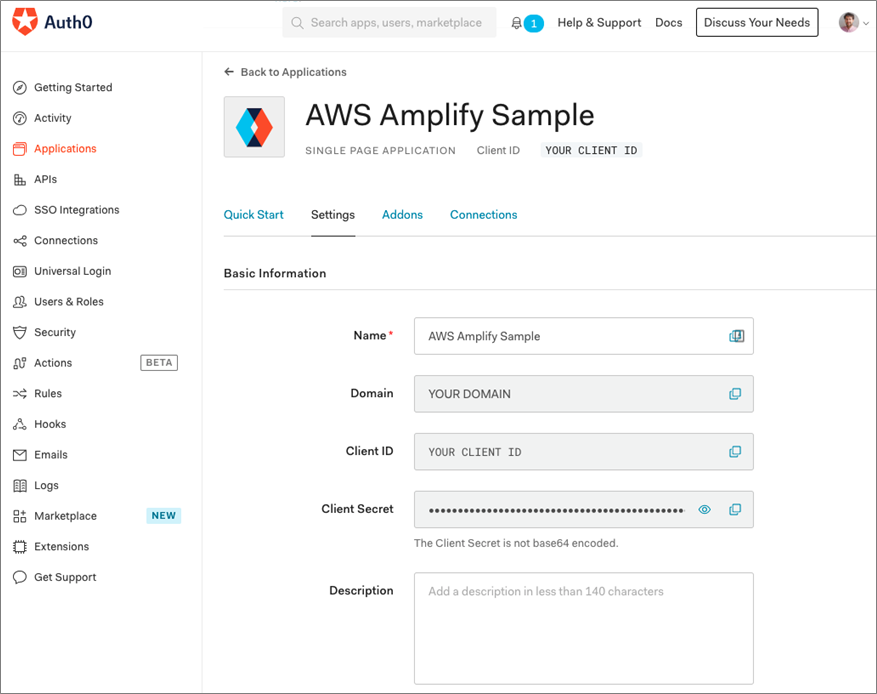
Figure 1 – Auth0 app dashboard.
React App Configuration
For the sake of simplicity, you can clone the Auth0 React Amplify Sample app available on the Auth0 Blog Samples GitHub:
Install the Auth0 React SDK
The Auth0 React Software Developer Kit (SDK) provides developers with methods and variables to integrate Auth0 with a React application using React Hooks or Higher-Order Components. Learn more about React Hooks vs Higher-Order Components, and you can also use the SDK with class components.
To install it, run the following command:
Integrate Auth0 React SDK
The easiest way to integrate Auth0 with React is to wrap your root component, generally in the index.js, with an Auth0Provider:
As you can see in the snippet above, Auth0Provider requires as props the details taken from the Auth0 AWS Amplify Sample dashboard.
To avoid tightly bounding the React app with the Auth0 details, we use a getConfig method (defined in config.js at same level as index.js) that retrieves the details from an auth_config.json file:
The auth_config.json file contains the following configuration information:
Important: the AUTH0_DOMAIN must be the actual domain without `http(s)://` and trailing `/`, e.g. dev-acsvdfreu.eu.auth0.com.
Head back to the Auth0 application Settings tab to obtain these values. Use the Domain value to replace ‘AUTH0_DOMAIN’ and the Client ID value to replace ‘AUTH0_CLIENT_ID’.
Add Login and Logout
The Auth0 React SDK provides an easy way to implement login and logout features using the `loginWithRedirect()` and `logout()` methods respectively from the `useAuth0` hook.
Please have a look at these samples should you need to use a React higher-order component rather than a React hook.
Below is an example of a LoginButton component that makes use of the `loginWithRedirect` method:
The `loginWithRedirect()` method redirects your app to the Auth0 universal login page where the user can log in using any identity providers configured in your Auth0 dashboard.
Once you implement the login feature, you can implement a logout button using the `logout()` method provided by the `useAuth0` hook. Below is an example of a React component that makes use of the `logout` method:
In the Auth0 React Amplify Sample app, Login and Logout buttons are part of the MainNav (“`main-nav.js“` can be found inside the “`components“` folder), where they are used in a conditional way depending on the “`isAuthenticated“` status (code on GitHub).
AWS Amplify Configuration
Now that you have configured Auth0 to integrate with the React app, you need to configure AWS Amplify.
The first step is to initialize an Amplify project is running the command amplify init in the root of your Single SPA.
Amplify asks you a few questions to understand how your Single SPA has been configured. If you have used the Auth0 React Sample or you have created your own app using create react app, you can accept the default answer to most of the questions (see screenshot)
Otherwise, you need to tweak them based on your project configuration:
- Enter a name for the project: Suggested one
- Enter a name for the environment: dev
- Choose your default editor: Select your editor
- Choose the type of app that you’re building: JavaScript
- What JavaScript framework are you using: react
- Source Directory Path: src
- Distribution Directory Path: src
- Build Command: npm run-script build
- Start Command: npm run-script start
- Select the authentication method you want to use: If you have followed the AWS Amplify Get Started doc, then you can select AWS profile > default; otherwise. you need to provide the AWS access keys.
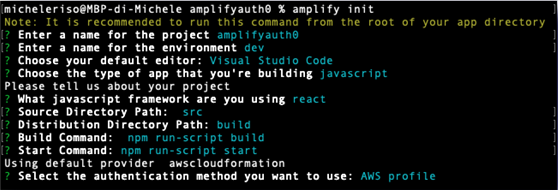
Figure 2 – AWS Amplify initialization.
Add Hosting
You now need to instruct AWS Amplify to provide hosting space for our Single SPA through the command `amplify hosting add`.
Amplify provides two different ways to host a web app:
- AWS Amplify console: This option provides a workflow to build, deploy, and host the Amplify web app, both frontend and backend. All of the changes are deployed to an `amplifyapp.com` subdomain, or you can choose your custom domain.
- Amazon S3 and Amazon CloudFront: This option lets you manage your static website hosting using Amazon Simple Storage Service (Amazon S3) and Amazon CloudFront.
In this post, we use the former and choose `Manual deployment`:

Figure 3 – Amplify hosting add.
Publish Your Changes
Using the command `amplify publish`, we can instruct AWS Amplify to build and deploy the Amplify app.
Amplify will show the changes in the infrastructure to be applied and ask for confirmation. Amplify runs several AWS CloudFormation templates to make changes in the AWS infrastructure, build locally the app using the scripts defined in the `package,json`, and deploy it on AWS.
Upon completion, it does give you a URL where the app is deployed (i.e. https://dev-xxxxxxxxx.amplifyapp.com).
The app is now live at that URL!
Auth0 URL Configuration
If you tried the tutorial so far, you would have noticed the app deployed at the URL provided in the previous step is loading, but it does show an error when trying to log in.
That happens because we didn’t allow that URL in the Auth0 application dashboard. Therefore, Auth0 is rejecting the login request enforcing security Access Control Lists (ACLs).
You need to head back to the Auth0 application dashboard and configure the URLs (e.g. https://dev-xxxxxxxxx.amplifyapp.com):
- Application login URL: This is your Single SPA login URI Auth0 might need to redirect to.
- Allowed callback URLs: URLs Auth0 can redirect to after the login.
- Allowed logout URLs: URLs Auth0 can redirect to after the logout.
- Allowed web origins: comma-separated list of allowed origin for use with Cross-Origin Authentication.
- Allowed origins (CORS): Allowed Origins are URLs that will be allowed to make requests from JavaScript to Auth0 API (typically used with CORS).
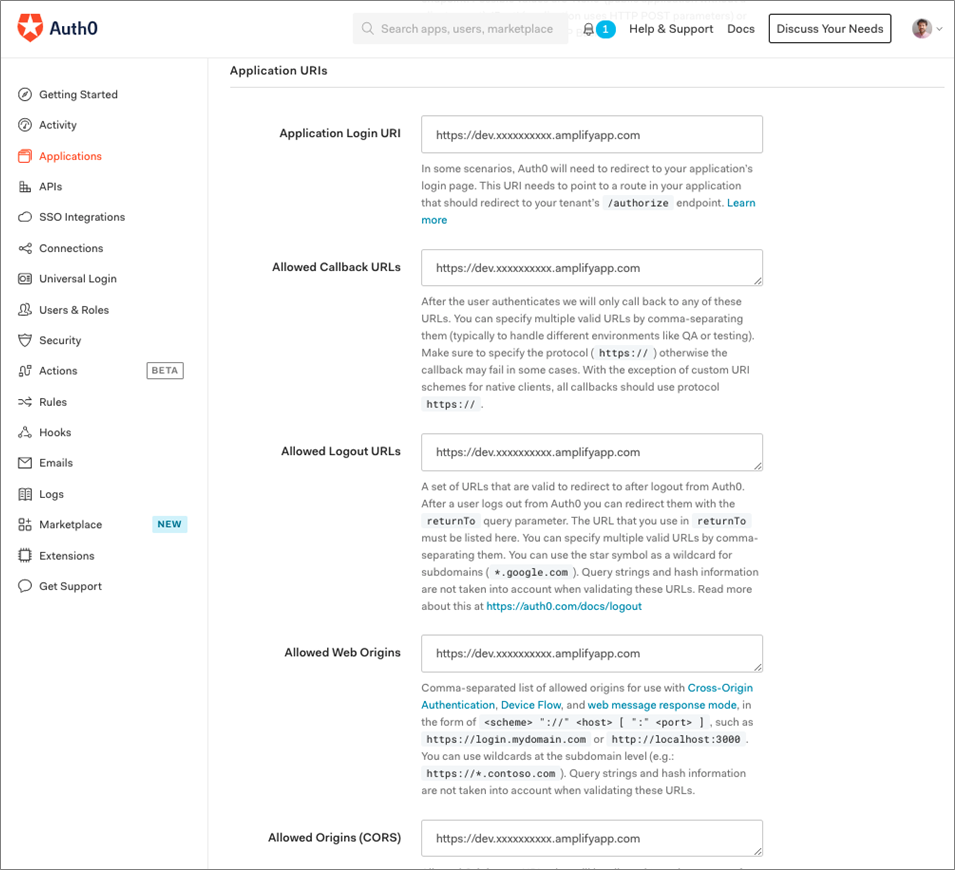
Figure 4 – Auth0 URIs configuration.
The app is now fully working and lets you perform authentication via any Identity providers configured in Auth0.

Figure 5 – Auth0 universal login page.
Multi-Factor Authentication
Internet security best practices state that to ensure users are who they claim to be, they need to provide at least two pieces of evidence. Therefore, just signing in with a username and password or using an Identity Provider (IdP) is not secure anymore.
The reason is because a user could have registered with the same credentials to many websites and one of them has been a victim of a hack, resulting in a security leakage. A similar issue can happen using Federated access.
Auth0 Rules
Auth0 offers extensive MFA capabilities via the Auth0 Rules. Rules are JavaScript (JS) functions that are hooked up to the login flow, running after the authentication is completed, and giving full flexibility on MFA based on the custom business logic.
Step-Up Authentication
Using Auth0 Rules, you can implement “Step-up” authentication providing the web app with different authentication mechanisms on a resource basis. For instance, a web app could require strong authentication for a specific type of transactions (invoice data or medical info, for example).
To start with Rules, you need to open the Auth0 default app console, select Rules from the left sidebar menu and click Create.
MFA Examples Using Auth0 Rules
Auth0 provides a set of ready-made rules templates, such as MFA based on the time or day of the week or IP address. However, it gives you the full capability to set up your own rule selecting `Empty rule`.
- Multi-factor when request comes from outside an IP range: This rule is used to trigger MFA when the requesting IP is from outside the corporate IP range.

Figure 6 – Auth0 Rule Multifactor when request comes from outside an IP range.
- Allow access during weekdays for a specific app: This rule is used to prevent access during weekends for a specific app.
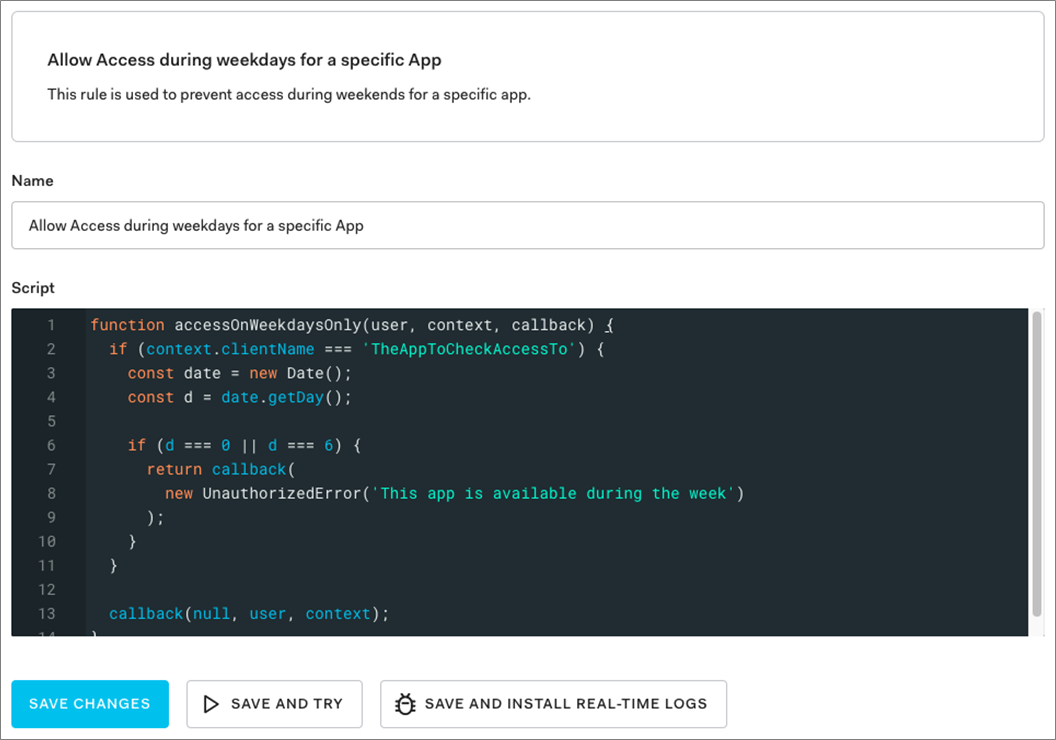
Figure 7 – Auth0 rule Allow Access during weekdays for a specific app.
Summary
To recap, in this post you learned about Auth0 identity management capabilities and AWS Amplify. In particular, we explored how to integrate a React Single SPA with Auth0 to provide user identity and Multi-Factor Authentication (MFA), and AWS Amplify to build, deploy and host a Single SPA on the AWS Cloud.
We have also explored what MFA is and why it’s needed, as well as how to easily implement it via Auth0 Rules.
If you wanted to try it out, you would need:
- AWS account: AWS gives you a free 12-month tier.
- Auth0 account: Auth0 gives you a free plan for up to 7,000 active users.
- Clone the React Sample-01 app available on Auth0 Samples Github (where you can find examples for any framework and languages).
This post explored how to integrate the frontend part of AWS Amplify with Auth0 using the React Framework. AWS Amplify provides an easy way to deploy a GraphQL endpoint, using AWS AppSync.
To secure the GraphQL endpoint, you can configure Auth0 as a federation provider of Cognito Identity Pool.
Authors from Auth0 contributed to this blog post.