AWS Database Blog
Save costs by automating the start and stop of Amazon RDS instances with AWS Lambda and Amazon EventBridge
Amazon Relational Database Service (Amazon RDS) makes it easy to set up, operate, and scale a relational database in the cloud. In traditional databases, you have to spend more time performing administration, backup, patching, capacity planning, version upgrades, new server provisioning, and recovery tasks. You have to manually perform all these activities with an expert DBA, which takes their time away from improving security, availability, and application-related updates in the database server. Amazon RDS helps organizations save costs and enables DBAs to focus on productive tasks and let Amazon RDS manage daily administration tasks.
For non-mission critical workloads, where the database instances do not need to run 24/7, by default you’re billed for compute and storage costs. This means you are paying for Amazon Elastic Compute Cloud (Amazon EC2) and RDS instances even when you’re not using them. To reduce costs, you can manually stop your instances during non-business hours and start them again just before the start of business hours. You can halt RDS instances for a maximum of 7 days. However, managing and remembering this process on a daily basis for multiple database instances is difficult.
In this post, I show a solution that helps you start and stop your instances according to workload requirements by automatically scheduling them with the least amount of one-time configuration and complete flexibility across multiple workloads.
Our solution uses AWS Lambda functions to start and stop instances. These functions are triggered by Amazon EventBridge rules (earlier known as Amazon CloudWatch rules) using a cron expression to check if any RDS instance is configured with predefined tags and ready to start or stop. You can check the progress on each Lambda trigger using CloudWatch Logs. You can set up and deploy the solution in any AWS Region that runs Amazon RDS. You can also use Tag Editor to add or update Amazon RDS tags in bulk.
This post presents additional features and improvements that you can apply to the solution in Schedule Amazon RDS stop and start using AWS Lambda. The previous post demonstrates how to schedule starts and stops based on a fixed schedule set with an EventBridge rule. This post expands on the solution by implementing more flexible scheduling rules that you can set for each instance separately. Additionally, this post shows how to configure start and stop times for weekdays and weekends separately, in the Region’s time zone (server time of the Region in which the resource is hosted) by default. This post uses CloudWatch logs to capture diagnostic output, which you can also use for progress monitoring. You can use an AWS CloudFormation template or AWS Serverless Application Model (AWS SAM) template to automatically spin up the resources to implement this solution.
This post presents an automated solution with quick configuration, the bare minimum of services, and all necessary functionality. For a more robust solution, use the AWS Instance Scheduler. For further information, refer to How do I use CloudFormation to stop and start my instances at predefined times?
Solution overview
Lambda is a serverless compute service that allows you to run code without the need for server provisioning or management. You can create or upload your function code, set memory and timeout duration, and specify an AWS Identity and Access Management (IAM) role with Lambda. The function is then triggered using an AWS resource. In this solution, we use EventBridge rules.
The EventBridge rule monitors specified types of events. When a matching event occurs, it’s routed to one or more targets defined by the rule. The rules are either based on an event pattern or a schedule.
We use Lambda functions to store the code that starts and stops RDS instances with predefined tags. EventBridge rules with cron-based schedule patterns trigger the Lambda functions.
The following diagram illustrates the solution architecture.

When implementing this solution with Amazon RDS tags, you can pick between two configurations. Depending on your business needs, you can use either or both:
- Fixed time – A fixed time setup has the following components:
- A single schedule applies to all RDS instances; for example you need to start several non-prod instances at a fixed time, such as daily at 9:00 AM, and stop them at 6:00 PM
- The start and stop times are configured in an EventBridge rule cron in the UTC time zone
- You can enable the solution by setting a
trueBoolean flag value (case insensitive) in the Amazon RDS tag key’s value - You disable the setup by not creating tags or by setting the Boolean flag value to
false(case insensitive) in the Amazon RDS tag - The tag keys are
AutoStartandAutoStop
- Flexible time – A flexible time setup has the following components:
- A different time schedule applies to each RDS instance; for example, if you want to start some servers at 7:00 AM, some at 8:30 AM, and so on, and stop some at 4:00 PM, some at 6:00 PM, and so on
- The start and stop times are configured in Amazon RDS tags in HH:MM format in the time zone of the Region in which Amazon RDS is hosted
- You enable this setup by setting the time value in the Amazon RDS tag key’s value
- You disable this setup by not creating a tag or by setting a blank value (empty or
null) in the Amazon RDS tag - The tag keys are
StartWeekDay,StopWeekDay,StartWeekEnd, andStopWeekEnd
We use the following high-level features to configure and implement this solution:
- Tags – Configure six predefined tags in Amazon RDS:
AutoStart– Set value asTrueorFalsewith a schedule set in the auto start ruleAutoStop– Set value asTrueorFalsewith a schedule set in the auto stop ruleStartWeekDay– Set value in HH:MM to start on a weekday (Monday to Friday)StopWeekDay– Set value in HH:MM to stop on a weekday (Monday to Friday)StartWeekEnd– Set value in HH:MM to start on a weekend (Saturday to Sunday)StopWeekEnd– Set value in HH:MM to stop on a weekend (Saturday to Sunday)
- Lambda – Configure six Lambda functions:
- Auto start (
AutoStartRDSInstance) - Auto stop (
AutoStopRDSInstance) - Weekend start (
RDSStartWeekEnd) - Weekend stop (
RDSStopWeekEnd) - Weekday start (
RDSStartWeekDay) - Weekday stop (
RDSStopWeekDay)
- Auto start (
- Rule – Create four EventBridge rules with cron schedule in UTC:
- Auto start (
AutoStartRDSRule)- Default schedule is cron (
0 13 ? * MON-FRI *) - Auto start instance (Mon–Fri 9:00 AM EST / 1:00 PM UTC)
- Default schedule is cron (
- Auto stop (
AutoStopRDSRule)- Default schedule is cron (
0 1 ? * MON-FRI *) - Auto stop instance (Mon–Fri 9:00 PM EST / 1:00 AM UTC)
- Default schedule is cron (
- Weekend start and stop (
RDSStartStopWeekEndRule)- Default schedule is cron (
*/5 * ? * MON-FRI *) - Instance is triggered every weekday, every 5 minutes
- Default schedule is cron (
- Weekday start and stop (
RDSStartStopWeekDayRule)- Default schedule is cron (
*/5 * ? * SAT-SUN *) - Instance is triggered every weekend, every 5 minutes
- Default schedule is cron (
- Auto start (
You can also use the CloudFormation or serverless templates provided at the end of this post to automate the procedure. For more information on how to use the templates, see Working with AWS CloudFormation templates and the AWS SAM Developer Guide.
Prerequisites
For this walkthrough, you should have the following prerequisites:
- An AWS account
- Amazon RDS (running) with permissions to manage tags
- Access to Lambda
- Access to EventBridge
- Access to CloudWatch Logs
Some Amazon Aurora DB clusters can’t be stopped and started. Refer to Limitations for stopping and starting Aurora DB clusters for more information.
Create IAM policy and role
First, we create an IAM policy and attach it with an IAM role. Refer to Creating policies on the JSON tab for step-by-step instructions.
- On the IAM console, on the JSON tab, delete any existing code and enter the following JSON policy code:
For
<region>, enter your Region name, such asus-east-1. For<account>, enter your 12-digit AWS account ID. The*in the preceding code denotes that this policy is applicable to all DB instance names. - Name your policy
LambdaRDSStartStopPolicyand add a description.
Now we create an IAM role and attach the policy to. Refer to Creating a role for an AWS service (console) for detailed instructions.
- For Select type of trusted entity, select AWS service.
- Choose Lambda as the service for this use case.
- Search for the policy
LambdaRDSStartStopPolicyand select it. - Search for the policy
AWSLambdaBasicExecutionRoleand select it. - Name the role
LambdaRDSStartStopRoleand add a description.
This role must be attached to all Lambda functions in this solution. It’s a best practice to have one IAM role per Lambda function, to help apply the principle of least privilege, and not share IAM roles across functions. We recommend creating different IAM roles and attaching one to each function.
Create Lambda and EventBridge resources
We now create Lambda and EventBridge resources based on the solution requirements (automatic with a fixed start and stop time, or flexible with a dynamic start and stop time).
Which functionality is enabled for Amazon RDS workloads is up to the your discretion and business requirements. You can enable one or both solutions. For this post, we demonstrate how to set up both.
Automatic start and stop solution
To implement the automatic start and stop feature (fixed time), we need to configure the Amazon RDS tags, then create two Lambda functions and two EventBridge rules.
Configure Amazon RDS tags
We need to add tags in the RDS instance to set up the automatic start and stop solution.
Tag keys should not be modified, but you can modify tag values to schedule starting and stopping the RDS instances. If no tag setting is required, you can leave the value for that particular tag key blank.
Set the tag keys AutoStop and AutoStart to both have the value true (case insensitive), as shown in the following screenshot.

Create Lambda functions
We now create Lambda functions to stop and start the RDS instance. Refer to Create a Lambda function with the console for detailed instructions. We begin with the function to stop the instance.
- On the Lambda console, choose Create function.
- Name the function
AutoStopRDSInstance. - For Runtime, choose Python 3.9.
- For Execution Role, select Use an existing role and choose the role
LambdaRDSStartStopRole. - For Description, enter
Auto Stop RDS Instance (from tag : AutoStop). - Set memory to 128 MB, timeout to 60 seconds, and reserve concurrency to 10.
- Use the Python code from the Lambda-Code-AutoStopRDSInstance.py file.
Now we create the function to start the RDS instance.
- Choose Create function.
- Name the function
AutoStartRDSInstance. - For Runtime, choose Python 3.9.
- For Execution Role, select Use an existing role and choose the role
LambdaRDSStartStopRole. - For Description, enter
Auto Start RDS Instance (from tag : AutoStart). - Set memory to 128 MB, timeout to 60 seconds, and reserve concurrency to 10.
- Use the Python code from the Lambda-Code-AutoStartRDSInstance.py file.
Create EventBridge rules
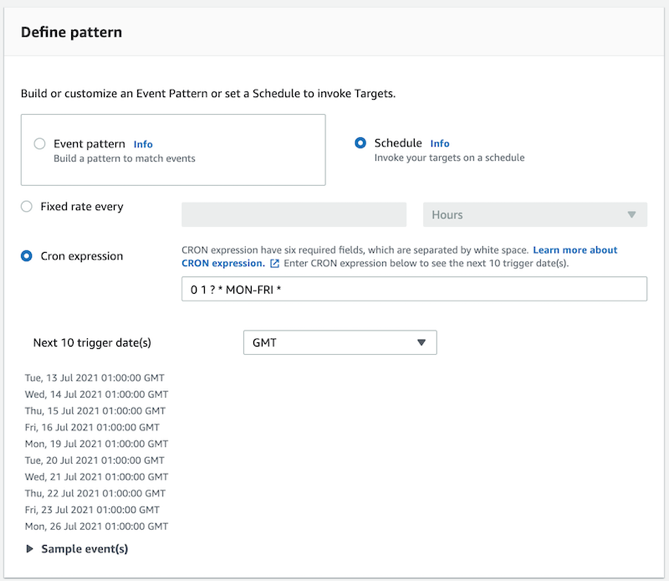
EventBridge rules trigger the Lambda functions we created. Refer to Create a rule in Amazon EventBridge for detailed instructions. We start by creating the automatic stop rule.
- On the EventBridge console, choose Create rule.
- Name the rule
AutoStopRDSRule. - For Description, enter
Auto Stop RDS Instance (Mon-Fri 9:00 PM EST / 1:00 AM UTC). - Under Define pattern, select Schedule and select Cron expression.
- Enter the expression
0 1 ? * MON-FRI *.
- Under Select targets, for Target, choose Lambda function.
- For Function, choose the function
AutoStopRDSInstance.

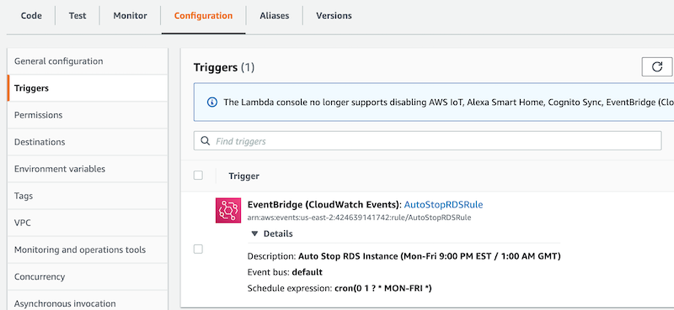
This attaches the rule AutoStopRDSRule to the Lambda function AutoStopRDSInstance. You can view the details on the Configuration tab in the Triggers section.
Repeat the previous steps to create an EventBridge rule to start the RDS instance.
- Choose Create rule.
- Name the rule
AutoStartRDSRule. - For Description, enter
Auto Start RDS Instance (Mon-Fri 9:00 AM EST / 1:00 PM UTC). - Enter the cron expression as
0 13 ? * MON-FRI *. - Choose the target Lambda function
AutoStartRDSInstance.
Scheduled start and stop time
To enable the flexible start and stop functionality (scheduled time), we configure the Amazon RDS tags, and create four Lambda functions and two EventBridge rules.
Configure Amazon RDS tags
We add tags to the RDS instance to set up the scheduled start and stop database instance solution.
Tag keys should not be modified, but you can modify tag values to schedule starting and stopping the RDS instances. If no tag setting is required, you can leave the value for that particular tag key blank.
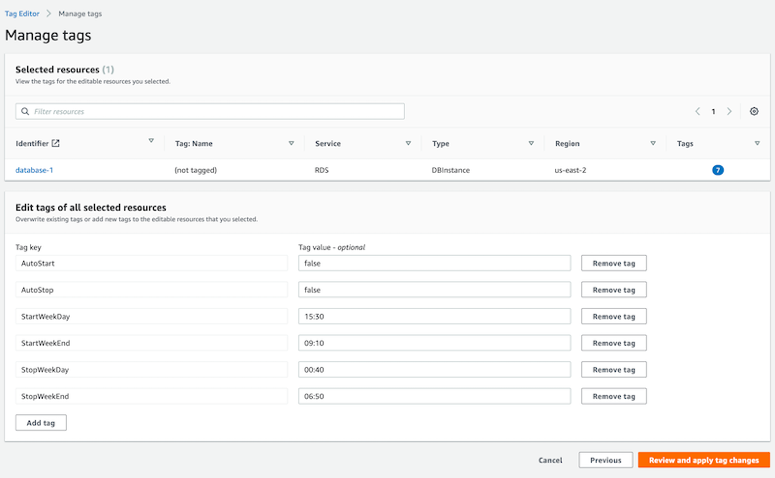
Set the tag keys StartWeekDay, StopWeekDay, StartWeekEnd, and StopWeekEnd to your preferred times, as shown in the following screenshot.

Create Lambda functions
We first create a function to stop an RDS instance on a weekday.
- On the Lambda console, choose Create function.
- For Function name, enter
RDSStopWeekDay. - For Runtime, choose Python 3.9.
- For Execution Role, select Use an existing role and choose the role
LambdaRDSStartStopRole. - For Description, enter
RDS Stop Week Day Time in HH:MM (from tag : StopWeekDay). - Set memory to 128 MB, timeout to 60 seconds, and reserve concurrency to 10.
- On the Configuration tab, in the Environment Variables section, add an environment variable with the key
REGION_TZand the value as your Region’s time zone, for example,US/Eastern. If you don’t set this key-value pair, it defaults to theUTCtime zone. - Use the Python code from the Lambda-Code-RDSStopWeekDay.py file.
Next, create a Lambda function to start an RDS instance on a weekday.
- Choose Create function.
- For Function name, enter
RDSStartWeekDay. - For Runtime, choose Python 3.9.
- For Execution Role, select Use an existing role and choose the role
LambdaRDSStartStopRole. - For Description, enter
RDS Start Week Day Time in HH:MM (from tag : StartWeekDay). - Set memory to 128 MB, timeout to 60 seconds, and reserve concurrency to 10.
- On the Configuration tab, in the Environment Variables section, add an environment variable with the key
REGION_TZand value as your Region’s time zone. - Use the Python code from the Lambda-Code-RDSStartWeekDay.py file.
Now you create a Lambda function to stop an RDS instance on a weekend.
- Choose Create function.
- For Function name, enter
RDSStopWeekEnd. - For Runtime, choose Python 3.9.
- For Execution Role, select Use an existing role and choose the role
LambdaRDSStartStopRole. - For Description, enter
RDS Stop Week End Time in HH:MM (from tag : StopWeekEnd). - Set memory to 128 MB, timeout to 60 seconds, and reserve concurrency to 10.
- On the Configuration tab, in the Environment Variables section, add an environment variable with the key
REGION_TZand value as your Region’s time zone. - Use the Python code from the Lambda-Code-RDSStopWeekEnd.py file.
Finally, create a Lambda function to start an RDS instance on a weekend.
- Choose Create function.
- For Function name, enter
RDSStopWeekEnd. - For Runtime, choose Python 3.9.
- For Execution Role, select Use an existing role and choose the role
LambdaRDSStartStopRole. - For Description, enter
RDS Start Week End Time in HH:MM (from tag : StartWeekEnd). - Set memory to 128 MB, timeout to 60 seconds, and reserve concurrency to 10.
- On the Configuration tab, in the Environment Variables section, add an environment variable with the key
REGION_TZand value as your Region’s time zone. - Use the Python code from the Lambda-Code-RDSStartWeekEnd.py file.
Create EventBridge rules
You now create EventBridge rules to stop and start an RDS instance on a weekday or weekend. We start with the weekday rule.
- On the EventBridge console, choose Create rule.
- Name the rule
RDSStartStopWeekDayRule. - For Description, enter
RDS Start Stop triggering every Week Day every 5 mins. - Enter the cron expression
*/5 * ? * MON-FRI *. - Choose the target Lambda functions
RDSStartWeekDayandRDSStopWeekDay.
Next, create the rule to start and stop the instance on a weekend.
- Choose Create rule.
- Name the rule
RDSStartStopWeekEndRule. - For Description, enter
RDS Start Stop triggering every Week End every 5 mins. - Enter the cron expression
*/5 * ? * SAT-SUN *. - Choose the target Lambda functions
RDSStartWeekEndandRDSStopWeekEnd.
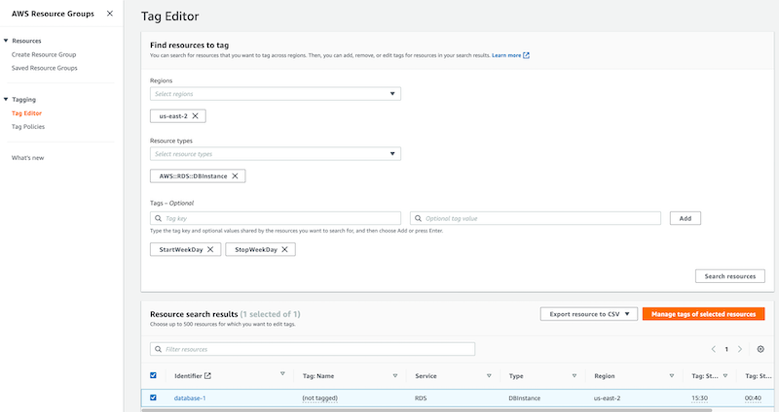
Bulk create or update Amazon RDS tags
To implement our solution, we need to create and configure either two or four tags, based on your application’s business needs on all or a subset of your instances.
You can use Tag Editor via AWS Resource Groups to save time and manual effort. You can search multiple resources and instances for a specific Region and AWS resource type, such as an RDS instance (AWS::RDS::DBInstance), to manage tags in bulk, as in the following screenshot.
You can bulk add, update, or remove tags on the Manage tags page.
Deploy the solution using AWS CloudFormation
In this section, we include instructions for automating the implementation using AWS CloudFormation.
The CloudFormation template cfn_auto_start_stop_rds.yaml automatically creates all the AWS resources required for the Amazon RDS solution to function. The template cfn_auto_start_stop_ec2.yaml automatically creates all the AWS resources required for the Amazon EC2 solution to function.
Complete the following steps to create your AWS resources via the CloudFormation template:
- On the AWS CloudFormation console, choose Create stack.
- Choose With new resources (standard).
- Choose Template is ready and choose Upload a template file.
- Upload the provided .yaml file and choose Next.
- For Stack name, enter
cfn-auto-start-stop-rdsorcfn-auto-start-stop-ec2, depending on which template you use. - Modify the parameter values that set the default cron schedule as needed.
- For RegionTZ, choose which Region time zone to use.
- Choose Next and provide tags, if needed.
- Choose Next and review the stack details.
- Select the acknowledgement check box because this template creates an IAM role and policy.
- Choose Create stack.
- Open the stack and navigate to the Resources tab to track the resource creation status.
Deploy the solution using AWS SAM
The AWS SAM template sam_auto_start_stop_rds.yaml automatically creates all the AWS resources required for the Amazon RDS solution to function. The template folder sam_auto_start_stop_ec2 automatically creates all the AWS resources required for the Amazon EC2 solution to function. Complete the following steps to deploy this template:
- Open a command prompt.
- Install the AWS SAM CLI, if not installed.
- Create a private Amazon Simple Storage Service (Amazon S3) bucket in the Region where you want to create resources; for example, an S3 bucket named
blog-saminus-west-1. - Download the AWS SAM template folder sam_auto_start_stop_rds, which has the template file
sam_auto_start_stop_rds.yaml. - Use the AWS SAM CLI command sam deploy to deploy the template and create all the resources:
For example, we use the following code:
The command prompt displays the deployment status of CloudFormation stack changeset and CloudFormation events from stack operations. You can also open the stack on the AWS CloudFormation console and navigate to the Resources tab to track the resource creation status.
Clean up
To clean up the resources created as part of this post and avoid incurring future charges, delete the following resources:
- Lambda functions:
AutoStartRDSInstanceAutoStopRDSInstanceRDSStartWeekDayRDSStopWeekDayRDSStartWeekEndRDSStopWeekEnd
- EventBridge rules:
AutoStartRDSRuleAutoStopRDSRuleRDSStartStopWeekDayRuleRDSStartStopWeekEndRule
- IAM resources:
LambdaRDSStartStopRole(role)LambdaRDSStartStopPolicy(inline policy)
- CloudWatch log groups:
/aws/lambda/AutoStartRDSInstance/aws/lambda/AutoStopRDSInstance/aws/lambda/RDSStartWeekDay/aws/lambda/RDSStopWeekDay/aws/lambda/RDSStartWeekEnd/aws/lambda/RDSStopWeekEnd
If you used the AWS CloudFormation template, you can delete all the resources created via this template using the console. Choose the stack on the AWS CloudFormation console and choose Delete. Choose Delete stack to confirm the stack deletion.
If you used the SAM template, you can delete all the resources created using the AWS SAM CLI command sam delete:
For example, we use the following code:
Summary
You can reduce costs by manually shutting down your servers when they’re not in use. However, manually managing and administering multiple servers is quite difficult and time-consuming. In this post, I shared a solution to automate the server stop and start procedure by scheduling with either a fixed time, a flexible time, or both.
We strongly recommend you implement this solution by following the step-by-step instructions in this post. You can also use the optional CloudFormation or AWS SAM templates, which automate this approach.
If you have any questions or comments about this post, please share your thoughts in the comments section.
About the Author
 Pinesh Singal is a Sr. Lead Consultant with AWS ProServe, GCC India. He works as a Database Migration Consultant, assisting and enabling customers to migrate servers and databases to AWS. He has architected and designed many successful databases and migration solutions addressing challenging business requirements. His primary focus is homogeneous and heterogeneous migrations of on-premise databases to Amazon RDS along with complete migration automation solutions.