Category: AWS Lambda
Anomaly Detection Using AWS IoT and AWS Lambda
One of the biggest benefits of the Internet of Things (IoT) is the ability to get contextual insight from sensor data. Before you analyze sensor data, you may want to remove anomalies. Sometimes, though, you may want to analyze the anomalies or at least be notified of their presence.
In this blog post, we will focus on detecting contextual anomalies. An example of a contextual anomaly is a temperature measurement that suddenly jumps from 50 to 70 degrees. The 70-degree measurement may not be unusual, but it is unusual in a context in which previous measurements were much lower. For more information about anomaly detection, see the survey by Varun Chandola, et al. [1]
Prerequisites
You should be familiar with the AWS CLI and should have set up an Amazon Cognito identity pool. For information, see Authenticate Users with Amazon Cognito Identity.
Although mathematical knowledge is not required, we encourage you to check out the references.
Contextual Anomaly Detection
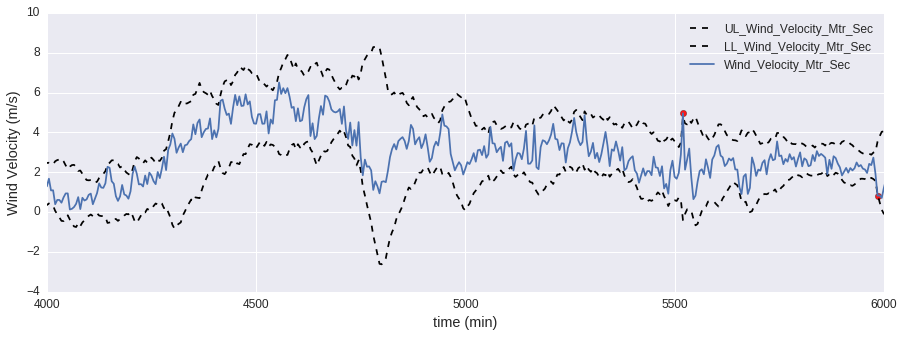
The demo in this post uses wind velocity measurements from the San Francisco Wind Monitoring Data as the data set. You can download the formatted data set here. The algorithm we’ll use is called the probabilistic exponentially weighted moving average (PEWMA), which was proposed by Carter and Streilein [2]. The details of the algorithm are not covered in this post, but at a high level, the algorithm is calculating an average and standard deviation of the time-series data and evaluating the probability of observing the current point. If the probability is below a set threshold, then it is marked as an anomaly. A plot of the raw data and an example of the upper and lower bounds of what is considered to be normal behavior is shown here:

The data flow for this anomaly detection process is shown in the following figure:

Data is sent from our sensor to AWS IoT, where it is routed to AWS Lambda through the AWS IoT Rules Engine. Lambda executes the logic for anomaly detection and because the algorithm requires knowledge of previous measurements, uses Amazon DynamoDB as a key-value store. The Lambda function republishes the message along with parameters extracted from the PEWMA algorithm. The results can be viewed in your browser through a WebSocket connection to AWS IoT on your local machine. A variation of this flow is to route observations marked as anomalous to Amazon Elasticsearch Service (Amazon ES) or Amazon S3.
For the anomaly detection method, we are using AWS Lambda with Python 2.7. Use the following AWS CLI command to set up your DynamoDB table:
aws dynamodb create-table --table-name windDemo --attribute-definitions AttributeName=Station_Name,AttributeType=S --key-schema AttributeName=Station_Name,KeyType=HASH --provisioned-throughput ReadCapacityUnits=50,WriteCapacityUnits=50
Now we need to create a role that will give trust permissions to Lambda and AWS IoT to execute actions on our behalf. To do this, save the following text as iot_lambda_role.json.
{
"Version": "2012-10-17",
"Statement": [{
   "Sid": "",
   "Effect": "Allow",
   "Principal": {
      "Service": ["lambda.amazonaws.com", "iot.amazonaws.com"]
   },
   "Action": "sts:AssumeRole"
 }]
}
The actions Lambda will execute on our behalf (access DynamoDB, AWS IoT, and logging) are defined in a policy document like the following. Save the following text as anom_det_policy.json.
{
 "Version": "2012-10-17",
 "Statement": [
  {
   "Sid": "Stmt1463425014235",
   "Action": [
    "dynamodb:GetItem",
    "dynamodb:PutItem"
   ],
   "Effect": "Allow",
   "Resource": "*"
  },
  {
   "Sid": "Stmt1463425053236",
   "Action": [
   "iot:Connect",
   "iot:Publish"
  ],
  "Effect": "Allow",
  "Resource": "*"
 },
 {
  "Effect": "Allow",
  "Action": [
   "logs:CreateLogGroup",
   "logs:CreateLogStream",
   "logs:PutLogEvents"
  ],
  "Resource": "arn:aws:logs:*:*:*"
  }
 ]
}
The following commands will create the role, create the policy, and attach the policy to the role.
aws iam create-role --role-name iot_lambda_role --assume-role-policy-document file://iot_lambda_role.json
aws iam create-policy --policy-name anom_det_policy --policy-document file://anom_det_policy.json
aws iam attach-role-policy --role-name iot_lambda_role --policy-arn arn:aws:iam::<your-aws-account-id-here>:policy/anom_det_policy
The next step is to create the Lambda function. Download the code for the Lambda function. The Lambda function will be executed every time a message is sent to the anom/detect topic. It will perform the PEWMA algorithm and republish the results to the anom/pred topic. Use the following command to create the Lambda function from the AWS CLI.
aws lambda create-function \
 --function-name anom_detector \
 --runtime python2.7 \
 --region us-east-1 \
 --role arn:aws:iam::<your-aws-account-id-here>:role/iot_lambda_role  \
 --handler lambda_function.lambda_handler \
 --memory-size 512 \
 --timeout 15 \
 --description "lambda function which implements probabilistic exponentially weighted moving average" \
 --zip-file fileb://lambda_function.zip
Now we need to create a rule that will send messages on a topic in AWS IoT to the Lambda function and give our rule permission to invoke Lambda. Copy and paste the following code into a JSON file and save it as anomaly_rule.json.
{
        "sql": "SELECT * FROM 'anom/detect'",
        "ruleDisabled": false,
        "actions": [{
          "lambda": {
            "functionArn": "arn:aws:lambda:us-east-1:<your-aws-account-id-here>:function:anom_detector"
           }
         }]
}
We will use this JSON message to create the rule and give it permission to call Lambda using the following AWS CLI commands.
aws iot create-topic-rule --rule-name anomaly_detection_lambda --topic-rule-payload file://anomaly_rule.json
aws lambda add-permission --function-name "anom_detector" --region "us-east-1" --principal iot.amazonaws.com --source-arn arn:aws:iot:us-east-1:<your-aws-account-id-here>:rule/anomaly_detection_lambda --source-account "<your-aws-account-id-here>" --statement-id "123123123" --action "lambda:InvokeFunction"
All of the resources required to run the demo are now created. To run the demo, download this script, and then use the following AWS CLI command to start sending data to AWS IoT.
python emit_json_data.py anom/detect SF36.json
Viewing Your Data Stream and Anomaly Boundaries
To connect to AWS IoT and view the output of the anomaly detection algorithm, download this WebSocket example. To use the websocket demo on your local machine, modify the config.js file to include your access key, secret key, Amazon Cognito pool ID, region, and AWS IoT endpoint. This websocket demo is only meant to be run on your local machine to be able to visualize the data stream and anomaly boundaries. Do not publish the html page in the demo to the public or in general any code that contains your API or secret key. If you don’t know your IoT endpoint, use the following AWS CLI command.
aws iot describe-endpoint
Now you can open the index.html file, connect to AWS IoT, and subscribe to the topic the anomaly detection algorithm is publishing to. You should start to see the plot of the raw data and the calculation of the anomaly boundaries. The anomaly boundaries set for the plot are 3.3 standard deviations away from the moving average, which corresponds to a threshold of 0.002. After the streaming plot is working, you can modify the alpha_0 and beta parameters in the Lambda function to see how those changes affect the anomaly boundary in real time.
The following figures shows what the streaming anomaly plot should look like in your browser:

Conclusion
This demo in this post has shown you how to perform anomaly detection for sensor data on a thing connected to AWS IoT. This approach could scale to many things. You can use a unique identifier for each sensor you want to monitor as a hash key in DynamoDB. A useful extension for this process would be to add a WHERE statement to the rule on anom/pred that filters the data so that only anomalous observations are routed to Amazon S3 or Amazon ES for analysis. We would love to hear your feedback!
Appendix: Tuning the PEWMA Algorithm to Your Data
The Lambda function has four parameters that you can change to tune the behavior of the algorithm. Two of these parameters are used to select pieces of the JSON messages and identify a DynamoDB table to use to persist state information for the algorithm. If you want to generalize the approach in this demo to work on a different data set, you will need to change a few parameters, including the name of the DynamoDB table (table_name) and and the JSON object (data_cols). You may also want to tweak alpha_0, beta, and threshold until the algorithm is identifying what you believe are anomalies.
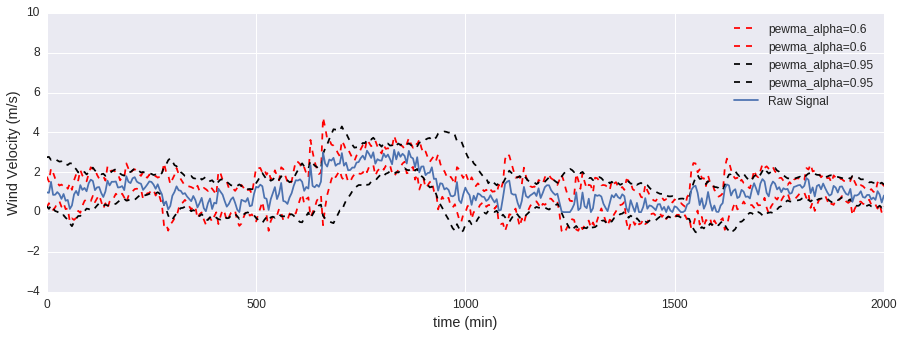
alpha_0 This parameter is used to specify how much weight to give to the previous value of the mean in determining the moving average. The default value is 0.95. The closer this parameter is to 1, the smoother the moving average will be. The closer this parameter is to 0, the more quickly the moving average will adjust to changing patterns in the data.
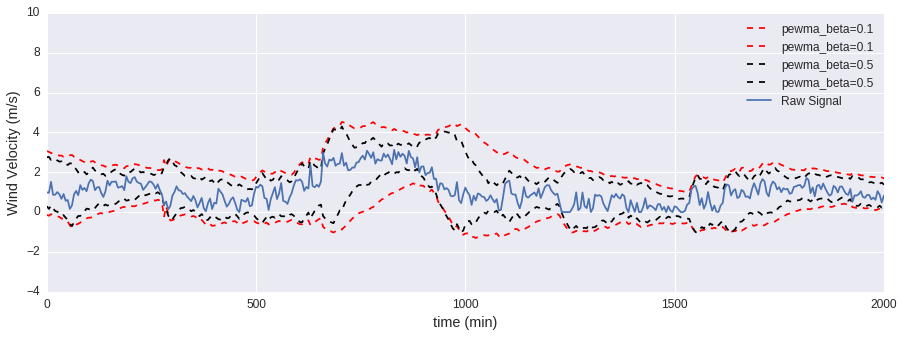
beta This parameter ranges from 0 to 1. It prevents anomalies from strongly shifting the mean. The larger the value, the more we limit the effect an anomalous point has on the mean. In the demo, we use a default of 0.5.
data_cols The object of our AWS IoT JSON payload where we want to perform anomaly detection.
key_param The object of our AWS IoT JSON payload to be used as the hash key in our DynamoDB table. Usually a device ID.
T The number of points to use to calculate the initial value for the moving average. The default value is 30.
table_name The name of the DynamoDB table used to persist data required during the execution of the PEWMA algorithm.
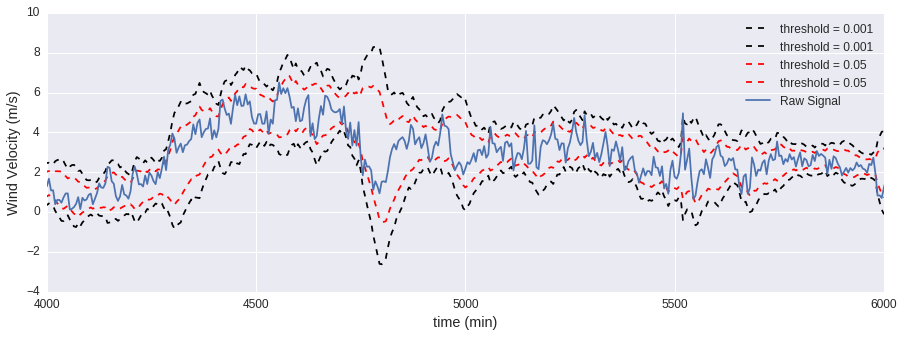
threshold This parameter sets the limit for what we call an anomaly. The lower the value, the fewer points will be classified as anomalies.
The following plots illustrate the effect that some of the parameters have on the PEWMA algorithm.
threshold

Raising the threshold reduces the area that is considered normal.
alpha_0

You can think of alpha_0 as a smoothing parameter. The closer this parameter is to 1, the smoother the moving average will be.
beta

The closer this parameter is to 1, the more the effect of anomalies on the moving average and standard deviation is minimized. To perform a standard exponentially weighted moving average, set this parameter to 0.
References
[1] Chandola, Varun, Arindam Banerjee, and Vipin Kumar. “Anomaly detection: A survey.” ACM computing surveys (CSUR) 41.3 (2009): 15.
[2] Carter, Kevin M., and William W. Streilein. “Probabilistic reasoning for streaming anomaly detection.” Statistical Signal Processing Workshop (SSP), 2012 IEEE. IEEE, 2012.