Artificial Intelligence
Implementing MLOps practices with Amazon SageMaker JumpStart pre-trained models
Amazon SageMaker JumpStart is the machine learning (ML) hub of SageMaker that offers over 350 built-in algorithms, pre-trained models, and pre-built solution templates to help you get started with ML fast. JumpStart provides one-click access to a wide variety of pre-trained models for common ML tasks such as object detection, text classification, summarization, text generation and much more. SageMaker Jumpstart also provides pretrained foundation models like Stability AI’s Stable Diffusion text-to-image model, BLOOM, Cohere’s Generate, Amazon’s AlexaTM and more. You can fine-tune and deploy JumpStart models using the UI in Amazon SageMaker Studio or using the SageMaker Python SDK extension for JumpStart APIs. JumpStart APIs unlock the usage of JumpStart capabilities in your workflows, and integrate with tools such as the model registry that are part of MLOps pipelines and anywhere else you’re interacting with SageMaker via SDK.
This post focuses on how we can implement MLOps with JumpStart models using JumpStart APIs, Amazon SageMaker Pipelines, and Amazon SageMaker Projects. We show how to build an end-to-end CI/CD pipeline for data preprocessing and fine-tuning ML models, registering model artifacts to the SageMaker model registry, and automating model deployment with a manual approval to stage and production. We demonstrate a customer churn classification example using the LightGBM model from Jumpstart.
MLOps pattern with JumpStart
As companies adopt machine learning across their organizations, building, training, and deploying ML models manually become bottlenecks for innovation. Establishing MLOps patterns allows you to create repeatable workflows for all stages of the ML lifecycle and are key to transitioning from the manual experimentation phase to production. MLOps helps companies innovate faster by boosting productivity of data science and ML teams in creating and deploying models with high accuracy.
Real-world data and business use cases change rapidly, and setting up MLOPs patterns with Jumpstart allows you to retrain, evaluate, version, and deploy models across environments quickly. In the initial phases of experimenting with Jumpstart models, you can use Studio notebooks to retrieve, fine-tune, deploy, and test models. Once you determine that that the model, dataset, and hyperparameters are the right fit for the business use case, the next step is to create an automatic workflow to preprocess data and fine-tune the model, register it with the model registry, and deploy the model to staging and production. In the next section, we demonstrate how you can use SageMaker Pipelines and SageMaker Projects to set up MLOps.
Integrate JumpStart with SageMaker Pipelines and SageMaker Projects
Jumpstart models can be integrated with SageMaker Pipelines and SageMaker Projects to create the CI/CD infrastructure and automate all the steps involved in model development lifecycle. SageMaker Pipelines is a native workflow orchestration tool for building ML pipelines that take advantage of direct SageMaker integration. SageMaker Projects provides MLOps templates that automatically provision underlying resources needed to enable CI/CD capabilities for your ML development lifecycle.
Building, training, tuning, and deploying Jumpstart models with SageMaker Pipelines and SageMaker Projects allows you to iterate faster and build repeatable mechanisms. Each step in the pipeline can keep track of the lineage, and intermediate steps can be cached for quickly rerunning the pipeline. With projects, dependency management, code repository management, build reproducibility, and artifact sharing is simple to set up. You can use a number of built-in templates or create your own custom template. SageMaker projects are provisioned using AWS Service Catalog products.
Solution overview
In this section, we first create a pipeline.yaml file for the customer churn example with all the steps to preprocess the data and retrieve, fine-tune, and register the model to the model registry. We then use a pre-built MLOps template to bootstrap the ML workflow and provision a CI/CD pipeline with sample code. After we create the template, we modify the sample code created from the template to use the pipeline.yaml created for our use case. The code samples for this example is available on GitHub.
The following diagram illustrates the solution architecture.
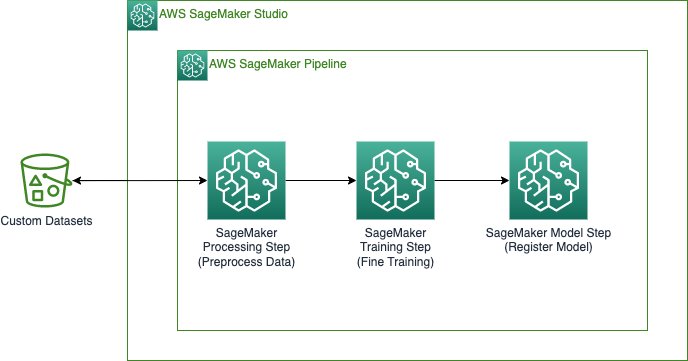
The pipeline includes the following steps:
- Preprocess the datasets in the format required by JumpStart based on the type of ML problem and split data into train and validation datasets.
- Perform the training step to fine-tune the pre-trained model using transfer learning.
- Create the model.
- Register the model.
The next sections walk through creating each step of the pipeline and running the entire pipeline. Each step in the pipeline keeps track of the lineage, and intermediate steps can be cached for quickly rerunning the pipeline. The complete pipeline and sample code are available on GitHub.
Prerequisites
To implement this solution, you must have an AWS Identity and Access Management (IAM) role that allows connection to SageMaker and Amazon S3. For more information about IAM role permissions, see Policies and permissions in IAM.
Import statements and declare parameters and constants
In this step, we download the dataset from a public S3 bucket and upload it to the private S3 bucket that we use for our training. We are also setting SageMaker and S3 client objects, and the steps to upload the dataset to an S3 bucket and provide this S3 bucket to our training job. The complete import statements and code are available on GitHub.
Define the data processing script and processing step
Here, we provide a Python script to do data processing on the custom datasets, and curate the training, validation, and test splits to be used for model fine tuning. The preprocessing.py file used for our example is located on GitHub.
In this step, we instantiate the processor. Because the processing script is written in Pandas, we use a SKLearnProcessor. The Pipelines ProcessingStep function takes the following arguments: the processor, the input S3 locations for raw datasets, and the output S3 locations to save processed datasets. See the following code:
Define the pipeline step for fine-tuning
Next, we provide the pipeline steps to retrieve the model and the training script to deploy the fine-tuned model. Model artifacts for Jumpstart are stored as tarballs in an Amazon Simple Storage Service (Amazon S3) bucket. Each model is versioned and contains a unique ID that can be used to retrieve the model URI. You need the following to retrieve the URI:
- model_id – A unique identifier for the JumpStart model.
- model_version – The version of the specifications for the model. To use the latest version, enter *. This is a required parameter.
Select a model_id and version from the pre-trained models table, as well as a model scope. In this case, you begin by using “training” as the model scope. Use the utility functions to retrieve the URI of each of the three components you need to continue. Select the instance type; for this model we can use a GPU or a non-GPU instance. The model in this example uses an ml.m5.4xlarge instance type. See the following code:
Next, use the model resource URIs to create an Estimator and train it on a custom training dataset. You must specify the S3 path of your custom training dataset. The Estimator class requires an entry_point parameter. JumpStart uses transfer_learning.py. The training job fails to run if this value is not set. While the model is fitting to your training dataset, you can see console output that reflects the progress the training job is making. This gives more context about the training job, including the transfer_learning.py script. Then, we instantiate the fine-tuning step using a SageMaker LightGBM classification estimator and the Pipelines TrainingStep function.
Define the pipeline step to retrieve the inference container and script for the model
To deploy the fine-tuned model artifacts to a SageMaker endpoint, we need an inference script and an inference container. We then initialize a SageMaker Model that can be deployed to an Endpoint. We pass the inference script as the entry point for our model.
Define the pipeline steps for the model registry
The following code registers the model within the SageMaker model registry using the Pipelines model step. You can set the approval status to Approved or PendingManualApproval. PendingManualApproval requires a manual approval in the Studio IDE.
Define the pipeline
After defining all of the component steps, you can assemble them into a Pipelines object. You don’t need to specify the order of the pipeline because Pipelines automatically infers the order sequence based on the dependencies between the steps. See the following code:
Launch a deployment template with SageMaker Projects
After you create the pipeline steps, we can launch an MLOps project template from the Studio console, as shown in the following screenshot.
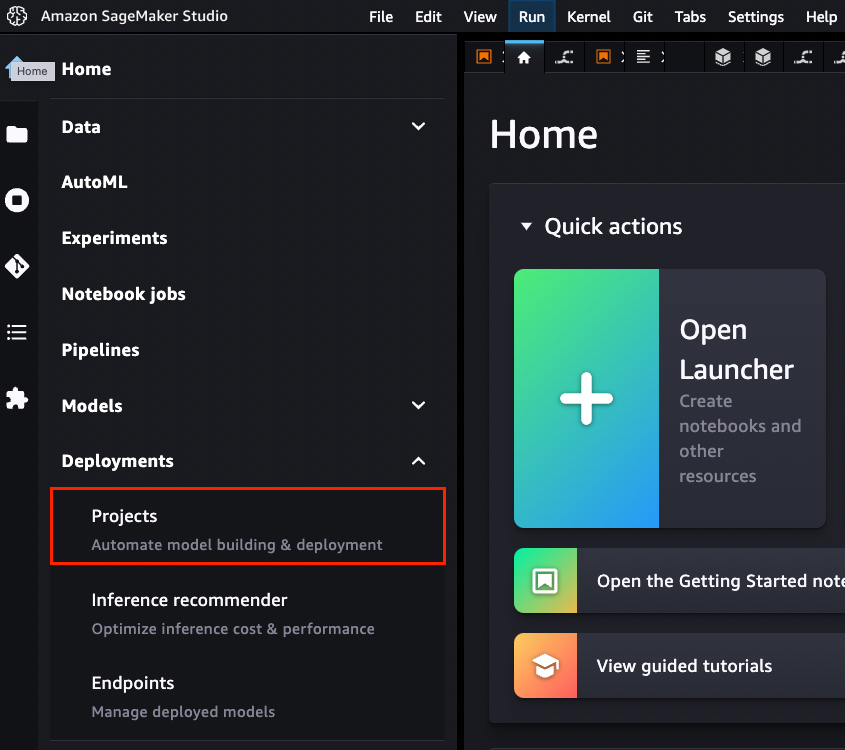
On the projects page, you can launch a preconfigured SageMaker MLOps template. For this example, we choose MLOps template for model building, training, and deployment.

This template creates the following architecture.
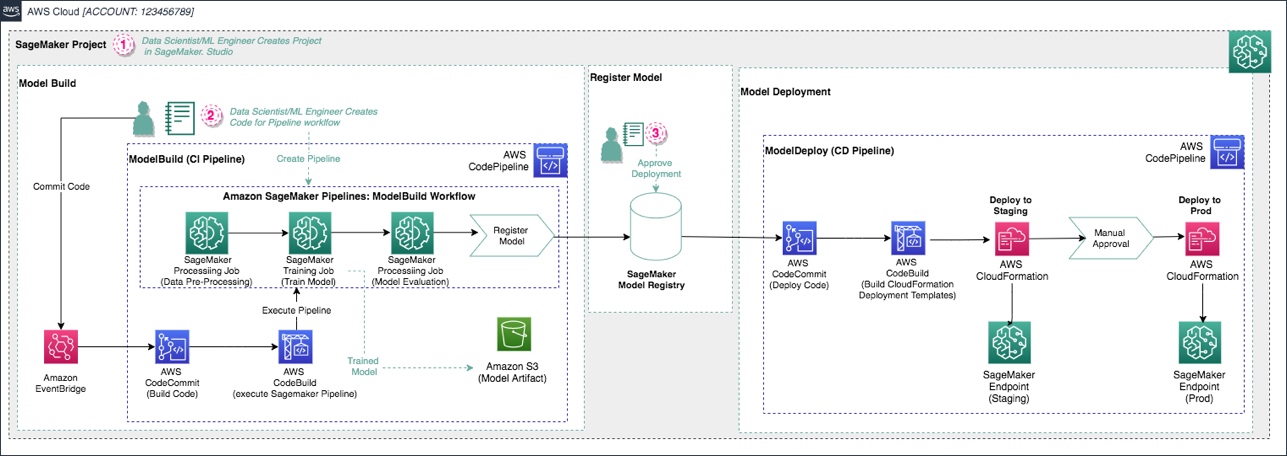
The following AWS services and resources are created:
- Two repositories are added to AWS CodeCommit:
- The first repository provides the code to create a multi-step model building pipeline along with a build specification file, used by AWS CodePipeline and AWS CodeBuild to run the pipeline automatically.
- The second repository contains code and configuration files for model deployment. This repo also uses CodePipeline and CodeBuild, which run an AWS CloudFormation template to create model endpoints for staging and production.
- Two CodePipeline pipelines:
- The
ModelBuildpipeline automatically triggers and runs the pipeline from end to end whenever a new commit is made to theModelBuildCodeCommit repository. - The
ModelDeploypipeline automatically triggers whenever a new model version is added to the SageMaker model registry and the status is marked asApproved. Models that are registered withPendingorRejectedstatuses aren’t deployed.
- The
- An S3 bucket is created for output model artifacts generated from the pipeline.
Modify the sample code for a custom use case
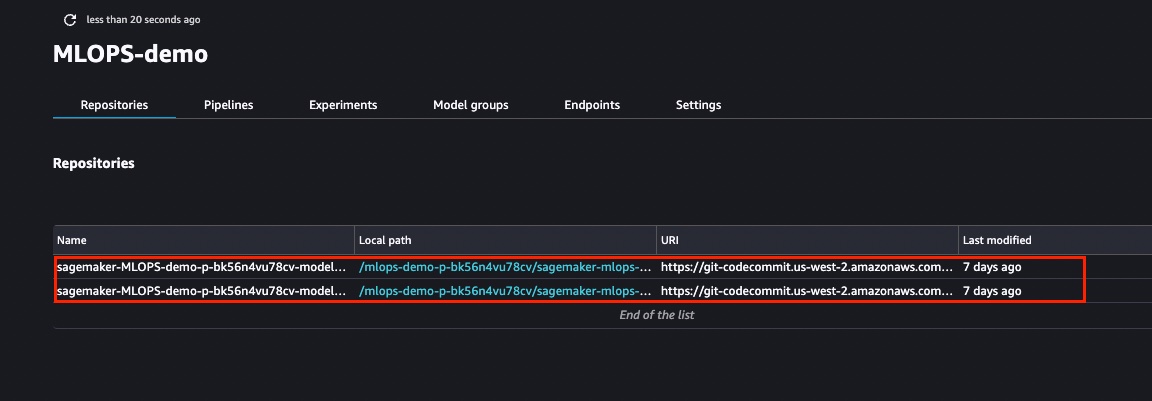
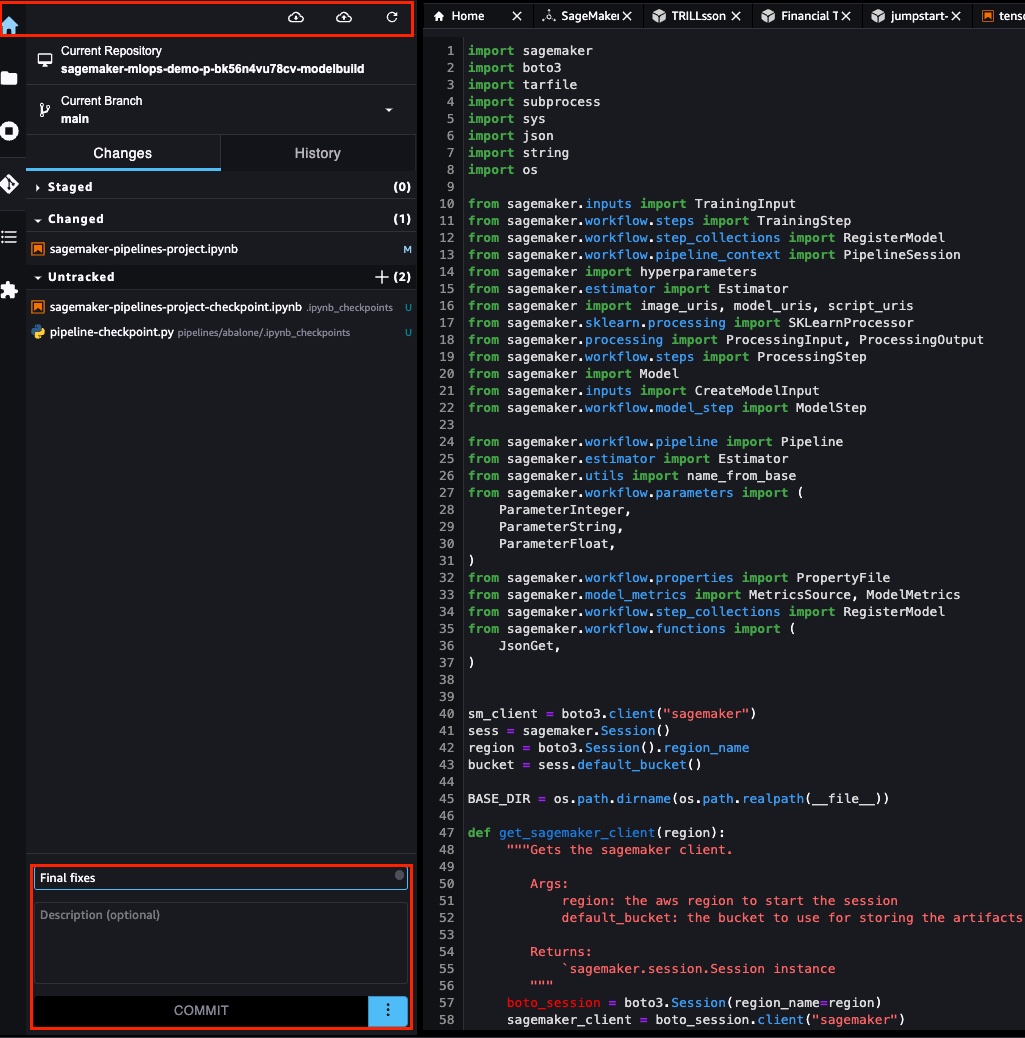
To modify the sample code from the launched template, we first need to clone the CodeCommit repositories to our local Studio instance. From the list of projects, choose the one that was just created. On the Repositories tab, you can choose the hyperlinks to locally clone the CodeCommit repos.
After you clone the repositories in the previous step, you can modify the seed code that was created from the template. You can create a customized pipeline.yaml file with the required steps. For this example, we can customize the pipeline by navigating to the pipelines folder in the ModelBuild repository. In the pipelines directory, you can find the abalone folder that contains the seed pipeline code. Replace the contents of the abalone directory with the scripts present in the GitHub folder. Rename the abalone directory to customer_churn.
We also have to modify the path inside codebuild-buildspec.yml, as shown in the sample repository:
The ModelDeploy folder has the CloudFormation templates for the deployment pipeline. As a new model is available in the model registry, it’s deployed to the staging endpoint. After a manual approval, the model is then deployed to production. Committing the changes to CodeCommit triggers a new pipeline run. You can directly commit from the Studio IDE.
The build phase registers a model to the model registry. When a new model is available, the staging deployment process is triggered. After staging is successfully deployed, a manual approval is required to deploy the model to a production endpoint. The following screenshot shows the pipeline steps.
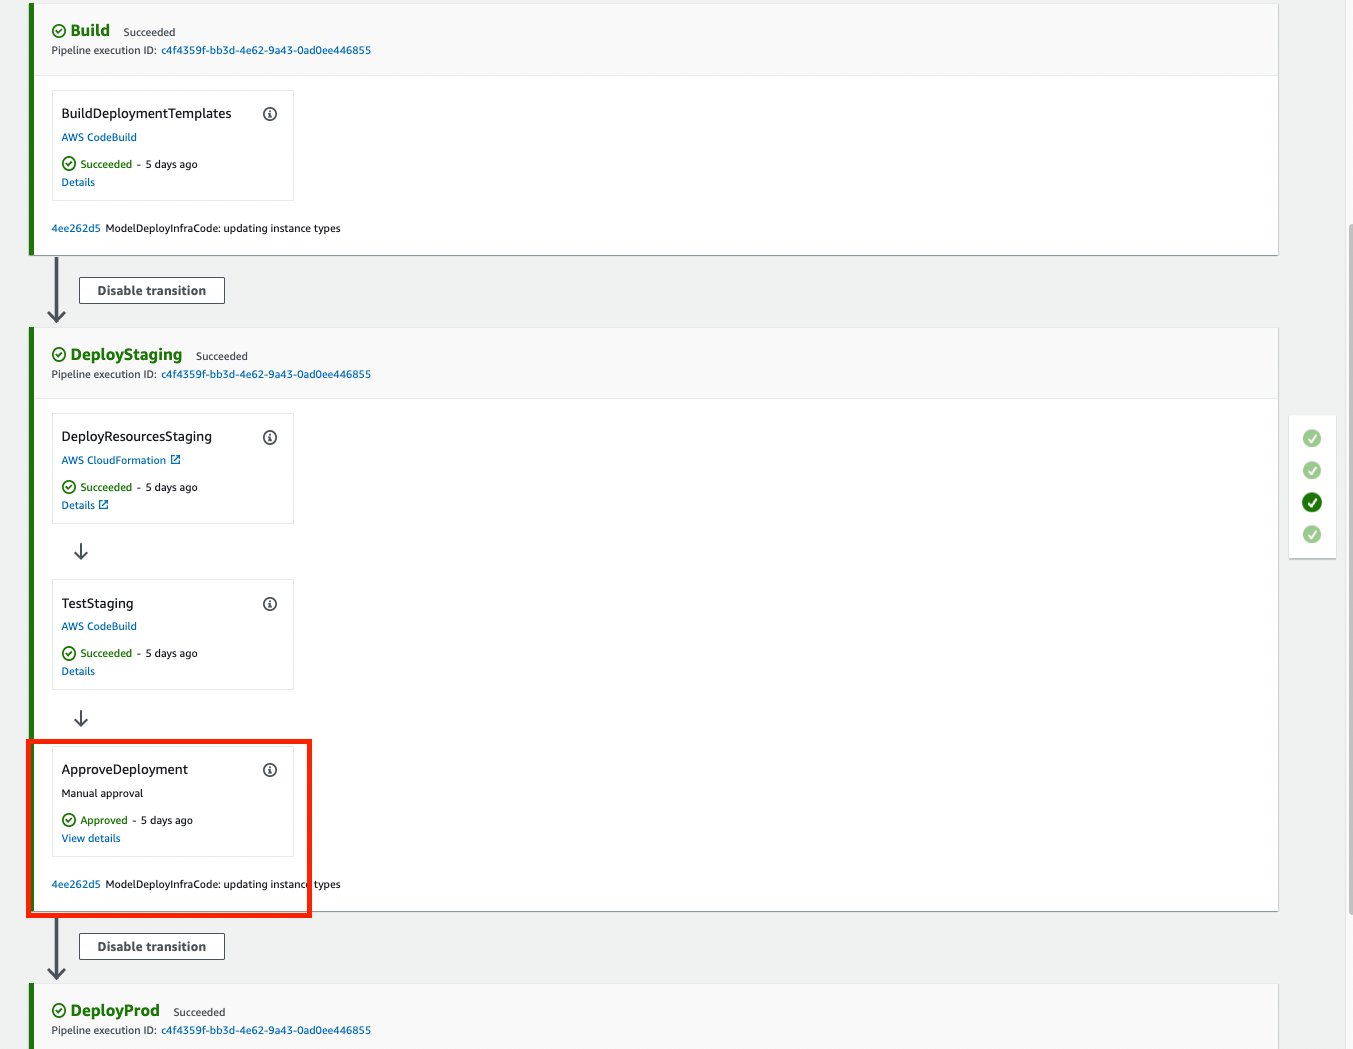
After a manual approval is provided, we can see that the production endpoint has been successfully created. At this point, the production endpoint is ready for inference.

Clean up
To avoid ongoing charges, delete the inference endpoints and endpoint configurations via the SageMaker console. You can also clean up the resources by deleting the CloudFormation stack.
Conclusion
Jumpstart provides hundreds of pre-trained models for common ML tasks, including computer vision and natural language processing uses cases. In this post, we showed how you can productionize JumpStart’s features with end-to-end CI/CD using SageMaker Pipelines and SageMaker Projects. We’ve shown how you can create a pipeline with steps for data preprocessing, and training and registering a model. We’ve also demonstrated how changes to the source code can trigger an entire model building and deployment process with the necessary approval process. This pattern can be extended to any other JumpStart models and solutions.
About the authors
 Vivek Gangasani is a Senior Machine Learning Solutions Architect at Amazon Web Services. He works with Machine Learning Startups to build and deploy AI/ML applications on AWS. He is currently focused on delivering solutions for MLOps, ML Inference and low-code ML. He has worked on projects in different domains, including Natural Language Processing and Computer Vision.
 Rahul Sureka is an Enterprise Solution Architect at AWS based out of India. Rahul has more than 22 years of experience in architecting and leading large business transformation programs across multiple industry segments. His areas of interests are data and analytics, streaming, and AI/ML applications.
 Davide Gallitelli is a Specialist Solutions Architect for AI/ML in the EMEA region. He is based in Brussels and works closely with customers throughout Benelux. He has been a developer since he was very young, starting to code at the age of 7. He started learning AI/ML at university, and has fallen in love with it since then.