AWS for M&E Blog
Generative AI assists creative workflows with inpaint eraser and Amazon SageMaker – Part 1
Introduction
Generative AI is transforming how content is created and consumed. Media & Entertainment (M&E) companies face growing demand for personalized and engaging content to serve their audiences across multiple channels. Models like Stable Diffusion, where images and video can be generated with just a simple text prompt, allows businesses to leverage generative AI as an assistive tool to scale their content creation. This helps creators improve efficiency in meeting content demand by automating repetitive tasks, optimizing campaigns, and providing a hyper-personalized experience for the consumer. The business value is clear through increased content output, cost savings, improved personalization, and enhanced customer experience. Whether it’s generating ideas for social media posts, drafts for marketing emails or even raw footage for a video asset, generative AI is poised to revolutionize content creation in M&E.
However, generative AI models that simply generate content from scratch are not ideal. Raw content generation lacks efficiency and usefulness for most practical applications. Content creators need fine-grained control over style, layout, and other attributes to produce high-quality, tailored content. In many cases, companies already have existing content assets that need to be modified, remixed, and refined. Generative AI will be far more appealing if it can satisfy these additional capabilities.
AWS is excited to announce a blog series that aims to help customers build useful creative assisting tools from generative AI. In this initial blog post, we demonstrate how to create an inpaint eraser that can remove any object from an image using Amazon SageMaker. This tool can come in handy when you need to remove unwanted objects or clean up backgrounds, particularly for graphic designers and creative artists who repeat these tasks on a daily basis. An inpaint eraser can be an efficiency booster to enhance creative workflows.
Solution overview
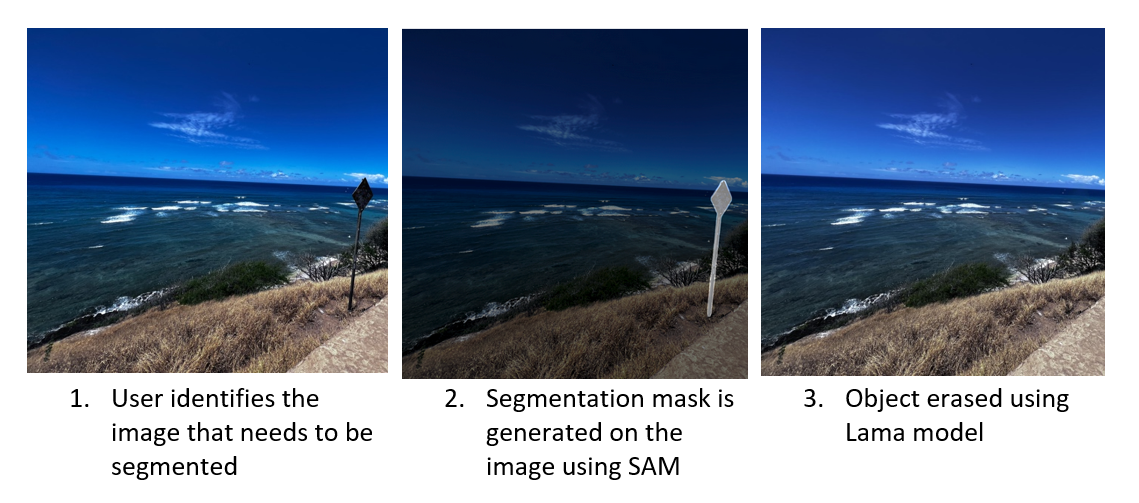
Using the inpaint eraser tool involves two main steps. The first step is to create a segmentation mask of the object to be removed based on a pixel coordinate input, which can be obtained by simply clicking on the image. This segmentation mask helps the tool identify the object to be removed and ensures that only the desired area is affected. Once the object has been segmented, step two is to “erase”, which fills the area using context from the rest of the image. This means that the removed object is replaced with a seamless and natural-looking background that blends in with the surrounding environment.
To generate segmentation, we use a foundation model (FM) developed by . This model is trained on a massive dataset called SA-1B with over 11 million images and 1.1 billion segmentation masks. This massive scale gives the SAM model an unprecedented ability to identify and isolate objects from an image out-of-the-box without training. To learn more about SAM, please reference its website and the associated research paper.
After segmentation is complete, we use a second model called Resolution-robust Large Mask Inpainting with Fourier Convolutions (LaMa) developed by Roman Suvorov. This model can fill in missing parts of images caused by irregular masks. Unlike many other inpaint models, LaMa uses a single-step architecture achieved using fast Fourier convolutions vs. the traditional two-step process. The design gives the model access to image-wide global context and allows it to achieve state-of-the-art results at faster speed. Additionally, LaMa is also trained on a dataset with generated large masks (big missing areas). This allows the model to generalize more effectively in real-world applications. Visit the website and the associated research paper for more information.
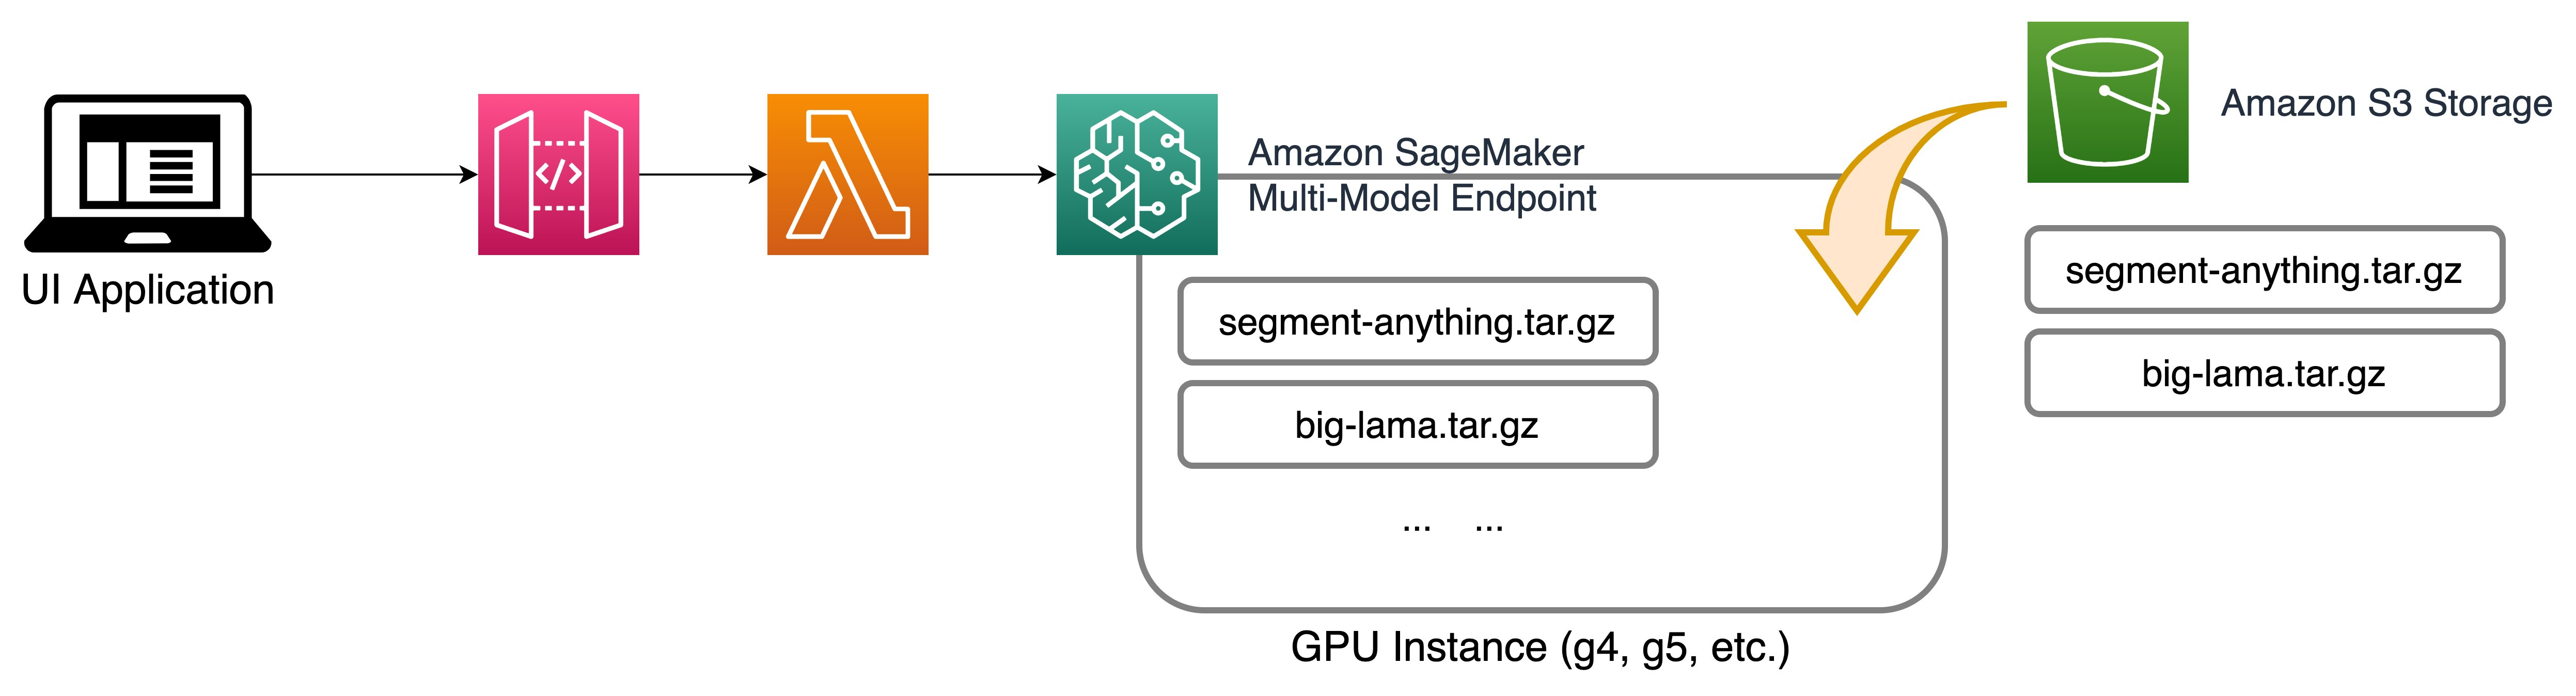
- SAM and big-lama models are stored in s3 for inferencing through Amazon Sagemaker MME.
- Amazon Sagemaker MME hosts the model and servers it through a sagemaker endpoint.
- User passes input to the model endpoint using API Gateway and lambda.
Both models are open source and can be easily hosted using Amazon SageMaker. In the above reference architecture diagram, the models are hosted using Amazon Sagemaker Multi-model endpoint running on an Amazon Elastic Compute Cloud (EC2) G5 instance. The inputs to the mode are passed using an UI application backed by Amazon API Gateway and AWS lambda function. Click here for the GitHub example.
Step 1: Deploy models using Amazon SageMaker multi-model endpoint – backend
Amazon SageMaker multi-model endpoints (MME) offer a cost-effective and scalable solution for deploying multiple models. By using a shared serving container, MME allows for the hosting of multiple models on a single SageMaker real-time endpoint. This unique feature enables time-sharing of memory resources across models, which optimizes endpoint utilization and helps reduce hosting costs. Additionally, MME provides fully managed model placement and smart traffic routing, ensuring efficient and secure deployment of machine learning (ML) models. With support for both GPU and CPU-based models, MME is a powerful tool for organizations looking to streamline their model deployment process while minimizing costs.
To learn more about MMEs and MMEs with GPUs, refer to Create a Multi-Model Endpoint documentation and Run multiple deep learning models on GPU with Amazon SageMaker multi-model endpoints on the AWS Machine Learning Blog.
Setup for MME with GPU
We use docker to extend the existing MME container by building a conda environment for each model and uploading the model artifacts and tokenizer artifacts for each model. With MME containers, you can improve the invocation time for large models by avoiding cold starts and simplify operations management of model dependencies. The model repo folder houses all of the model repositories and each model follows a tree-like folder structure as follows.
Inside the folder structure, the Triton config file and the Python script are mandatory when you use the Python backend for MME with GPU. The python script should be named model.py. Every Python backend can implement four main functions in TritonPythonModel class. For more detail, reference Hosting ML Models on Amazon SageMaker using Triton: XGBoost, LightGBM, and Treelite Models on the AWS Machine Learning Blog.
Following is the code snipping for SAM modely.py file. The file has four main functions, initialize, encode_image, dilate_mask, and execute. The general TritonPythonModel has another option, function finalize, that we are not using in this example. In the following screenshot, you can see the initialize() function. This is the first function that executes when the model is loaded. This function loads the config file and the settings needed for the model to execute. Similarly, there are other functions in this file.
Following is the config.pbtxt file describing the model configuration. To learn more about the config settings, refer to documentation for Model Configuration, available in GitHub.
In the config file the parameters are explained as follows:
- name: This is identical to the model repository name if no value is provided; otherwise, it should match the model repository name.
- backend: This specifies the framework to serve model predictions. Triton is a deep learning inference server developed by NVIDIA that provides high performance and low latency for serving models in production. This
backendparameter is mandatory, and we specifypythonbecause we’ll be using the Triton Python backend to host the Stable Diffusion models. - max_batch_size: This indicates the maximum batch size that the model supports for the types of batching that can be exploited by Triton.
- input→image : The input image that is base64 encoded. Specify -1 to accept dynamic tensor shape.
- input→mask_image: The input mask image that is base64 encoded. Specify -1 to accept dynamic tensor shape.
- output→ generated_image: Generated image of type string. Specify -1 to accept dynamic tensor shape.
- instance_group: You can use this setting to place multiple run instances of a model on every GPU or on only certain GPUs. We specify
KIND_GPUto make copies of the model on available GPUs. - parameters: We set the conda environment path to
EXECUTION_ENV_PATH.
Next step: Package and load the models to Amazon S3
Now that we have the models packaged as needed, the next step is to upload the model to MME. The below code deploys the model to an Amazon S3 bucket for the MME deployment. Upon successful deployment, the API returns the Amazon S3 bucket URL.
Build the MME endpoint
Define the serving container: In the container definition, define the ModelDataUrl to specify the Amazon S3 directory that contains all the models that the SageMaker multi-model endpoint will use to load and serve predictions. Set Mode to MultiModel to indicate SageMaker will create the endpoint with MME container specifications. We set the container with an image that supports deploying multi-model endpoints with GPU. Reference MME container images for more detail.
We see all three model artifacts in the following S3 ModelDataUrl location.
Create an MME object: Using the SageMaker boto3 client, create the model using create_model API. We pass the container definition to the create model API along with ModelName and ExecutionRoleArn.
Define configuration for the MME: Create a multi-model endpoint configuration using create_endpoint_config boto3 API. Specify an accelerated GPU computing instance in InstanceType (we will use the same instance type that we are using to host our SageMaker Notebook). We recommend configuring your endpoints with at least two instances with real-life use cases. This allows SageMaker to provide a highly available set of predictions across multiple Availability Zones (AZs) for the models.
Create MME: Using the previous endpoint configuration, we create a new SageMaker endpoint and wait for the deployment to finish. The status will change to InService once the deployment is successful.
Invoke the endpoint
In order to inference the image, the image first needs conversion to bytes and is sent to the SageMaker invoke endpoint API. The following command is used to invoke the SageMaker endpoint with the image data and payload.
Quick application with Gradio
In this section, we walk through building the Gradio application to interact with the SageMaker models. The run.py file in the GitHub repo contains the Gradio code. The code contains many functions for image manipulation. The two key functions contained in the code are “get_select_coords”, which captures the image for the co-ordinates, and “rm_object()”, which removes the segmented portion of the image by invoking the SageMaker endpoint. For more information on deploying this Gradio application, please refer to the documentation.
To run the application locally, you first need to install the libraries. A requirement.txt is provided in the repo. Execute the following commend in your terminal to install.
To launch the application, execute the run.py file using this command.
If the application doesn’t automatically launch in your default browser, you can click on the hosted link to open.

In the prior image you can see that the street sign that was segmented in the first image is removed in the output.
Clean up
Follow the instructions in the clean-up section of the notebook to delete the resource-provisioned part of this blog to avoid unnecessary charges. Refer to Amazon SageMaker Pricing for details about the cost of inference instances.
Conclusion
By using Amazon SageMaker and its MME capabilities, we can deploy and serve multiple models through a single API endpoint. We also included a Gradio application for you to try with your own images. We encourage you to check out Amazon SageMaker and try this tool on your images today.
Continue with part two of this series: Generative AI assists creative workflows with text-guided inpainting and outpainting using Amazon Bedrock.