AWS Messaging Blog
How to build LINE messaging into business communications
In today’s interconnected world, businesses need to communicate with their customers through multiple channels. This means using a variety of messaging apps, social media platforms, and other communication tools to reach customers where they are. One such platform that has gained immense popularity in select Asian markets is LINE. As the biggest social network in Japan, LINE offers businesses a unique opportunity to connect with customers in this region. Within Japan alone, LINE’s 2021 data shows 86 million users, constituting approximately 85% of Japan’s adult population. However, managing communication through multiple channels can be challenging for businesses.
That’s where Amazon Pinpoint comes in. Amazon Pinpoint is a flexible communication service for businesses that simplifies the process of sending targeted messages to customers across multiple channels. In this blog post, we’ll focus on how to integrate LINE with Amazon Pinpoint. This post is part of a series on integrating different communication channels with Amazon Pinpoint, and it is intended for both marketing operations and communication developers.
If you are already using LINE, this blog post will help you centralize management within Amazon Pinpoint. Additionally, if you are looking to integrate another messaging service with an open API, the steps outlined here will provide a helpful guide. Finally, if you’re a business looking to tap into Asian markets, this blog post is essential reading. By integrating LINE with Amazon Pinpoint, you’ll be able to reach your customers on the platform they are already using, providing seamless end-to-end customer engagements that will greatly enhances customer experience.
Note
Line is a third-party service that is subject to additional terms and charges. Amazon Web Services isn’t responsible for any third-party service that you use to send messages with custom channels.
Why Integrate LINE with Amazon Pinpoint?
Integrating LINE with Amazon Pinpoint has several benefits for businesses:
- Centralized communication management: With LINE integrated into Amazon Pinpoint, businesses can centralize the management of outbound communication channels and simplify their communication workflows.
- Increased flexibility for marketing campaigns: With LINE added as a custom channel in Amazon Pinpoint, businesses can create targeted messaging campaigns and reach customers through multiple channels, including LINE. Along with Pinpoint journeys, businesses can craft end-to-end customer engagement journeys that start from one channel and end in another.
- Access to LINE’s popular messaging platform: With LINE integrated into Amazon Pinpoint, businesses can tap into the app’s massive user base in select Asian markets and engage with their customers through a popular and widely used messaging platform. Having access to LINE’s demographics of approximately 50% office workers with high penetration into 20s-30s age band, brands can tap into this high-spending power segment to drive revenue for their products.
Architecture
This solution uses Amazon Pinpoint,AWS Lambda, Amazon API Gateway, Amazon Simple Storage Service (Amazon S3), AWS Secrets Manager and LINE Messaging API
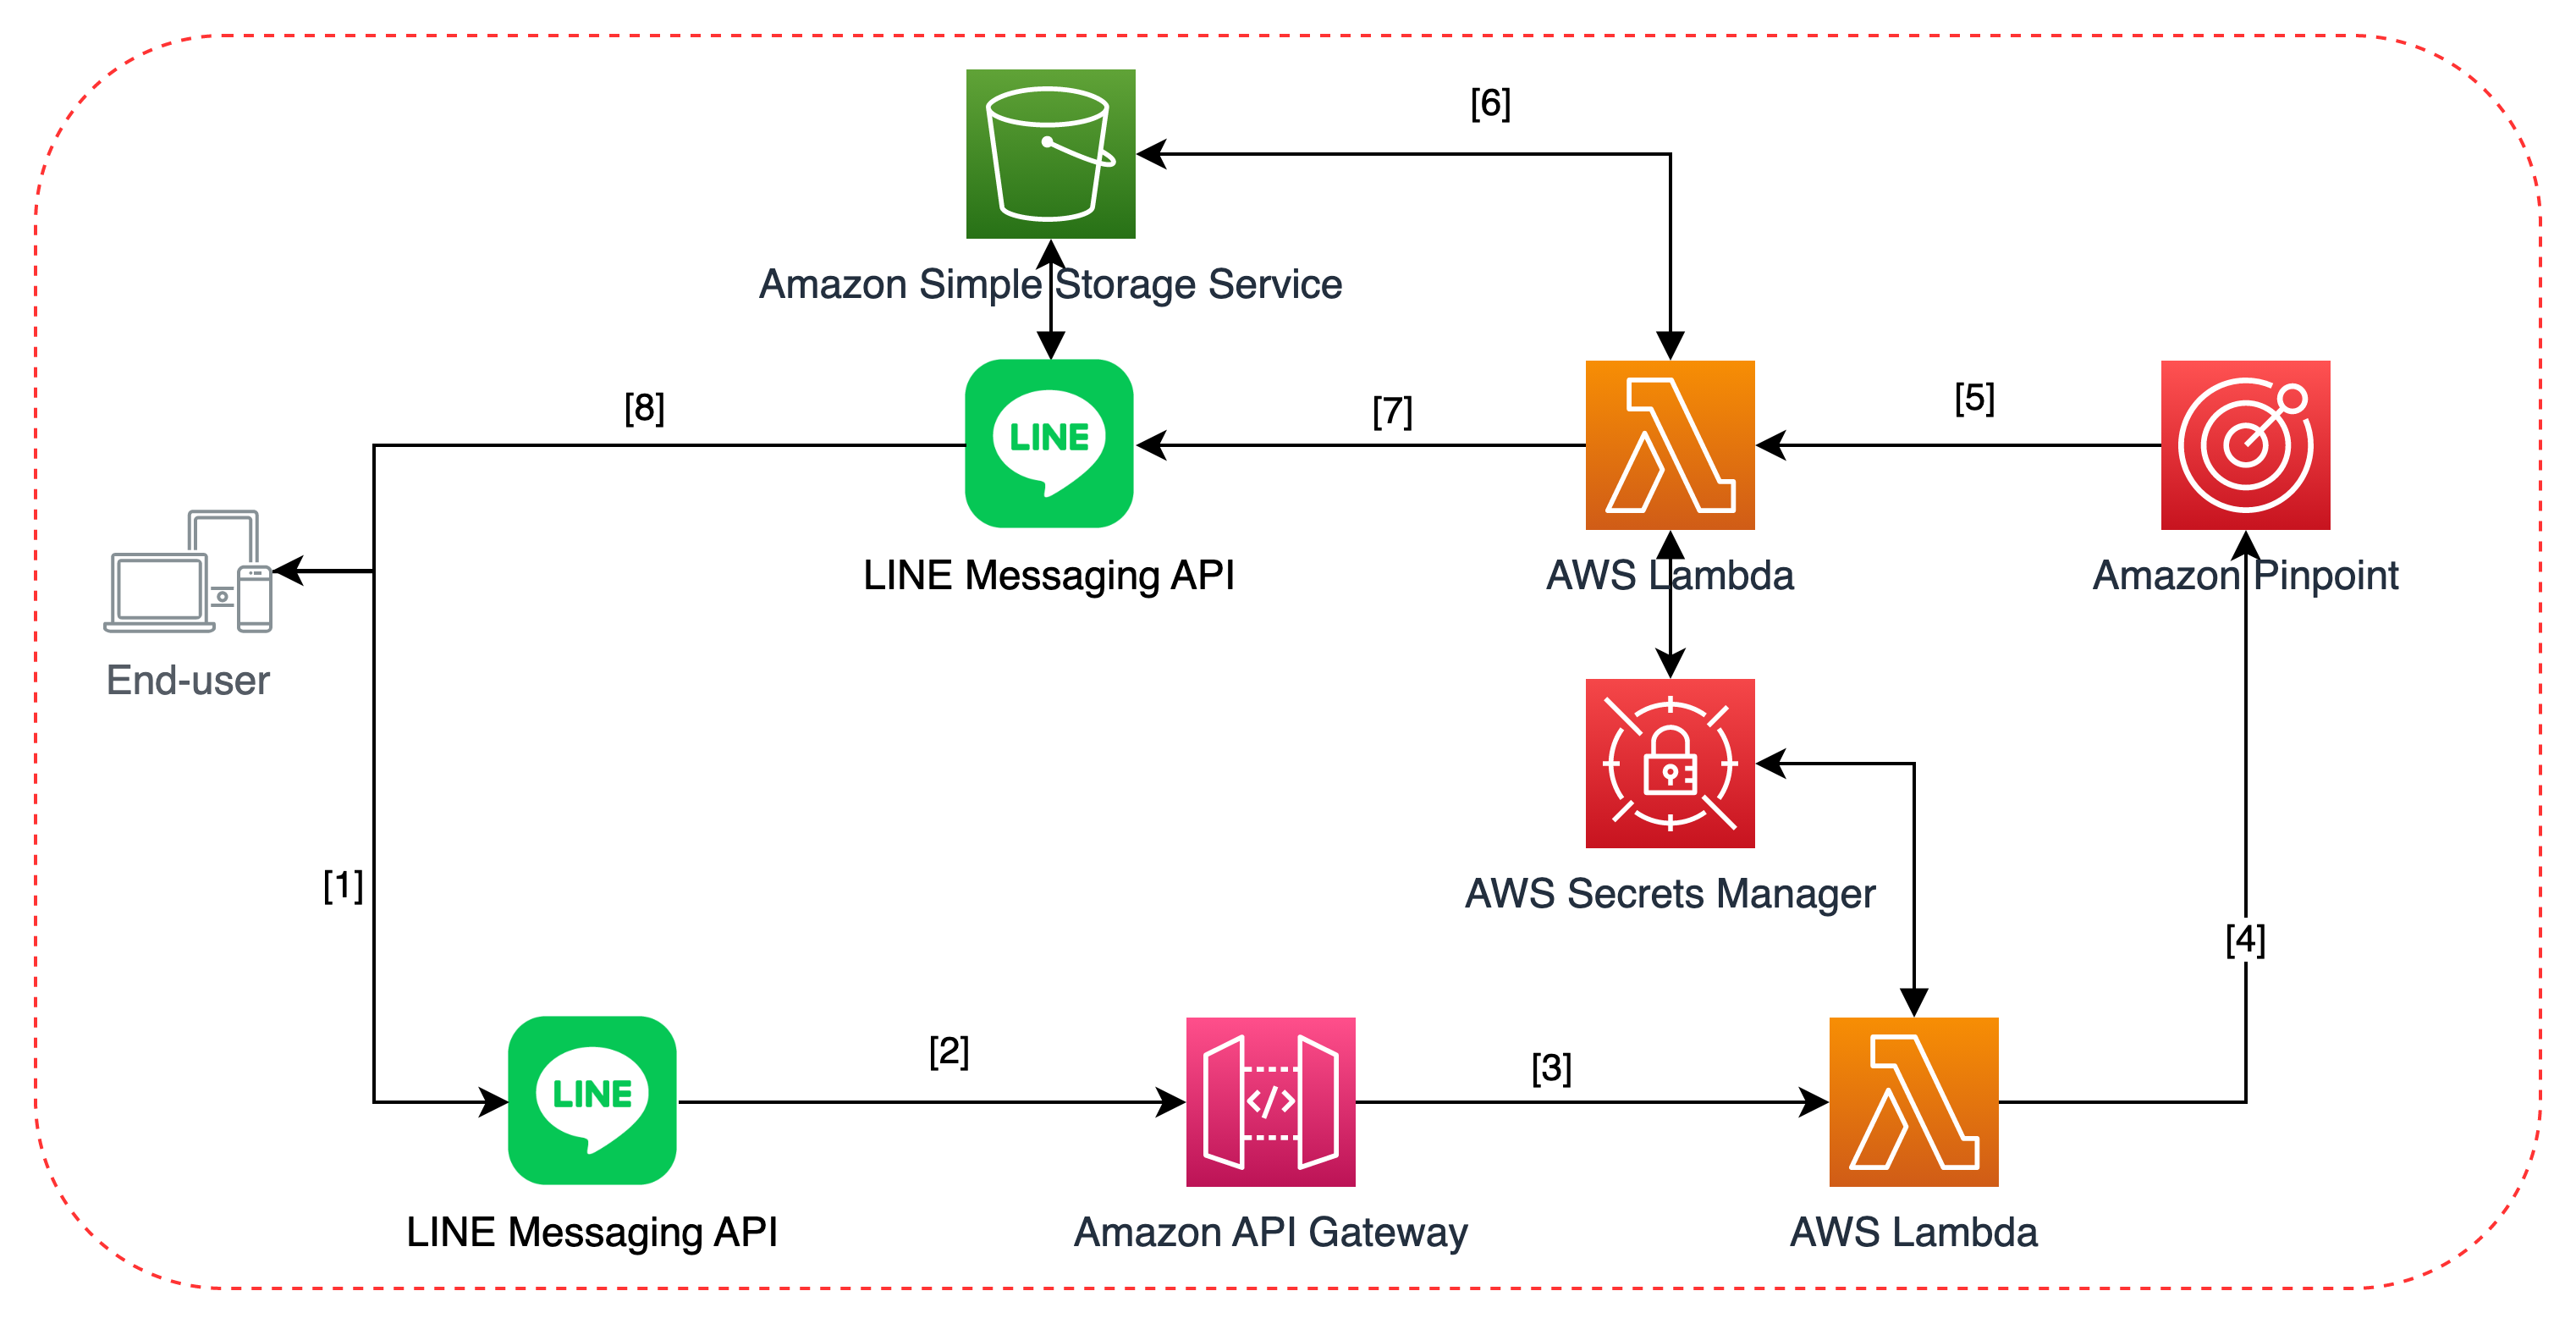
The solution architecture can be broken up into two main sections:
- Steps 1-4 cover handling inbound user events and managing user data within Amazon Pinpoint.
- Steps 5-8 cover how to send outbound campaigns via Amazon Pinpoint Custom Channel.
- The customer subscribes to the business’ LINE channel.
- The subscribe/unsubscribe event is received and checked via Amazon API Gateway.
- The edge-optimized Amazon API Gateway passes valid requests via a proxy integration to the backend Lambda.
- The backend Lambda compares the request body with the
x-line-signaturerequest header to confirm that the request was sent from the LINE Platform, as recommended by LINE API document. Afterwards, the Lambda function processes the user events:- If the user subscribes to the channel, a new endpoint will be added to Amazon Pinpoint’s user database.
- If the user unsubscribes from the channel, the corresponding endpoint (identified by the LINE User ID) is deleted from Amazon Pinpoint’s user database.
- Amazon Pinpoint initiates a call to a Lambda function via Custom Channel with a payload. Of particular importance would be the
Datafield contained within the payload, which can be specified within the Amazon Pinpoint console to modify the content of the message. - If the message contains image/audio/video files, the Lambda will request the file from the corresponding Amazon S3 buckets to be included for step 7. Amazon S3 then sends back the presigned URL containing the requested file(s).
- The Lambda function puts the message in the correct format expected by the LINE Messaging API and sends it over to the LINE Platform.
- The LINE Messaging API receives the request and processes the message content. If necessary, it will retrieve and download the file from Amazon S3 using the presigned URLs generated in step 6 then finally send the message to the corresponding user on the LINE Mobile App.
Step-by-Step Deployment Guide
Prerequisites
To deploy this solution, you must have the following:
- An AWS account, with the appropriate AWS CLI profile.
- Named Profile: Run
aws configurewith the--profileoption. The following steps assumed you have created a profile calledline-integrationto use with AWS CDK.
- Named Profile: Run
- Minimum Python v3.7, with
pipandvenv - AWS CDK v2 installed.
- Docker Engine installed. You can download and install the appropriate Docker Desktop Distribution for your system via this link
- A LINE Account.
- If you have never worked with LINE Messaging API before, you should login to to LINE Developers Console using one of the following accounts.
- LINE account
- Business account
- Afterwards, you should create a new provider.

- Within the provider page, you can then choose to create a new channel. For our Integration purposes, we will be choosing Messaging API channel type.

- If you have never worked with LINE Messaging API before, you should login to to LINE Developers Console using one of the following accounts.
Preparation
The source code can be found in this GitHub Repository.
- Fork the GitHub Repo into your account. This way you can experiment with changes as necessary to fit your workload.
- In your local compute environment, clone the GitHub Repository and
cdinto the project directory. - Run the following commands to create a virtual environment, activate it and install required dependencies.
python3 -m venv env \
&& source env/bin/activate \
&& python -m pip install -r requirements.txt
Deploy the CDK
- We can set the AWS CLI profile in CDK commands by adding the
--profileflag. Run the following commands to bootstrap your AWS environment, synthesize the CDK template and deploy to your environment.
cdk bootstrap --profile LINE-integration \
&& cdk synth --profile LINE-integration \
&& cdk deploy --profile LINE-integration
Note
Enterywhen prompted withDo you wish to deploy these changes (y/n)?
- After the deployment is done, the CDK template will output the API Gateway endpoint URL which takes the form of
https://[********].execute-api.[region].amazonaws.com/prod/. Copy down this information as you will need it to set up the webhook connection later on.
Getting LINE Official Account Credentials
- Log in to LINE developer console.

- Once inside, choose the channel you’d like to have integrated with Amazon Pinpoint. This assumes that you’ve created a provider and a channel as mentioned in the Prerequisite section.

- In the Basic settings tab, scroll down and note down the Channel Secret.
- In the Messaging API tab, scroll down and click on Edit under Webhook URL and enter the API Gateway endpoint URL you have noted down in step 5. Click on Update to save the changes.

NOTE Once you have finished entering your Channel Secret token in step 14, you can return to this page to Verify your webhook URL is set up correctly). - Finally, issue a Channel Access Token (at the bottom of the Messaging API tab) and note it down.

Registering Secrets in AWS Secrets Manager
- Navigate to the AWS Secrets Manager console. Make sure you’re in the same region as your CDK deployment region.
- Click on Secrets in the left side pane. You should find a secret with the name LINE_secrets
- Click on Retrieve Secret Value.

- Then click on Edit:
- Replace YOUR_CHANNEL_SECRET secret value with the channel secret you issued in step 10.
- Replace YOUR_CHANNEL_ACCESS_TOKEN secret value with the access token you issued in step 10
Marketing Operations Demonstration
Once you’ve successfully deployed the CDK and configured your secrets, you can immediately get started sending communications campaign to your customers.
LINE supports multimedia messaging formats, meaning that you can choose to send texts, images, audio and even video files to your customers as part of your campaigns. You just need to make sure that your customers have subscribed to your channel.
Create a segment of subscribed users
The deployed solution has integrated user database management with Amazon Pinpoint so once users start subscribing to your LINE channel, they will be added as endpoints. To start filtering out who we should send to, you can create segments of your subscribers.
- Navigate to the Amazon Pinpoint console.
- On the All projects page, a project named Line-Pinpoint-Project has been created for you.
- On the left-side pane, choose Segments and then Create a segment.

- Give your segment a descriptive name and add the appropriate criteria to filter down to your target audience (E.g.: filter down to customers who have Custom channel type).

- Confirm the number of endpoints that you will be sending in the Segment estimate section matches your expectations and then choose Create segment.
Upload media files for campaign
If you’d like to use your own image, audio and video files for the campaign, follow along with this section. Otherwise, proceed to the Create Campaigns section (step 9).
Note
Depending on the media type, there are restrictions imposed such as maximum file size and file format extensions. You can find more information here.
- Navigate to the Amazon S3 console.
- Here you will find a list of buckets which corresponds to the type of media files you want to upload:
part-1-stack-images3bucket...: contains image files.part-1-stack-audios3bucket...: contains audio files.part-1-stack-videos3bucket...: contains both video and image cover files.
- Upload the corresponding files that you want to use for your campaign by choosing Upload.

Create campaigns
- In the navigation pane, choose Campaigns, and then choose Create a campaign.
- Give your campaign a descriptive name. Under Campaign Type choose Standard campaign and under Channel, choose Custom. Click Next to confirm.

- On the Choose a segment page, choose the segment that you created in step 5, and then choose Next.
- In Create your message, depending on the type of message that you want to send, choose the corresponding Lambda function. Your function should be named
part-1-stack-send[text/image/audio/video]lambda...

- In the custom data section, you can choose to leave it blank, which will trigger the campaign to send the sample message.
- Otherwise, depending on the type of message, you can customize your campaigns to send the content that you want by inputting the following values into Custom Data.
- Text Campaign: Enter the Text Message that you want to send.
- Image Campaign: Enter the name of the image file you’ve uploaded in step 8 including the extension name (E.g.: sample_image.png)
- Audio Campaign: Enter the name of the audio file you’ve uploaded in step 8 including the extension name and the duration of the audio file in milliseconds separated by a comma (E.g.: sample_audio.mp3,5000)
- Video Campaign: Enter the name of the video file you’ve uploaded in step 8 including the extension name and the name of the image file you’ve uploaded in step 8 including the extension name, separated by a comma (E.g.: sample_video.mp4,sample_image.png)
- Choose Next and configure when to send the campaign depending on your needs. Once done, choose Next again.
- On the Review and launch page, verify all your information is correct and then click on Launch campaign.
That’s it! Your message will be sent through LINE to the designated recipients.
Cleanup
To delete the sample application that you created, use the AWS CDK.
cdk destroy
You’ll be asked:
Are you sure you want to delete: part-1-stack (y/n)?
Hit “y” and you’ll see your stack being destroyed.
What’s Next?
In conclusion, integrating LINE with Amazon Pinpoint provides businesses with a powerful tool to centralize their communication management, create more flexible marketing campaigns, and tap into LINE’s massive user base. With the step-by-step guide and demo provided in this blog post, you can easily get started with integrating LINE with Pinpoint and start leveraging its benefits for your business.
The solution presented in this blog post serves as a template that you can develop and customize to make it your own:
- Adding additional message types: The LINE messaging platform is famous for its rich messaging types and format. The deployed solution only utilized a fraction of what is available. You can add additional Lambda functions to send Stickers, Locations, Image Maps, Buttons or Carousel and more.
- Orchestrate LINE with other channels: Using Amazon Pinpoint Journeys, you can now meet the customer where they are most likely to see and respond to your message. Create a journey that starts with an SMS, send targeted communications based on yes/no or multivariate splits via emails and seal the deal with LINE. With Pinpoint and journey custom channel input and response support, you can craft the perfect omni-channel journey for your customers.
- Watch this space: Do stay tuned for the next blog post in this series, where we’ll show you how to manage inbound communications through LINE using Amazon Connect and Amazon Lex bots.
About the Author

Tristan (Tri) Nguyen
Tristan (Tri) Nguyen is a Senior Specialist Solutions Architect at AWS. With deep expertise in data science, martech and customer data platforms, Tristan specialises in utilising Machine Learning and Generative AI to craft scalable customer engagement strategies and architectural solutions for customer across the Asia Pacific Region. He holds a Master of Computer Science from the Georgia Institute of Technology, and has extensive hands-on experience with AWS technologies, achieving all 12 AWS certifications. In his spare time, Tristan dabbles in triathlon, hiking big mountains and climbing big rocks.