AWS Public Sector Blog
Amazon Connect achieves FedRAMP High authorization
Amazon Web Services (AWS) announced that Amazon Connect, its omnichannel cloud contact center service, has achieved Federal Risk and Authorization Management Program (FedRAMP) Authorized status at the High Impact Level. FedRAMP is a US government-wide program that promotes the adoption of secure cloud services across the federal government by providing a standardized approach to security and risk assessment, and continuous monitoring for cloud technologies and federal agencies.
This authorization continues AWS’s leadership in attaining security and compliance certifications, and applies to the AWS GovCloud (US) Regions. The types of sensitive data covered under the High Impact Level include various types of Controlled Unclassified Information (CUI) like patient records, financial and tax data, and law enforcement data.
With this announcement, AWS customers can deploy Amazon Connect inside their FedRAMP High boundary. Organizations with mission sensitive, unclassified data can now create and operate an agile and elastic contact center at scale.
Combine Amazon Connect with other AWS services within the FedRAMP High boundary, such as AWS Lambda to integrate the contact center with cloud hosted and on-premise systems, and Amazon Lex to enable conversational artificial intelligence (AI) across voice and chat that understands intent and maintains context. These integrations can create a digital front door to your organization with dynamic and personalized interactive voice response (IVR) design.
In this blog post, learn how to deploy a secure Amazon Connect contact center with conversational AI features to route callers and chatters to the agents best able to assist them.
Solution Overview: How to deploy an Amazon Connect contact center for FedRAMP High customers
In this solution, we use an Amazon Lex bot integrated with an Amazon Connect contact flow to deliver the conversational experience for constituents engaging with the chatbot over text or voice. After using artificial intelligence to analyze the user’s query, Amazon Lex and Amazon Connect will route the user to the appropriate agent, via call or chat, and inform the agent of the caller’s intent and relevant information needed to handle their query.
Create a “front door” Lex Bot
1. Validate your region. Please choose a region where Amazon Lex and Amazon Connect is deployed and FedRAMP high compliant. Visit the AWS Regional Service and AWS Services in Scope page to validate service and compliance availability.
2. Download the Front Door Bot ZIP archive.
3. In the AWS Management Console, search for the Amazon Lex service from the search bar. Navigate to the Bots page, and select Actions > Import to import the sample FrontDoor Lex Bot that you just downloaded.

Figure 1. Import your Amazon Lex bot via the AWS Console screen.
4. After the bot has been created, select the FrontDoorBot from the bots list.
5. In the top right-hand corner, select Build to build the bot. Confirm by selecting Build again on the pop-up.

Figure 2. Build bot confirmation screen.
6. When the bot has finished building, navigate to the Settings Under Aliases, create an alias named Prod and choose the latest bot version. Use the + icon to add the alias.

Figure 3. Amazon Lex bot aliases screen.
7. In the top right-hand corner, choose the Publish Select the Prod alias from the dropdown, and select Publish on the pop-up.

Figure 4. Amazon Lex bot publishing screen.
Now that you have deployed a Lex bot, let’s move on to creating a FedRAMP High Amazon Connect virtual contact center.
Deploy the Amazon Connect contact center and add the Lex bot
Search for the Amazon Connect service from the search bar at the top of your AWS Management Console. Select Get Started or Add an instance to create a new instance.

Figure 5. Amazon Connect virtual contact center instances page in the AWS Console.
2. On the Set Identity Management screen

Figure 6. Set identity screen in Amazon Connect instance setup wizard.
-
- Select Store users within Amazon Connect
- Enter a globally unique instance name in the Access URL field.
- Select Next
3. On the Add Administrator screen, fill out the form to create an administrator and select Next.

Figure 7. Add administrator screen in Amazon Connect setup wizard.
4. On the Set Telephony options screen, select Next. Make sure Allow incoming calls and Allow outgoing calls are selected.

Figure 8. Set telephony screen in Amazon Connect setup wizard.
5. On the Data storage screen, select Default settings and then select Next.

Figure 9. Data storage configuration screen in Amazon Connect setup wizard.
6. On the Review and create screen, review your settings, then select Create instance.
7. Wait for instance creation to complete. Once it has completed, select the instance alias on the Instances page.
8. On the left-hand side, choose Contact flows. Under the Amazon Lex section, choose your region and select the FrontDoorBot from the dropdown. Choose Add Amazon Lex Bot to associate it with your instance.

Figure 10. Contact flows screen and Amazon Lex section of Amazon Connect instance configuration.
9. Back on the Instances page or Overview tab in your instance, navigate to the Instance URL and login using the administrative credentials from Step 3.

Figure 11. Amazon Connect console login page.
Now that you have successfully created an Amazon Connect virtual contact center, let’s build out our customer experience by importing contact flows into Amazon Connect.
Import the sample contact flows
1. Once you are inside of the Amazon Connect instance management console, navigate to Contact Flows, under the routing tab on the left side of your screen.

Figure 12. Amazon Connect console menu that shows “Contact Flows”.
2. Click the dropdown next to the Create Contact Flow button to enter the Flow editor and select Create agent whisper flow.

Figure 13. Create contact flow dropdown in Amazon Connect contact flows page.
3. Download the Front Door Agent Whisper contact flow file. On the Flow editor screen, click the dropdown next to Save and select Import. Upload the contact flow you just downloaded to your computer.

Figure 14. Amazon Connect contact flow editor “Import flow” dropdown menu.
4. Select Publish to publish the whisper flow.

Figure 15. Imported Amazon Connect contact flow on the Flow editor.
5. Download the Front Door Flow contact flow file. Go back to the Contact Flows screen, and click the Create contact flow button. On the Flow editor screen, select the dropdown next to Save and choose Import. Upload the contact flow you just downloaded to your computer.
6. Click into the Get Customer Input block. Under the Amazon Lex section, make sure your FrontDoorBot is selected with the version as $LATEST. Select Save.
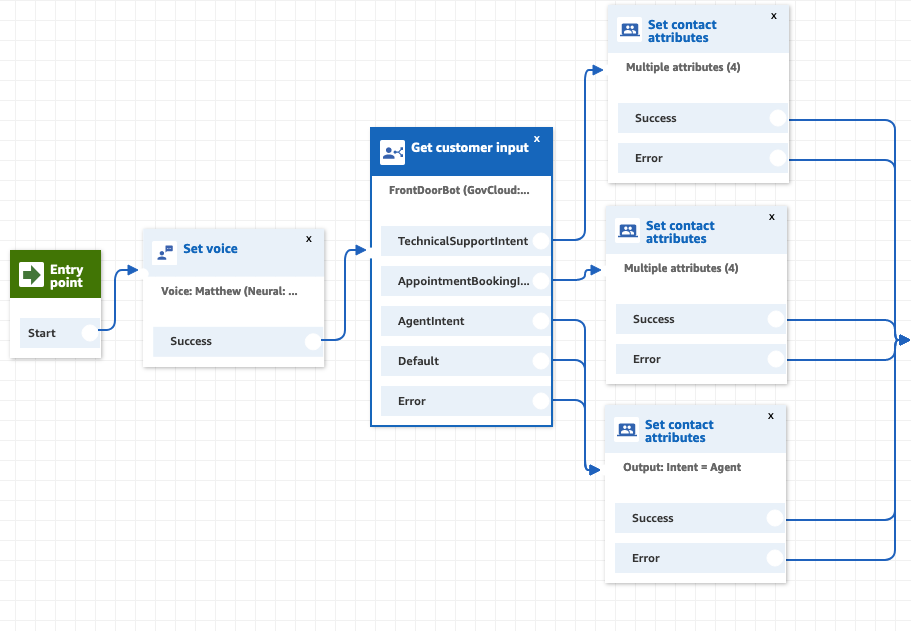
Figure 16. Get Customer Input block of the Front Door Flow contact flow in the Amazon Connect flow editor.
7. Farther to the right side of your contact flow, select into the Set working queue block. Make sure that BasicQueue is selected, and select Save.
8. The block after the set working queue block is the Set whisper flow block. Make sure that To Agent is selected, and that the Front Door Agent Whisper flow is selected. Then select Save.

Figure 17. Set working queue and Set whisper flow blocks in the Amazon Connect flow editor.
9. In the top-right, publish the contact flow using the Publish button in the top right-hand corner.
You have now designed a contact center customer experience that works over voice and chat modalities. Now, let’s test this newly created contact center.
Test the solution with voice and chat
1. Navigate to the Phone numbers page under Routing. Choose Claim a number in the top right hand corner.

Figure 18. Phone numbers menu option in the Amazon Connect console menu.
2. On the Claim Phone number screen, choose either a Toll-Free or Direct Inward Dialing number. Select one from the options shown.
3. Type a description of your phone number, and select the Front Door Flow contact flow from the dropdown.

Figure 19. Claim phone number screen of the Amazon Connect console.
4. Now, we can test our phone number. Open up the Amazon Connect Contact Control Panel using the phone button at the top of your screen. Set the status to Available to receive incoming contacts.

Figure 20. Amazon Connect Contact Control panel in available state.
5. Call the phone number you claimed in Steps 2-3. You will be greeted by the Front Door Amazon Lex bot that you deployed earlier. After listening to the prompt, choose one of the below paths to continue.
-
- Say “Technical support.” The bot will prompt you for your first name, last name, and an employee ID number. For the employee ID number, you can say any number, such as 12345.
- Or, say “Appointment booking.” The bot will prompt you for your first name, last name, and a desired date for your appointment. For the desired date, you can say any date. Amazon Lex can support relative dates such as “Tomorrow,” or you can say a date like January 1, 2023.
- You can also say “Agent” to be connected with a contact center agent (in this case, yourself).
6. After the bot has collected the relevant information, you will hear a prompt and the call will be routed to your computer. Choose Accept Call to answer.
7. With your computer audio, you will hear a “whisper” before the agent is connected. This can be used to pass information gathered in our contact flows to agents to let them better understand the users’ inquiry. For this demo, the information gathered in the paths above will be read back to the agent.
8. If you choose, you may hang up and call again to try additional paths.
9. To test the Chat solution, navigate to the Amazon Connect management console dashboard by selecting the Amazon Connect logo in the top left.
10. In the Amazon Connect Dashboard, under Step 1 of the setup guide, click Test Chat.

Figure 21. Amazon Connect console dashboard screen showing Test Chat option.
11. Choose the Test settings link, and under System Settings > Contact Flow, choose the Front Door Flow. Select Apply.

Figure 22. Test chat settings screen in the Amazon Connect console.
12. Open up the user chat window. Here, you can interact with the same Amazon Lex bot and contact flow experienced over the voice channel.

Figure 23. Test chat screen in the Amazon Connect console.
In following these steps, you have successfully deployed an omnichannel, FedRAMP high compliant contact center in AWS GovCloud (US).
Conclusion
In this blog post, we showed you how to deploy an Amazon Connect contact center with an Amazon Lex bot powering a conversational AI IVR. As these services are all within the FedRAMP High boundary, your organization can reduce the effort and complexity of your Authority to Operate (ATO) and deploy contact center designed to be secure and FedRAMP High compliant in minutes. To learn more, register for our upcoming live webinar “Deploy Amazon Connect inside the FedRAMP High boundary” on Tuesday, January 24, 2023, 1:00 PM – 2:00 PM EST.
To learn what other public sector customers are doing on AWS, visit the Public Sector Case Studies and Customer Success Stories. Stay tuned for future updates on our Services in Scope by Compliance Program page. Let us know how this post will help your mission by reaching out to your AWS Account Team. Lastly, if you have feedback about this blog post, let us know in the comments section.
Subscribe to the AWS Public Sector Blog newsletter to get the latest in AWS tools, solutions, and innovations from the public sector delivered to your inbox, or contact us.
Please take a few minutes to share insights regarding your experience with the AWS Public Sector Blog in this survey, and we’ll use feedback from the survey to create more content aligned with the preferences of our readers.