AWS Public Sector Blog
How to develop microservices using AWS Cloud9, Docker, and Docker Compose
According to a survey of attendees at the Amazon Web Services (AWS) DC Public Sector Summit in 2019, 74 percent of government IT professionals believe their agencies hold onto data centers longer than they should. Monolithic methods of deployment impact speed, performance, and cost. With microservices, customers can break their monoliths into smaller business units, making it easier to migrate and manage systems in the cloud.
Why microservices?
- Microservices are scalable, offering the ability to scale up instances of different services independently whenever performance requirements arise. Users don’t have to scale up the entire application to meet performance demands.
- Microservices enable agility. DevOps teams working with microservice architectures can employ continuous integration techniques in updating individual services without compromising the entire architecture. Locating issues unique to a service becomes simple.
- Microservices speeds up DevOps and continuous integration processes, due to its ease of use in container technology, such as AWS Docker.
This post outlines how customers can migrate from on-premises data centers to the cloud and break away from monolithic methods of deployment using microservices and containers. To get started, install Docker and Docker Compose on your laptop. You’ll also need an AWS account, a docker hub account, and a GitHub account.
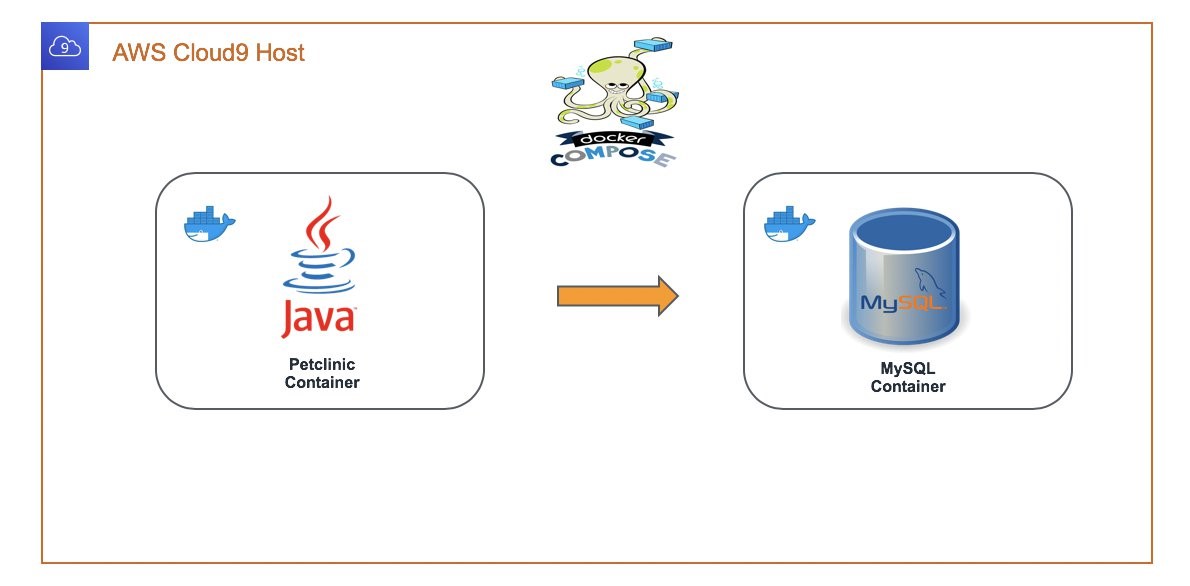
Fig 1. Application and database containers
Create an AWS Cloud9 environment
Log into the AWS Management Console through your AWS account and search and select AWS Cloud9.

Fig 2. AWS Cloud9 environment
Create an AWS Cloud9 environment in us-east-1 region based on Ubuntu Server 18.04 LTS. Choose the settings as shown in Fig. 3.

Fig 3. AWS Cloud9 settings
Configure AWS Cloud9 environment
Launch AWS Cloud9 IDE and you will be in the IDE. Launch a new Terminal session and follow the instructions to configure the AWS Cloud9 environment.
1. Upgrade awscli
aws --version
pip install awscli --upgrade --user
2. Install apache maven
sudo apt update
sudo apt install maven -y
mvn -version
Fig 4. Apache Maven
3. Install docker compose
sudo curl -L "https://github.com/docker/compose/releases/download/1.23.1/docker-compose-$(uname -s)-$(uname -m)" -o /usr/local/bin/docker-compose
sudo chmod +x /usr/local/bin/docker-compose
docker-compose --version
4. Add additional block volume
When you create an AWS Cloud9 environment, you get one AWS EBS volume of 10 GB and you may run out of space quickly. Follow these instructions to create and attach an additional AWS EBS volume to your Cloud9 environment. You can also follow these instructions to mount the additional volume to the Cloud9 environment.
Clone Spring Petclinic microservice
The Spring Petclinic Application can be an entry point into microservices. Clone the Spring Petclinic application:
git clone https://github.com/spring-projects/spring-petclinic.git
cd spring-petclinic
Using the AWS Cloud9 code editor, open the pom.xml file at the root of the spring-petclinic directory and change the version from 2.2.0.BUILD-SNAPSHOT to 2.2.0 on line 8 as:

Fig. 5. pom.xml
Configure the application server port
Open the file application.properties in spring-petclinic/src/main/resources and the following line at the bottom of the file.
server.port=80Package the application using Apache Maven. The package command builds the project and packages the resulting Java JAR file into the target directory under the spring-petclinic directory. From spring-petclinic run:
mvn packageThe first time you execute this (or any other) command, Maven will need to download the plugins and related dependencies it needs to fulfill the command. From a clean installation of Maven, this can take some time (note: in the output above, it took almost four minutes). If you execute the command again, Maven will now have what it needs, so it won’t need to download anything new and will be able to execute the command quicker.

Fig 6. mvn package
The compiled java classes were placed in spring-petclinic/target/classes, which is another standard convention employed by Maven. By using the standard conventions, the POM above is small and you haven’t had to tell Maven explicitly where any of your sources are or where the output should go. By following the standard Maven conventions, you can do a lot with little effort.
Containerize the microservice
1. Create Dockerfile
Using AWS Cloud9 code editor, create a Dockerfile under spring-petclinic directory as shown below:
FROM java:8
VOLUME /tmp
ADD target/spring-petclinic-2.2.0.jar app.jar
EXPOSE 80
ENTRYPOINT ["java","-Djava.security.egd=file:/dev/./urandom","-jar","/app.jar"]
2. Build and tag the microservice docker image
From the spring-petclinic directory, run:
docker build -t ibuchh/spring-petclinic-blog .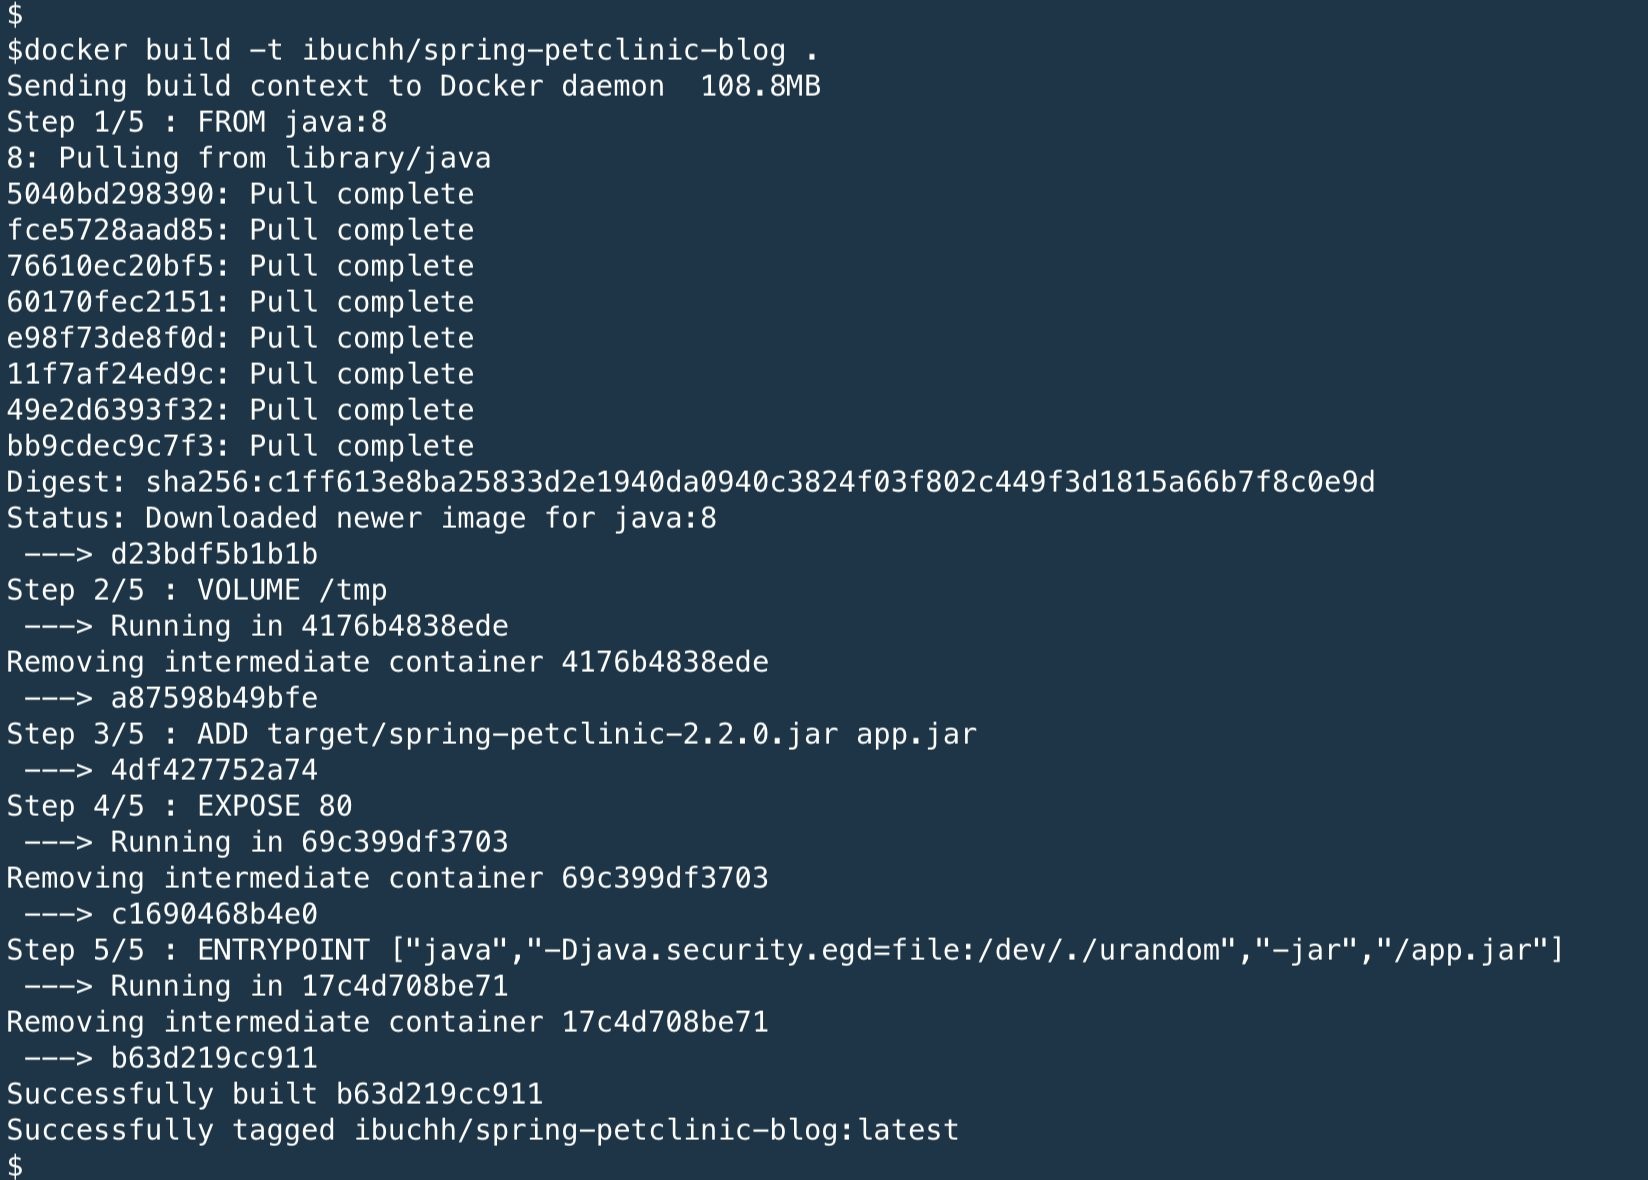
Fig 7. docker build
3. Run microservice using docker
From the AWS Cloud terminal, run:
docker run -it --rm -p 8080:80 --name petclinic ibuchh/spring-petclinic-blog
Fig 8. docker run
This will run the application using container port of 80 and will expose the application to host port of 8080. Click Preview from the top menu and then click “Preview Running Application.” It will open a browser displaying the Spring Petclinic application.
Publish the microservice container image to docker registry
1. Log into your Docker registry using
docker loginIt will prompt you for your docker registry password, input your password, and hit enter.
2. Publish the container image to docker registry
docker push ibuchh/spring-petclinic-blog
Run microservice using Docker Compose
Using Docker Compose is a three-step process:
- Define your app’s environment with a Dockerfile, so it can be reproduced anywhere.
- Define the services that make up your app in docker-compose.yml, so they can run together in an isolated environment.
- Run docker-compose up and Compose starts and runs your entire app.
The docker-compose.yml for the Spring Petclinic application along with the backend mysql database is shown in Fig. 11. The application ports are defined as 8080:80 and the mysql database ports are defined as 3307:3306. All of the variables under environment section are documented at Properties and Configuration.
version: '3'

services:
app:
image: ibuchh/spring-petclinic-blog
restart: on-failure
ports:
- "8080:80"
environment:
- SPRING_DATASOURCE_URL=jdbc:mysql://mysql:3306/${DATABASE}?autoReconnect=true&failOverReadOnly=false&maxReconnects=10
- SPRING_DATASOURCE_USERNAME=${ROOT_USERNAME}
- SPRING_DATASOURCE_PASSWORD=${PASSWORD}
- SPRING_DATASOURCE_INITIALIZE=yes
- SPRING.DATASOURCE.INITIALIZATION-MODE=always
- SPRING_PROFILES_ACTIVE=${PROFILE}
depends_on:
- mysql

mysql:
image: mysql:5.7
ports:
- "3307:3306"
environment:
- MYSQL_ROOT_PASSWORD=${PASSWORD}
- MYSQL_DATABASE=${DATABASE}
- MYSQL_USER=${DB_USER}
- MYSQL_PASSWORD=${PASSWORD}
volumes:
- "./conf.d:/etc/mysql/conf.d:ro"
Fig 11. docker-compose.yml
Using an .env file
Use environment variables inside the docker-compose.yml file and store these environment variables in a separate file .env. Using an external file for your environment variables can keep the file out of your source control.
The .env file shown in Fig. 12 should live in the root of spring-petclinic project, which is where your docker-compose.yml file should be. I declared and assigned variables in the .env file. You can name the variables however you want, since we will only be accessing their values.
ROOT_USERNAME=root
PASSWORD=petclinic
PROFILE=mysql
DATABASE=petclinic
DB_USER=petclinic
Fig 12. .env file
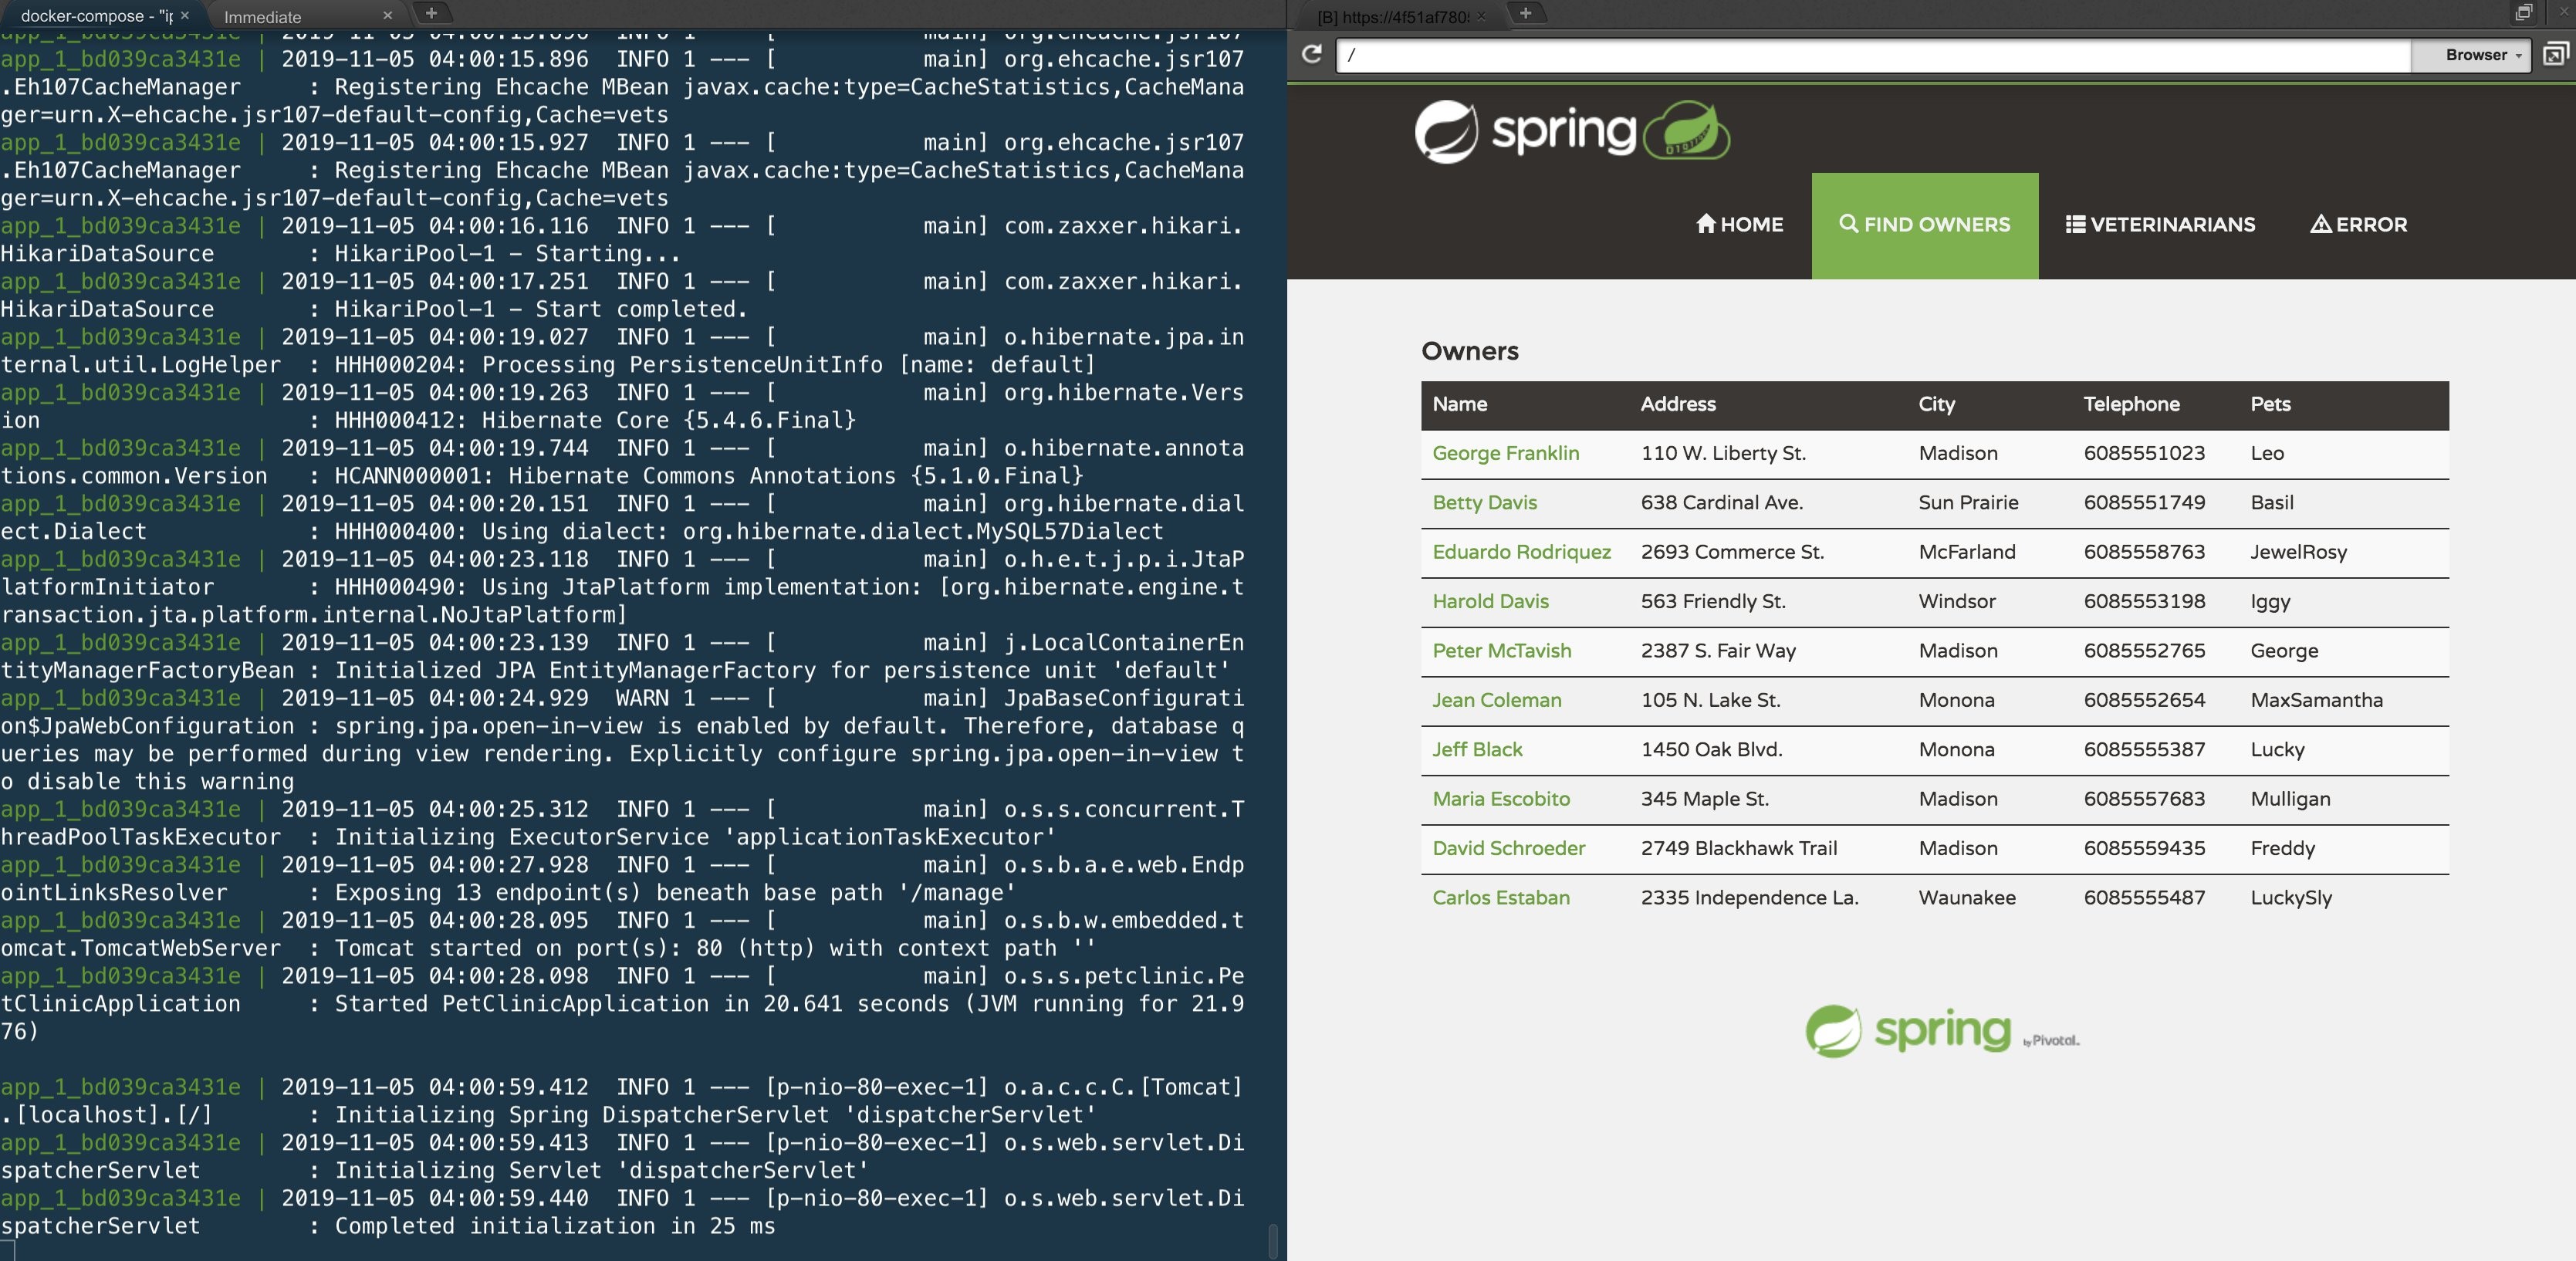
Run docker compose
At the root of the spring-petclinic folder, open a shell terminal in AWS Cloud9 and type docker-compose up. The application and the database containers shall start successfully. I chose SPRING.DATASOURCE.INITIALIZATION-MODE=always. This variable will initialize the database container with a sample schema (in schema.sql) and data (in data.sql) files under spring-petclinic/src/main/resources/db/mysql folder.

Fig 13. docker-compose up
Redeploy application after code changes
Using AWS Cloud9, change the title of the welcome.html page located in spring-petclinic/src/main/resources/templates directory. To redeploy the code changes, run build-deploy.sh in the AWS Cloud9 terminal. This script at the root of the application and will run the following commands:
mvn package
docker build -t ibuchh/spring-petclinic-blog .
docker push ibuchh/spring-petclinic-blog
Stop the docker-compose session by pressing the ctrl+c and the run docker-compose up.
Learn more about microservices on AWS and AWS Cloud9. If you have questions or suggestions, comment below.
Subscribe to the AWS Public Sector Blog newsletter to get the latest in AWS tools, solutions, and innovations from the public sector delivered to your inbox, or contact us.