AWS Public Sector Blog
Web filtering for education using AWS Network Firewall
Update: As of February 2026, this blog has been updated to demonstrate new feature, allowing AWS Network Firewall users to block traffic based on Domain Categories.
Important: This solution relies on Server Name Indication (SNI) in HTTP/HTTPS requests to identify target domains. Modern browsers increasingly use Encrypted Client Hello (ECH), which masks the SNI field. AWS Network Firewall supports outbound TLS inspection, which can help in this situation. Stay tuned for Part 2 of this series where we will demonstrate this setup with outbound TLS inspection enabled.

Managing access to websites and safeguarding users from harmful content is a critical component of a layered cybersecurity approach, especially in educational settings. Schools and institutions of higher learning have a responsibility to provide a secure online experience for their students and staff. Traditionally, this has been accomplished through on-premise web filtering appliances.
Amazon Web Services (AWS) Network Firewall allows customers to filter their outbound web traffic from on-premises environments based on fully qualified domain names (FQDN) or Server Name Indication (SNI) for encrypted traffic. AWS managed rule groups can be used to block access to known malware and botnet threats. These predefined rules are written and maintained by AWS and automatically update when new vulnerabilities and threats emerge. Additionally, AWS Network Firewall now allows filtering of traffic based on URL or Domain content categories.
This post will use AWS Client VPN to demonstrate routing and filtering traffic from external resources through Network Firewall. In real-world scenarios, AWS Site-to-Site VPN or AWS Direct Connect would typically be used for connecting on-premises networks to AWS. The concepts discussed here related to routing and filtering traffic with Network Firewall apply regardless of the specific connectivity method used.
Architecture overview
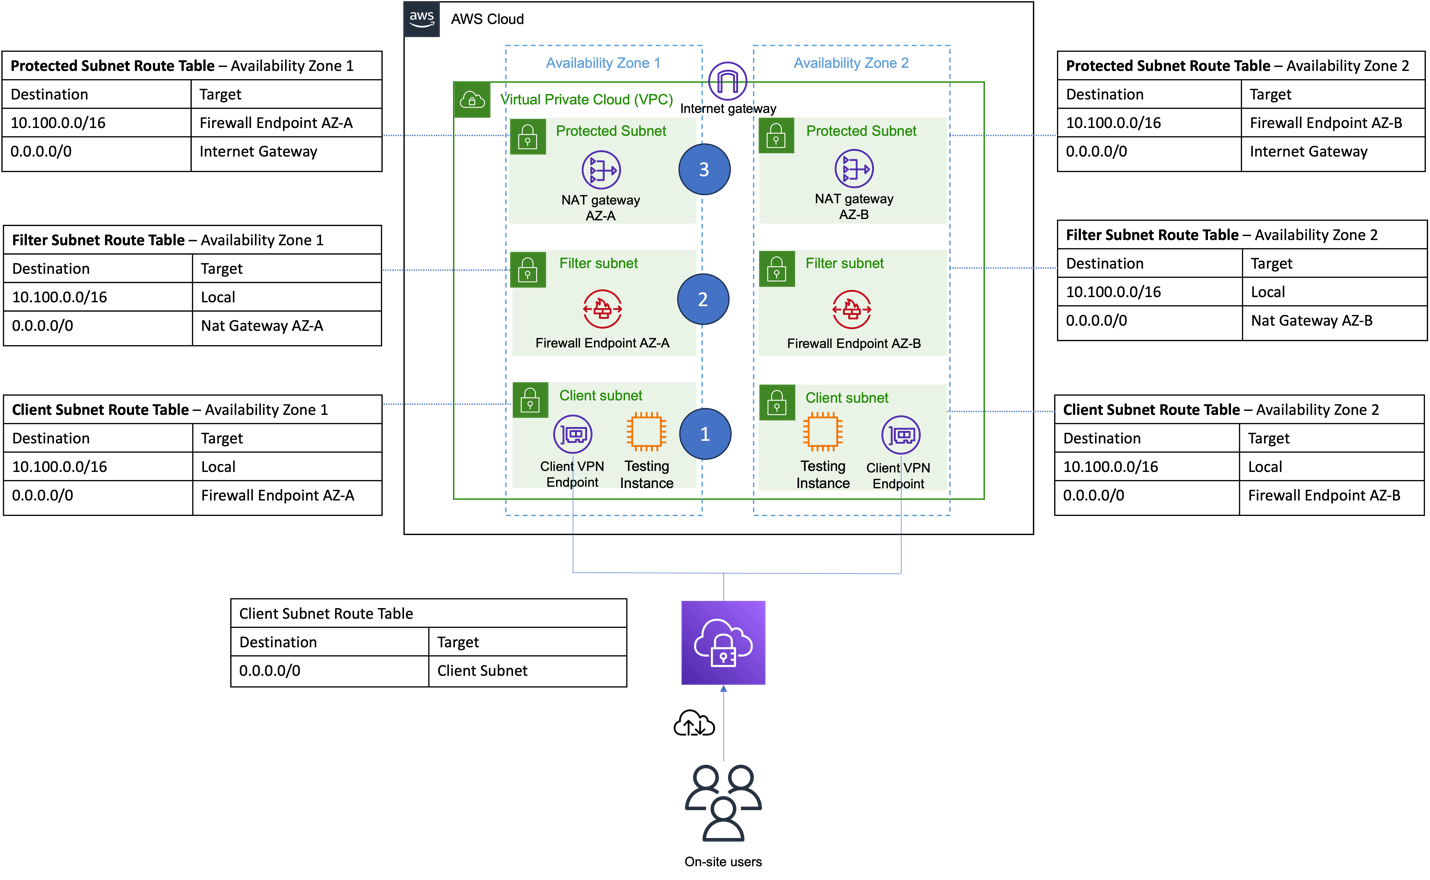
Figure 1. Architecture overview of the solution described in this post. The diagram depicts a virtual private cloud (VPC) with six subnets across two AWS Availability Zones. Each Availability Zone contains three subnets: the protected subnets contain the NAT Gateway, the filter subnet contains the Network Firewall, and the client subnet contains the Client VPN endpoint. On-premises users are depicted connecting to the VPC using Client VPN.
This solution uses a single VPC. Resources are deployed across two Availability Zones to provide a level of fault tolerance. Three subnets are deployed within each Availability Zone:
- Client – After successful authentication with AWS Client VPN, users will land in this subnet.
- Network Firewall filter – Contains the AWS Network Firewall endpoints where traffic originating from the client subnet will be routed.
- Protected – Contains the AWS NAT Gateway, which enabled outbound internet access. All traffic originating from the filter subnet will be targeted towards this NAT Gateway.
The traffic flow from our on-premises users following the path is shown in Figure 2.

Figure 2. Diagram of the traffic flow. The image shows traffic flow starting at on-premises users and moving left to right from AWS Client VPN to AWS Network Firewall to AWS NAT Gateway before ending at Internet Gateway.
Solution walkthrough
For this guide, a single Availability Zone will be used. This simplifies the creation of a proof of concept and reduces development cost. In a production system, use at least two Availability Zones for high availability of the Network Firewall endpoints.
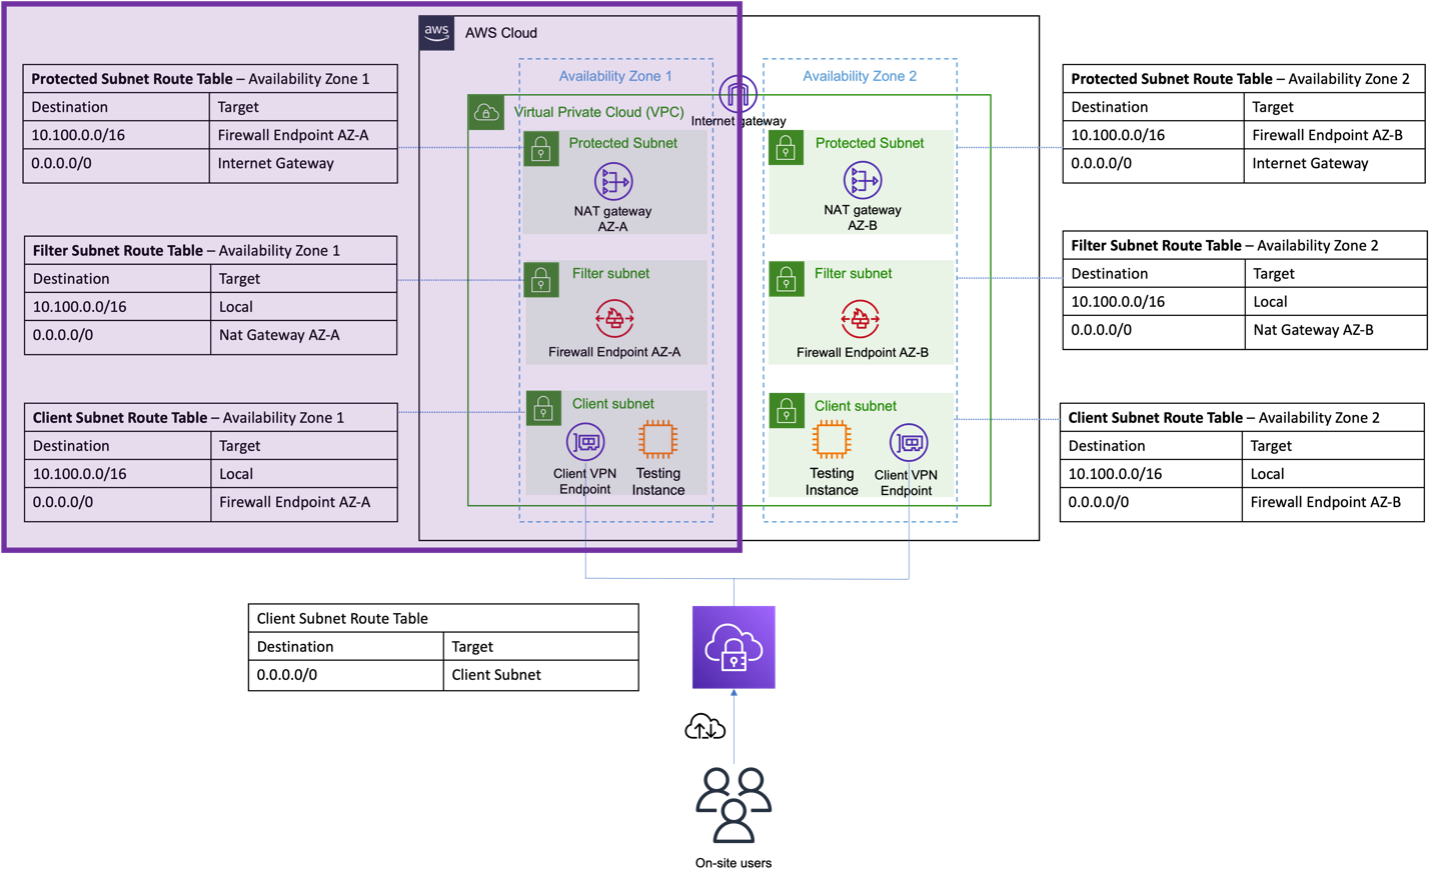
Figure 3. Architecture overview diagram, highlighting the subnets within Availability Zone 1 and their route tables.
Some resources will be created as part of this solution:
- Amazon Virtual Private Cloud (Amazon VPC) and subnets
- AWS Network Firewall and endpoint
- NAT and internet gateway
- Route tables
- AWS Network Firewall policy
Out of scope
This post does not cover deployment details for AWS Client VPN or authentication. For more details on configuring AWS Client VPN and authentication, refer to the following resources:
- Documentation: Getting started with AWS Client VPN
- Blog post: Authenticate AWS Client VPN users with AWS IAM Identity Center
- There are various methods to connect on premises or remote locations with AWS. This post uses AWS Client VPN as an example. For static locations, AWS Direct Connect or AWS Site-to-Site VPN would typically be used. The configuration of these is not covered in this post.
- This solution can also be tested from within AWS by provisioning an Amazon Elastic Compute Cloud (Amazon EC2) instance in the Client Subnet. Figures 1 and 3 show a testing instance within the Client Subnet. Use EC2 Instance Connect with an Instance Connect Endpoint to securely connect to the instance in a private subnet and run the tests.
Create VPC resources
Start by creating a VPC from the Amazon VPC console. You can use the VPC and More wizard.
- Uncheck the Auto-generate box.
- Specify a CIDR range that meets your requirements (default is fine for testing).
- Set the Number of Availability Zones (AZs) to 1.
- Increase the number of private subnets to 2.
- Enable NAT Gateways 1 per AZ.
- Change VPC Endpoints to None; they are not required for this example.
- Rename the resources according to the following tables. This helps with identification later. The preview screen (Figure 4) can be used to validate.
- Create the VPC and wait for the workflow to complete.
| VPC | |
| VPC | network-filter-vpc |
| Subnets (6) | |
| Public subnet 1a | filter-protected-public-subnet-1a |
| Private subnet 1a | filter-nfw-subnet-1a |
| Private subnet 1a | filter-client-subnet-1a |
| Route tables (5) | |
| Public route table | protected-subnet-route-table-az1 |
| Private route table | filter-subnet-route-table-az1 |
| Private route table | client-subnet-route-table-az1 |
| Network connections (3) | |
| Internet gateway | filter-igw |
| NAT gateway | filter-ngw-az1 |
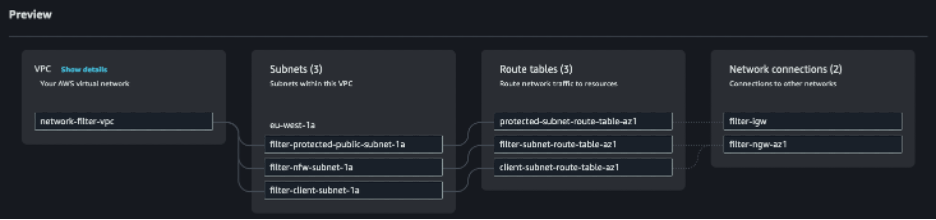
Figure 4. VPC preview showing resources that will be created according to the preceding tables.
Create AWS Network Firewall and firewall endpoints
Network Firewall endpoints are similar to AWS PrivateLink endpoints. They allow traffic to be routed to a network firewall for inspection and filtering before continuing to its destination. This provides an effective way to increase security and control over network traffic flows.
-
-
- Create the Firewall from the Amazon VPC console Network Firewall section using a descriptive name, as shown in Figure 5.

Figure 5. Describe firewall. Depicts the naming of the firewall during the creation wizard on the AWS console using the example name “network-firewall-content-filter.”
- On the Configure VPC and Subnets page, select the VPC that was created earlier.
- Define the Firewall subnets, where the Network Firewall endpoints will be created. Just one subnet was created earlier to host the endpoints, one for each Availability Zone, as shown in Figure 6.
Availability Zone Subnet IP address type 1a filter-nfw-subnet-1a IPV4 
Figure 6. Configure VPC and subnets. Depicts the selection of each of the subnets where the AWS Network Firewall endpoints will be deployed according to the preceding table.
- Accept the Configure advanced setting default configuration.
- Select Create and associate an empty firewall policy and name it “content-filter-fw-policy.” By default, the policy will automatically be associated with the firewall but will not contain any rules.
- For Rule evaluation order, keep the default setting of Strict order – recommended.
- Leave the Drop Action setting with its default configuration of Application drop established. This setting is required for the proper functioning of domain-based filtering when using both strict order and custom domain list rule groups. The Network Firewall service needs the layer 3 and 4 connection to be established first in order to evaluate whether to allow or deny packets based on domain lists. Compared to Drop Established setting, maintaining the default Application drop established setting ensures that connections with segmented TLS client hello messages (for https payloads) or segmented host headers (for http payloads) are allowed to establish until those headers can be inspected by the firewall domain rules, determining whether to pass or drop the traffic.
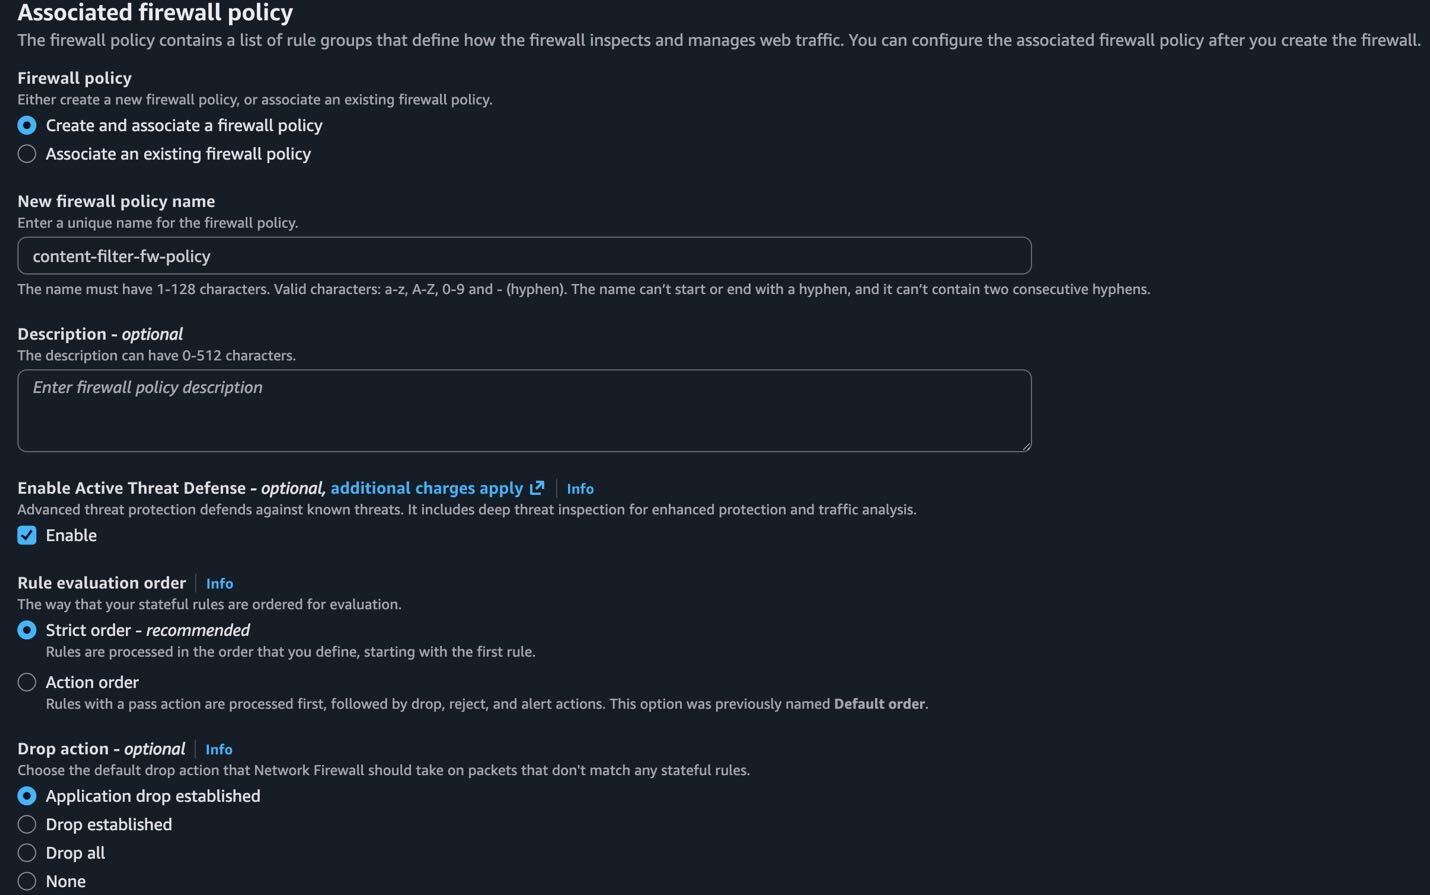 Figure 7. Associate firewall policy. Shows the default settings that are kept. The new firewall policy name field has been filled with “content-filter-fw-policy.”
- Create the Firewall from the Amazon VPC console Network Firewall section using a descriptive name, as shown in Figure 5.
- 8. On the final screen, review the configuration, then create the firewall.
- 9. Once the firewall has been created, retrieve the Endpoint ID of the endpoint, as shown in Figure 9. This is required for the next step of configuring the routing tables. Find the Endpoint ID from the Amazon VPC console Network Firewall section, under Firewall endpoints.
-
Update the route tables
Next, update the client and protected subnet route tables. The filter subnet route tables are already correctly configured.
- Navigate to the route tables section of the Amazon VPC console and select client-subnet-route-table-az1, then go to Actions and Edit routes.
- Replace the NAT Gateway route with a Gateway Load Balancer Endpoint using the Firewall endpoint ID for Availability Zone 1. All outbound traffic is now directed towards the Network Firewall endpoint, as shown in Figure 10.
client-subnet-route-table-az1 Destination Target 10.100.0.0/16 Local 0.0.0.0/0 Firewall endpoint AZ-A 
Figure 9. Client subnet route table showing the selection of the Gateway Load Balancer Endpoint and endpoint ID to replace the NAT Gateway route.
- Also update protected-subnet-route-table-az1. Change the local route target to the Endpoint ID of the Network Firewall; this allows symmetric routing, where return traffic is sent back to the Network Firewall.
protected-subnet-route-table-az1 Destination Target 10.100.0.0/16 Firewall Endpoint AZ-A 0.0.0.0/0 Internet Gateway 
Figure 10. Protected subnet route table showing the selection of the Gateway Load Balancer Endpoint and endpoint ID to replace the local route.
Configuration of Network Firewall policy
-
- First, as shown in Figure 11, edit the Stateless default actions. Find this setting under the Firewall policy settings tab within the Firewalls section of the Amazon VPC console. Update the setting for Default actions for fragmented packets to Forward to stateful rule groups.


Figure 11. Stateless default actions edit screen shows that the rule action for fragmented packets has been updated to Forward to stateful rule group.
- First, as shown in Figure 11, edit the Stateless default actions. Find this setting under the Firewall policy settings tab within the Firewalls section of the Amazon VPC console. Update the setting for Default actions for fragmented packets to Forward to stateful rule groups.
Create stateful rule groups
In this example, the Suricata-Stateful-Rules allows access to amazon.de and blocks all other domains domains for both HTTP and HTTPS traffic.
- Create a new stateful rule group from the AWS console, using “Suricata compatible rule sting” as the rule group format.

Figure 12. Create and add statfule rule group screen shows selecting Suricata compatible rule string.
- The following provides an annotated example of a Suricata compatible rule set. The ruleset contains an allowlist of domains for HTTP and HTTPs traffic, all other domains will be blocked.
These rules are provided for demonstration purposes only. Create and thoroughly test your own rules in a non-production environment before implementing to ensure they meet your filtering and security requirements.
# TLS Domain Allow-List
pass tls $HOME_NET any -> any any (tls.sni; content:”amazon.de”; dotprefix; nocase;
sid:100003;)
# HTTP Domain Allow-List
pass http $HOME_NET any -> any any (http.host; content:”amazon.de”; dotprefix; sid:100004;)
#TLS Domain Category News Allow
pass tls $HOME_NET any -> any any (msg:”Domain Category is News”; aws_domain_category:News; sid:100005; rev:1;)
#TLS Domain Category Gambling Block
reject tls $HOME_NET any -> any any (msg:”Domain Category is Gambling”; aws_domain_category:Gambling; sid:100006; rev:1;)
Test the solution
Now test outbound filtering.
1. First, connect into the client subnet through the method you provisioned (such as client VPN or Amazon EC2 instance) and confirm traffic is routing out of the NAT gateway. A simple test is to check your external IP address. If traffic is successfully routing out of the VPC, then it will be the IP of the NAT gateway.

Figure 15. Check public IP. Depicts the output of the curl ifconfig.me command and the NAT Gateway console.
2. Once confirmed traffic from a local device or a device within the client subnet is routing out the NAT gateway in AWS, check that the domain filtering rules are working. Run two curl commands from the terminal on your local device:
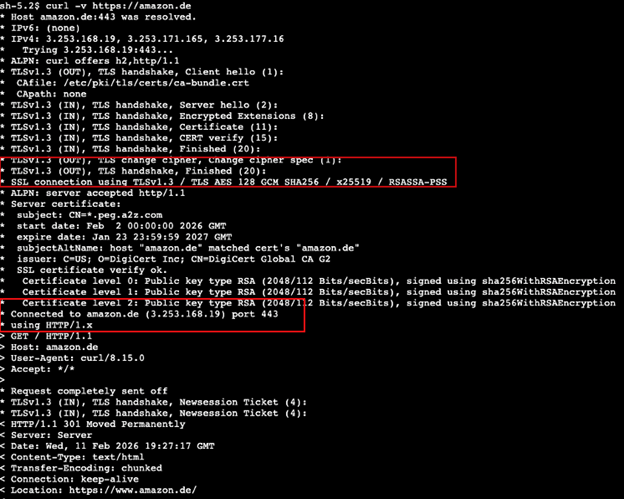
a) curl -v https://amazon.de ; expect a TLS handshake and successful connection
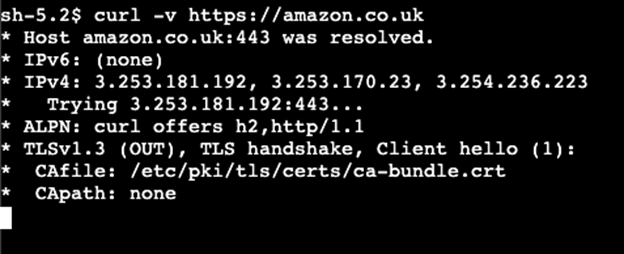
b) curl -v https://amazon.co.uk ; expect Operation timed out
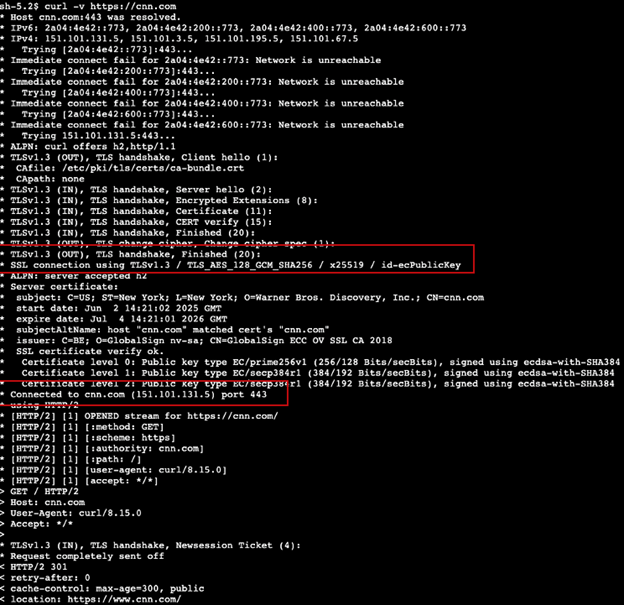
c) curl -v https://cnn.com ; expect a TLS handshake and successful connection due to our Domain Category allow rule
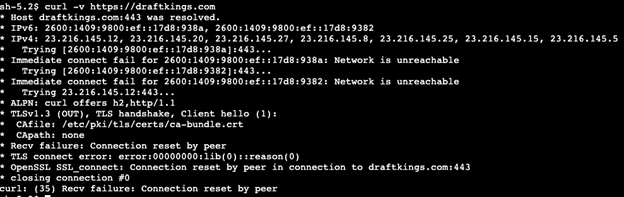
d) curl -v https://draftkings.com ; expect Operation timed out due to our Domain Category reject rule
(Note: some parts of curl command outputs below have been redacted for brevity and clarity)
Curl -v https://amazon.de output, successful connection.
Curl -v https://amazon.co.uk output, blocked connection does not go past Client hello
Curl -v https://cnn.com output, successful connection.
Curl -v https://draftkings.com reset/blocked connection.
Below is a JSON export of the Alert log AWS Network Firewall would publish for the rejected traffic to https://draftkings.com:
Cleanup
To avoid ongoing charges, remove resources that were created as part of this walkthrough. Resources that should be deleted if applicable are (in order):
- Client VPN endpoint. You must first remove all associations that were created for the endpoint.
- Network Firewall; including rule groups, policies, and endpoints.
- Internet gateway
- NAT gateways
- Subnets and route tables
- VPC
Conclusion
In this post, we demonstrated how AWS Network Firewall can provide outbound web filtering and stateful packet filtering for external traffic, including remote users and on-premises resources.
Using AWS Network Firewall enables the creation of a resilient, scalable cloud-based filtering solution, reducing the need for on-premises equipment. Combining custom domain stateful filtering and domain category filtering along with AWS managed rule groups helps save time and stay current with the constantly evolving security landscape. AWS automatically updates the managed rule groups as new vulnerabilities and security issues emerge.
If you have feedback about this post, submit comments in the comments section. If you have questions about this post, contact AWS Support.