AWS Partner Network (APN) Blog
How to Simplify Machine Learning with Amazon Redshift
By Ryan Ries, Practice Lead, Data Science and Engineering – Mission Cloud
By Sudhir Gupta, Sr. Analytics Specialist Solutions Architect – AWS
By Cristian Torres Salamanca, Sr. Partner Solutions Architect – AWS
 |
| Mission Cloud Services |
 |
Modern IT has a dilemma of quantity over quality; you must manage vast amounts of data effectively to optimize your business while minimizing costs.
Over the past decade, enterprise machine learning (ML) has exploded. Businesses use ML to make informed decisions, solve challenges, and create smart products and revenue streams.
Building effective ML models requires storing and managing extensive historical data. With data’s exponential growth, conventional databases can quickly become a nightmare to regulate. Queries start taking too long, for example, slowing down business decisions.
In this situation, it’s practical to store your data in a data warehouse like Amazon Redshift. This keeps it organized and accessible for ML, reporting, and analytics.
In this post, we’ll show you how to use Amazon Redshift ML and Query Editor V2 to create, train, and apply ML models to predict diabetes cases for a sample diabetes dataset. You can follow a similar approach to address other use cases such as customer churn prediction and fraud detection.
Mission Cloud Services is an AWS Premier Consulting Partner that accelerates enterprise cloud transformation by delivering a differentiated suite of agile managed cloud services and consulting. Mission is also a member of the AWS Managed Service Provider (MSP) and Well-Architected Partner Programs.
Building Machine Learning Models
Data pipelines feeding into a data warehouse like Amazon Redshift help maintain data quality and integrity. In the ML space, the old adage “garbage in, garbage out” is especially true. Lack of appropriate data, data organization, and data quality often prevent organizations from building models quickly and efficiently.
During development, models often produce unexpected results due to inadequate data, which may result from data silos. Data scientists might not have access to critical data, or might not be aware it exists. To avoid surprising results, businesses need to knock down data silos and embrace a data lake or data warehousing system like Amazon Redshift.
During model building, companies must determine if they have the correct data to solve the problem at hand before investing resources into ML solutions. Mission Cloud Services often conducts sessions with clients to help determine what ML models can be developed and if the company has the data to solve the problem.
Amazon Redshift ML is a new feature that allows you to run machine learning models directly on your Amazon Redshift cluster. You can use the Amazon Redshift cluster for your ML inferences and SQL to create and train your models.
Amazon Redshift recently introduced a new Query Editor V2, a web-based tool that allows you to explore, analyze, and share data using SQL.
Let’s look closer at Amazon Redshift and examine how you may use it to house your data and create an effective ML solution.
Amazon Redshift as a Machine Learning Data Source
Amazon Redshift is a fully managed cloud data warehouse that enables you to query and combine exabytes of structured and semi-structured data. You can do this in your data warehouse, operational database, and data lake. This makes it easy for you to gain new insights.
Amazon Redshift is cost-effective and can scale quickly with ease. It automatically organizes and stores data and uses ML to analyze queries and graph optimization algorithms for faster results.
Amazon Redshift combines structured data from operational databases and semi-structured data from NoSQL data sources. You can also run queries against exabytes of unstructured data in Amazon Simple Storage Service (Amazon S3) data lakes, with no loading or extract, transform, load (ETL) required, through Amazon Redshift Spectrum.
In addition, Amazon Redshift allows you to add ML-based capabilities to your applications using familiar SQL programming commands
To run machine learning, you can import data stored in Amazon Redshift by specifying the cluster and data you’re seeking. After you have imported this data, you can use data wranglers to create ML data prep workflows to transform and analyze it.
Then, you can integrate this defined data flow with ML solutions on AWS. You can use Amazon SageMaker, for example, to simplify processing, sharing, and storing ML training data.
Keep in mind that while data analysts and database developers are usually comfortable with SQL, building, training, and deploying ML models in Amazon SageMaker requires some machine learning expertise.
Amazon Redshift ML is best suited to use cases where teams need to do ML alongside reporting, business intelligence (BI), and dashboarding on a single data set.
Your team should also be familiar with a programming language, such as Python, and have a basic understanding of the given problem’s ML algorithm.
Even after building, training, and deploying the model, it requires updated data to retrain to make predictions on new data. This involves repeatedly moving data among various data sources, such as Amazon Redshift, Amazon S3, and Amazon SageMaker.
Amazon Redshift ML
To make it easier for data analysts, data scientists, BI engineers, and developers, AWS introduced Amazon Redshift ML. Organizations can create, train, and deploy machine learning models in Amazon Redshift data warehouses using familiar SQL commands.
You can quickly analyze the data and use ML capabilities alongside the dashboarding and reporting you’d traditionally expect from a data warehouse.
Amazon Redshift ML uses Amazon SageMaker Autopilot to build supervised ML models automatically. As a result, you won’t have to learn any new language or tools. You’ll simply provide Amazon Redshift with data and specify the goal or variable to predict.
Amazon Redshift ML acts as an abstraction layer for all of the interactions between Amazon Redshift, Amazon S3, and Amazon SageMaker. This means you don’t have to worry about time-consuming training and compilation steps.
If you desire more control over the whole process, Amazon Redshift ML also supports specifying other ML models such as XGBoost and MLP. You can customize the model type by specifying the objective, problem type, and preprocessors or by tuning hyperparameters.
You can even bring (or reuse) an ML model, prebuilt using Amazon SageMaker, within Amazon Redshift for local or remote inferences.
Predictive Analytics Use Case
Amazon Redshift ML enables you to embed predictions like risk scoring, fraud detection, and sales predictions as a SQL function in your reports and dashboards. For example, you can use patient data in Amazon Redshift to train a diabetes risk prediction model. These models are especially useful in healthcare, so personnel can implement preventive measures.
After you train the model, you can run a SQL function on a new patient’s data. This checks if the patient is at risk for diabetes. Let’s see this in action!
Prerequisites
Amazon Redshift exports the specified data to Amazon S3 and calls Amazon SageMaker to prepare the data, select the appropriate algorithm, and train the model. For the workflow to run successfully, Amazon Redshift accesses the Amazon S3 and Amazon SageMaker services on your behalf.
Because we’re starting from nothing, we’ll first create an S3 bucket and upload our data. After that, we’ll create a role and assign it appropriate permissions using AWS Identity and Access Management (IAM) services.
Amazon S3 Bucket Configurations
To create an Amazon S3 bucket, log in to the AWS Management Console and search for the S3 bucket. Select Create bucket.
Provide the general configurations on the next page. Choose a name and AWS Region for your bucket. In this tutorial, we’re providing public read access to the bucket. Be sure you don’t do this for sensitive data and, if necessary, make sure the data is encrypted in transit and at rest.
Next, upload data to the bucket. Select the bucket’s name. To choose files, select Upload.
We’re using the open-source diabetes dataset in this tutorial. Download the file and split it into two parts to create two separate files. After choosing the files, review the destination, permissions, and properties. To upload the files to the bucket, select Upload. It takes a few moments for files to upload successfully.

Figure 1 – Diabetes data files in the Amazon S3 bucket.
Creating an Amazon Redshift Cluster
Log in to the AWS console, search for Amazon Redshift, and then select Create Cluster.

Figure 2 – Amazon Redshift console.
On the next page, we must provide some basic cluster configurations like identifier, node type, and the number of nodes. Choose a cluster identifier and its use. You can opt for a limited-time free trial if you plan on only learning.
When opting for the Production option, you can choose between different node types. For example, you can select RA3, DC2, and others. The RA3 node type offers best-in-class performance with scalable managed storage. Use Help me choose for a node type recommendation based on your dataset and access pattern.
After the basic cluster configurations, move on to Database configurations. Enter an admin user name, and choose a password or select Auto-generated password.
Next, expand Manage IAM roles in the Cluster Permissions section of the Amazon Redshift cluster.
Click Create IAM role, choose Any S3 bucket, and select Create IAM role as default.
Take note of the Amazon Resource Name (ARN) of the IAM role, as you will use this IAM role to run SQL statements such as COPY, CREATE MODEL.
Click Create cluster.
You have created an Amazon Redshift cluster with the default IAM role that has the AmazonRedshiftAllCommandsFullAccess policy attached. This policy includes permissions to run SQL commands to COPY, UNLOAD, and query data with Amazon Redshift. The policy also grants permissions to run SELECT statements for related services, such as Amazon S3, Amazon CloudWatch logs, Amazon SageMaker, and AWS Glue.
Using the Dataset
Our open-source diabetes dataset aims to predict whether a person is diabetic or non-diabetic based on specific features, such as pregnancies, glucose, blood pressure, insulin, body mass index (BMI), and age.
The outcome is a class variable. If the outcome is zero, the person doesn’t have diabetes. If the outcome is one, the person has diabetes.
We have already divided the dataset into 80% training and 20% testing. You can directly download the dataset and split it into training and testing datasets, or just download the attached files and upload them to your S3 bucket.
Copying Data from S3 to Amazon Redshift
Because our dataset resides in Amazon S3, we must first load the data from the S3 bucket into the Amazon Redshift table. Amazon Redshift allows you to query the cluster right from the AWS console. From your cluster, select Query data and then select Query in Query Editor V2.
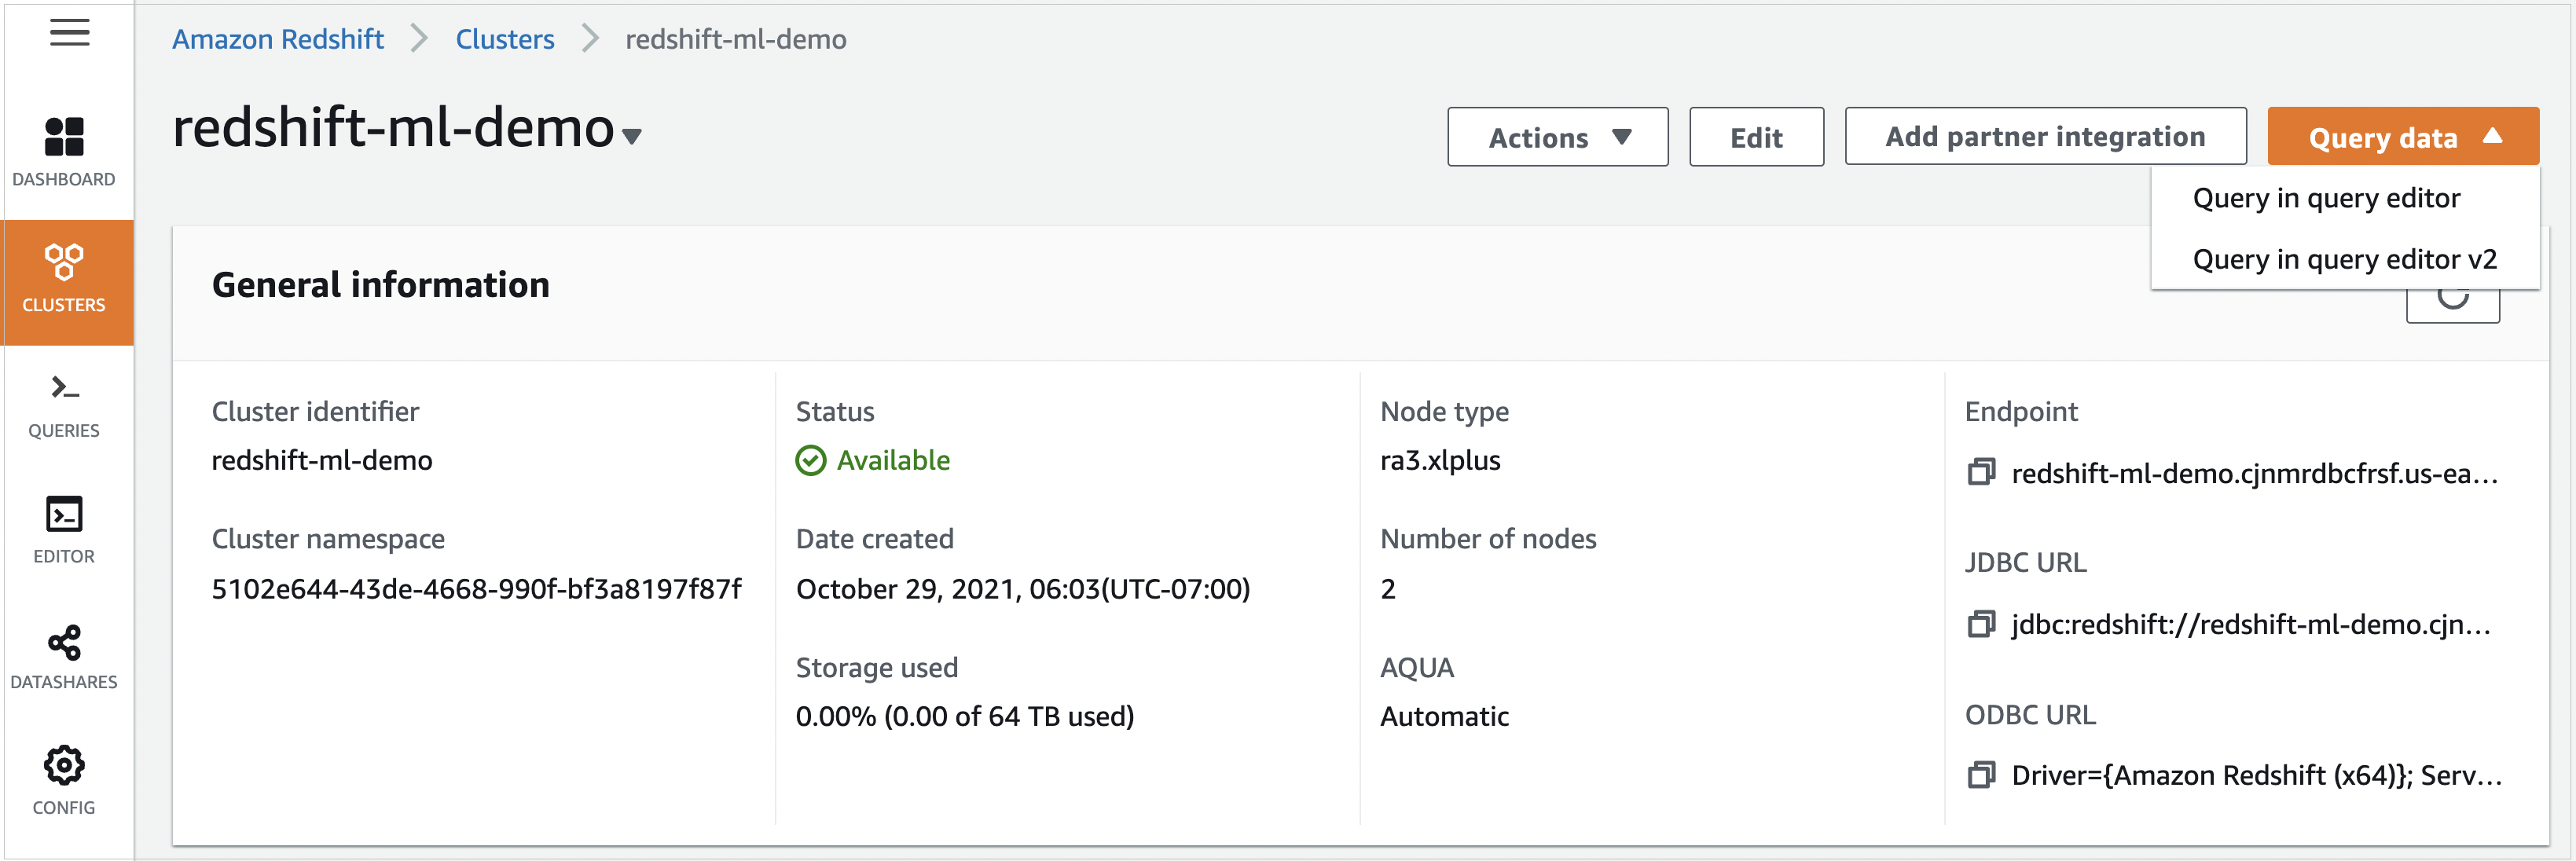
Figure 3 – Your Amazon Redshift cluster.
An editor opens that allows you to run queries when connected to the database. Browse, and select your cluster.
When prompted, enter the database you want to connect to and the user name. To connect to the database, select Create connection.
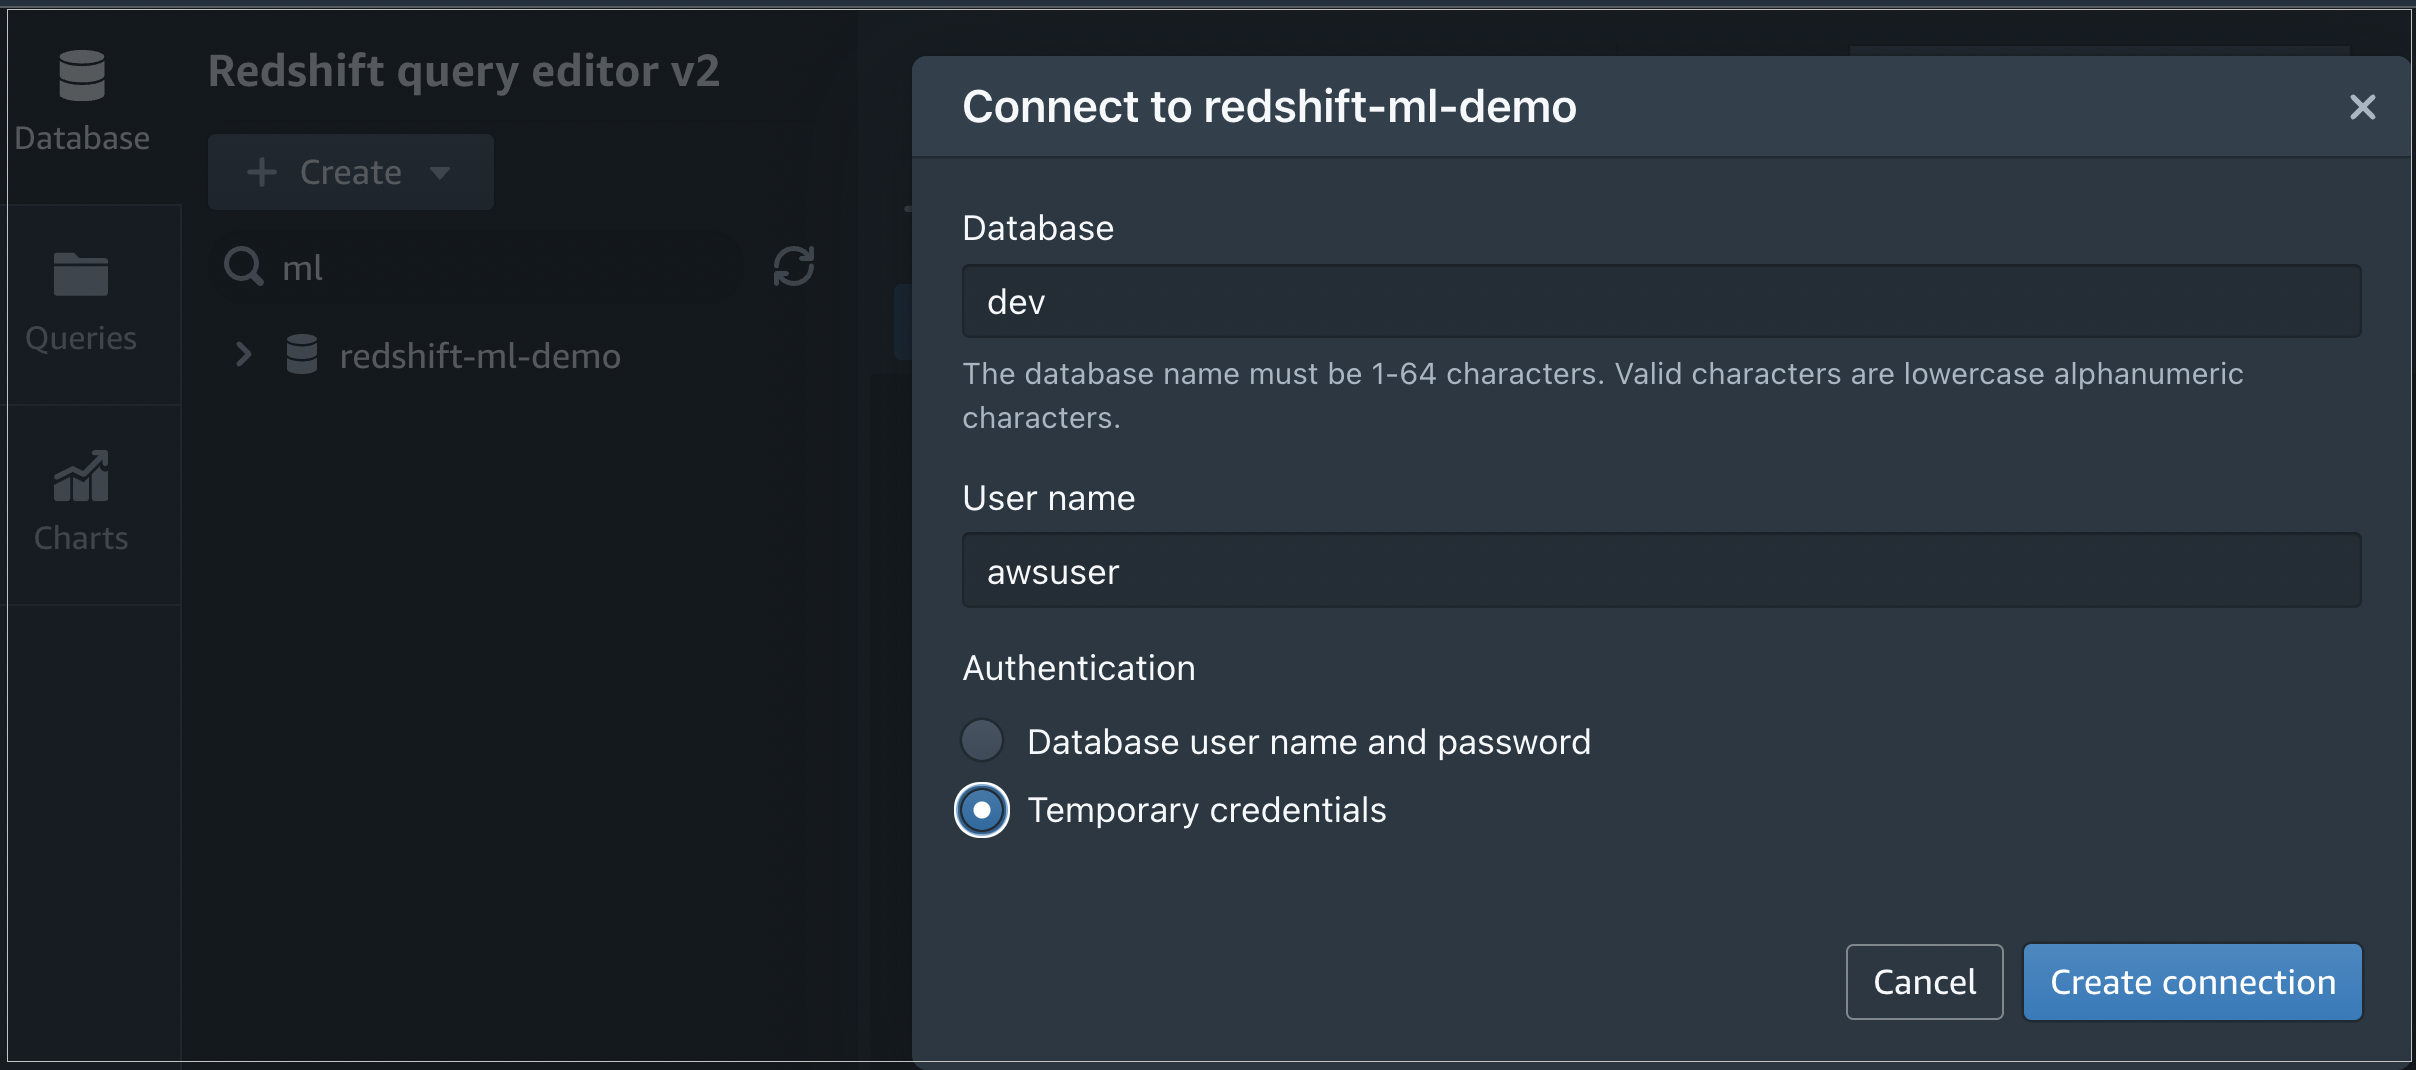
Figure 4 – Amazon Redshift connection window from Query Editor v2.
After you’ve connected to the database, you’ll see the database name and user in the editor. Let’s create a table in Amazon Redshift and import the data from S3.
To create the table, run the following command:
To copy the data from the S3 bucket to our new table, run the following query. Replace the IAM_ROLE and Amazon S3 bucket information with the resources in your own AWS account:
Amazon Redshift allows you to preview data in the query editor. Run SELECT * FROM diabetes; in the editor, so you can verify if the data is loaded successfully.

Figure 5 – Sample output from “diabetes” table.
In the same way, we can load the dataset for testing in a separate table named diabetes_inference.
To copy the data from the S3 bucket to our newly-created table, run the following query. Remember to replace the IAM_ROLE and Amazon S3 bucket information with the resources created in your own AWS account:
Training the Model
Finally, we’re all set to create our machine learning model. Amazon Redshift allows users to make models using a simple CREATE MODEL command. This command provides an abstraction layer over exporting the training data, training the model, importing the model, and preparing the Amazon Redshift prediction function.
To create the model for diabetes prediction, run the following commands. Remember to replace the IAM_ROLE and S3 bucket information with the resources created in your own AWS account:
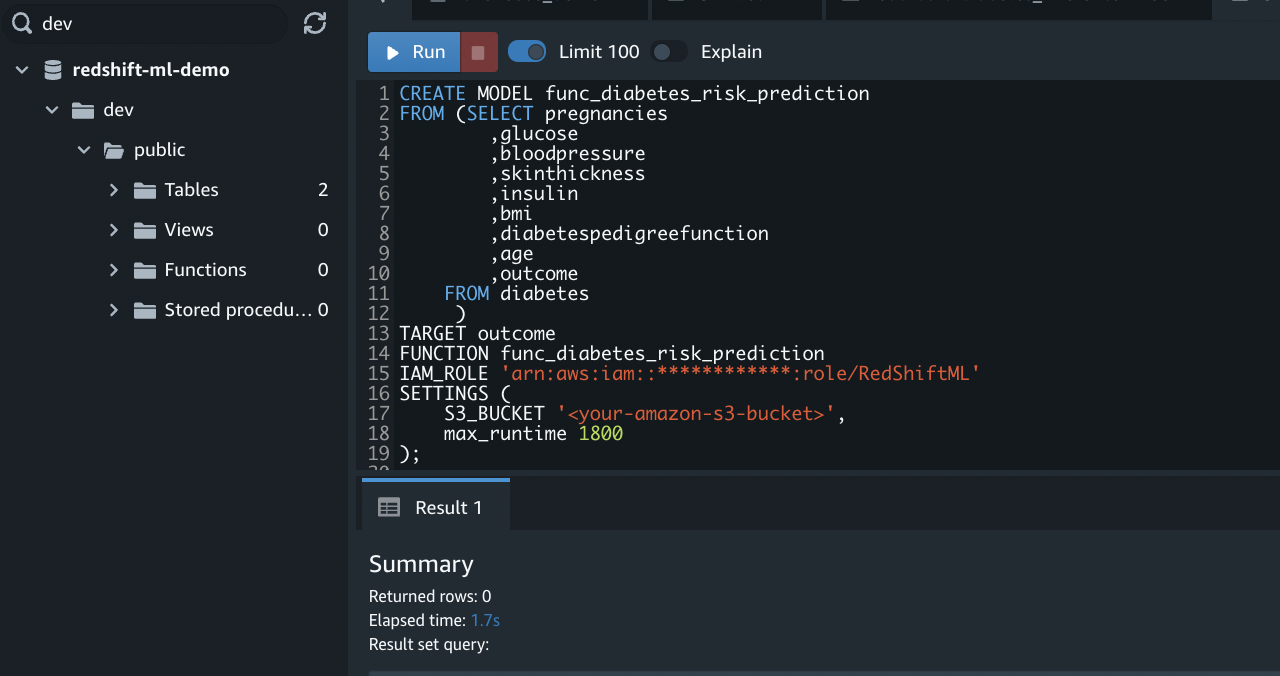
Figure 6 – Output of CREATE MODEL command.
The SELECT query selects all of the input features and creates the training data. The columns are input features except for the outcome column that acts as our class label. The TARGET statement specifies the column to use as a prediction target.
The CREATE MODEL takes in all the input features specified in the SELECT query and tries to learn the TARGET, the “outcome” column.
Amazon Redshift uses Amazon SageMaker Autopilot to start training immediately and fine-tune the best model for the specified binary classification problem. To check the model training status, run the following command:
We can get more details about the model such as accuracy, F1 score, and other performance metrics using the following command:
If the model is still training, the Model State field shows TRAINING, as shown in the following output.

Figure 7 – Model State shows “TRAINING” in the output of the SHOW MODEL command.
When the training finishes and the model is ready, the Model State field changes to READY, as shown in the following output.

Figure 8 – The Model State shows “READY” in the output of the SHOW MODEL command.
Model Accuracy and Prediction
When your model is ready, you can make it available as a SQL function, func_diabetes_risk_prediction. You can use the same function to predict and test the accuracy of the model using the test data loaded in the diabetes_inference table.
To test the model accuracy, run the following query.
This code compares the predicted result to the actual outcome in the diabetes_inference table and reports the accuracy of the results.
We can see our accuracy is about 65%. We can also check to see how many diabetes cases we have using the same function.
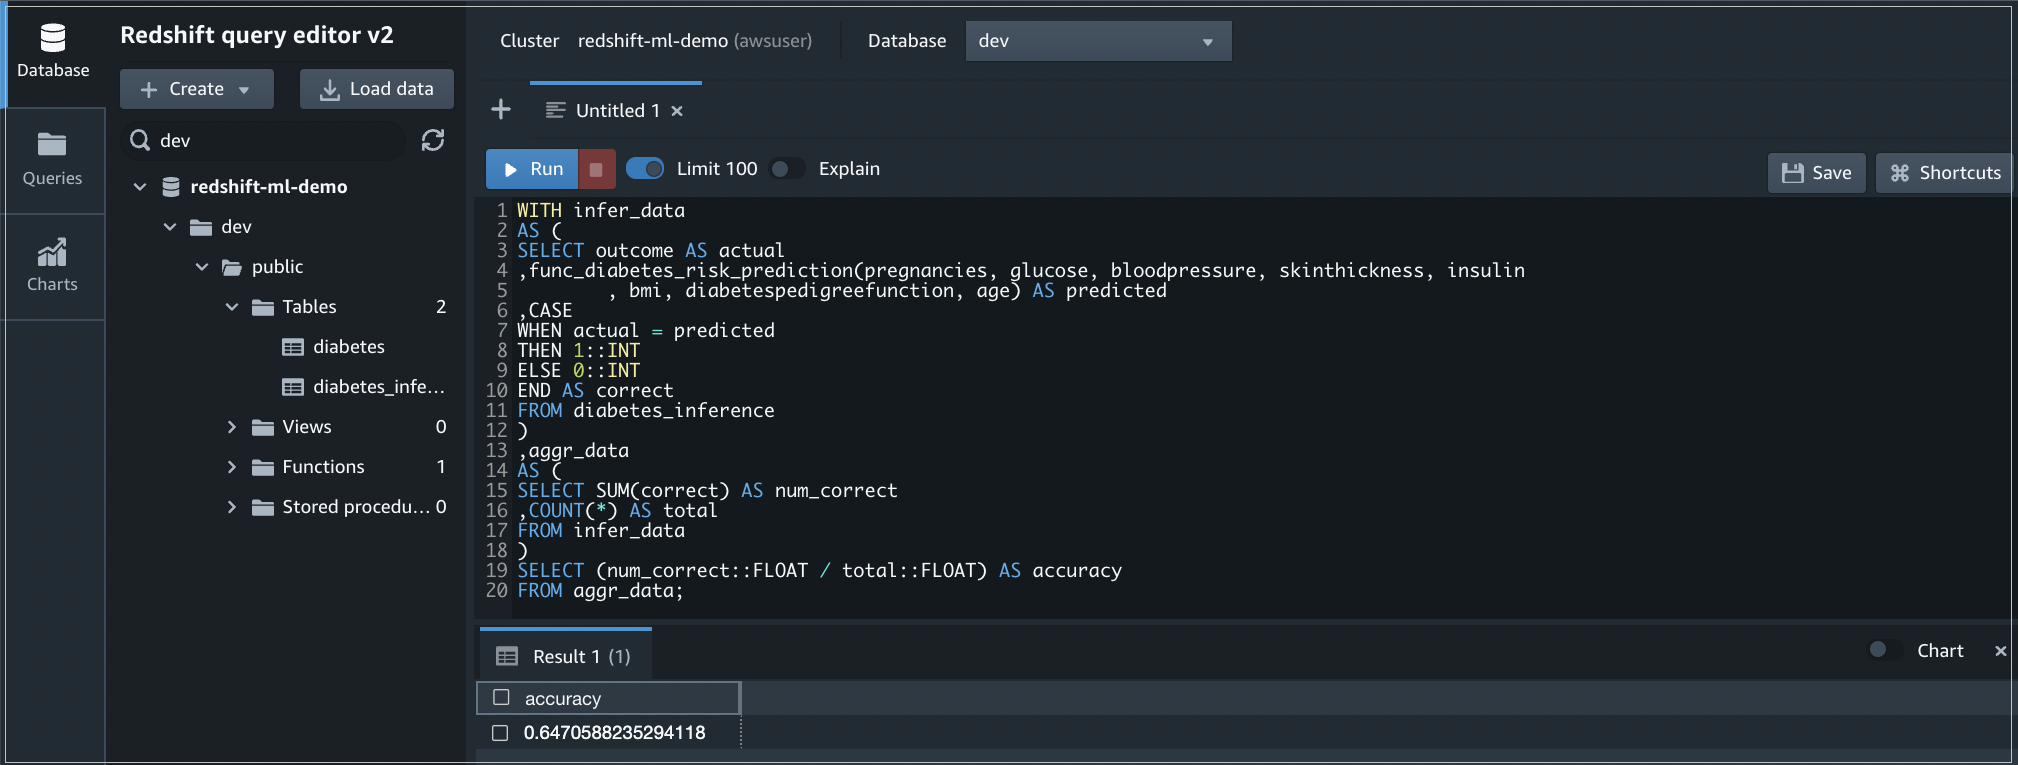
Figure 9 – Output of the query that checks the accuracy of the model.
To predict diabetes cases for the test data copied into the table diabetes_inference using the machine learning SQL function func_diabetes_risk_prediction, run the following query.
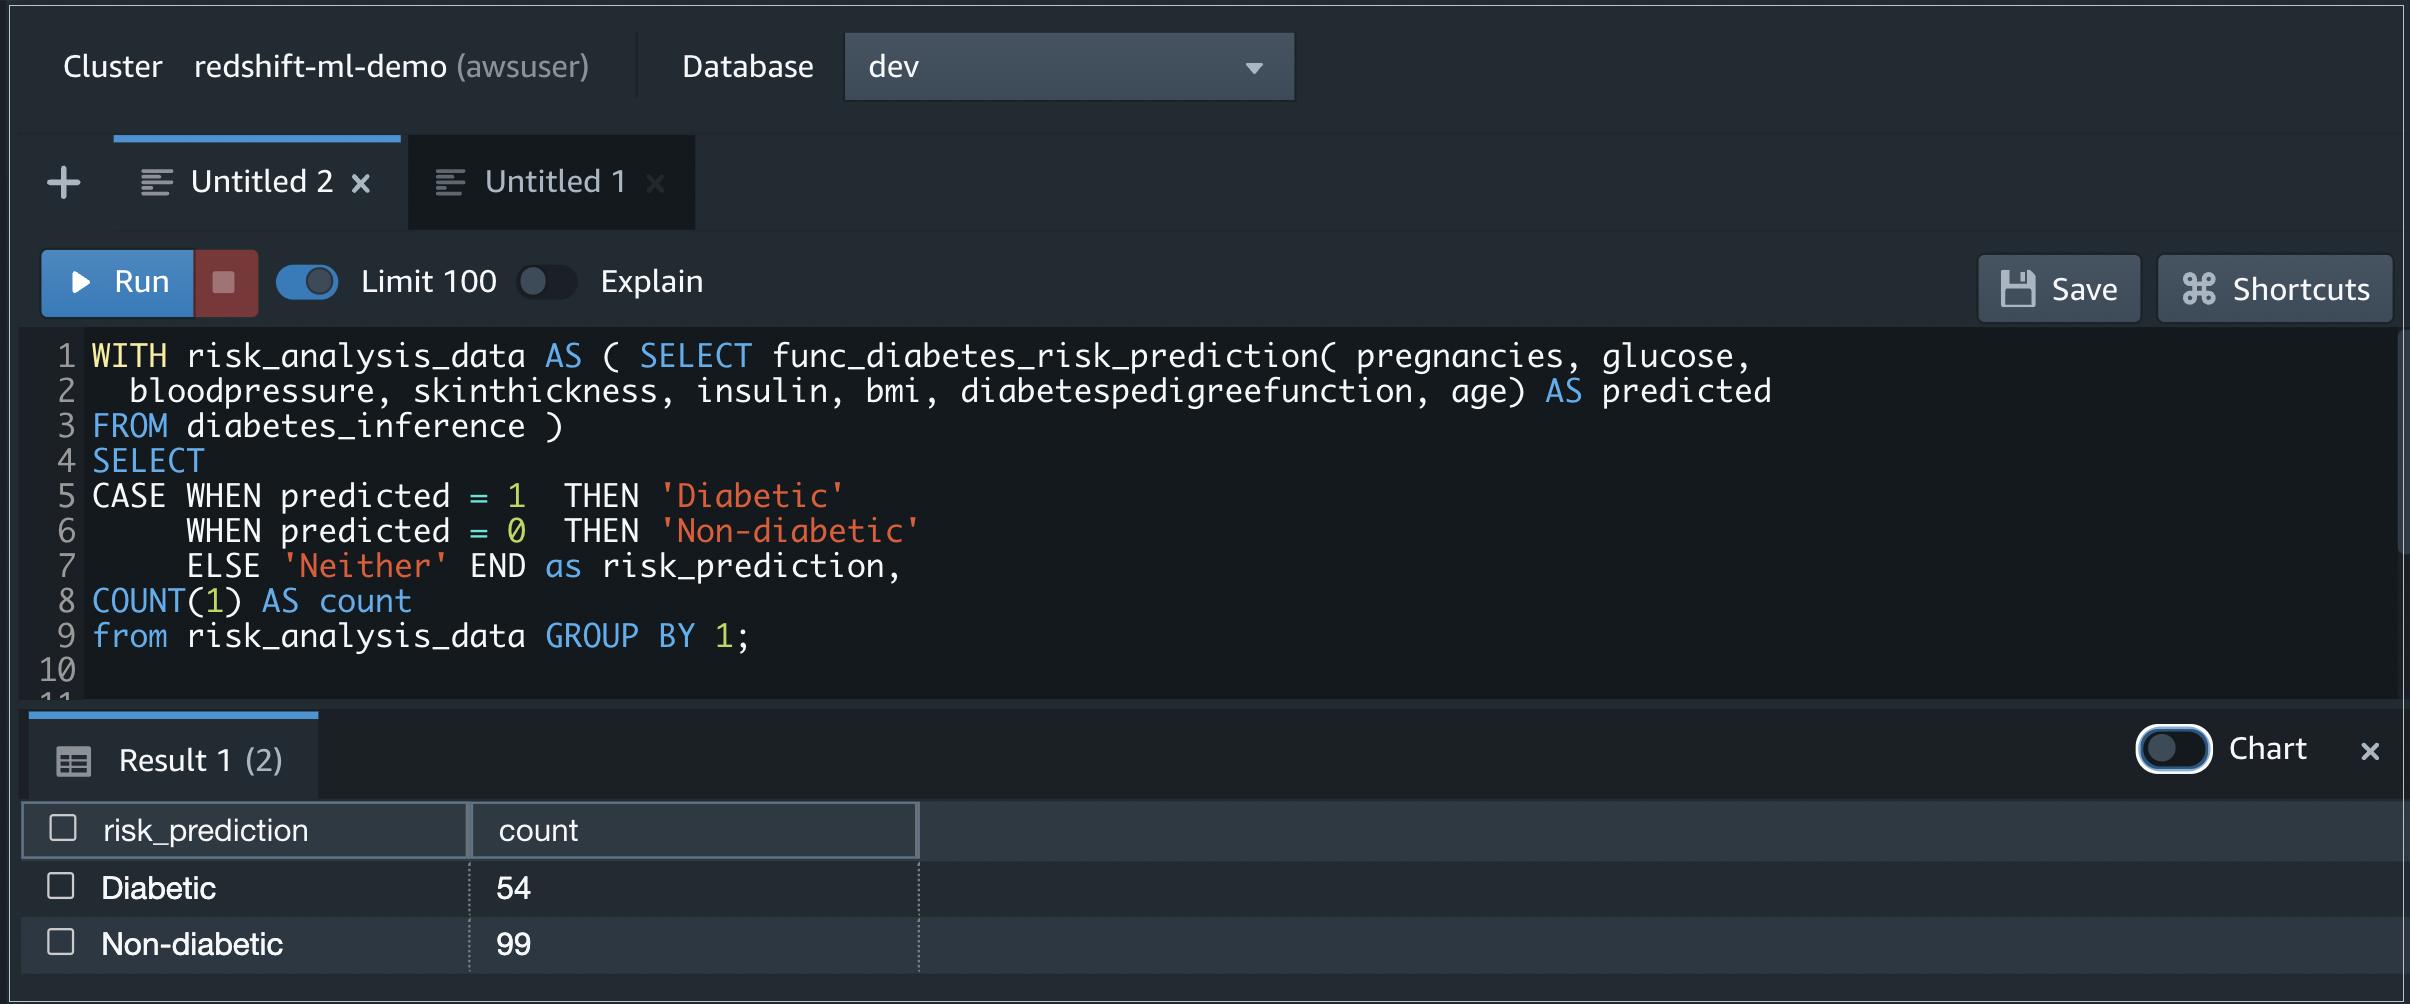
Figure 10 – Output of the query that predicts diabetes cases using the Redshift ML function.
You can also visualize the query output from the Query Editor.
To create a visual chart for the query output, select Chart then define the X and Y axes.

Figure 11 – Bar chart for the previous query output from Query Editor.
Conclusion
AWS makes it easy to manage huge amounts of data while gaining meaningful insights. Amazon Redshift ML enables users to bring machine learning to the data, powering fast, informed decision-making. Users with minimal ML expertise can still take advantage of these services and leverage ML to support their business.
If you’re new to cloud or machine learning, the journey can be daunting and risky. Mission Cloud Services is an AWS Premier Consulting Partner and managed cloud services provider that can help you every step of the way.
Whether you’re considering building data infrastructure, improving existing architecture, transforming your data storage, or optimizing resources and improving ROI, Mission’s in-house expertise helps make your data journey successful.
.

.
Mission Cloud Services – AWS Partner Spotlight
Mission Cloud Services is an AWS Premier Consulting Partner that accelerates enterprise cloud transformation by delivering a differentiated suite of agile managed cloud services and consulting.
Contact Mission | Partner Overview
*Already worked with Mission? Rate the Partner
*To review an AWS Partner, you must be a customer that has worked with them directly on a project.