AWS Partner Network (APN) Blog
Sending Amazon Inspector’s Common Vulnerabilities and Exposures Findings to the ServiceNow SecOps Module
By Carlos Caro, Security Transformation Consultant – AWS
By Navya Somepalli, Security Transformation Consultant – AWS
By Amir Hashem, Security Consultant – AWS
 |
| ServiceNow |
 |
This post will show you how to send Amazon Inspector‘s Common Vulnerabilities and Exposures (CVE) findings to the ServiceNow Security Operations (SecOps) module.
At the time of this write-up, there is no native adaptor from Amazon Web Services (AWS) to the ServiceNow SecOps module and, as such, requires a custom integration.
We’ll demonstrate how to use ServiceNow’s native RESTful API to create a custom interface that an AWS Lambda function will leverage to send the CVE findings as they reach the AWS Security Hub service.
ServiceNow is an AWS Partner and leading provider of cloud-based services that automate enterprise IT operations.
Use Case
You may find yourself in a position where you’re a member of a vulnerability management team for your organization, and your organization uses ServiceNow as a centralized Customer Service Management (CSM) system.
You have the responsibility to send all AWS CVE findings to the ServiceNow SecOps module. As there is no native adaptor (at the time of this writing), you can leverage a custom ServiceNow RESTful API to complete the task.
Note that, conceptually, this solution could apply to any generic API to any system or CSM that needs to receive such info.
Scope and Assumptions
The scope of this post covers the interface to a “staging table” in ServiceNow SecOps that receives the CVE findings.
We assume your organization already has a ServiceNow Administrator that will collect these findings and generate the transformation map to move the findings to the Vulnerable Items table in the ServiceNow SecOps module.
Architecture Overview
Let’s look at the high-level architecture to understand the flow.

Figure 1 – CVE findings from Amazon Inspector to ServiceNow SecOps module via REST API.
- Amazon Inspector sends all of the CVE findings it generates to AWS Security Hub.
- AWS Security Hub findings generate events of all Amazon Inspector findings and automatically sends them to Amazon EventBridge.
- An event rule captures all CVE findings events and forwards those events to a target Lambda function.
- Before Lambda can call the custom ServiceNow API, it must collect the secrets from AWS Secrets Manager needed to authenticate with ServiceNow.
- The Lambda function uses the Secrets for ServiceNow endpoint and invokes a RESTful API that sends the information such as Amazon Elastic Compute Cloud (Amazon EC2) instance ID, corresponding CVE IDs, CVSS score, and remediation text to the ServiceNow custom CVE staging table.
- As an optional step, we added an Amazon DynamoDB table to capture any fallouts in the RESTful API, such as invalid credentials or issues reaching ServiceNow. The fallouts details include the ServiceNow API error message, event information, and payload that failed to send. An example would be a 401 error where the secret credentials are no longer valid and need ServiceNow Administrator attention.
In this post, we include the AWS CloudFormation template that will create all of the automation for you except the RESTful API in ServiceNow, which we’ll help with some guidance on the following steps.
Create the ServiceNow Custom API
You’ll need to work with your ServiceNow administrator to grant you the proper system credentials for your organization’s ServiceNow instance. Alternatively, you can request a personal developer instance from ServiceNow to perform end-to-end testing.
ServiceNow Developer Instance to Get By if You Are Learning
A prerequisite to this next step is to have a ServiceNow instance for your development. However, if you follow along and need a test instance with the proper credentials to test the steps on this post, ServiceNow allows you to request a personal developer instance that will give you complete control.
You can register for a developer instance of ServiceNow.
Note that if using a new ServiceNow developer instance, ServiceNow will generate a username and password with admin privileges that lets you test this proof of concept (PoC) and continue with the steps (screenshot for this demo purposes only).
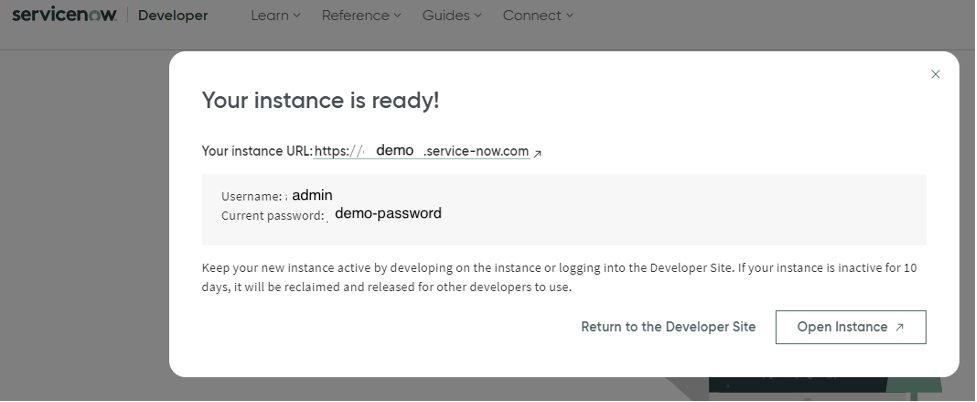
Figure 2 – ServiceNow developer instance with URL and credentials.
If you don’t have the Security Operations application already installed, you can install it from the ServiceNow Store. However, to continue you can still proceed on your developer instance with the API exercise.
Just be aware you will not see a vulnerability response application without the Security Operations module install and default to Global.
Create the RESTful API
To create the ServiceNow RESTful API, go to the ServiceNow console, filter for “System Web Services,” and select Create New.

Figure 3 – ServiceNow‘s Create Web Service form.
The Application field will likely default to Global. To reach the Vulnerable Items table as your target table, you’ll need to change the Application value to Vulnerability Response, and then you will see Vulnerable Items in your Target Table dropdown.
If you see Global, select System Settings > Developer, and then change Application to Vulnerability Response.

Figure 4 – ServiceNow System Settings with Vulnerability Response selected.
To create the staging table, we’ll start with at least three fields for this post. However, you can enter as many as you’d like (all Amazon Inspector finding fields).
In our case, we’re only interested in instance ID, CVE ID, and CVSS2 score for that CVE. We’re also unchecking the Create Transform Map box. That step requires your ServiceNow System Admin to customize how the values captured in the staging table will be mapped to the Vulnerable Items table for this demo.
Note that for this demo to work, enter the below fields and ensure the system-generated auto fields match accordingly. The Lambda Python deployed is looking for the following fields:
- CVE ID becomes u_cve_id
- CVSS2 score becomes u_cvss2_score
- Instance ID becomes u_instance_id

Figure 5 – ServiceNow form showing Web Service Fields populated.
After you choose Create, you now see AWS CVE Findings and Explore Rest API on the lower form on the screenshot below. Select Explore Rest API.

Figure 6 – ServiceNow form with a focus on Explore REST API link.
Rest API View
After you select Explore Rest API, ServiceNow’s Rest API Explorer page will open up and provide you with an interface to explore the API with the required headers and code examples, as well as the API name. The naming convention of the API, per ServiceNow, is as follows:

Figure 7 – ServiceNow‘s REST API Explorer form.
The staging table API will be in the format below:
POST https://demo.service-now.com/api/now/import/{stagingTableName}
Taking the name of our table, the API would translate to:
https://demo.service-now.com/api/now/import/u_aws_cve_findings
We now have three required parameters to proceed to the next steps:
- ServiceNow API
- Username
- Password
Prerequisites
The following resources must be set up before you can implement this solution:
- An Amazon Simple Storage Service (Amazon S3) bucket for storage of the Lambda source code for the solution.
- Download the Lambda function zip and upload it to the S3 bucket used for Lambda code storage.
AWS CloudFormation Steps
To deploy the solution, follow the steps below:
- To launch the AWS CloudFormation console with the prepopulated template, select the following Launch Stack button:
.
 .
. - In the CloudFormation console, you are presented with the template parameters before you deploy the stack. You can customize these parameters or keep the defaults:
- Secret Name: This secret is to store credentials for ServiceNow integration.
- Secret Description: Provide a description for your secret or use the default.
- S3 Bucket: Provide the name of the S3 bucket used for Lambda function storage.
- S3 Key: Provide the zip folder name of the Lambda function.
- Function Name: This Lambda function will send Amazon Inspector’s findings to the ServiceNow staging table.
- Event Name: This event triggers the Lambda function whenever AWS Security Hub receives an event from Amazon Inspector.
- DynamoDB Table Name: This DynamoDB table captures any fallout events that might not make it to ServiceNow.
.
- Go to the AWS Secrets Manager console and find the secret created by CloudFormation. Select the secret name, scroll down to retrieve the secret value, and then update the secret with your ServiceNow instance credentials.
On successful CloudFormation deployment, you’ll have a solution that enables the required services and policies for Lambda, AWS Secrets Manager, and AWS EventBridge to work together.
Setting up Environment Configuration for Amazon Inspector
Task 1: Install the Amazon Inspector Agent
- You must have at least one Amazon EC2 instance running in your AWS environment to run an Amazon Inspector assessment. For information about launching EC2 instances, see the Amazon EC2 documentation.
- For this demo setup, tag the EC2 instance using the key of SecurityScan and a value of True.
In most cases, the Amazon Inspector agent must be running on each EC2 instance in your assessment target. For information about installing an agent, see Installing Amazon Inspector agents.
Alternatively, you can use Systems Manager Run Command to install the agent on your EC2 instances. For more information about Amazon Inspector agents, see Amazon Inspector agents.
Task 2: Set Up Amazon Inspector
- In the AWS console, select Services and then select Inspector.
- On the Amazon Inspector landing page, select Get started.
You’ll create an assessment that runs on tagged instances created in previous steps:
- Select Advanced setup.
- On the Define an assessment target page, configure the following:
- Name: Assessment-Target-Tagged-Instances
- Uncheck All Instances
- Tags: Add key SecurityScan with the value True
- Uncheck Install Agents
- Select Next to continue.
You have now created the assessment target. Next, create an assessment template that defines the parameters of the scan:
- On the Define an assessment template page, configure the following:
- Name: Assessment-CommonVulnerabilities-Exposures
- Rules packages: Only include Common Vulnerabilities and Exposures-1.1
- Duration: 15 minutes
- Uncheck Assessment Schedule
- For this demo, you will run an on-demand assessment to see what information Amazon Inspector provides.
- Choose Next to review the assessment settings.
- Review the settings and verify they are correct. Choose Create to create and run the assessment.
- In the left navigation pane, select Assessment targets.
On this page, there’s an assessment target named Assessment-Target-Tagged-Instances.
- Select the ▶ icon to expand the details of the target group.
The details of the scan should match the settings you chose in the previous steps. To make adjustments to the target group settings, choose Edit.
- Select Preview Target to see a list of instances that are assessment targets. You should see your EC2 instance created in the previous step, listed as HEALTHY.
- Choose OK.
- In the left navigation pane, choose Assessment templates.
On this page, there’s an assessment template named Assessment-CommonVulnerabilities-Exposures. The information provided gives a quick overview of the assessment template. Notice that the Last run is currently Collecting data. The page will update to Analyzing and Analysis complete as the scan finishes.
- Check the box for the Assessment-CommonVulnerabilities-Exposures assessment template.
- Select the ▶ icon to expand the details of the assessment template.
Task 3: Review the Scan Results
- The right side of the Amazon Inspector dashboard lists the most recent assessment scan runs. Select the assessment name to open the scan details.
- Select the ▶ icon to show the details of the scan. Notice the rules packages and duration match the settings you defined previously.
- When the assessment is finished, the status displays Analysis complete. Wait until the assessment is finished before continuing to the next task.
The assessment takes about 15 minutes to run. Refresh the page periodically until the assessment is finished.
- For this demo, you’ll review the findings in the console. Select Close to exit the assessment report window.
- In the left navigation menu, select Findings. A list of the findings displays.
You can confirm that all CVE findings have populated the ServiceNow staging table, as shown in the following figure. To view contents of the ServiceNow staging table for your API, enter <yourAPIName>.list under search (for example, u_aws_cve_findings.list).
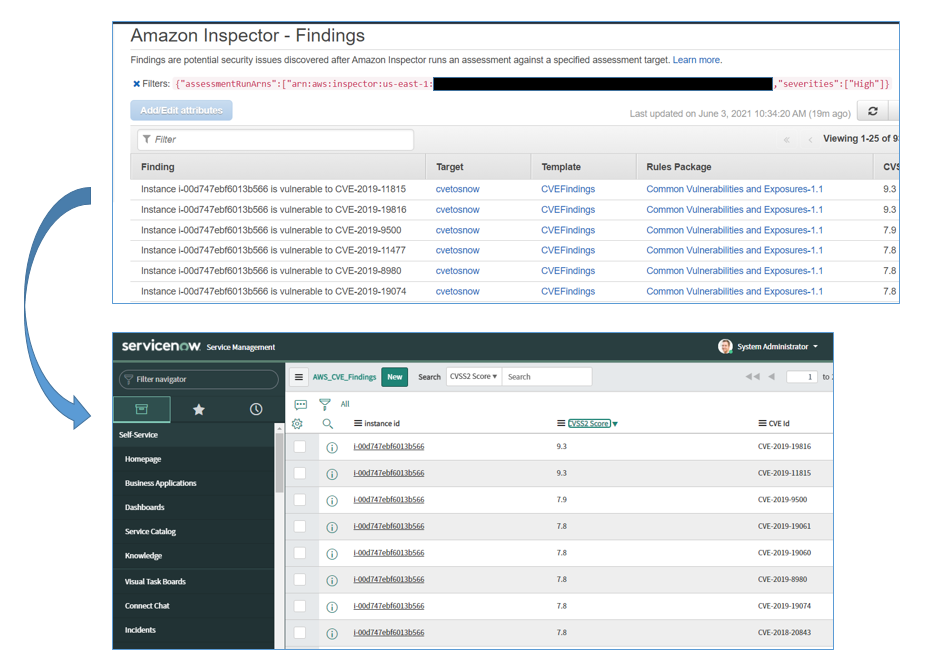
Figure 8 – Amazon Inspector findings matching ServiceNow staging table.
Conclusion
In this post, you learned how to send CVE findings from Amazon Inspector to the ServiceNow staging table, which will feed to the ServiceNow SecOps module. You also have an Amazon DynamoDB table to capture errors during transmission, such as invalid credentials.
.

.
ServiceNow – AWS Partner Spotlight
ServiceNow is an AWS Partner and leading provider of cloud-based services that automate enterprise IT operations.
Contact ServiceNow | Partner Overview
*Already worked with ServiceNow? Rate the Partner
*To review an AWS Partner, you must be a customer that has worked with them directly on a project.