AWS Partner Network (APN) Blog
Using AWS PrivateLink for Amazon S3 for Private Connectivity Between Snowflake and Amazon S3
By Maxwell Moon, Sr. Solutions Architect – AWS
By Bosco Albuquerque, Sr. Partner Solutions Architect – AWS
 |
| Snowflake |
 |
Amazon Web Services (AWS) customers running on-premises workloads that leverage Amazon Simple Storage Service (Amazon S3) previously needed to set up proxies running on Amazon Elastic Compute Cloud (Amazon EC2) to access S3 gateway endpoints.
This creates additional complexity for operations and considerations for bandwidth to S3, which becomes more complex when adding another service that support AWS PrivateLink for Amazon S3 such as Snowflake.
With AWS PrivateLink for Amazon S3, you can provision interface VPC endpoints (interface endpoints) in your virtual private cloud (VPC).
These endpoints are directly accessible from applications that are on-premises over virtual private network (VPN) and AWS Direct Connect, or in a different AWS region over VPC peering.
You can use AWS PrivateLink for Amazon S3 to connect to a software-as-a-service (SaaS) provider such as Snowflake, which allows users to ingest data from their own S3 buckets into Snowflake-managed S3 buckets.
In this post, you’ll learn how to set up AWS PrivateLink for Amazon S3 using Snowflake-provided S3 PrivateLink endpoints. We’ll walk through verifying connectivity over AWS PrivateLink to Snowflake’s staging buckets via an Amazon EC2 instance.
Snowflake is an AWS Partner with the Data and Analytics Competency and AWS PrivateLink Service Ready designation. Snowflake has reinvented the data warehouse, building a new enterprise-class SQL data warehouse designed from the ground up for the cloud and today’s data.
Solution Overview
Previously, VPC endpoints only supported gateway endpoints for Amazon S3. This works well for workloads already operating on AWS, but for workloads operating on-premises a set of proxy EC2 instances needed to be set up to allow for connectivity between the data center and S3 using gateway endpoints.
Interface endpoints use private IP addresses within your VPC to access Amazon S3. This allows workloads operating on-premises or connected by either AWS Direct Connect or AWS Site-to-Site VPN to connect to S3 without the need for proxy servers.
The architecture demonstrated in this post should only be used in test VPCs and VPCs that are used to connect resources running on-premises to AWS. It requires making changes to domain name system (DNS) that may impact your ability to connect to other S3 buckets in the same AWS region.

Figure 1 – On-premises workloads connecting to AWS using Direct Connect or AWS VPN can leverage AWS PrivateLink for S3 to connect to Snowflake.
If you’re interested in learning more about using AWS PrivateLink for Amazon S3 with resources in your VPC, examples are provided in the S3 documentation for the AWS Command Line Interface (CLI) and software development kits (SDKs).
Prerequisites
To complete this solution, you need the following:
- AWS account
- Snowflake account
- Snowflake database and table
- Snowflake warehouse
- Sufficient AWS Identity and Access Management (IAM) privileges to create VPC endpoints, route tables, security groups, and Amazon Route 53 hosted zones and resource record sets
Walkthrough
We’ll start in Snowflake to retrieve the Amazon S3 URL for the Snowflake stage. Once this step is complete, all other steps will be performed on AWS.
This post assumes you have the permissions required on AWS to create VPC endpoints and Amazon Route 53 private hosted zones, as well as EC2 instances for testing connectivity.
Retrieve the Configuration for the S3 Stage in Snowflake
First, retrieve the S3 URL that will be used when creating the VPC endpoint that will use AWS PrivateLink for Amazon S3.
From Snowflake, execute the following select statement:
select key, value from table(flatten(input=>parse_json(system$get_privatelink_config())));
This command will output a table containing several rows. Retrieve the value for privatelink-internal-stage. This value is required later when creating the Amazon Route 53 internal hosted zone. Copy it and paste it in the text editor of your choice temporarily.
Create a VPC Endpoint for AWS PrivateLink for Amazon S3
Next, we’ll set up the VPC endpoint that will allow us to use AWS PrivateLink for Amazon S3 to connect to Snowflake stages.
Navigate to the VPC Menu in the AWS Management Console, and then select Endpoints from the left panel.
Select Create Endpoint in the top left corner, leave the radio icon for AWS Services selected for Service category, and then search for S3 in the Service name field.
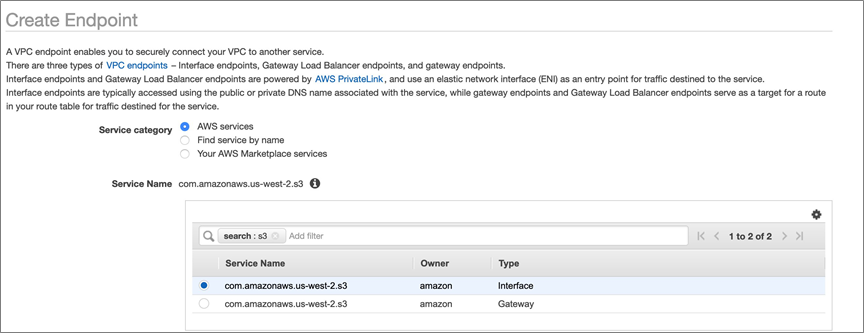
Figure 2 – Options for S3 endpoints; for PrivateLink select the Interface type.
Next, from the VPC drop-down, select the VPC in which the endpoint will be deployed. After selecting the VPC, a series of dropdowns for Subnets will be automatically populated per AWS Availability Zone in the region (in us-west-2, for example, there are four AZs so there are four drop-downs).
Select the subnets in which you would like the endpoint to be available.

Figure 3 – Associating subnets from a VPC with the PrivateLink endpoint.
For security group, create a new security group that will allow access to the endpoint. Select create a new security group, which will automatically redirect you in a new tab to the Security Groups menu in the AWS console.
Select create security group in the upper right corner, and give your security group a name and description that you’ll remember; for example, s3-privatelink-interface-endpoint.
For now, don’t create any inbound rules and leave the default outbound rules.

Figure 4 – Creating a new security group for the PrivateLink for S3 endpoint.
Select the create security group button in the lower right corner. You’ll be automatically redirected to the details menu for the security group. Copy the value for Security group ID.
Switch back to the tab where you are creating the VPC endpoint and paste the value of Security group ID in the input field of the Security group section. Once the search results populate, select the security group by clicking the box on the left side of the row. Be sure to remove any security groups that were added automatically, if present (such as the default security group).
Leave the policy section as-is for full access.
An optional step is to select Add Tag to add tags, if required by your organization for asset tracking or cost attribution. We won’t be adding tags in this post.
Next, select the Create endpoint button in the bottom right. Once created, take note of the VPC endpoint ID, which will be displayed in a green box stating the VPC endpoint was created successfully, and then select close.
Create an Amazon Route 53 Private Hosted Zone
In this section, we’ll cover the steps required to resolve DNS to the Snowflake internal stage S3 bucket. This requires the use of Amazon Route 53 private hosted zones to create a CNAME record for the S3 URL for host value of the stage that points to our newly-created VPC endpoint.
Navigate to the Amazon Route 53 console and select Hosted zones from the left panel. Choose Create hosted zone, and in the domain name input enter s3.<region>.amazonaws.com. In this post, we are deploying the solution in us -west-2, so we enter s3.us-west-2.amazonaws.com.
Select the radio icon for Private hosted zone.

Figure 5 – Creating a private hosted zone in Amazon Route 53.
In the VPCs to associate with the hosted zone section, select the region and VPC in which the VPC endpoint was created. For example, us-west-2, and vpc-xxxxxxxxxxx.
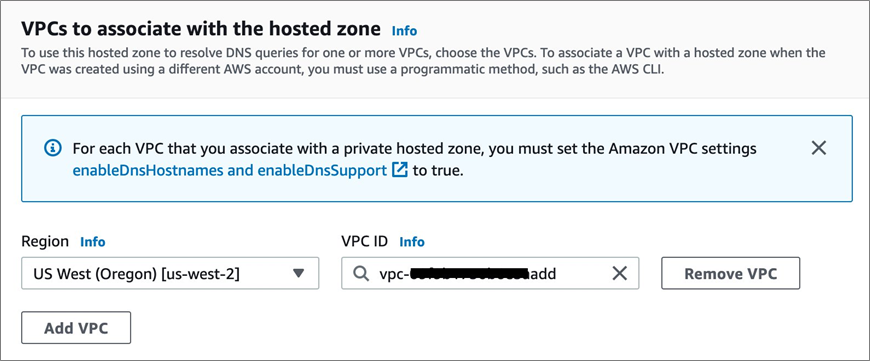
Figure 6 – Associating a VPC with a private hosted zone.
An optional step here is to select Add Tag to add tags, if required by your organization for asset tracking or cost attribution.
Select the Create hosted zone button in the bottom right.
Next, we’ll create a CNAME record in the private hosted zone that will point the URL for host value of the Snowflake stage S3 bucket to the VPC Endpoint created above.
Select the private hosted zone you just created from the list of hosted zones. Click the Create record button in the records section.
For the Record name, use the value preceding the first period in the host value for the Snowflake stage which should start with sfc and end with customers-stage.
For the Record type, select CNAME from the drop-down.
For the Value, retrieve the DNS record from the VPC endpoint for the region (it does not a have zonal letter as the suffix). This should be the topmost value in the DNS names section of the VPC endpoint (such as *.vpce-xxxxxxxx-xxxxxxxx.s3.us-west-2.vpce.amazonaws.com).
Replace the asterisk in the DNS name for the VPC endpoint with the name of the S3 bucket in the host value for the Snowflake stage. This will reduce the potential impact of accessing other S3 buckets, outside of the Snowflake stage.

Figure 7 – Creating a DNS record for AWS PrivateLink for Amazon S3 endpoint.
Finally, select the Create records button in the bottom right.
Verify Private Connectivity to the Snowflake Stage
In this section, we’ll cover testing private connectivity to the Snowflake internal stage. This requires you to spin up an EC2 instance in the VPC in which the VPC endpoint to S3 was created.
Once created, we’ll access get shell access to the EC2 instance using AWS Systems Manager Session Manager.
First, we’ll create an IAM role that allows us to connect to the EC2 instance via AWS Systems Manager Session Manager.
Navigate to the IAM menu in the AWS console, select Roles from the left panel, and then select Create role. Leave the box for AWS Service selected as the trusted entity, select EC2 in the common use cases section, and then select Next: Permissions in the bottom right corner.

Figure 8 – Create role page showing EC2 selected for trusted entity.
Next, search for AmazonSSMManagedInstanceCore in Filter policies. This is an AWS managed policy that allows an instance to use AWS Systems Manager service core functionality, including connecting to the instance using Session Manager. For more information, see Create an IAM instance profile for Systems Manager.
Select Next: Tags. Optionally, you can apply tags and select Next: Review.
Give the role a name you will remember. For example, snowflake-s3-privatelink-ssm-role. Then, click Create role in the bottom right corner.
Next, we’ll launch an Amazon EC2 instance in the same VPC as the VPC endpoint. To get started, navigate to the EC2 menu in the AWS console and select Launch instances in the top right corner.
Choose Select for the latest Amazon Linux 2 AMI. It should be the top-most result. Then, choose the t2.micro instance type, which is free tier eligible, and select Next: Configure Instance Details.
In the Configure Instance Details menu, select a VPC and subnet in which there is a VPC endpoint for S3 PrivateLink from the Network and Subnet drop-downs. Then, select the IAM role snowflake-s3-privatelink-ssm-role from the IAM role drop-down.
Select Next: Add storage, leave the default 8GiB GP2 volume configuration, and then select Next: Add Tags.
Select Add Tag using Name as the Key and snowflake-s3-privatelink-connectivity-test as the value. Click on Next: Configure Security Group.
Leave the radio icon for Create a new security group selected. Enter a name and description you will remember; for example, snowflake-s3-privatelink-connectivity-test-sg.
Remove the default SSH rule, since we’ll use AWS Systems Manager Session Manager to connect to the instance. We need no other ingress rules for this test.

Figure 9 – Creating a new security group.
Select Review and Launch to review the configuration, and then select Launch.
When prompted to select an existing key pair or create a new key pair, select proceed without a key pair from the drop-down. You don’t need a key pair for the instance when using AWS Systems Manager Session Manager to connect.
Select the checkbox acknowledging that without a key pair you will only be able to connect to this instance by using EC2 instance connect.
Click on Launch instances and you’ll be redirected to a success screen that shows the instance ID of the instance. Select the instance ID, which will take you to the EC2 menu.

Figure 10 – Amazon EC2 console with running EC2 instance.
Next, we need to modify the security group for the S3 interface endpoint to allow for traffic over HTTPS from the security group assigned to the EC2 instance.
Navigate to the Security Group menu in the AWS console, and select the security group you created for the S3 interface endpoint. Add an inbound rule for HTTPS from the security group that was created for the EC2 instances, and then save the changes.
Now, we’ll connect to the EC2 instance using AWS Systems Manager Session manager to test connectivity to Snowflake over AWS PrivateLink for Amazon S3.
If you’re following the steps, you will already be in the EC2 menu with the newly-launched EC2 instance selected. If not, navigate to the EC2 menu in the AWS console.
Select Connect from top menu. You’ll be navigated to a page that outlines Session Manager usage, and select the connect button in the bottom right.

Figure 11 – Options to connect to an EC2 instance.
Click on Connect, which opens a new tab in your browser that allows shell access to the EC2 instance.
Finally, we’ll test connectivity to the instance. We will run dig for the S3 URL for the internal stage to ensure it returns private IP address for the VPC endpoint, rather than a public IP address.
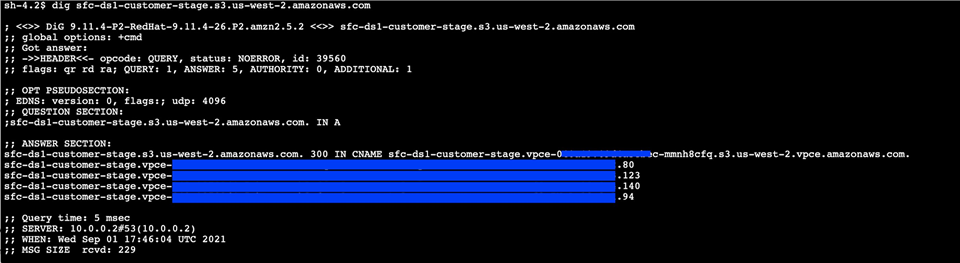
Figure 12 – DNS answers for Snowflake internal stage S3 bucket.
Cleaning Up
If your work with AWS PrivateLink for Amazon S3 and Snowflake is complete, shut down the resources created in this post to avoid incurring additional fees:
- Amazon Route 53 internal hosted zone and CNAME record.
- Interface VPC endpoint for S3.
- EC2 instance that was launched for the connectivity test.
- IAM role that was created for EC2 instance.
Conclusion
In this post, we showed you how to use AWS PrivateLink for Amazon S3 to establish private connectivity between resources in your AWS account and a Snowflake internal stage. We ran a test to show connectivity to the stage over the AWS network from an Amazon EC2 instance in a virtual private cloud (VPC).
This architecture ensures that data loading and data unloading from your account or on-premises infrastructure to Snowflake internal stages uses the AWS internal network and does not take place over the public internet.
After you set up these resources, you can further extend your use of VPC endpoints using gateway endpoints for S3 for workloads operating in your VPC. You can also extend your use of AWS PrivateLink and Snowflake with other services such as Amazon QuickSight or Amazon SageMaker.
To use AWS PrivateLink for Amazon S3 with resources inside of your VPC, you can configure your SDK client to use the VPC endpoint URL that’s provided when the endpoint is created.
Learn more about AWS PrivateLink for Amazon S3 in the AWS documentation.
.

.
Snowflake – AWS Partner Spotlight
Snowflake is an AWS Competency Partner that has reinvented the data warehouse, building a new enterprise-class SQL data warehouse designed from the ground up for the cloud and today’s data.
Contact Snowflake | Partner Overview | AWS Marketplace
*Already worked with Snowflake? Rate the Partner
*To review an AWS Partner, you must be a customer that has worked with them directly on a project.