AWS Big Data Blog
Use a linear learner algorithm in Amazon Redshift ML to solve regression and classification problems
July 2024: This post was reviewed and updated for accuracy.
Amazon Redshift is a fast, petabyte-scale cloud data warehouse delivering the best price–performance. Tens of thousands of customers use Amazon Redshift to process exabytes of data every day to power their analytics workloads. Amazon Redshift ML, powered by Amazon SageMaker, makes it easy for SQL users such as data analysts, data scientists, and database developers to create, train, and deploy machine learning (ML) models using familiar SQL commands and then use these models to make predictions on new data for use cases such as churn prediction, customer lifetime value prediction, and product recommendations. Redshift ML makes the model available as a SQL function within the Amazon Redshift data warehouse so you can easily use it in queries and reports. Customers across all verticals are using Redshift ML to derive better insights from their data. For example, Jobcase uses Redshift ML to recommend job search at scale. Magellan RX Management uses Redshift ML to predict drug therapeutic use conditions.
Amazon Redshift supports supervised learning, including regression, binary classification, multi-class classification, and unsupervised learning using K-Means. You can optionally specify XGBoost, MLP, and now linear learner model types, which are supervised learning algorithms used for solving either classification or regression problems, and provide a significant increase in speed over traditional hyperparameter optimization techniques. Amazon Redshift also supports bring-your-own-model to invoke remote SageMaker endpoints.
In this post, we show you how to use Redshift ML to solve regression and classification problems using the SageMaker linear learner algorithm, which explores different training objectives and chooses the best solution from a validation set.
Solution overview
We first solve a linear regression problem, followed by a multi-class classification problem.
The following table shows some common use cases and algorithms used.
| Use Case | Algorithm / Problem Type |
| Customer churn prediction | Classification |
| Predict if a sales lead will close | Classification |
| Fraud detection | Classification |
| Price and revenue prediction | Linear regression |
| Customer lifetime value prediction | Linear regression |
To use the linear learner algorithm, you need to provide inputs or columns representing dimensional values and also the label or target, which is the value you’re trying to predict. The linear learner algorithm trains many models in parallel, and automatically determines the most optimized model.
Prerequisites
To get started, we need an Amazon Redshift cluster or an Amazon Redshift Serverless endpoint and an AWS Identity and Access Management (IAM) role attached that provides access to SageMaker and permissions to an Amazon Simple Storage Service (Amazon S3) bucket.
For an introduction to Redshift ML and instructions on setting it up, see Create, train, and deploy machine learning models in Amazon Redshift using SQL with Amazon Redshift ML.
To create a simple cluster with a default IAM role, see Use the default IAM role in Amazon Redshift to simplify accessing other AWS services.
Use case 1: Linear regression
In this use case, we analyze the Abalone dataset and determine the relationship between the physical measurements and use that to determine the age of abalone. The age of abalone is determined by cutting the shell through the cone, staining it, and counting the number of rings through a microscope, which is a time-consuming task. We want to predict the age using different physical measurements, which is easier to measure. The age of abalone is (number of rings + 1.5) years.
Prepare the data
Load the Abalone dataset into Amazon Redshift using the following SQL. You can use the Amazon Redshift query editor v2 or your preferred SQL tool to run these commands.
To create the table, use the following commands:
To load data into Amazon Redshift, use the following COPY command:
To train the model, we use the abalone table and 80% of the data to train the model, and then test the accuracy of that model by seeing if it correctly predicts the age of ring label attribute on the remaining 20% of the data. Run the following command to create training and validation tables:
Create a model in Redshift ML
To create a model in Amazon Redshift, use the following command:
We define the following parameters in the CREATE MODEL statement:
- Problem type – We use the linear learner problem type, which is newly added to extend upon typical linear models by training many models in parallel, in a computationally efficient manner.
- Objective – We specified MSE (mean square error) as our objective, which is a common metric for evaluation of regression problems.
- Max runtime –This parameter denotes how long the model training can run. Specifying a larger value may help create a better tuned model. The default value for this parameter is 5400 (90 minutes). For this example, we set it to 15000.
The preceding statement takes a few seconds to complete. It initiates an Amazon SageMaker Autopilot process in the background to automatically build, train, and tune the best ML model for the input data. It then uses Amazon SageMaker Neo to deploy that model locally in the Amazon Redshift cluster or Amazon Redshift Serverless as a user-defined function (UDF). You can use the SHOW MODEL command in Amazon Redshift to track the progress of your model creation, which should be in the READY state within the max_runtime parameter you defined while creating the model.
To check the status of the model, use the following command:
The following is the tabular outcome for the preceding command after model training was done. It took approximately 120 minutes to train the model.
| Key | Value |
| Model Name | model_abalone_ring_prediction |
| Schema Name | public |
| Owner | awsuser |
| Creation Time | Tue, 10.05.2022 19:42:33 |
| Model State | READY |
| validation:mse | 4.082088 |
| Estimated Cost | 5.423719 |
| . | . |
| TRAINING DATA: | . |
| Query | SELECT SEX , LENGTH , DIAMETER , HEIGHT , WHOLE , SHUCKED , VISCERA , SHELL, RINGS AS TARGET_LABEL |
| . | FROM ABALONE_TRAINING |
| Target Column | TARGET_LABEL |
| . | . |
| PARAMETERS: | . |
| Model Type | linear_learner |
| Problem Type | Regression |
| Objective | MSE |
| AutoML Job Name | redshiftml-20220510194233380173 |
| Function Name | f_abalone_ring_prediction |
| Function Parameters | sex length diameter height whole shucked viscera shell |
| Function Parameter Types | bpchar float8 float8 float8 float8 float8 float8 float8 |
| IAM Role | default-aws-iam-role |
| S3 Bucket | poc-generic-bkt |
| Max Runtime | 15000 |
Model validation
We notice from the preceding table that the MSE for the training data is 4.08. Now let’s run the prediction query and validate the accuracy of the model on the testing and validation dataset:
The following is the outcome from the query:
| mse | rmse |
| 5.08 | 2.25 |
The MSE value from the preceding query results indicates that our model is accurate enough to the actual values from our validation dataset.
We can also observe that Redshift ML is able to identify the right combination of features to come up with a usable prediction model. We can further check the impact of each attribute and its contribution and weightage in the model selection using the following command:
The following is the outcome, where each attribute weightage is representative of its role in model decision-making:
Use case 2: Multi-class classification
For this use case, we use the Covertype dataset (copyright Jock A. Blackard and Colorado State University), which contains information collected by the US Geological Survey and the US Forest Service about wilderness areas in northern Colorado. This has been downloaded to an S3 bucket to make it simple to create the model. You may want to download the dataset description. This dataset contains various measurements such as elevation, distance to waters and roadways, as well as the wilderness area designation and the soil type. Our ML task is to create a model to predict the cover type for a given area.
Prepare the data
To prepare the data for this model, you need to create and populate the table public.covertype_data in Amazon Redshift using the Covertype dataset. You may use the following SQL in Amazon Redshift query editor v2 or your preferred SQL tool:
Now that our dataset is loaded, we run the following SQL statements to split the data into three sets for training (80%), validation (10%), and prediction (10%). Note that Redshift ML Autopilot automatically splits the data into training and validation, but by splitting it here, you’re able to verify the accuracy of your model.
To prepare the dataset, assign random values to split the data:
Use the following code for the training set:
Use the following code for the validation set:
Use the following code for the test set:
Now that we have our datasets, it’s time to create the model.
Create a model in Redshift ML using linear learner
Run the following SQL command to create your model—note our target is cover_type and we use all the inputs from our training set:
You can use the SHOW MODEL command to view the status of the model.
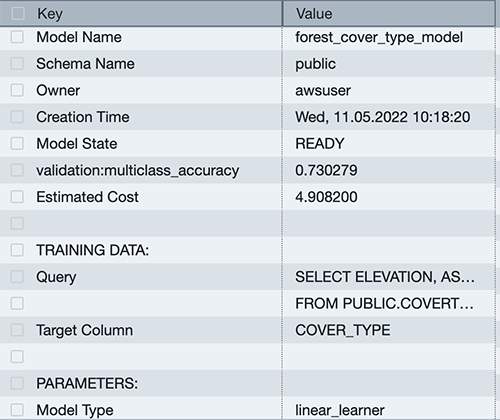
You can see that the model has an accuracy score of .730279 and is in the READY state. Now let’s run a query to do some validation of our own.
Model validation
Run the following SQL query against the validation table, using the function created by our model:
You can see that our accuracy is very close to our score from the SHOW MODEL output.

Run a prediction query
Let’s run a prediction query in Amazon Redshift ML using our function against our test dataset to see the most common class of cover type for the Neota Wilderness Area. We can denote this by checking wildnerness_area2 for a value of 1.
The dataset includes the following wilderness areas:
- Rawah Wilderness Area
- Neota Wilderness Area
- Comanche Peak Wilderness Area
- Cache la Poudre Wilderness Area
The cover types are in seven different classes:
- Spruce/Fir
- Lodgepole Pine
- Ponderosa Pine
- Cottonwood/Willow
- Aspen
- Douglas Fir
- Krummholz
There are also 40 different soil type definitions, which you can see in the dataset description, with a value of 0 or 1 to note if it’s applicable for a particular row. The following are a few example soil types:
- Cathedral family – Rock outcrop complex, extremely stony
- Vanet-Ratake families –Rocky outcrop complex, very stony
- Haploborolis family – Rock outcrop complex, rubbly
- Ratake family – Rock outcrop complex, rubbly
- Vanet family – Rock outcrop complex, rubbly
- Vanet-Wetmore families – Rock outcrop complex, stony

Our model has predicted that the majority of cover is Spruce and Fir.
You can experiment with various combinations, such as determining which soil types are most likely to occur in a predicted cover type.
Conclusion
Redshift ML makes it easy for users of all levels to create, train, and tune models using a SQL interface. In this post, we walked you through how to use the linear learner algorithm to create regression and multi-class classification models. You can then use those models to make predictions using simple SQL commands and gain valuable insights.
To learn more about RedShift ML, visit Amazon Redshift ML.
About the Authors
 Phil Bates is a Senior Analytics Specialist Solutions Architect at AWS with over 25 years of data warehouse experience.
 Sohaib Katariwala is an Analytics Specialist Solutions Architect at AWS. He has 12+ years of experience helping organizations derive insights from their data.
 Tahir Aziz is an Analytics Solution Architect at AWS. He has worked with building data warehouses and big data solutions for over 13 years. He loves to help customers design end-to-end analytics solutions on AWS. Outside of work, he enjoys traveling and cooking.
 Jiayuan Chen is a Senior Software Development Engineer at AWS. He is passionate about designing and building data-intensive applications, and has been working in the areas of data lake, query engine, ingestion, and analytics. He keeps up with latest technologies and innovates things that spark joy.
 Debu Panda is a Senior Manager, Product Management at AWS, is an industry leader in analytics, application platform, and database technologies, and has more than 25 years of experience in the IT world. Debu has published numerous articles on analytics, enterprise Java, and databases and has presented at multiple conferences such as re:Invent, Oracle Open World, and Java One. He is lead author of the EJB 3 in Action (Manning Publications 2007, 2014) and Middleware Management (Packt).