Relational database management systems (RDMS) have provided the foundation for storing data for organizations for years. Relational databases store data in tables and are optimized for storage and ACID properties. Non-relational (NoSQL) databases, on the other hand, allow flexible data structures and are optimized for scalability and data retrieval patterns. NoSQL databases can be used in scenarios where data relationships need flexibility. For example, to model the relationships in a social media network, in a relational database you would need a table with hundreds of rows, each storing the foreign key of a friend. In contrast, this data can be represented in a single line in a NoSQL store in the following format{"id": 123, "name": "Roger", "friends": ["Mary", "Peter","Julia"]}. The decision to choose a relational or non-relational database depends on the specific needs of your application. A move to a NoSQL database can happen during the application development phase when, based on the structure of data, it’s identified that NoSQL is a better fit, or it can happen at a later phase when the application evolves and business needs change.
This post describes a methodology to transform and migrate data from a relational database like Amazon Relational Database Service (Amazon RDS) for MySQL to a non-relational database like Amazon DocumentDB (with MongoDB compatibility) using AWS Glue.
AWS Glue is a serverless data integration service that makes it easier to discover, prepare, move, and integrate data from multiple sources for analytics, machine learning (ML), and application development. AWS Glue provides greater flexibility to customize data during transformation, including the ability to normalize or denormalize tables over a service like AWS Database Migration Service (AWS DMS). An AWS Glue extract, transform, and load (ETL) job encapsulates a script that connects to source data, processes it, and then writes it to the target.
Amazon DocumentDB is a fully managed, fast, and scalable document database service that supports native JSON workloads.
Solution overview
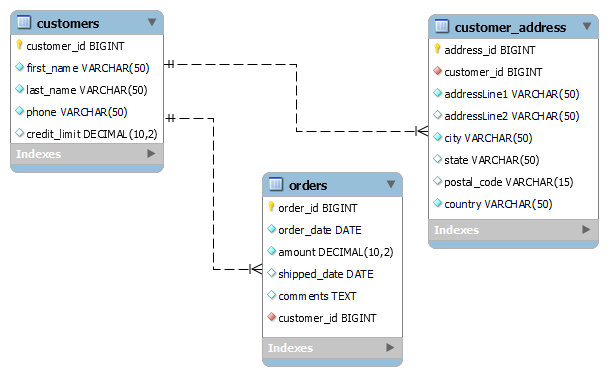
Let’s consider the following scenario: Company ABC has a large MySQL database, which has three large tables in the customers schema:
- customers
- customer_address
- orders
The relationship between the tables is explained in the following diagram. The customers table has a 1:1 relationship with the customer_address table and a 1:N relationship with the orders table.
Company ABC wants to view orders based on territories (city, state, country) from their reporting application. Due to the large size of the RDMS and the compute expenses associated with hosting it, the company is looking for opportunities to offload some of their workloads to their Amazon DocumentDB cluster while keeping the RDMS for online transactions. Company ABC chose a NoSQL document store like Amazon DocumentDB over a data warehouse solution to keep their data schema flexible as their applications evolves. Company ABC currently doesn’t envision the need to aggregate structured and unstructured data, which might require a data lake solution.
Additionally, while migrating the data, Company ABC wants to tokenize the phone number field. Tokenization is the process of replacing sensitive data with unique identifiers (tokens) that inherently don’t have any meaning with an intent to secure the original underlying data against unauthorized access.
There are multiple ways to solve this requirement:
- Extract the data from RDMS tables to three collections inside Amazon DocumentDB using AWS DMS. This approach reduces joins and overhead on the RDMS database; however, the reporting application will need to query against three collections in Amazon DocumentDB.
- Extract and transform the data in the three tables, perform a one-time join, and load it to a single collection in Amazon DocumentDB. This approach reduces joins and overhead on the RDMS database, simplifies the data structure, and exposes it in the format it needs to be accessed by the application.
In this post, we show how to build an AWS Glue job to extract, transform, and load data from Amazon RDS for MySQL to Amazon DocumentDB.
Prerequisites
In this section, we walk through the prerequisite steps to provision your resources using AWS CloudFormation, connect to an AWS Cloud9 instance, and prepare the MySQL and Amazon DocumentDB databases.
Provision resources with AWS CloudFormation
We provide a CloudFormation template to create the resources for this solution. Note that the template provided here is example code; further testing is required before using with production workloads.
Some of the resources deployed by this stack incur costs if they remain in use, like Amazon RDS for MySQL and Amazon DocumentDB. The CloudFormation template creates the following resources:
- VPC, public and private subnets, internet gateway, route tables, and routes
- RDS for MySQL database (version 8.0.31), security group, and AWS Secrets Manager secret
- Amazon DocumentDB cluster, security group, and Secrets Manager secret
- AWS Lambda function, AWS Identity and Access Management (IAM) role, Application Load Balancer, and security group
- AWS Glue data connection, ETL job, and IAM role
- AWS Cloud9 instance with a public IP address
To provision your resources using CloudFormation, complete the following steps:
- Sign into the AWS Management Console.
- Choose the us-east-1 Region in which to create the stack.
- Click Launch Stack:

This step automatically launches AWS CloudFormation in your AWS account with a template. You can view the template from the AWS CloudFormation console as required.
- Choose Next.
- Keep the stack name and default values for parameters.
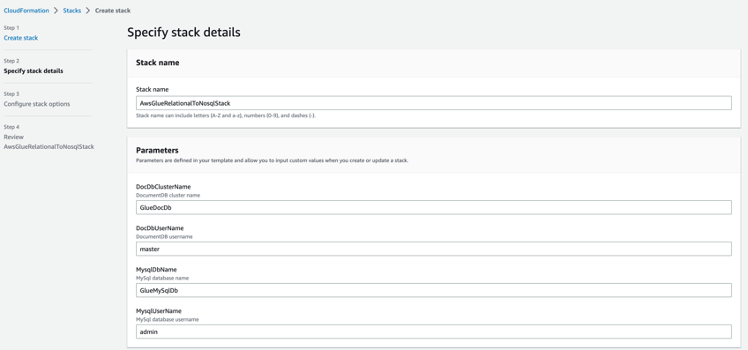
- Choose Next and Next.
- Review the details, acknowledge the creation of IAM resources, and choose Submit.
Stack creation can take up to 15 minutes. After the stack is complete, go to the Outputs tab on the AWS CloudFormation console and note the following values (you use this information in later steps):
RdsHostnameRdsUsernameRdsPasswordSecretDocDbHostnameDocDbSecret
Connect to an AWS Cloud9 instance
Next, we need to prepare the RDS for MySQL and Amazon DocumentDB databases using the AWS Cloud9 instance.
- On the AWS Cloud9 console, locate the glue-cloud9 environment.
- In the Cloud9 IDE column, choose Open to launch your AWS Cloud9 instance in a new web browser.
Prepare the MySQL database
From the AWS Cloud9 terminal, install the mysql client and connect to the RDS instance using the following commands:
sudo yum update -y && sudo yum install -y mysql
mysql -h <hostname> -P 3306 -u admin -p GlueMySqlDb -p'<password_goes_here>'
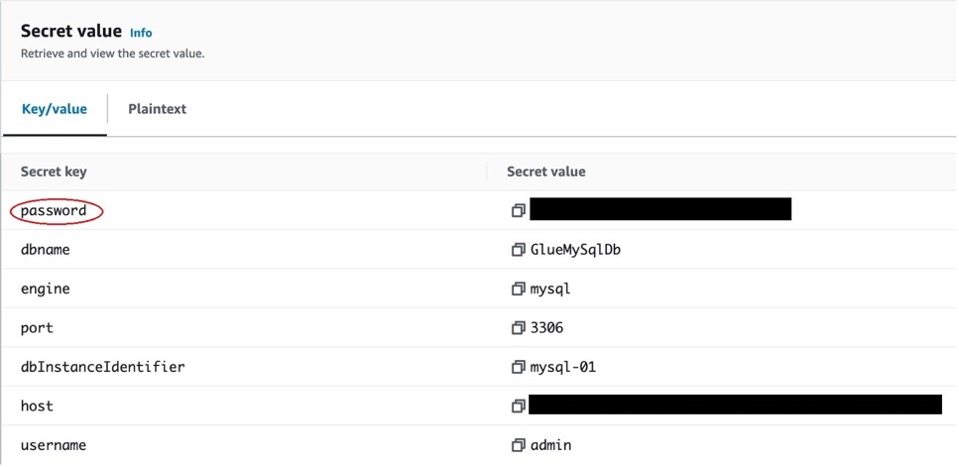
Use the CloudFormation output parameter value in RdsHostname as the hostname. On the Secrets Manager console, open the secret with the name listed in RdsPasswordSecret and retrieve the value from the password field (see the following screenshot) and use it for the password in the preceding code.
When you’re connected to the mysql prompt, create the source schema, tables, and data:
create schema customer;

USE `customer`;

CREATE TABLE `customers` (
  `customer_id` bigint NOT NULL,
  `first_name` varchar(50) NOT NULL,
  `last_name` varchar(50) NOT NULL,
  `phone` varchar(50) NOT NULL,
  `credit_limit` decimal(10,2) DEFAULT NULL,
  PRIMARY KEY (`customer_id`)
) ;

insert  into `customers`(`customer_id`,`first_name`,`last_name`,`phone`,`credit_limit`) values
(103,'Schmitt','Carine ','7025551838','21000.00'),
(112,'King','Jean','7025551838','71800.00');

CREATE TABLE `customer_address` (
  `address_id` bigint NOT NULL,
  `customer_id` bigint NOT NULL,
  `addressLine1` varchar(50) NOT NULL,
  `addressLine2` varchar(50) DEFAULT NULL,
  `city` varchar(50) NOT NULL,
  `state` varchar(50) DEFAULT NULL,
  `postal_code` varchar(15) DEFAULT NULL,
  `country` varchar(50) NOT NULL,
  PRIMARY KEY (`address_id`),
  CONSTRAINT `customer_ibfk_1` FOREIGN KEY (`customer_id`) REFERENCES `customers` (`customer_id`)
) ;

insert  into `customer_address`(`address_id`,`customer_id`,`addressLine1`,`addressLine2`,`city`,`state`,`postal_code`,`country`) values
(203,103,'54, rue Royale',NULL,'Nantes',NULL,'44000','France'),
(212,112,'8489 Strong St.',NULL,'Las Vegas','NV','83030','USA');

CREATE TABLE `orders` (
  `order_id` bigint NOT NULL,
  `order_date` date NOT NULL,
  `amount` decimal(10,2) NOT NULL,
  `shipped_date` date DEFAULT NULL,
  `comments` text,
  `customer_id` bigint NOT NULL,
  PRIMARY KEY (`order_id`),
  CONSTRAINT `orders_ibfk_1` FOREIGN KEY (`customer_id`) REFERENCES `customers` (`customer_id`)
) ;

insert  into `orders`(`order_id`,`order_date`,`amount`,`shipped_date`,`comments`,`customer_id`) values
(10100,'2003-01-06','456.56','2003-01-13',NULL,103),
(10101,'2003-01-09','21980.21','2003-01-18','Check on availability.',112);
Prepare the Amazon DocumentDB database
From the AWS Cloud9 terminal, install mongo-shell and connect to the Amazon DocumentDB cluster using the following commands:
echo -e "[mongodb-org-4.0]\nname=MongoDBRepository\nbaseurl=https://repo.mongodb.org/yum/amazon/2013.03/mongodb-org/4.0/x86_64/\ngpgcheck=1\nenabled=1\ngpgkey=https://www.mongodb.org/static/pgp/server-4.0.asc" | sudo tee /etc/yum.repos.d/mongodb-org-4.0.repo

sudo yum install -y mongodb-org-shell

wget https://s3.amazonaws.com/rds-downloads/rds-combined-ca-bundle.pem

mongo --ssl --host <hostname> --sslCAFile rds-combined-ca-bundle.pem --username master
Use the CloudFormation output parameter value in DocDbHostname as the hostname. On the Secrets Manager console, open the secret with the name listed in DocDbSecret and retrieve the value from the password field. Use this value when prompted for the password.
When you’re connected to the mongo prompt, create a target database called customers where the AWS Glue job will load the data:
use customers

db.customers.insert({"test":"123"})
Run an AWS Glue ETL job
After you complete the prerequisites and set up the databases, you’re ready to run the AWS Glue job that you created with the CloudFormation template. This job connects to the RDS database, extracts the data, transforms it in the manner we need in the target database, and then loads the data to Amazon DocumentDB. To run the glue job
- On the AWS Glue console, choose ETL jobs in the navigation pane.
- Select the job
rds-to-docdb-job.
- Choose Run.
We use the following PySpark script in our ETL job:
import sys
import requests
import json
import boto3
from awsglue.transforms import *
from awsglue.utils import getResolvedOptions
from pyspark.context import SparkContext
from awsglue.context import GlueContext
from awsglue.job import Job
from pyspark.sql.types import StructType, StructField, StringType, NumericType, DateType

args = getResolvedOptions(sys.argv, [
    'JOB_NAME',
    'DOC_DB_SECRET',
    'DOC_DB_DB_NAME',
    'RDS_CONNECTION_NAME',
    'TOKENIZE_SERVICE_URL',
])

sc = SparkContext()
glueContext = GlueContext(sc)
spark = glueContext.spark_session
job = Job(glueContext)
job.init(args['JOB_NAME'], args)
client = boto3.client('secretsmanager')

# tokenize service
tokenize_url = args['TOKENIZE_SERVICE_URL']

# rds
connection_name = args['RDS_CONNECTION_NAME']

# mongo
doc_db_secret_val = json.loads(client.get_secret_value(SecretId=args['DOC_DB_SECRET']).get('SecretString'))
doc_db_host = doc_db_secret_val['host']
doc_db_port = str(doc_db_secret_val['port'])
doc_db_user_name = doc_db_secret_val['username']
doc_db_password = doc_db_secret_val['password']
doc_db_name = args['DOC_DB_DB_NAME']
doc_db_url = 'mongodb://' + doc_db_host + ':' + doc_db_port
doc_db_collection_name = "customerPurchases"

# tokenize call
def ApplyTransformation(rec):
    if (rec['phoneNumber']):
        payload = rec['phoneNumber']
        headers = {
            'Content-Type': 'application/json'
        }
        response = requests.request(
            "GET", tokenize_url, headers=headers, data=payload)
        rec['phoneNumber'] = response.text
    return rec

connection_mysql_options_orders_src = {
    "useConnectionProperties": "true",
    "connectionName": connection_name,
    "dbtable": "customer.orders",
    "jobBookmarkKeys": ["order_id"],
    "jobBookmarksKeysSortOrder": "asc"
}

connection_mysql_options_customers_src = {
    "useConnectionProperties": "true",
    "connectionName": connection_name,
    "dbtable": "customer.customers",
    "jobBookmarkKeys": ["customer_id"],
    "jobBookmarksKeysSortOrder": "asc"
}

connection_mysql_options_address_src = {
    "useConnectionProperties": "true",
    "connectionName": connection_name,
    "dbtable": "customer.customer_address",
    "jobBookmarkKeys": ["address_id"],
    "jobBookmarksKeysSortOrder": "asc"
}

connection_doc_db_options_dest = {
    "connection.uri": doc_db_url,
    "database": doc_db_name,
    "username": doc_db_user_name,
    "password": doc_db_password,
    "collection": doc_db_collection_name,
    "ssl": "true",
    "ssl.domain_match": "false",
}

# Extract orders
df_orders1 = glueContext.create_dynamic_frame.from_options(connection_type="mysql",
                                                           connection_options=connection_mysql_options_orders_src,
                                                           transformation_ctx="df_orders1")

# Select, rename columns, change datatypes
df_orders2 = ApplyMapping.apply(frame=df_orders1, mappings=[
    ("order_date", "timestamp", "orderDate", "timestamp"),
    ("amount", "decimal", "amount", "long"),
    ("customer_id", "long", "orderCustomerId", "long"),
    ("comments", "string", "comments", "string"),
],
    transformation_ctx="df_orders2")
df_orders2.printSchema()

# Extract customers
df_customer1 = glueContext.create_dynamic_frame.from_options(connection_type="mysql",
                                                             connection_options=connection_mysql_options_customers_src,
                                                             transformation_ctx="df_customer1")
# Select, rename columns, change datatypes
df_customer2 = ApplyMapping.apply(frame=df_customer1, mappings=[
    ("customer_id", "long", "customerId", "long"),
    ("first_name", "string", "firstName", "string"),
    ("last_name", "string", "lastName", "string"),
    ("phone", "string", "phoneNumber", "string"),
    ("credit_limit", "decimal", "creditLimit", "long"),
],
    transformation_ctx="df_customer2")
df_customer2.printSchema()

# Extract customer_address
df_address1 = glueContext.create_dynamic_frame.from_options(connection_type="mysql",
                                                            connection_options=connection_mysql_options_address_src,
                                                            transformation_ctx="df_address1")

# Select, rename columns, change datatypes
df_address2 = ApplyMapping.apply(frame=df_address1, mappings=[
    ("customer_id", "long", "addressCustomerId", "long"),
    ("city", "string", "city", "string"),
    ("state", "string", "state", "string"),
    ("country", "string", "country", "string"),
],
    transformation_ctx="df_address2")
df_address2.printSchema()

# Join customers and address and then join the result with orders
df_customer_orders1 = Join.apply(
    Join.apply(df_orders2, df_customer2, 'orderCustomerId', 'customerId'),
    df_address2, 'customerId', 'addressCustomerId'
).drop_fields(['addressCustomerId', 'orderCustomerId'])
df_customer_orders1.printSchema()

# For each row , apply transformation to tokenize phone number
df_customer_orders2 = Map.apply(
    frame=df_customer_orders1, f=ApplyTransformation, transformation_ctx="df_customer_orders2")

# Load to documentDb
df_customer_address_sink = glueContext.write_dynamic_frame.from_options(df_customer_orders2,
                                                                        connection_type="documentdb",
                                                                        connection_options=connection_doc_db_options_dest,
                                                                        transformation_ctx="df_customer_address_sink")

job.commit()
Verify the results
When the job is complete, connect to the Amazon DocumentDB cluster and verify if the customerPurchases collection was created in the customers database and transformed data exists. You can use the following query:
db.customerPurchases.find().pretty()

{
        "_id" : ObjectId("6477dc962515e06b9627092d"),
        "lastName" : "Carine ",
        "city" : "Nantes",
        "orderDate" : ISODate("2003-01-06T00:00:00Z"),
        "country" : "France",
        "amount" : NumberLong(456),
        "phoneNumber" : "######1838",
        "customerId" : NumberLong(103),
        "creditLimit" : NumberLong(21000),
        "firstName" : "Schmitt"
}
{
        "_id" : ObjectId("6477dc962515e06b9627092e"),
        "lastName" : "Jean",
        "city" : "Las Vegas",
        "orderDate" : ISODate("2003-01-09T00:00:00Z"),
        "country" : "USA",
        "state" : "NV",
        "amount" : NumberLong(21980),
        "phoneNumber" : "######1838",
        "customerId" : NumberLong(112),
        "comments" : "Check on availability.",
        "creditLimit" : NumberLong(71800),
        "firstName" : "King"
}
Exploring AWS Glue features
In this section, we take a closer look at the AWS Glue job and the operations.
Read job parameters for configurable values
AWS Glue allows you to provide job parameters that are useful to pass as configurable values to a job:
args = getResolvedOptions(sys.argv, [
    'JOB_NAME',
    'DOC_DB_SECRET',
    'DOC_DB_DB_NAME',
    'RDS_CONNECTION_NAME',
    'TOKENIZE_SERVICE_URL',
])
In this job, we pass the JDBC connection name, Amazon DocumentDB database name and secret, and the service URL of the tokenize service, the values of which change in environments.
Use useConnectionProperties and connectionName to provide database credentials
In the following code, we use the name of the JDBC connection without having to hardcode and expose sensitive values like database passwords:
connection_name = args['RDS_CONNECTION_NAME']

connection_mysql_options_orders_src = {
    "useConnectionProperties": "true",
    "connectionName": connection_name,
    "dbtable": "customer.orders",
    "jobBookmarkKeys": ["order_id"],
    "jobBookmarksKeysSortOrder": "asc"
}
Use Secrets Manager for storing and retrieving sensitive fields
AWS Glue allows you to use Python libraries within your job. In the following code, we use the Python Boto3 API to allow the job to retrieve the Amazon DocumentDB password at runtime from Secrets Manager without having to hardcode the database password in the job:
client = boto3.client('secretsmanager')
doc_db_secret_val = json.loads(client.get_secret_value(
    SecretId=args['DOC_CRED_SECRET']).get('SecretString'))
For this to work, the IAM role associated with the AWS Glue job has been provided with secretsmanager:GetSecretValue and secretsmanager:DescribeSecret permissions in CloudFormation. If the secret is encrypted with a customer managed secret (CMK), then AWS Key Management Service (AWS KMS) permission needs to be provided to the job role.
Select, rename, and change data types
AWS Glue allows you to change column names and data types during data transformation. In the following code, we rename the order_date column to orderDate, which is a better field name in Amazon DocumentDB that follows the JSON camel case naming convention. We convert the amount from decimal to long, which can be referred by a long data type in the Java reporting application:
df_orders2 = ApplyMapping.apply(frame=df_orders1, mappings=[
    ("order_date", "timestamp", "orderDate", "timestamp"),
    ("amount", "decimal", "amount", "long"),
    ("customer_id", "long", "orderCustomerId", "long"),
    ("comments", "string", "comments", "string"),
],
    transformation_ctx="df_orders2")
Fields that aren’t part of the mapping get automatically dropped and can be used to select columns that are only required for processing. The printSchema() method can be useful to debug and understand the source data type AWS Glue is inferring and convert it to the relevant target data type.
Join and denormalize data
In the following code, we do a one-time join of the orders table with the customer and customer_address tables to create a denormalized customerPurchases collection that has the required fields to be easily searched by the reporting application:
df_customer_orders1 = Join.apply(
    Join.apply(df_orders2, df_customer2, 'orderCustomerId', 'customerId'),
    df_address2, 'customerId', 'addressCustomerId'
).drop_fields(['addressCustomerId', 'orderCustomerId'])
Creating indexes on city, state, and country in the Amazon DocumentDB database can help make queries even faster.
Apply a transformation to mask phone numbers
AWS Glue supports calling HTTP services from the job during transformation. Map.Apply applies a function to all rows. In the following code, we use it to call the tokenize HTTP service (created using AWS Lambda in AWS CloudFormation) that masks the phone number for each row:
def ApplyTransformation(rec):
    if (rec['phoneNumber']):
        payload = rec['phoneNumber']
        headers = {
            'Content-Type': 'application/json'
        }
        response = requests.request("GET", tokenize_url, headers=headers, data=payload)
        rec['phoneNumber'] = response.text
    return rec

df_customer_orders2 =  Map.apply(frame = df_customer_orders1, f = ApplyTransformation,transformation_ctx = "df_customer_orders2")
The AWS Glue job must have networking to reach the tokenize service. In this example, the tokenize service runs in the same subnet as the RDS database, so no extra networking is required. However, if this is not the case (your service runs in a different VPC), AWS Glue supports network type connections to be associated to a job, allowing it to connect to a network where the service is accessible.
Use Amazon DocumentDB as the sink database
AWS Glue supports a variety of target databases. In the following code, we use Amazon DocumentDB as the sink database:
df_customer_address_sink = glueContext.write_dynamic_frame.from_options(df_customer_orders2,connection_type="documentdb",connection_options=connection_doc_db_options_dest,transformation_ctx="df_customer_address_sink")
Clean up
After you finish, don’t forget to delete the CloudFormation stack because some of the resources deployed by the stack in this post will incur cost if they continue to run. To delete the CloudFormation stack and all resources associated with it, complete the following steps:
- On the AWS CloudFormation console, choose Stacks in the navigation pane.
- Choose the stack
AwsGlueRelationalToNosqlStack.
- Choose Delete.
- Choose Delete stack when prompted.
Summary
In this post, we showed you how to build an AWS Glue ETL Spark job to extract, transform, and load data from a relational database to a non-relational database. AWS Glue supports a variety of relational and non-relational databases. AWS Glue ETL jobs provide greater flexibility to transform your data in the format needed by your applications over AWS DMS.
With the techniques shown in this post, you can extract data to AWS purpose-built databases like Amazon DocumentDB and alleviate some of the problems with having large relational databases, which can inhibit business agility, until the time when you modernize and migrate applications to use to NoSQL databases.
To learn more about AWS Glue jobs and to create your own job, refer to Creating ETL jobs with AWS Glue Studio.
About the Author

Utsab Roy is a Senior Application Architect at AWS. He works with AWS customers to build and deploy end-to-end business solutions. He is passionate about containers, serverless, DevOps, and open-source technologies.