Integration & Automation
Create AMIs with AWS CodePipeline
One way to alleviate the pain of drift in your Amazon Web Services (AWS) workloads is to use a GitOps workflow to automate Amazon Machine Image (AMI) builds with AWS CodePipeline. In this post, we show you how to deploy a continuous integration and continuous delivery (CI/CD) pipeline, managed by CodePipeline, to build AMIs.
Manually creating AMIs for your Amazon Elastic Compute Cloud (Amazon EC2) instances and containers can be an error-prone process. As your AWS workloads grow, you can lose track of infrastructure changes and discrepancies, or drift. The solution I provide uses a Git repository managed by AWS CodeCommit as the single source of truth. You invoke the pipeline when you commit AWS CloudFormation templates containing the recipe that the pipeline uses to build an AMI. The templates I provide build an AMI that’s based on Amazon Linux2 ARM64. After the AMI is built, Amazon Simple Notification Service (Amazon SNS) sends you an email notification. After you approve or reject the AMI build, the pipeline automatically cleans up the resources it created.
| About this blog post | |
| Time to read | ~10 min. |
| Time to complete | ~45 min. |
| Cost to complete | ~$1 |
| Learning level | Advanced (300) |
| AWS services | AWS CodePipeline
AWS CodeCommit AWS CloudFormation Amazon Elastic Compute Cloud (Amazon EC2) Amazon EC2 Image Builder Amazon Simple Storage Service (Amazon S3) Amazon Simple Notification Service (Amazon SNS) |
Overview
Figure 1 shows a high-level overview of the resources that you deploy in the walkthrough.
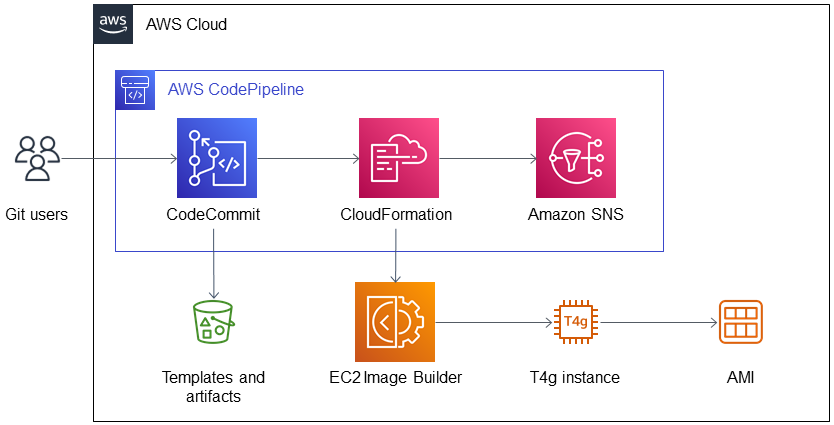
Figure 1. Architecture diagram for creating AMIs with AWS CodePipeline.
As shown in Figure 1, the solution deploys the following:
- A CD pipeline with the following:
- CodePipeline to read source code from AWS CodeCommit.
- CodeCommit with a GitHub repository. You invoke the pipeline when you commit templates to the repository.
- CloudFormation to create an Amazon EC2 Image Builder stack based on the template.
- Amazon SNS to send email notifications upon completion of AMI builds. The notifications prompt you to review and approve or reject builds in the CodePipeline console.
- An Amazon Simple Storage Service (Amazon S3) bucket to store templates and artifacts.
- EC2 Image Builder to launch a temporary Amazon EC2 T4g instance that builds and tests an AMI.
AMI recipe template files
Our solution uses the following templates to define the AMI build recipe. The templates contain the recipe used by Amazon EC2 Image Builder to build, validate, and test an AMI.
linux-ami-imagebuilder.yaml
The template linux-ami-imagebuilder.yaml contains the following EC2 Image Builder parameters:
LinuxImagetells the EC2 Image Builder service that we are building an AMI and specifies the image recipe and infrastructure configuration to use. The image recipe defines how the AMI is customized, and the infrastructure configuration defines the build and test configurations.LinuxImageRecipedefines the components to configure and deploy to the AMI. You can customize the solution by specifying different components, including your own custom components that you write in Bash or PowerShell. I configure the template to deploy the following components:amazon-cloudwatch-agent-linux: Amazon CloudWatch agent.aws-cli-version-2-linux: The AWS Command Line Interface (AWS CLI) version 2.stig-build-linux-low: The Security Technical Implementation Guide (STIG) for Category 1 (Low) compliance level.SetLocaleComponent: Thesetlocalefunction in Linux sets the current locale, which determines the language and cultural conventions used by various system functions and libraries. It fixes the following common error when logging into Linux:
-bash: warning: setlocale: LC_CTYPE: cannot change locale (UTF-8): No such file or directory.
In this warning, the LC_CTYPE category of the locale specifies character classification, case conversion, and character encoding/decoding. When the LC_CTYPE category is set, it affects how functions like isalpha() and toupper() behave. It’s important to note that setlocale affects not only your own program but also any other programs running on the system that rely on the locale.
-
YumUpdateComponent—Invokes theyum updatecommand. This command in Linux updates the installed packages to their latest available versions. For more information, refer to Linux package management with YUM and RPM.
stack-configuration.json
The template stack-configuration.json includes the parameters needed to run the pipeline. Edit stack-configuration.json to specify the parameters, such as the base AMI image used by the pipeline to build the AMI. You can customize your solution by entering the Value key from a different AMI for the BaseImageId parameter. To find an AMI, refer to Find a Linux AMI.
Prerequisites
Before getting started, ensure that you have the following:
- An AWS account. If you don’t have one, sign up at https://aws.amazon.com.
- A virtual private cloud (VPC) with a subnet in your AWS account.
- An EC2 key pair. A key pair enables you to log in using SSH (Secure Shell) to the AMI produced by the pipeline.
- Version 2 of the AWS CLI. You need this if you want to deploy the CloudFormation stack using AWS CLI instead of the AWS Management Console.
- A Git client installation. You need this to use Git to invoke the pipeline by committing templates. In the walkthrough, you can also use the AWS Management Console to commit them.
Walkthrough
In the walkthrough, you perform the following steps:
- Download the templates.
- Deploy the CD pipeline CloudFormation stack.
- Commit files to the CodeCommit repository.
- Verify the AMI build.
- Approve or reject the AMI build.
Step 1: Download the templates
Download the following templates:
Step 2: Deploy the CD pipeline CloudFormation stack
Deploy the pipeline infrastructure using the CloudFormation stack that I provide. You can deploy using the AWS Management Console or AWS CLI.
Deploy using the AWS Management Console
- Choose Launch Stack.
![]()
- On the Specify stack details page of the CloudFormation console, enter a name for the stack.
- For Email, enter an email address to receive AMI build notifications.
- (Optional) If desired, you can edit default entries except for
TemplateFileNameandStackConfig. - Choose Next.
- On the Configure stack options page, choose Next.
- On the Review page, choose I acknowledge that AWS CloudFormation might create IAM resources.
- Choose Submit. The stack takes about two minutes to deploy.
Deploy using AWS CLI
In the directory where you save linux-ami-codepipeline.yaml, run the following command. Replace <my@email-address.aws> with the address that you want to use to receive AMI build notifications.
aws cloudformation create-stack[TB1] [MOU2] --region eu-west-1 --stack-name ami-builder-blog-linux-pipeline --template-body[TB3] [MOU4] file://Linux/linux-ami-codepipeline.yaml --parameters ParameterKey= Email,ParameterValue=<my@email-address.aws> --capabilities CAPABILITY_NAMED_IAM
You will receive an email from AWS Notifications <no-reply@sns.amazonaws.com> asking you to confirm subscription to the CodePipeline SNS topic. Choose Confirm subscription in the email message.
Step 3: Commit files to the CodeCommit repository
Commit linux-ami-imagebuilder.yaml and stack-configuration.json to the CodeCommit repository. This invokes the pipeline to build an AMI.
- Sign in to the AWS Management Console and open the CodePipeline console.
- In the navigation pane, choose Pipeline, Pipelines.
- Choose ami-builder-blog-linux-pipeline. As shown in Figure 2, an error displays in the Source section of the ami-builder-blog-linux-pipeline page. This is normal and expected because you have not yet committed files to invoke the pipeline.
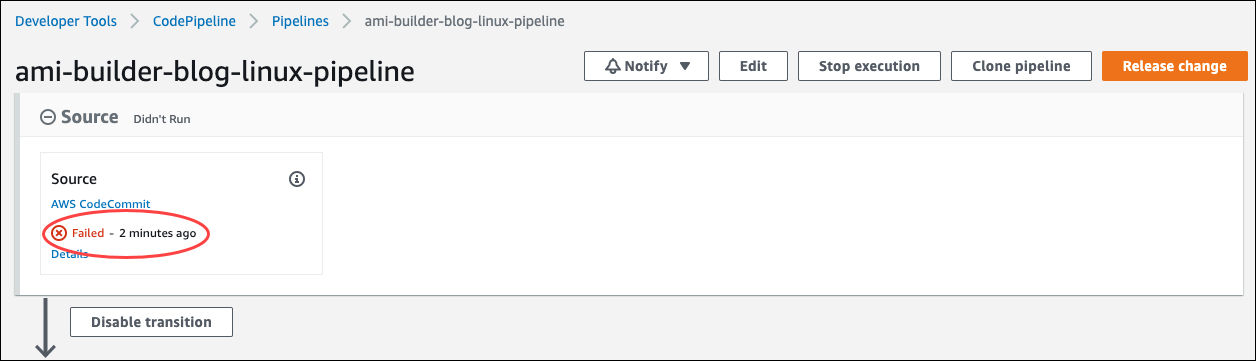
Figure 2. Ami-builder-blog-linux-pipeline page in the CodePipeline console.
- In the Source section, choose AWS CodeCommit.
- Set up your GitHub repository on the ami-builder-blog-linux-pipeline page. For Clone URL, select Connection steps and follow the instructions provided. Then add
linux-ami-imagebuilder.yamlandstack-configuration.jsonto your repository and commit them in a pull request to the CodeCommit repository.
If you’re not using Git, choose Add file, Upload file to manually upload linux-ami-imagebuilder.yaml and stack-configuration.json one at a time. For more information, refer to Create or upload a file (console).
Step 4: Verify the AMI build.
If you confirmed your subscription to the pipeline SNS topic, you will receive a notification email when the build completes. To verify the AMI build, launch an instance of it and then log in to the instance.
Note: If the build pipeline fails, terminate the Build EC2 instance and delete the temporary CloudFormation stack test-amazon-linux2-arm64-ami that the pipeline deploys. Then recommit the templates to restart the build process. To troubleshoot issues with the AMI build, refer to the Amazon CloudWatch logs. The solution stores AMI build logs in CloudWatch/Loggroups/aws/imagebuilder/test-amazon-linux2-arm64-ami-Image-xxxxxxxxxxx/0.0.1/1/.
Step 5: Approve or reject the AMI build.
If you confirmed your subscription to the pipeline SNS topic, you will receive a notification that includes a link to approve or reject the build. For more information, refer to Approve or reject an approval action in CodePipeline.
Cleanup
After you approve or reject, the pipeline cleans up the resources it created, including the CloudFormation template and EC2 Image Builder resources. When you’re finished testing the pipeline and want to remove the solution from your account, delete the following:
- The pipeline artifacts S3 bucket. For more information, refer to Deleting a bucket.
- The CloudFormation stack
ami-builder-blog-linux. For more information, refer to Deleting a stack on the AWS CloudFormation console.
Conclusion
In this post, we deployed a CD pipeline managed by CodePipeline to build AMIs. Customize the solution used in this post by adding unit testing to the CD pipeline and additional software and operating system logic. For more insight into building AMIs, refer to the following:
- AWS for Microsoft Workloads Immersion Day
- Create immutable servers using EC2 Image Builder and AWS CodePipeline
- Automate OS Image Build Pipelines with EC2 Image Builder
Let us know how you use CodePipeline to build AMIs. Use the Comments section for questions and comments.
About the author
 Henry Bravo
Henry Bravo is a senior global solutions architect at AWS. He helps AWS customers in the automotive and manufacturing industry with their digital transformations. His work helps companies fundamentally change how they deliver value to their customers, reduce operational costs, and empower their employees.