Integration & Automation
Manage permission sets and account assignments in AWS IAM Identity Center with a CI/CD pipeline
This post was updated on January 14, 2025, to include new features such as syntax validation for permission sets and mapping files, automated generation of JSON files from existing Identity Center setup, support for account and OU names in target mappings, implementation of permission boundaries and option for AWS CodeConnections to support third party Git-based source providers.
This post was previously updated on March 10, 2023, to add the options of delegating an administrator for AWS IAM Identity Center or using AWS Control Tower.
Have you created permission sets and assigned them to AWS Identity and Access Management (IAM) groups in AWS Organizations? Have you used existing corporate identities with AWS IAM Identity Center (successor to AWS Single Sign-On) to grant Active Directory groups access to AWS accounts and applications? If so, you know that doing these things manually can be time-consuming and error-prone.
You can save time and minimize errors by managing permission sets automatically. To do this, you can use AWS developer tools to build a continuous integration and continuous deployment (CI/CD) pipeline, as we show you in this post.
Other benefits of this approach:
- You prevent people from tampering with your deployed permission sets and assignments.
- You can automatically revert any manual changes made to your permission sets and assignments.
- You can more easily extend a permission set or group mapping to a new AWS account.
- You can audit changes to your permission sets through version control.
- You can delegate administration of IAM Identity Center to a member account in your AWS Organizations.
| About this blog post | |
| Time to read | ~25 min. |
| Time to complete | 30-45 min. |
| Cost to complete | ~$1 |
| Learning level | Advanced (300) |
| AWS services | AWS CloudFormation
AWS CodeBuild AWS CodeCommit AWS CodePipeline Amazon EventBridge AWS IAM Identity Center AWS Lambda AWS Organizations Amazon Simple Storage Service (Amazon S3) Amazon DynamoDB Amazon Simple Notification Service (Amazon SNS) |
Solution overview
Figure 1 shows the architecture that you deploy in our walkthrough.

Figure 1. Architecture diagram for the IAM Identity Center CI/CD pipeline
The following points summarize the high-level workflow after the solution is deployed.
- You (the cloud administrator) provision AWS CodePipeline by deploying the file
codepipeline-stack.templateusing AWS CloudFormation, updating the stack parameters with your own values. - You push the updated code to AWS CodeCommit or your external Git repository, which initiates the AWS CodePipeline run.
- CodePipeline creates a CloudFormation stack to provision an Amazon Simple Storage Service (Amazon S3) bucket. It then synchronizes the CodeBuild code archives—mapping-definition files—from Git repository to the S3 bucket.
- CodePipeline creates a CloudFormation stack of CodeBuild Project.
- You approve the review action to invoke the CodeBuild Project.
- The first function (
auto-permissionsets) uses the mapping-definition files downloaded from the S3 bucket to create IAM Identity Center permission sets. It then invokes the second function (auto-assignment), which assigns the permission sets to IAM groups in an AWS Organizations account. - (Optional) When an IAM Identity Center API action is made by an IAM user, group, or role that’s not on the allow list, Amazon EventBridge rules invoke a Lambda function (
auto-notification), which sends out a notification email through Amazon Simple Notification Service (Amazon SNS) and invokes the CodeBuild Project to revert manual changes. - (Optional) In the case of having a delegated administrator for Identity Center and/or having AWS Control Tower enabled, the first function (
auto-permissionsets) also makes a list of permission sets provisioned in the Organization management account and those tagged with ManagedBy:ControlTower respectively, and stores those Permission Set names and ARNs in an Amazon DynamoDB table (ic-SkippedPermissionSetsTable).
Prerequisites
- An AWS account with AWS Organizations enabled. If you don’t have an account, sign up at https://aws.amazon.com.
- Basic knowledge of CloudFormation.
- IAM Identity Center prerequisites.
- An identity provider (IAM Identity Center or one of the supported identity providers).
- Git.
Consideration
If you are deploying this solution in a delegated administrator account (recommended) for AWS IAM Identity Center, it is a best practice to Create permission sets for use only in the management account. This makes it easier to administer permission sets solely for users accessing your management account and helps differentiate them from permission sets managed by your delegated administrator account. Additionally, a delegated administrator account does not have permissions to manage Permission Sets provisioned in the management account, meaning you must have permission sets provisioned in the management account which are used only in that account.
If you want to deploy this solution in an AWS Control Tower based landing zone, AWS Control Tower creates some pre-configured groups and corresponding Permission Sets for you and requires them for account provisioning. You can either add users into those Control Tower groups or you can create your own groups and use those to assign permission sets. Regardless, you can either tag Permission Sets created by AWS Control Tower with ManagedBy:ControlTower (recommended) before running the pipeline, or you can delete those Permission Sets in the Management account and recreate them using this solution. It is essential for AWS Control Tower created Permission Sets to exist for proper account provisioning. You can also choose to disable this setting in Control Tower when deploying Landing Zone or by modifying Landing Zone, by selecting Self-managed AWS account access with IAM Identity Center or another method under AWS account access configuration.
Walkthrough
In this walkthrough, you source-control example IAM Identity Center permission sets and a group-to-account mapping for deploying those permissions. The CodeCommit or your external Git repository contains permission-set definitions, JSON data files for mapping those sets for group-to-account combinations, and permission-set-to-group mappings that go to all accounts. We recommend that you manage the IAM Identity Center identity on the group level as a best practice, as in this walkthrough; every workforce user should be part of a group.
Main steps:
- Step 1: Clone the sample GitHub repository
- Step 2: Create IAM groups
- Step 3: Create an AWS CodeCommit or an external Git repository
- Step 4: Create a CodePipeline stack
- Step 5: Modify parameters and mapping files
- Step 6: Commit your changes to initiate the AWS CodePipeline run
- Step 7: Validate the new resources
Step 1: Clone the sample GitHub repository
Clone the sample GitHub repository to your local system. This repository contains example data files that you can use to deploy permission sets. You can modify the example data with your own account IDs and resource names. Although you could fork the GitHub repository and link it directly to the CI/CD pipeline, we show you how to use the AWS CodeCommit or your external Git repository.
Step 2: Create IAM groups
- Enable IAM Identity Center. For details, see IAM Identity Center prerequisites.
- If you chose to administer IAM Identity Center in the Organization management account, continue to Step 3 below. If you have chosen to delegate an Organization member account as administrator for Identity Center, create a stack using the
templates/delegate-admin/IC-Delegate-Admin.ymltemplate in the repository, as shown in Figure 2. For details, refer to Creating a stack on the AWS CloudFormation console. You can alternatively delegate administrator for Identity Center in the IAM Identity Center Console directly. For details, refer to Register a member account.
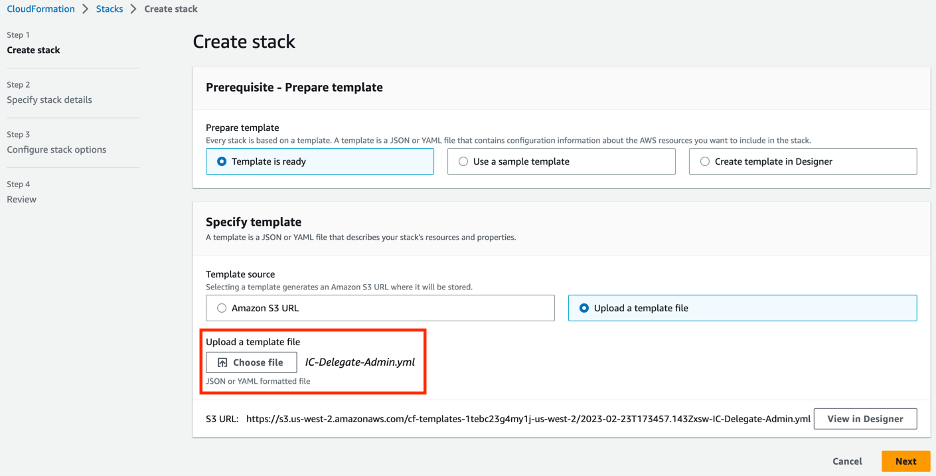
Figure 2: Creating a CloudFormation Stack using IC-Delegate-Admin.yml
Additionally, if you have chosen to delegate an Organization member account as administrator for Identity Center, create permission sets using IAM Identity Center console in the Organization Management account for use only in the management account. It is recommended to use unique names when creating permission sets for use only in the management account, for example, management-administrator, management-readOnly, management-ViewOnly. These permission sets will allow you to have access to the management account via AWS Access Portal as the delegated administrator does not have permissions to provision permission sets in the Management account, and help to differentiate them from permission sets managed by your delegated administrator account.
- Create your own testing IAM groups in an AWS Organizations management account or a delegated administrator account depending on where you choose to manage IAM Identity Center.
- If you use IAM Identity Center as your identity source, use either the AWS Management Console or AWS Command Line Interface (AWS CLI). This example, as shown in Figure 3, shows one group called
admin_group. - If you use Active Directory or an external identity provider (IdP) such as Okta or Azure Active Directory, users and groups should be automatically synchronized from the source to IAM Identity Center.

Figure 3. Sample IAM group
- If you use IAM Identity Center as your identity source, use either the AWS Management Console or AWS Command Line Interface (AWS CLI). This example, as shown in Figure 3, shows one group called
Step 3: Create an AWS CodeCommit repository or an external Git repository
- Create a CodeCommit repository in your AWS Organization Management account or delegated administrator account depending on where you choose to manage IAM Identity Center, as shown in Figure 4. For details, refer to Create a repository. Alternatively, you could also choose to create an external Git repository, such as GitHub or any AWS CodeConnections supported providers.
- Please note, if you chose to connect your external Git repository, you must create a connection and retrieve the connection Arn. The Arn will be used later when deploying the CloudFormation stack. For details, refer to Creating a connection.

Figure 4: Creating a CodeCommit repository
- Connect to the new repository. For AWS CodeCommit, refer to Connect to an AWS CodeCommit repository.
- Clone the IAM Identity Center project.
- Copy the files from the GitHub IAM Identity Center project to the Git repository directory.
Step 4: Create a CodePipeline stack
- In the AWS CloudFormation console in the same account, create a stack using
templates/codepipeline-stack.templatein your Git repository, as shown in Figure 5. For details, refer to Creating a stack on the AWS CloudFormation console.
Figure 5: Creating your CodePipeline stack using a CloudFormation template
- Fill in the stack parameters with your own values, as shown in Figure 6.
- For the parameter
ICMappingBucketName, the CloudFormation stack creates a new bucket with the name you enter and additionally appends the current AWS region and AWS account ID you’re deploying the solution in. The same name is used later in your fileidentity-center-stacks-parameters.json. - GeneratePermissionSetsAndMappings: Set to
trueif you want to deploy a separate build project to generate permission sets and mapping JSON files. If you are already using Identity Center and would like to import existing permission sets and assignments into this solution then see Step 5 below. - ICInstanceARN: Required when
GeneratePermissionSetsAndMappingsis set totrue.ICInstanceARNcan be found on the AWS IAM Identity Center console Settings page. - IdentityStoreId: Required when
GeneratePermissionSetsAndMappingsis set totrue. Identity Store ID can be found on the AWS IAM Identity Center console Settings page. - AutomationBuildProjectName: Specify the name for the automation CodeBuild projects or leave default.
- SourceType: Choose the source type for your pipeline (AWS CodeCommit or CodeConnection).
- ConnectionArn: The ARN of the CodeConnections connection. Required if you set
SourceTypeas CodeConnection). - RepositoryName: The name of the repository (full name of repository with path for
CodeConnectionor repository name for AWS CodeCommit ). - RepoBranch: The name of branch that will trigger the CodePipeline run. Default is
main. - SNSPipelineApprovalEmail: The email that will receive and approve pipeline approval notifications.
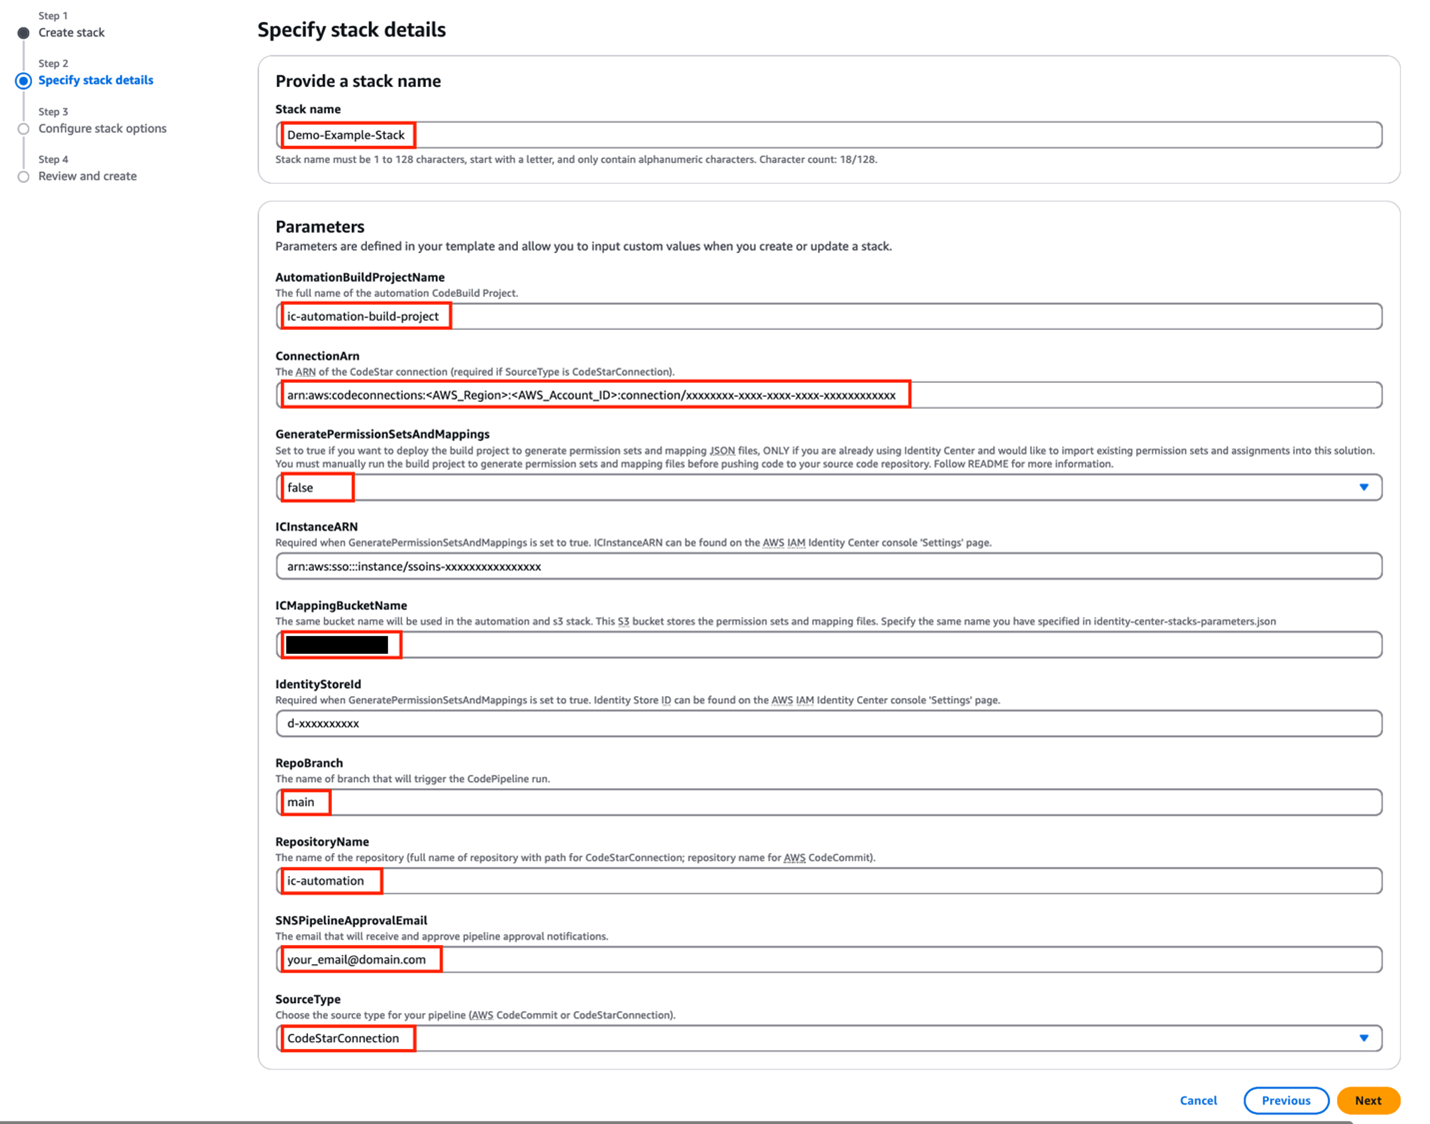
Figure 6: Specifying CloudFormation stack details
- For the parameter
- Keep the defaults for all stack options, and choose Next.
- On the Review page, select
I acknowledge that AWS CloudFormation might create IAM resources with custom names. Then choose Create stack.
After you’ve created the stack, your CodePipeline would fail in the build stage because there’s no file in your remote Git repository. Don’t worry; in the following steps you’ll modify the local repository before pushing it to your Git repository.
Step 5: (Optional) Automatically generate permission set and mapping JSON files from your existing AWS IAM Identity Center configuration
If you set GeneratePermissionSetsAndMappings to true, then upload src/automation-code/permission-set-and-mapping-files-generator/auto-generate-permissionsets-mapping-files.py file to the root of the S3 bucket (Bucket name starts with icpermsetmapping). Once uploaded, an EventBridge Rule will automatically trigger the CodeBuild Project to generate necessary JSON files and directory structure. You can check the status of the build under IC-GeneratePermissionSetsAndMappingFiles under Build Projects in the CodeBuild console. This will read your existing Identity Center configuration and generate a identity-center-mapping-info folder with necessary files in the S3 Bucket. The name of the S3 Bucket and the Build Project can be found in Outputs section of the stack once the codepipeline-stack.template is deployed successfully.
Step 6: Modify parameters and mapping files
- Provide the value for all the required parameters to create the CloudFormation stacks for S3 and other AWS resources for this solution. Some of the parameters have the default value in the templates. Review and update all the nondefault parameters in the file
identity-center-stacks-parameters.json.- AdminDelegated: If you have delegated an administrator for Identity Center, set to
true. If you have not delegated an administrator and are deploying in the management account, set tofalse. - ControlTowerEnabled: If you have AWS Control Tower enabled, set to
true. If not, set tofalse. - OrgManagementAccount: Enter the 12-digit management account ID of your AWS Organization.
- OrganizationId: AWS Organizations ID, for example,
o-awsaabb12. Enter the correct Organizations ID; otherwise, you will lock yourself out from the new IAM Identity Center S3 bucket. - IdentityStoreId: Identity Store ID can be found on the IAM Identity Center console Settings page.
- ICInstanceARN: You can find this ARN on the IAM Identity Center console Settings page.
- ICMappingBucketName: The same bucket name that you defined in
codepipeline-stack.template. - SNSEmailEndpointSubscription: The email address that notifications for manual changes to the IAM Identity Center will be sent to.
- createICAdminRole: If you do not have an existing IAM role or user in your account for administering IAM Identity Center, you can set the value to
true, and the solution will create an IAM role for you. If you have an existing IAM role or a user, set it tofalseand update the ICAutomationAdminArn parameter below. - ICAutomationAdminArn: Leave this blank if you do not have an existing IAM role or user and you set ICAutmationAdminArn to
true. The Amazon Resource Name (ARN) of an existing IAM role or user in your account that will be used as the IAM Identity Center administrator. - createICKMSAdminRole: If you do not have an existing IAM role or user in your account for administering KMS keys, you can set the value to
trueand the solution will create an IAM role for you. If you have an existing IAM role or a user, set it tofalseand update ICKMSAdminArn parameter below. - ICKMSAdminArn: Leave this blank if you do not have an existing IAM role or user and you set createICKMSAdminRole to
true. The ARN of an existing IAM role or user that will have administrator permissions to manage the IAM Identity Center’s AWS Key Management Service (AWS KMS) - createS3KmsKey: If you do not have an existing KMS key to encrypt mapping S3 Bucket, you can set the value to
trueand the solution will create a KMS key for you. If you have an existing KMS key, set it tofalseand update S3KmsArn parameter below. - S3KmsArn: Leave this blank if you do not have an existing KMS key and you set createICKMSAdminRole to
true. The ARN of an existing KMS key to encrypt mapping S3 Bucket.
- AdminDelegated: If you have delegated an administrator for Identity Center, set to
- Modify the IAM Identity Center mapping files in your Git repository. To do this, create your own
permission-setJSON files,global-mapping.jsonandtarget-mapping.jsonfiles, or use the files generated by IC-GeneratePermissionSetsAndMappingFiles CodeBuild Project if you chose true for GeneratePermissionSetsAndMappings in Step 4. Refer to the example in README.md for more info.- Clone your Git repo, and create a branch with the same name you specified in
codepipeline-stack.templateCloudFormation template. - Create your permission set and mapping files in your cloned Git repo directory.
- Add your modified files to the Git repo using Git commands.
- Clone your Git repo, and create a branch with the same name you specified in
Step 7: Initiate the AWS CodePipeline run
- Push your code changes to your Git Repository. For details, refer to Getting started with Git and AWS CodeCommit.
- Provide the manual approval to invoke the CodeBuild Project, as shown in Figure 7.

Figure 7: CodePipeline waiting for manual approval
- If the CloudFormation stack fails, delete the failed stack, fix the issue, and rerun the pipeline by pushing a newer version of the code to your Git repository.

Step 8: (Optional) Setup Organizations event forwarder in Management account
If you have chosen to delegate an Organizations member account as a delegated administrator for Identity Center and deployed the solution in the delegated administrator account, create an EventBridge Rule in the management account, in order to forward Organizations events, such as creation/joining of a new account, moving of an account, creation of an Organizational Unit, to allow EventBridge to trigger CodeBuild Project in delegated administrator account.
- In the AWS CloudFormation console in us-east-1 region in the management account, create a stack using
templates/management-account-org-events-forwarder.templatein your Git repository. This template must be deployed in us-east-1 region in the management account as AWS Organizations is a global service and the it’s events exist only in us-east-1 region. - On the Specify stack details page, type a stack name in the Stack name box. You can choose any name, such as, ic-orgEventsForwarder.
- Fill in the stack parameters with your own values, as shown in Figure 8.
- IdcDelegatedAccountId: 12-digit AWS Account ID of the delegated administrator account for Identity Center where you deployed the above solution.
- TargetRegion: Target region of your delegated administrator account for Identity Center where you enabled Identity Center and deployed the above solution. For example, us-west-2.

Figure 8: Specifying CloudFormation Stack details
- On the Review page, select
I acknowledge that AWS CloudFormation might create IAM resources with custom names. Then choose Create stack.
Once the stack is deployed, AWS Organizations events will now be forwarded to the delegated administrator account and will trigger the automation to baseline your permissions and assignments when specific Organizations events are detected by EventBridge rules.
Step 9: Validate the new resources
- In the IAM Identity Center console, verify that the management account’s permission sets have been provisioned, as shown in Figure 9.

Figure 9: Provisioned status of permission sets
- Verify the account assignments on the management account’s IAM Identity Center console using the List view, as shown in Figure 10.

Figure 10: List of AWS accounts in IAM Identity Center
- If you deployed in a Control Tower–enabled AWS account or in a delegated administrator account for IAM Identity Center, verify that the Amazon DynamoDB table exists and contains permission set names and ARNs of the skipped permission sets, as shown in Figure 11.

Figure 11: Skipped permission sets in ic-SkippedPermissionSetsTable table
- Verify that manual changes are getting detected and reverted automatically. You can test this by making a manual change, such as creating/deleting a Permission Set, attaching/detaching a Permission Set from accounts, adding a new account to AWS Organizations or any other change within IAM Identity Center. This will trigger the EventBridge rule to send an SNS email notification on the specified email address, and will revert the manual changes back to baseline configuration by invoking automation CodeBuild Project.
Troubleshooting
When you use this pipeline, you might encounter issues when you create, update, or delete resources in your account. The following tips can help you troubleshoot some common issues that you might encounter.
- View pipeline details, including when actions last ran in the pipeline, whether any actions have failed, and other information.
- If there are any syntax errors within your JSON files, pipeline will fail at the
ValidateAndPackagestage andMappingFilesSyntaxValidationaction. Click View details to review CodeBuild logs and all syntax errors that you must fix for the execution to complete successfully. - For issues creating the CloudFormation stack, view the error message in the stack events, and refer to Troubleshooting CloudFormation.
- For CodePipeline issues, review the error messages on the CodePipeline console.
- For IAM issues, refer to Troubleshooting AWS CodePipeline identity and access.
- Review the automation CodeBuild logs within CodeBuild or default CloudWatch log groups for the automation functions:
ic-permissionsets-enabler-YourAccountId-YourRegionic-auto-assignment-enabler-YourAccountId-YourRegion/aws/lambda/ic-alert-SNSnotification
Cleanup
When you finish your tests or no longer need this solution in your environment, follow these steps to remove the AWS resources so that you don’t continue to incur costs:
- Replace all the mapping information with an empty list (
[]) inglobal-mapping.jsonandtarget-mapping.json. Then rerun the pipeline to automatically remove all the IAM Identity Center assignments. - Delete all the .json files in the
permissions-setfolder. Then rerun the pipeline to automatically remove all permission sets. - Delete CloudFormation stack that was created using
identity-center -automation.template. - Empty the IAM Identity Center S3 bucket that was created as part of this stack. Then delete the CloudFormation stack that was created using
identity-center-s3-bucket.template. - Empty the S3 bucket named
ic-pipeline-artifact-bucket-<name>where<name>is the name of the bucket that was created as a part of this stack. Then delete CloudFormation stack that was created usingpipeline-stack.template. - Delete the AWS CodeCommit repository or the external Git repository that you created in this walkthrough.
These cleanup steps will remove only the resources that were provisioned in this walkthrough. You may need to remove other permission sets or IAM Identity Center assignments if any were created beyond what we’ve described.
Conclusion
In this post, we introduced an automated pipeline that allows you to manage your IAM Identity Center with AWS DevOps services. After implementing this solution, you should be able to source-control your IAM Identity Center permission sets and account assignments using your own code repository on AWS CodeCommit or an external Git repository using CodeConnections. In this way, you save time by avoiding repetitive manual changes and troubleshooting inconsistent issues that are caused by unexpected operational incidents. You can also audit user access across your organization with confidence.
Do you have feedback about this blog post? Please submit comments below. You can also post questions on the AWS re:Post forum.
About the authors
 Wenxin Liu
Wenxin Liu is a cloud infrastructure architect with AWS Professional Services. Wenxin advises AWS enterprise customers on how to accelerate cloud adoption and supports their innovations on the cloud. He’s a pet lover and is passionate about snowboarding and traveling.
 Chris Childers
Chris Childers is a cloud infrastructure architect with AWS Professional Services. He helps AWS customers design and automate their cloud infrastructure and supports their adoption of DevOps culture and processes.
 Ashmeet Singh Pahwa
Ashmeet Singh Pahwa is a security consultant with AWS Professional Services. He helps AWS nonprofit customers design, build, and optimize secure infrastructure and data-protection controls, and he helps them automate security processes to drive business outcomes.