AWS for M&E Blog
How-To: Create multiple MediaLive inputs using the same AWS Elemental Link (part 3)
This post is part of a series
AWS Elemental Link features for building flexible and cost-efficient live streaming platforms
Part 1 How-To: Transfer an AWS Elemental Link between AWS Accounts
Part 2 How-To: Transfer AWS Elemental Link between AWS Regions
Part 3 How-To: Create multiple MediaLive inputs using the same AWS Elemental Link (this post)
Introduction
Since its launch in April 2020, AWS Elemental Link has provided a simple to use, configuration-free, cost-efficient way to securely and reliably transport high quality live streams to AWS Elemental MediaLive. Customers are using Link for live stream contribution to AWS Media Services-based workloads for public service announcements, news reporting, live events, and other novel use cases. To enable reliable and resilient architecture for these use cases, MediaLive now supports two new features:
- MediaLive standard input with two Links as redundant sources.
- A single Link can be the source for up to four MediaLive inputs.
In this post, you learn how to use these new features to add the flexibility in operations and improve performance of your live streaming workloads.
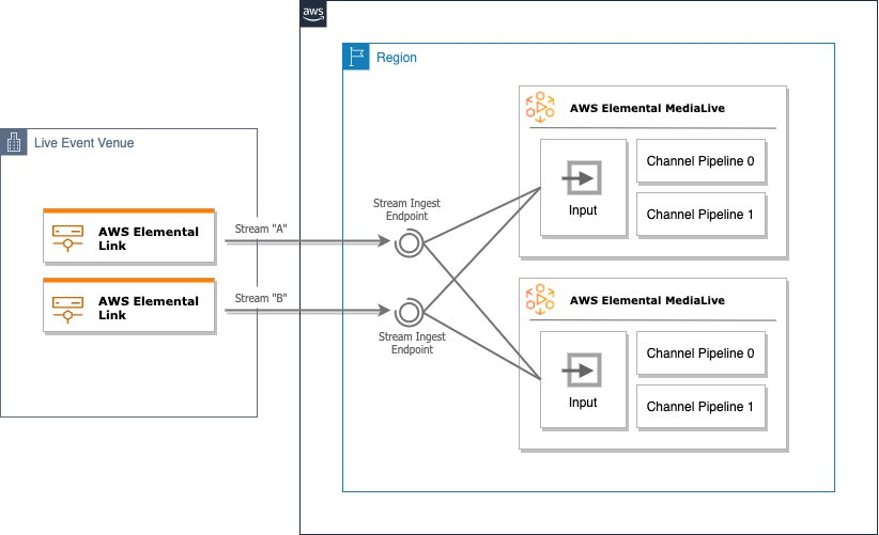
Figure: Two Elemental Link devices streams being used in multiple MediaLive inputs
Requirements
1. AWS Command Line Interface (AWS CLI): Set up AWS CLI on your computer. Instructions for setup can be found here.
2. AWS Management Console: Log in credentials to AWS Management console.
3. Link: Access to two Links attached to the AWS account.
4. AWS Identity & Access Management (AWS IAM) permissions: An AWS User with required permissions in the AWS account as described in the IAM permissions setup instructions.
AWS IAM
Users that operate MediaLive-based workloads will require permissions as per MediaLive IAM permissions documentation. To follow along with this post, ensure your user has the necessary permissions to create and manage MediaLive inputs.
Part 1: Create a standard MediaLive input using two Link devices
For high value live events, you can use two Links as redundant sources for a MediaLive standard input. If the source video contains embedded timing, the MediaLive channel can be set up with epoch locking to produce seamless failover between the two pipelines. To learn more about resilient live stream workflows refer to the post How-to: Build resilient live streaming workloads.
Using AWS Management Console
1. Navigate to the Devices section of MediaLive Management Console. Take note of the device ID of both Links to be used as sources for the standard MediaLive input.
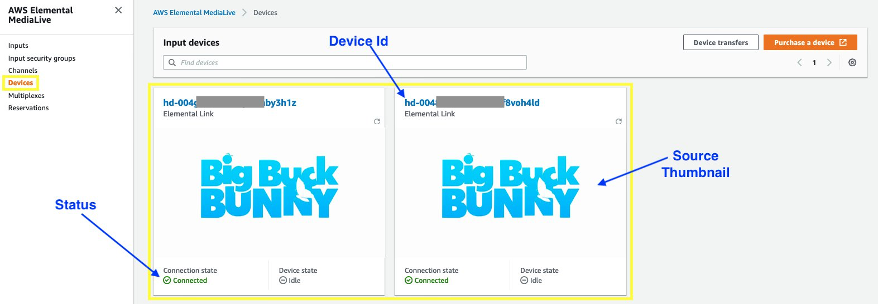
Figure: MediaLive Management Console, Devices page
2. If the Connection status is Connected and a video thumbnail is present, you can start creating the MediaLive Input. Otherwise, check the video input and the internet connectivity to Link.
3. Navigate to the Inputs section of the MediaLive Management Console.
4. Click Create Input button, add an input name, and select the Elemental Link radio button in the input type. You will see the Input devices subsection.
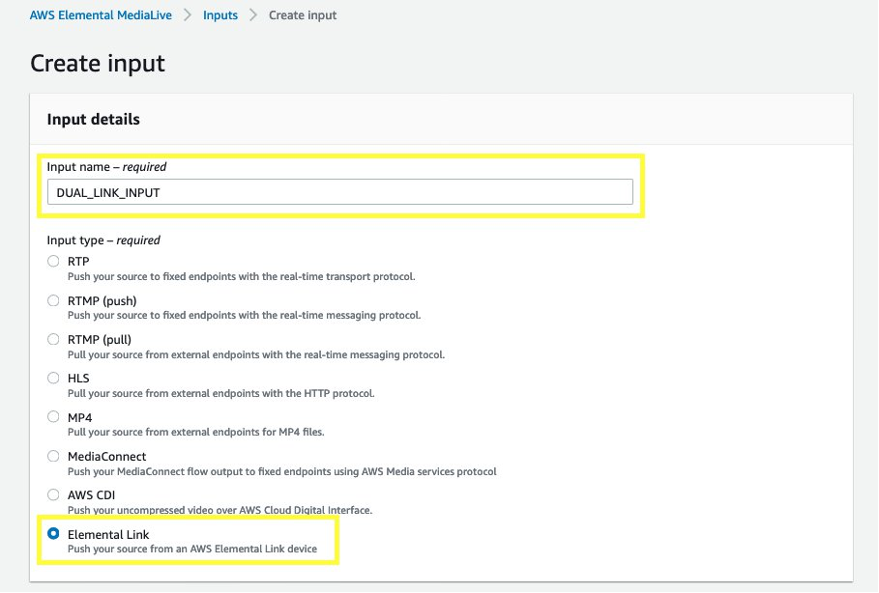
Figure: MediaLive Management Console, create input page
5. In the drop-down, make sure that Input Class is set as STANDARD_INPUT
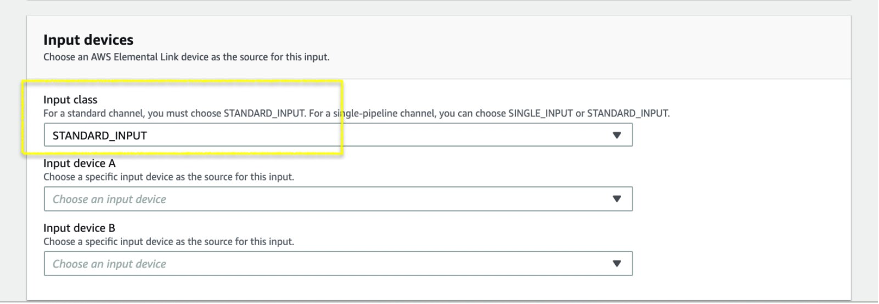
Figure: Create Input page, focus on Input class
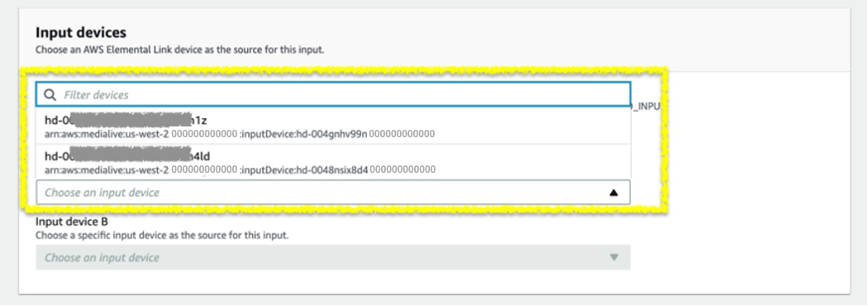
Figure: Create Input page, focus on available input devices
6. From the Input device A drop-down select the first Link you would like to associate with the input.
7. Similarly, from the Input device B drop-down select the second Link you would like to associate with the input.
8. Click Create to complete creating the MediaLive Standard input. You can attach this input to a MediaLive Standard channel.
Using AWS CLI
1. Make sure the AWS CLI configuration is ready. Instructions to set up AWS CLI can be found here.
2. To create the MediaLive Standard input, you need the device ID of the two Links. Run the following command in AWS CLI to get the Link details including the device ID of each available device.
$ aws medialive list-input-devices
{
  "InputDevices": [
    {
      "Arn": "arn:aws:medialive:us-west-2:521000000008:inputDevice:hd-004xxxxxxxxczyxcrhby3h1z",
      "ConnectionState": "CONNECTED",
      "DeviceSettingsSyncState": "SYNCED",
      "HdDeviceSettings": {
        "ActiveInput": "SDI",
        "ConfiguredInput": "SDI",
        "DeviceState": "IDLE",
        "Framerate": "59.94",
        "Height": 1080,
        "MaxBitrate": 9000000,
        "ScanType": "INTERLACED",
        "Width": 1920
      },
      "Id": "hd-004xxxxxxxxczyxcrhby3h1z",
      "MacAddress": "00:25:xx:xx:xx:FD",
      "Name": "Elemental Link",
      "NetworkSettings": {
        "DnsAddresses": [
          "0.0.0.0"
        ],
        "Gateway": "10.13.142.1",
        "IpAddress": "10.13.143.230",
        "IpScheme": "DHCP",
        "SubnetMask": "255.255.254.0"
      },
      "SerialNumber": "476000000002",
      "Type": "HD"
    },
    ...
  ]
}
3. To create a standard input using the two selected Links, use the following command. If a visual validation of Link source is required, navigate to Devices section of MediaLive Management Console to verify.
$ aws medialive create-input --type INPUT_DEVICE --name TwoLinksStdInput \
--input-device '[{"Id":"hd-004xxxxxxxxczyxcrhby3h1z"},{"Id":"hd-004xxxxxxxx5mk0xf8voh4ld"}]'

{
  "Input": {
    "Arn": "arn:aws:medialive:us-west-2:521000000008:input:2600172",
    "AttachedChannels": [],
    "Destinations": [],
    "Id": "2600172",
    "InputClass": "STANDARD",
    "InputDevices": [
      {
        "Id": "hd-004xxxxxxxxczyxcrhby3h1z"
      },
      {
        "Id": "hd-004xxxxxxxx5mk0xf8voh4ld"
      }
    ],
    "InputSourceType": "STATIC",
    "MediaConnectFlows": [],
    "Name": "TwoLinksStdInput",
    "SecurityGroups": [],
    "Sources": [],
    "State": "DETACHED",
    "Tags": {},
    "Type": "INPUT_DEVICE"
  }
}
You have now created a MediaLive standard input that can be attached to a standard MediaLive channel with the built-in redundancy of two independent pipelines with their own Link inputs.
Part 2: Create multiple MediaLive inputs using same Elemental Link devices
MediaLive now supports attaching a Link as a source for up to four MediaLive inputs. In this section, you learn how to use a single Link as the source for multiple MediaLive inputs. The supported number of inputs is independent of input class used.
Using AWS Management Console
1. Follow the steps in part 1 of this post to create a standard MediaLive input. To test the multiple input feature, select Elemental Link in the Input Devices drop-down menu that have the Attached label as shown in the following snapshot. This indicates that the Link is attached to at least one MediaLive input.
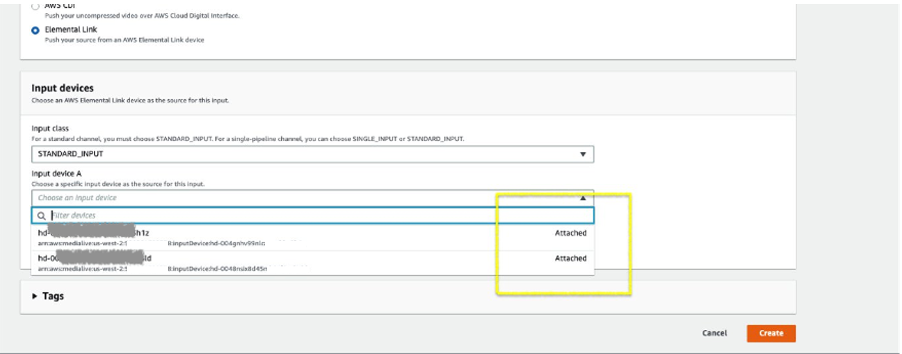
Figure: Create input page, focus on devices attached status
2. Click Create to complete the Input creation process.
- If both Links are attached to fewer than four inputs, the input is created.
- If either of the two Links is already attached to four MediaLive inputs, you receive following error.
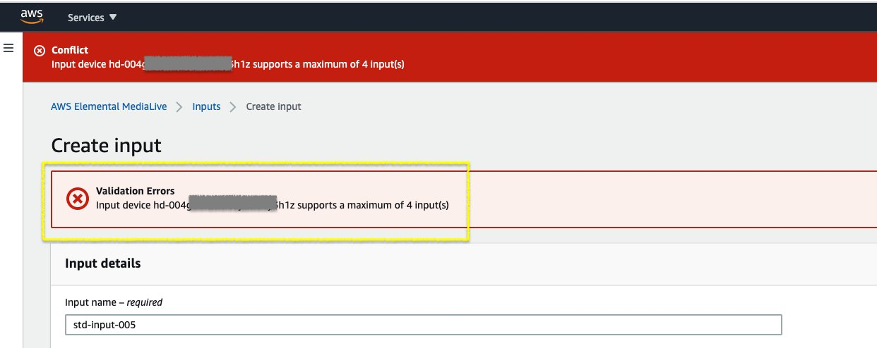
Example validation error when exceeding maximum input creation limits
3. You can create up to four MediaLive inputs using the same Link as source. Each of these MediaLive inputs can be attached to a different MediaLive channel.
Using AWS CLI
1. Follow the AWS CLI steps in the part 1 of this post to create additional standard MediaLive inputs using the following commands.
$ aws medialive create-input --type INPUT_DEVICE --name TwoLinksStdInput --input-device '[{"Id":"hd-004xxxxxxxxczyxcrhby3h1z"}, {"Id":"hd-004xxxxxxxx5mk0xf8voh4ld"}]'2. If either of the Links is already attached to four inputs, the following error is returned.
An error occurred (ConflictException) when calling the CreateInput operation: Input device hd-004xxxxxxxxczyxcrhby3h1z supports a maximum of 4 input(s)3. If the input is created successfully, the input details are returned. You can continue to add up to four MediaLive inputs as needed.
With the knowledge of these new features, you can review your live streaming architecture to add redundancy or build additional channels with same input. If you are new to AWS Elemental Media Services, please refer to the following detailed blog posts to continue building your live streaming workload:
- How-to: Build resilient live streaming workloads.
- How-to: Stream your live video to social media sites using AWS Elemental Link
If you have questions, feedback, or would like to get involved in discussions with other community members, visit the AWS Developer Forums: Media Services.