AWS for M&E Blog
How-To: Transfer an AWS Elemental Link between AWS Accounts (part 1)
This post is part of a series
AWS Elemental Link features for building flexible and cost-efficient live streaming platforms
Part 1 How-To: Transfer an AWS Elemental Link between AWS Accounts (this post)
Part 2 How-To: Transfer AWS Elemental Link between AWS Regions
Part 3 How-To: Create multiple MediaLive inputs using the same AWS Elemental Link
Introduction
AWS Elemental Link devices can now be transferred between AWS accounts. This enables organizations with multiple internal teams to use the same Link device, while maintaining siloed operations. Customers operating AWS Media Services-based multi-tenant streaming platforms can meet their end user’s strict privacy and administrative requirements by keeping AWS resources within a specified AWS account. In this post, you learn how to move Link devices between AWS accounts.
Requirements
- AWS Command Line Interface (AWS CLI): Set up AWS CLI on your computer. Instructions for setup can be found here.
- AWS Management Console: Log in credentials to AWS Management console.
- Link: Access to a Link attached to the AWS account.
- AWS Identity & Access Management (AWS IAM) Permissions for the current device owner account:
a. An IAM user with list, describe, create, and revoke permissions to view and manage device transfers
b. The AWS Region of registration and device id of the Link device
c. The AWS account number of new owner account - AWS IAM permissions for new device owner account:
a. An IAM user with list, describe, accept, and reject permissions to view and manage device transfers
b. AWS Region of registration and device id of the Link
AWS IAM permissions
To view and manage Link devices and device transfer operations, the AWS IAM user must have certain minimum permissions. Users that operate MediaLive-based workloads require additional permissions. The following policy statements show only the permissions required to perform actions in this post. You can refer to the AWS documentation to create an IAM user and assign specific permissions.
Current device owner account
The following policy statement shows the minimum permissions necessary to view, initiate, and cancel the account transfer of an existing Link device.
{
  "Version": "2012-10-17",
  "Statement": [
    {
      "Sid": "VisualEditor0",
      "Effect": "Allow",
      "Action": [
        "medialive:ListInputs",
        "medialive:UpdateInput",
        "medialive:UpdateChannel",
        "medialive:StopChannel",
        "medialive:TransferInputDevice",
        "medialive:UpdateInputDevice",
        "medialive:CancelInputDeviceTransfer",
        "medialive:DescribeInput",
        "medialive:RejectInputDeviceTransfer",
        "medialive:ListInputDeviceTransfers",
        "medialive:ListInputDevices",
        "medialive:DeleteInput",
        "medialive:DescribeInputDeviceThumbnail",
        "medialive:ListChannels",
        "medialive:AcceptInputDeviceTransfer",
        "medialive:DescribeChannel",
        "medialive:DescribeInputDevice"
      ],
      "Resource": "*"
    }
  ]
}
New device owner
The following policy statement shows the minimum permissions necessary to view and accept the transfer of an incoming Link device account transfer.
{
  "Version": "2012-10-17",
  "Statement": [
    {
      "Sid": "VisualEditor0",
      "Effect": "Allow",
      "Action": [
        "medialive:RejectInputDeviceTransfer",
        "medialive:ListInputDeviceTransfers",
        "medialive:ListInputDevices",
        "medialive:DescribeInputDeviceThumbnail",
        "medialive:AcceptInputDeviceTransfer",
        "medialive:UpdateInputDevice",
        "medialive:DescribeInputDevice"
      ],
      "Resource": "*"
    }
  ]
}
Step 1: Initiate Link transfer
To initiate a Link transfer, ensure that user permissions are in place as described in the AWS IAM permissions section. The Link transfer instructions are provided for both AWS Management Console and AWS CLI.

Transfer using the AWS Management Console
In the following instructions, you learn how to complete a Link transfer between two accounts using the AWS Management Console. To do so, you need the device id and the receiving AWS account number.
Note: To initiate a Link transfer, the Link must not be currently associated with a MediaLive input. Navigate to the Inputs section on the MediaLive Management Console. Identify MediaLive inputs of type INPUT_DEVICE. Click on the inputs to verify the source device. Delete or edit the input to remove association of the Link with the input.
1. Navigate to the Devices section. Select the Link that you want to transfer. You are then taken to the Link’s overview page.
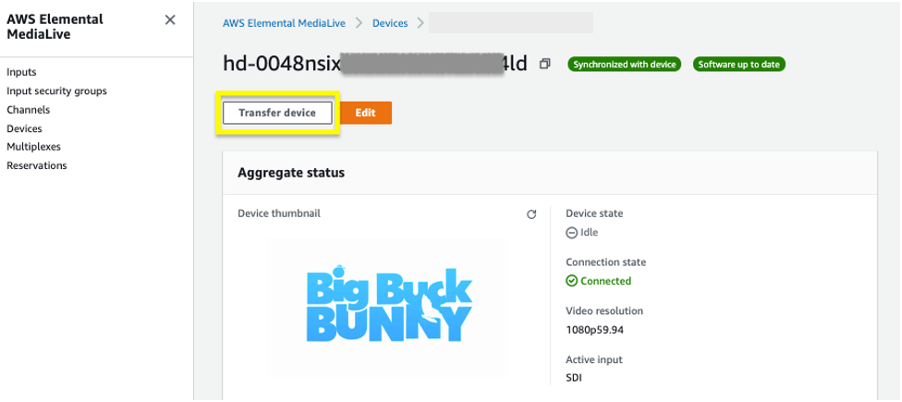
Figure: MediaLive Management Console, Devices page.
2. Click the Transfer device button to begin transfer process.
3. In the window that appears, select radio button to Transfer to another AWS account and enter the Target account ID of the recipient AWS account. Include a Transfer message for the recipient to add context to the transfer. Click Transfer button to complete the device transfer.
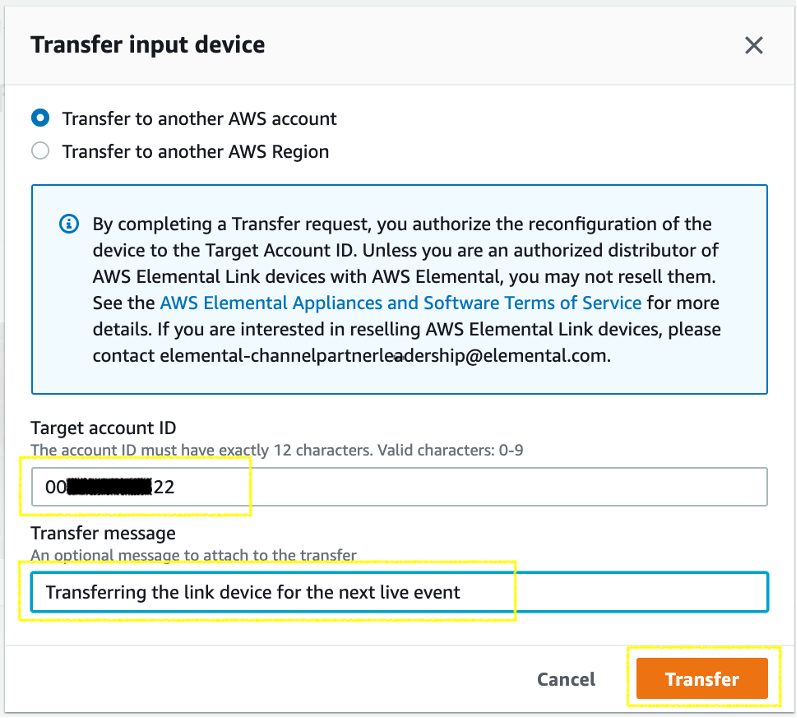
Figure: Transfer device window
- If the transfer initiation is successful, a success message appears.

Figure: Transfer device success notification
- If you get the following error, you must follow Steps 1 and 2 of this section to remove any association of this Link with a MediaLive input.
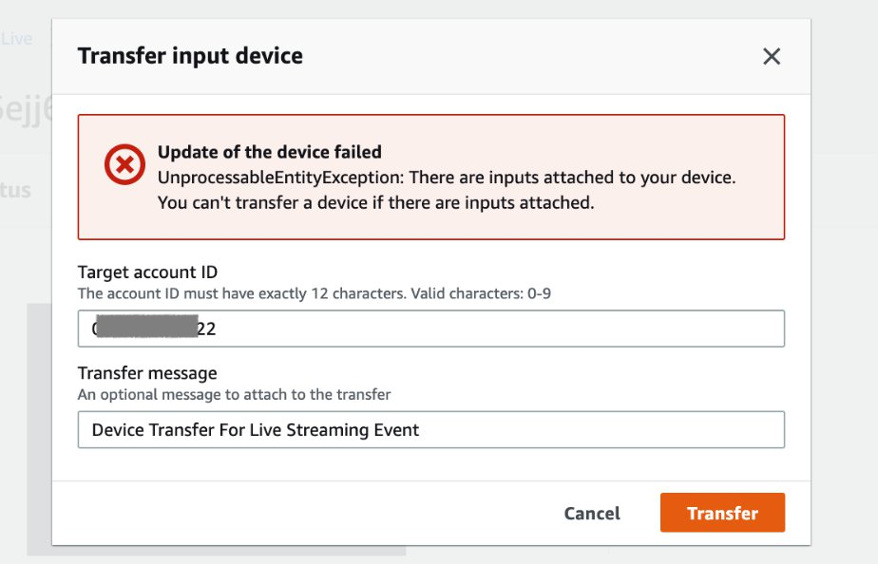
Figure: Transfer device failure notification
- If you need to revoke the transfer, navigate to Outgoing Transfer, select the radio button for the device, and click Revoke. The device transfer is cancelled and the Link is available again in the Devices. The revoke step must be completed before the transfer is accepted by the receiving AWS account.

Using AWS CLI
1. Make sure that the AWS CLI configuration is ready with the credentials of the AWS account initiating the transfer. Instructions to set up AWS CLI can be found here.
2. To identify the device to be transferred, you can list all the devices associated with the account. The results display the device details including source settings and status.
$ aws medialive list-input-devices
{
  "InputDevices": [


    {
      "Arn": "arn:aws:medialive:us-west-2:300000000098:inputDevice:hd-004xxxxxxxxxxxxxxxil3f6i",
      "ConnectionState": "CONNECTED",
      "DeviceSettingsSyncState": "SYNCED",
      "HdDeviceSettings": {
        "ActiveInput": "HDMI",
        "ConfiguredInput": "AUTO",
        "DeviceState": "IDLE",
        "Framerate": "59.94",
        "Height": 1080,
        "MaxBitrate": 9000000,
        "ScanType": "PROGRESSIVE",
        "Width": 1920
      },
      "Id": "hd-004xxxxxxxxxxxxxxxil3f6i",
      "MacAddress": "00:25:4C:AA:AA:AA",
      "Name": "Elemental Link",
      "NetworkSettings": {
        "DnsAddresses": [
          "0.0.0.0"
        ],
        "Gateway": "10.0.0.1",
        "IpAddress": "10.0.0.189",
        "IpScheme": "DHCP",
        "SubnetMask": "255.255.255.0"
      },
      "SerialNumber": "476000000951",
      "Type": "HD"
    }
  ]
}
3. Now list the MediaLive inputs to verify if the device is attached to any input. You cannot transfer a device that is associated with an input.
$ aws medialive list-inputs
{
  "Arn": "arn:aws:medialive:us-west-2:301000000698:input:3600046",
  "AttachedChannels": [],
  "Destinations": [],
  "Id": "3600046",
  "InputClass": "SINGLE_PIPELINE",
  "InputDevices": [
    {
      "Id": "hd-004xxxxxxxxxxxxxxxil3f6i"
    }
  ],
  "InputSourceType": "STATIC",
  "MediaConnectFlows": [],
  "Name": "LINK_1",
  "SecurityGroups": [],
  "Sources": [],
  "State": "DETACHED",
  "Tags": {},
  "Type": "INPUT_DEVICE"
}
4. If the Link device is attached to an input, you can delete the input or update the input to associate it with a different device. If the State of the input is ATTACHED, you must first remove it from the attached channel before deleting the input.
$ aws medialive delete-input --input-id 3600046
5. The device is now ready to initiate the transfer. Run the following MediaLive command using the device id and the receiving account number.
$ aws medialive transfer-input-device --input-device-id hd-004xxxxxxxxxxxxxxxil3f6i --target-customer-id 467000000645 --transfer-message "Transferring the Link device for the next live event"
- If there is no error, the device transfer is successful and you can verify using the following command
$ aws medialive list-input-device-transfers --transfer-type OUTGOING
{
  "InputDeviceTransfers": [
    {
      "Id": "hd-004xxxxxxxxxxxxxxxil3f6i",
      "Message": "Transferring the Link device for the next live event"
    ,
      "TargetCustomerId": "467000000645",
      "TransferType": "OUTGOING"
    }
  ]
- If you need to revoke the outgoing Link transfer, you are able to do that before the device transfer is accepted by the receiving account using the following command. If no error is returned, the Link is again available under the Devices section of account initiating the transfer.
$ aws medialive cancel-input-device-transfer --input-device-id hd-004xxxxxxxxxxxxxxxil3f6i
- If you had an input associated with the device, the device transfer fails and an error is returned. Follow the steps 3 and 4 of this section to remove the association and try the transfer command again.
$ aws medialive transfer-input-device --input-device-id hd-004xxxxxxxxxxxxxxxil3f6i --target-customer-id 467000000645 --transfer-message "Transferring the Link device for the next live event"

An error occurred (UnprocessableEntityException) when calling the TransferInputDevice operation: There are inputs attached to your device. You can’t transfer a device if there are inputs attached.
You have successfully initiated the Link transfer. In the next section, you learn how to accept or reject the incoming device transfer requests.
Step 2: Accept or reject device transfer
To accept or reject an incoming device transfer, ensure that user permissions are in place as described in AWS IAM permissions section. The device transfer acceptance and rejection instructions are provided for both AWS Management Console and AWS CLI.
Using AWS Management Console
1. On the recipient account, navigate to the Devices section of the MediaLive Management Console. Click the Device transfers button.

Figure: MediaLive Management Console, Devices page
Note: The Link device remains associated with the same AWS Region on transfer. A Device Region transfer can be used later to change its AWS Region.
2. Ensure the AWS Region selected in the AWS Management Console matches the AWS Region the Link was attached to in the transferring account. The Link is listed in the Incoming transfers tab as the following image shows.
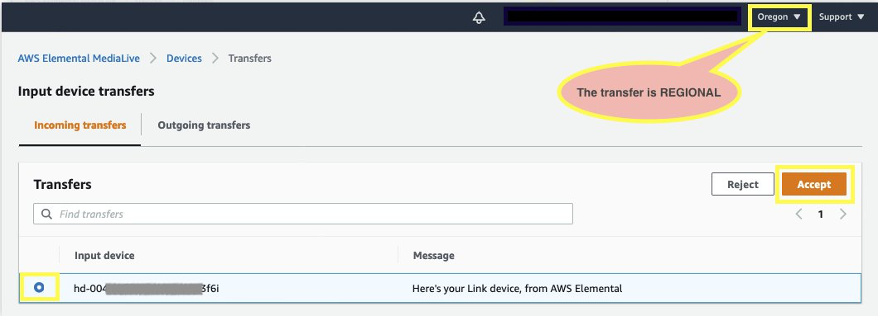
Figure: View of incoming device transfers
- To accept the transfer, select the radio button next to the Link and click the Accept button. If the transfer is successful, the following success message appears.

Figure: Transfer receipt success notification
- To reject the transfer, select the radio button next to the Link and click the Reject button. The Link is removed from the Incoming transfers tab of receiving account and is available again in the Devices section of the AWS account that initiated the transfer.
3. After successful transfer, validate Link is listed in the Devices section of the MediaLive Management Console for the receiving account. It may take up to 1 minute for the Link to become available in the Devices section.
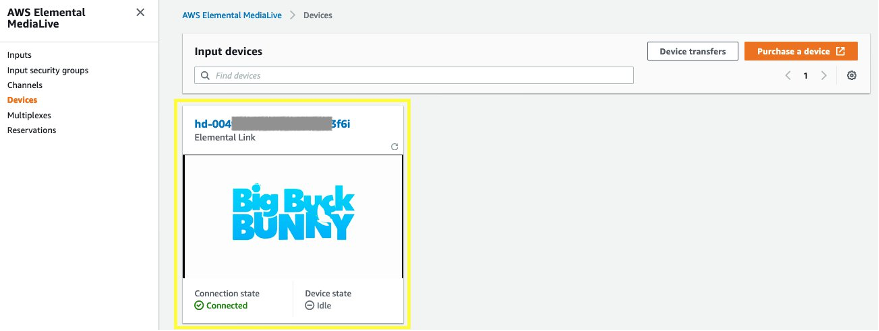
Figure: MediaLive Management Console, Devices page
4. Continue to set up the Link with your MediaLive channels by following the user guide.
Using AWS CLI
1. Make sure that the AWS CLI configuration is ready with the credentials of the AWS account receiving the transfer. Instructions to set up AWS CLI can be found here.
2. To find the Id of the available Link, use the list incoming transfers command.
$ aws medialive list-input-device-transfers --transfer-type INCOMING
{
  "InputDeviceTransfers": [
    {
      "Id": "hd-004xxxxxxxxxxxxxxxil3f6i",
      "Message": "Here's your Link device, from AWS Elemental",
      "TransferType": "INCOMING"
    }
  ]
3. To reject the incoming device transfer, use the following command. If there are no errors, the device transfer is cancelled and Link is re-listed under the AWS account that initiated the transfer.
$ aws medialive reject-input-device-transfer --input-device-id hd-004xxxxxxxxxxxxxxxil3f6i
4. To accept the incoming device transfer, use the following command. If there are no errors, the Link is listed in the receiving AWS account.
$ aws medialive accept-input-device-transfer --input-device-id hd-004xxxxxxxxxxxxxxxil3f6i
5. To validate the device transfer, run the command to list input devices in the receiving account. You can see device settings and input details of the transferred Link.
$ aws medialive list-input-devices
{
  "InputDevices": [
    {
      "Arn": "arn:aws:medialive:us-west-2:467000000645:inputDevice:hd-004xxxxxxxxxxxxxxxil3f6i",
      "ConnectionState": "DISCONNECTED",
      "DeviceSettingsSyncState": "SYNCING",
      "HdDeviceSettings": {
        "ConfiguredInput": "AUTO",
        "MaxBitrate": 9000000
      },
      "Id": "hd-004xxxxxxxxxxxxxxxil3f6i",
      "MacAddress": "00:25:4C:AA:AA:AA",
      "Name": "Elemental Link",
      "NetworkSettings": {},
      "SerialNumber": "476000000951",
      "Type": "HD"
    }
  ]
}
6. Continue to setup the device with your MediaLive channels by following the user guide.
In this post, you learned how to use the Link device transfer feature of MediaLive. This feature enables customers to build cost efficient live streaming workflows through re-use of purchased hardware. To continue building your streaming workload, please refer to the following detailed blog posts:
- How-to: Build resilient live streaming workloads
- How-to: Stream your live video to social media sites using AWS Elemental Link:
If you have questions, feedback, or would like to get involved in discussions with other community members, visit the AWS Developer Forums: Media Services.