AWS for M&E Blog
Live stream highlights with AWS Media Services
Using Amazon Web Services (AWS), live stream broadcasting has become simpler than ever before. AWS Elemental MediaLive and AWS Elemental MediaPackage provide delivery of live streams or video on demand (VOD) assets to the end consumer. Sports and other live events demand extracting certain segments or golden moments from the live video and saving them as VOD assets as highlights or for training purposes.
This blog post explains how to set up a Real-time messaging protocol (RTMP) live stream from a camera source and deliver it to the user in near real time using AWS Elemental MediaLive, AWS Elemental MediaPackage, and AWS Elemental MediaConvert. We’ll discuss how to save clips within a particular time frame as a video file that can be played later.
Following are links to AWS service documents related to this post.
Live Streaming on AWS
https://aws.amazon.com/solutions/implementations/live-streaming-on-aws/
Using RTMP to AWS Media Services
https://aws.amazon.com/blogs/media/connecting-ffmpeg-using-rtmp-to-aws-media-services-in-the-cloud/
Links to AWS services used in this blog post
AWS Elemental MediaLive (MediaLive), a broadcast-grade live video processing service that creates high-quality streams for delivery to broadcast TVs and internet-connected devices.
AWS Elemental MediaPackage (MediaPackage), a service that prepares, protects, and distributes your video content to a broad range of connected devices.
AWS Elemental MediaConvert (MediaConvert), a file-based video transcoding service with broadcast-grade features.
Amazon Simple Storage Service (Amazon S3), an object storage service offering industry-leading scalability, data availability, security, and performance.
Solution overview

Figure 1: Solution overview
The solution uses a camera device for capturing the video, and for this example, we’ll choose a GoPro. You can also use a broadcasting studio software like Open Broadcaster Software (OBS) as a streaming video source.
We’ll set up the live video to stream to an input provided by a MediaLive channel using the RTMP push method. MediaLive will encode the video in real time, compressing the live stream based on channel output configuration. The destination can either be an HLS output or an archive to an Amazon S3 bucket or another RTMP live video endpoint. For our purpose, we will use the MediaPackage destination with an HLS endpoint to receive the video and capture segments to save them as clips in addition to the live stream.
Now that the video is in the scope of MediaPackage, the stream can be packaged to multiple outputs for live broadcasting. MediaPackage supports HLS, DASH, CMAF, and Microsoft Smooth through origin endpoints. For saving clips, MediaPackage provides a harvest feature that captures segments from within a given time frame and saves them in an Amazon S3 bucket with an m3u8 playlist so the clips can be consumed as they are. But using AWS Elemental MediaConvert to convert into a MP4 VOD asset will also facilitate wide playback options and simple sharing.
Walkthrough
Prerequisites
- an AWS account
- choose region “us-west-2” to create all resources
- a GoPro camera with the Quik app installed on your phone
- You can also use OBS studio or any other broadcasting software with RTMP push options.
- an existing Amazon S3 bucket to save clips of the highlights
- refer to this link on how to create an Amazon S3 bucket
https://docs.aws.amazon.com/AmazonS3/latest/userguide/creating-bucket.html
- refer to this link on how to create an Amazon S3 bucket
Steps
- Set up an AWS Elemental MediaPackage channel
First, we’ll set up the MediaPackage channel by following the steps below:
-
- Log on to the AWS console and go to MediaPackage.
- Select “Create New Channel.”
- As channel ID, you enter “MyMediaPackageChannel”; leave everything else as is.
- Make sure the Input type is “Apple HLS.”
- Select “Create” to create a new channel.
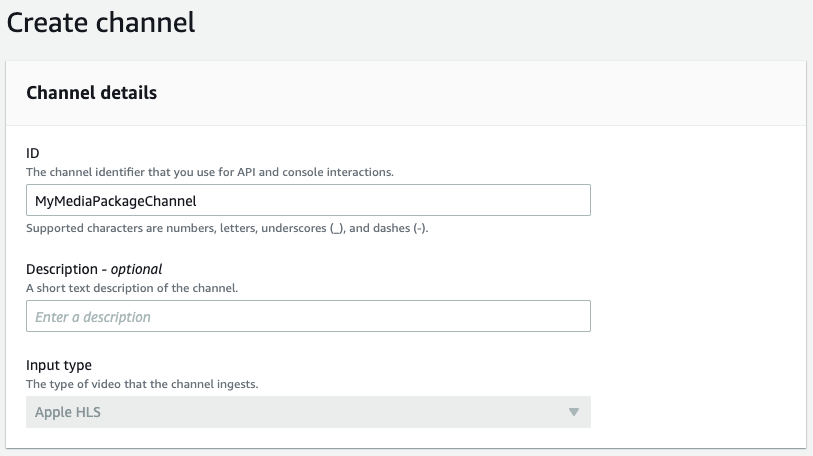
Figure 2: Creating a channel in MediaPackage
-
- After the channel is created, select the channel name.
- Under the Origin endpoints, select “Manage Endpoints.”
- Select Add to add an endpoint.
- Give “MyMediaPackageEndpoint” as the endpoint
- Facilitate Startover window by entering 86400 (24 hours).
- Make sure the packaging type is “Apple HLS.”
- Leave everything else as is and select “”
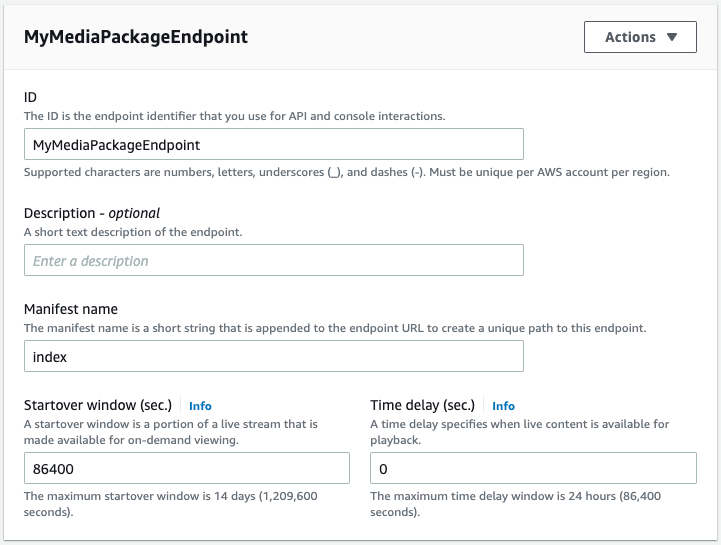
Figure 3: Adding MediaPackage Endpoint
2. Set up an AWS Elemental MediaLive input
Now, go to the MediaLive console and follow the steps below to setup the RTMP input:
-
- Select “Create input” under the Inputs menu.
- Enter “MyRTMPInput” as the Input name.
- Select “RTMP (Push)” for the Input type.
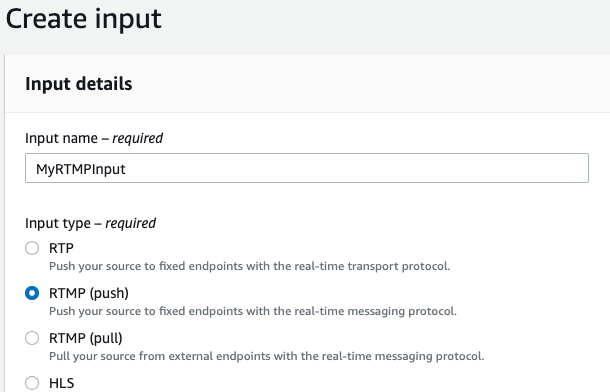
Figure 4: Creating a MediaLive input
-
- Create a security group and enter your IP CIDR block.
- Go to https://checkip.amazonaws.com/ to find your public IP address.
- Enter your IP address with CIDR block /32 (ex: xxx.xxx.xxx.xxx/32).
- Under Input class, select “”
- Enter Destination A application name and instance.
For example: Application name = mystream; Application Instance = live

Figure 5: Adding input security groups and destinations
-
- Leave everything else as is and select “”
- Note down the RTMP URL for Destination A.
For example: rtmp://[ip-address]:1935/mystream/live
3. Set up an AWS Elemental MediaLive channel
In the same MediaLive console, go to the channels menu and select Create Channel.
-
- Under Channel name, enter “”
- Choose “Create role from template” under IAM role.
- If the role already exists, select Use existing role and choose the role from the drop-down menu.

Figure 6: Creating channel in MediaLive
-
- Under Channel template, choose “HTTP live streaming” with MediaPackage.
- Select SINGLE_PIPELINE under Channel class.
- Choose Input codec = MPEG2; Input resolution = HD; Maximum input bitrate = MAX_20_MBPS.
- Leave everything else to the default values.

Figure 7: Configuring Channel template
-
- Attach Input attachments on the left side, select “Add”
- In the Attach Input form, choose the input you already created, “MyRTMPInput,” and select
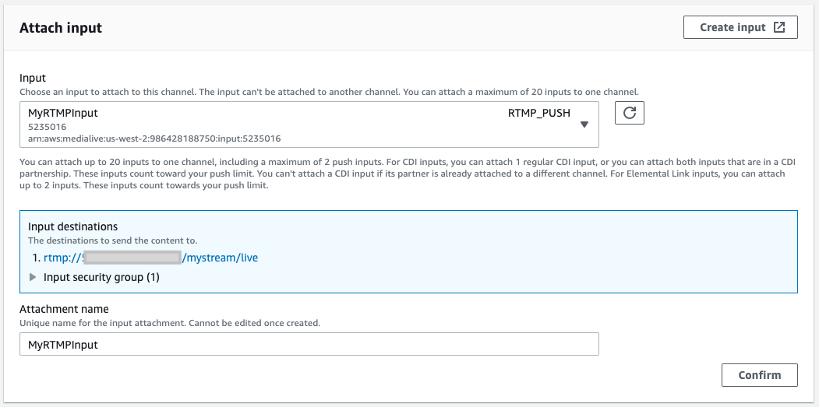
Figure 8: Attaching input to the channel
-
- Under Output groups, select the group name that is already created, “MediaPackage group.”
- For your MediaPackage destination, choose your MediaPackage channel ID created in step 1.c above.

Figure 9: Choose MediaPackage channel
-
- Now select “Create Channel.
4. Set up GoPro with the Quik app for live streaming
-
- Turn on your GoPro and pair it with your Quik App on your phone with a Wi-Fi network.
- For details on connecting, check the GoPro manual.
- When the GoPro and Quick app are paired, you can connect to the camera by selecting “Control your GoPro.”
- The app will prompt for connection; select “”
- When connected, the camera view will appear in the app.
- Choose the menu “Live Stream” and select platform “”
- Enter the RTMP URL noted in step 2.j above.
- For example: rtmp://[stream-ip-address]:1935/mystream/live
- Select resolution 720p, but depending on the camera version, you can also use 1080p, 2k or 4k.
- Select “Setup Live Stream.”
- The app will stream the camera feed up through the Wi-Fi connection and show the status info.
- The app might ask for permission to use the camera.
- Click Yes to any permission requests.

Figure 10: GoPro live setup
5. Test live stream
-
- Go to the MediaPackage console and select the channel created earlier, “MyMediaPackageChannel”.
- Under Origin endpoints, click on the link “Preview”.
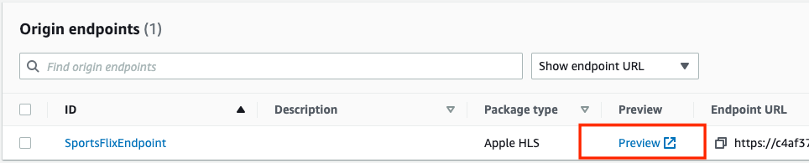
Figure 11: Preview the live streaming
-
- This will open a preview player in a new tab and start playing the live video that is streamed from your camera.
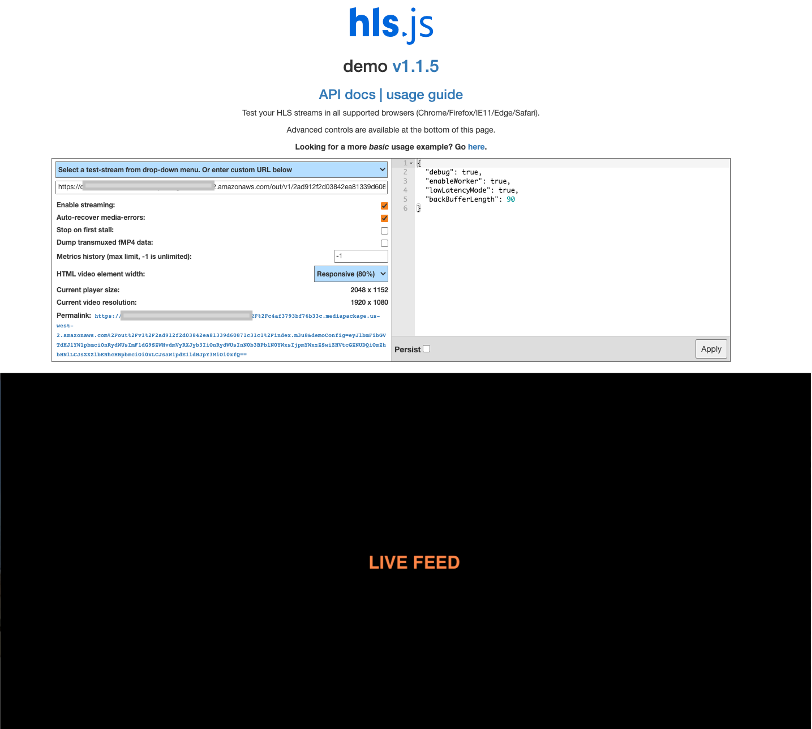
Figure 12: Live feed preview
6. Capturing highlights
-
- While watching the live stream, you have the ability to save a clip of the past seconds/minutes.
- Using the AWS Command Line Interface (AWS CLI), a unified tool to manage your AWS service, you can harvest these sections of the live stream as clips.
- Before you begin, you need an Amazon S3 bucket to save the extracted content.
- Choose your existing Amazon S3 bucket.
- Assign IAM roles for MediaPackage to write to the Amazon S3 bucket by following this guide.
- Note down the Amazon Resource Name (ARN) to uniquely identify the new role.
For example: “arn:aws:iam::[account-id]:role/MediaPackageWriteToS3”
-
- You can harvest using the console, but it is much easier to create the job by running an AWS CLI command. An example of a workflow for operators would be to push a button to save a clip that can fire the AWS CLI command in the background as many times as necessary and at any given time of the live stream.
- Make sure you set up AWS CLI and configure your login with access and secret keys.
- For details on this, follow this link.
- Make sure you use the same region used earlier (“us-west-2”).
- Open a terminal and run the following command to save the clip for the past 60 seconds. Replace the variable values between square brackets “[]” with your given values. Use PowerShell if you are using windows.
-
- In the above command:
- The first line is the AWS CLI command for the MediaPackage harvest job.
- Parameter “origin-endpoint-id” is the MediaPackage endpoint that we created earlier.
- Parameter “id” is a unique ID for the job.
- Parameter “start-time” is the preferred start time in epoch time—for example, 60 seconds before the current time [x-60].
- Parameter “end-time” is the current time in epoch time [x].
- If you are on Linux or a Mac, you can replace start-time and end-time values as below:
- In the above command:
-
-
- If you are on Windows, replace them in PowerShell as below:
-
-
- Parameter “s3-destination” has the properties of the Amazon S3 bucket where the clips will be saved.
- The Amazon S3 properties are key-value pairs of the bucket name, key name (or the clip name), and the ARN of the IAM role created for MediaPackage to facilitate writing to the Amazon S3 bucket.
- The clip name is the file name, and it should end with an extension *.m3u8 (ex: clip1.m3u8).
- When initiated, this command will create a harvest job in the MediaPackage console, where you can check its status.
- When the job is completed, you will see a playlist file in the bucket with TS video image files.
- You can play these files in Quicktime Player by giving the HTTP URL of the playlist file.
- If there are any errors while running this AWS CLI, please refer to the troubleshooting guide here.
- After the command is initiated successfully, you will see a JSON response with the details of the harvest job created, as in this example below:
-
- It might take a while for the job to be completed. You can check the status of any given job by selecting the MediaPackage menu “Harvest Jobs” and clicking on the given Job ID.
- When the job is completed, you will find the playlist file under the Amazon S3 bucket specified.
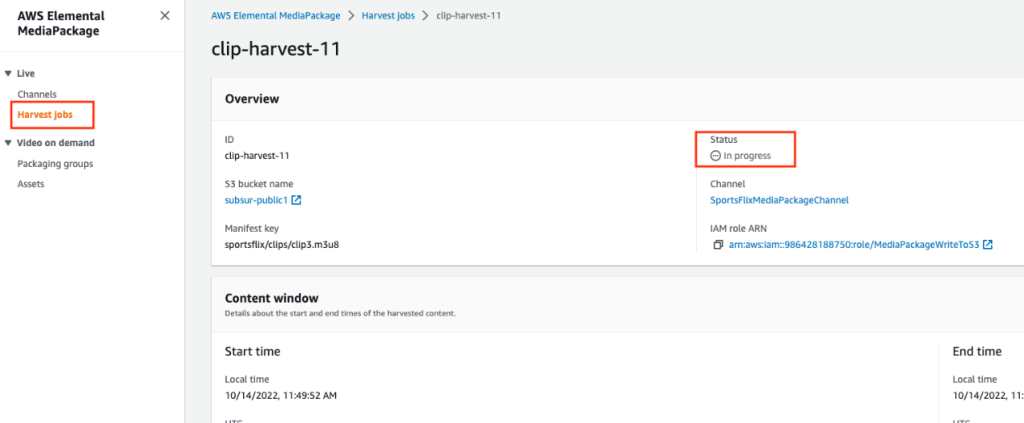
Figure 13: Harvest job status
7. Saving MP4 VOD asset of the highlights
-
- For universal playback, the TS files playlist has to be converted into a single video file.
- We can use AWS Elemental MediaConvert to do this.
- Go to the MediaConvert console and select “Create Job” under
- In the Input file URL, enter the Amazon S3 URL of the playlist file created as an output in step 6.m above.

Figure 14: Creating a MediaConvert Job
-
- Leave everything to the default values.
- Select “Add” under Output groups and choose File group.
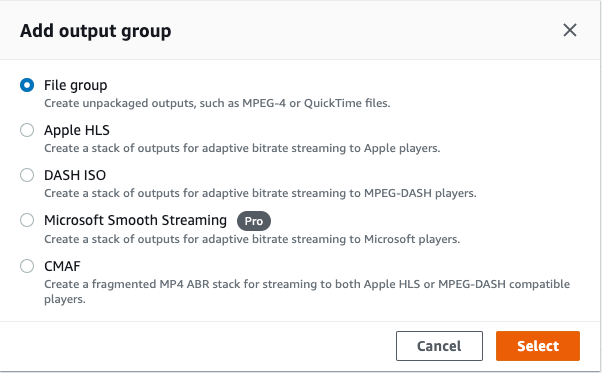
Figure 15: Adding output group as a file
-
- Give a Custom group name, and enter the Amazon S3 file URL under
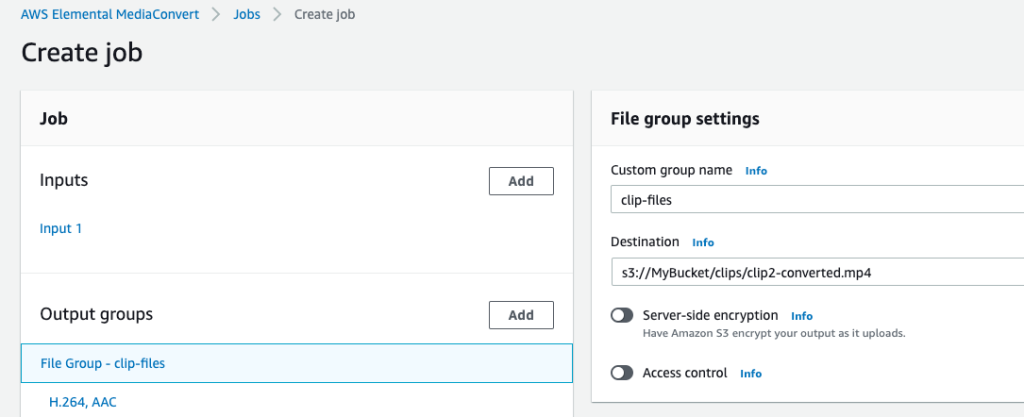
Figure 16: Creating the job with S3 file destination
-
- Leave everything else to default and select “”
- This will create an MP4 file in the destination bucket that you can store for playback or share.
Cleaning up
When you’re finished testing the MediaLive channel and you no longer need it, you can stop and delete it. Also, clean up the video files in the Amazon S3 buckets that were created for testing.
Cost
AWS Media Services pricing varies by a number of properties, such as inputs, active hours, resolution, ingest bitrate, and so forth. Please visit the appropriate links below for pricing and sample calculations:
https://aws.amazon.com/medialive/pricing/
https://aws.amazon.com/mediapackage/pricing/
https://aws.amazon.com/mediaconvert/pricing/
https://aws.amazon.com/s3/pricing/
https://aws.amazon.com/cloudfront/pricing
Conclusion
In this blog, you learned how to set up a live stream using AWS Media Services with a camera source. Additionally, you learned how to capture highlights and save clips of live content as video files.
With this core architecture, you can create a complete broadcasting solution with a web interface for near-real-time playback and multiple push buttons for saving highlights for various timeframes, such as 30 seconds, 60 seconds, and 5 minutes. By using other AWS services, such as AWS Step Functions, which are visual workflows for distributed applications; AWS Lambda, a serverless, event-driven compute service; and Amazon Simple Notification Service (Amazon SNS), a fully managed Pub/Sub service for A2A and A2P messaging, you can manage the streaming session, workflow state, and jobs without having to write complex application logic.