AWS for M&E Blog
How to live stream pre-recorded video using AWS Elemental MediaLive
In this blog post I walk you through how to live stream pre-recorded videos using AWS Elemental MediaLive. This use case is ideal for customers who want to retain control of their messaging by pre-recording their videos and reach a larger audience using multiple social channels like Twitch, YouTube, and Facebook. In 2020, due to the global pandemic, historically in-person events had to be held virtually. With this shift, customers asked for a workflow to provide a better user experience and also reach a broader global audience with multiple time-zones; re-streaming the same event became a new requirement.
This how to provides you with an on-demand, serverless, and cost-effective live streaming workflow that makes use of MP4 file for ingestion and distribution to multiple channels. The MediaLive workflow wizard lets you quickly set up the entire workflow that I’m going to walk you through. If you are looking to stream your live event with live inputs, take a look at Live Streaming on AWS Solution.
Architecture overview
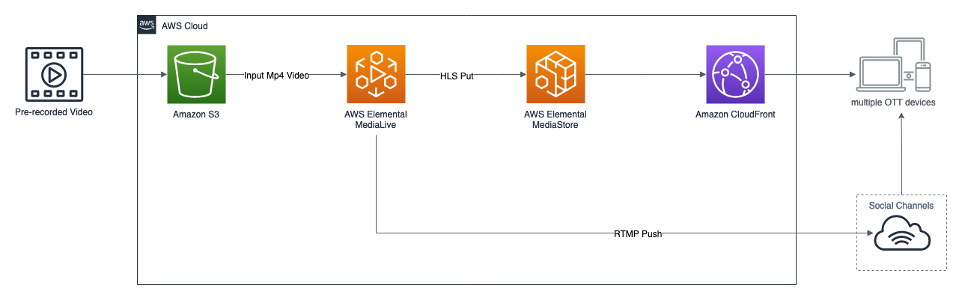
Solution Architecture diagram including Amazon S3, Elemental MediaLive, Elemental MediaStore, Amazon CloudFront to social channels and multiple OTT devices
Overview
- Create an Amazon S3 Bucket
- Upload the pre-recorded video to Amazon S3 Bucket
- Create a MediaStore container
- Create a CloudFront distribution
- Create a MediaLive Input
- Create a MediaLive Channel
- Create a Social Channel Output (Optional)
- Start the MediaLive Channel
- Stop the MediaLive Channel
Prerequisites
Be sure to have the following to get the most out of this blog post. All are recommended but not required.
Required Prerequisites:
- an AWS account
- a Twitch / YouTube / Facebook account and/or the stream key (required for an optional step)
Recommended Prerequisites
- prior experience with MediaLive
- prior experience with AWS Elemental MediaStore
- prior experience with Amazon CloudFront
Before diving in, we recommend familiarizing yourself with the services used throughout this post.
- Amazon Simple Storage Service (Amazon S3) is an object storage service that offers industry-leading scalability, data availability, security, and performance.
- AWS Elemental MediaLive is a broadcast-grade live video processing service.
- AWS Elemental MediaStore is an AWS storage service optimized for media.
- Amazon CloudFront is a fast content delivery network (CDN) service that securely delivers data, videos, applications, and APIs to customers globally with low latency, high transfer speeds, all within a developer-friendly environment.
Cost disclaimer
The AWS resources needed to build this workflow are not covered by the Free Tier, so you will incur additional cost while running. You are responsible for the cost of the AWS services used while running this workflow. Remember to clean up your resources once finished to avoid charges due to long-running resources. For example, for the AWS Ireland Region this workflow costs $1.63 per hour without the Twitch setup, and costs $2.05 per hour with the Twitch setup, excluding the view-based data transfer out to the internet charges for the CloudFront. For more information see the CloudFront pricing page.
Walkthrough
I am going to walk you through the deployment of this workflow using the AWS Management Console. Following these steps, you are going to create an end-to-end live streaming workflow using your pre-recorded MP4 video as an input and output to multiple channels. Then you are going to watch your stream on your player or on your Twitch channel.
Step 1: Create an Amazon S3 Bucket
To store pre-recorded MP4 video, you need to create an Amazon S3 Bucket. This video is going to be the input for your live stream.
To create an Amazon S3 Bucket:
- Sign in to the AWS Management Console
- In the Amazon S3 console, choose Create bucket
- On the Create Bucket page, configure the following settings:
- For Bucket name, enter a DNS-compliant name for your bucket
- For AWS Region, choose the AWS Region where you want the bucket to reside
- Choose Create Bucket
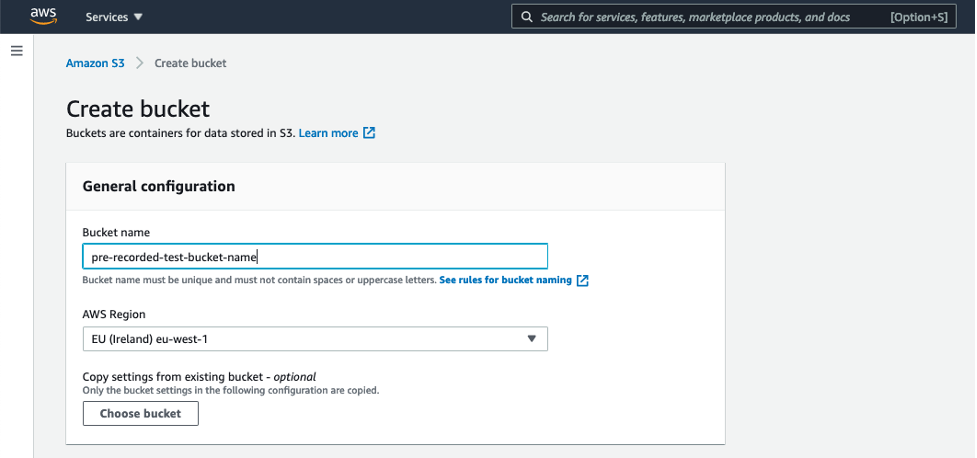
Create an Amazon S3 Bucket using AWS Management Console
Step 2: Upload the pre-recorded video to Amazon S3 Bucket
Now that you created an Amazon S3 Bucket, upload your pre-recorded video to the Amazon S3 Bucket. You can upload video to the Amazon S3 Bucket using AWS Console.
To upload using the AWS Console:
- In the Amazon S3 console, under Buckets, choose your newly created bucket
- Under Objects, choose Upload
- Under Files and folder, choose Add files, choose your pre-recorded video file
- Choose Upload
Step 3: Create a MediaStore container
Create a MediaStore container to be used as a media optimized origin for Content Delivery Network (CDN). MediaLive is going to use the container to store HLS manifests and segments.
To create a MediaStore container:
- In the MediaStore console, choose Create container
- For Container name, enter a name for the container
- Choose Create
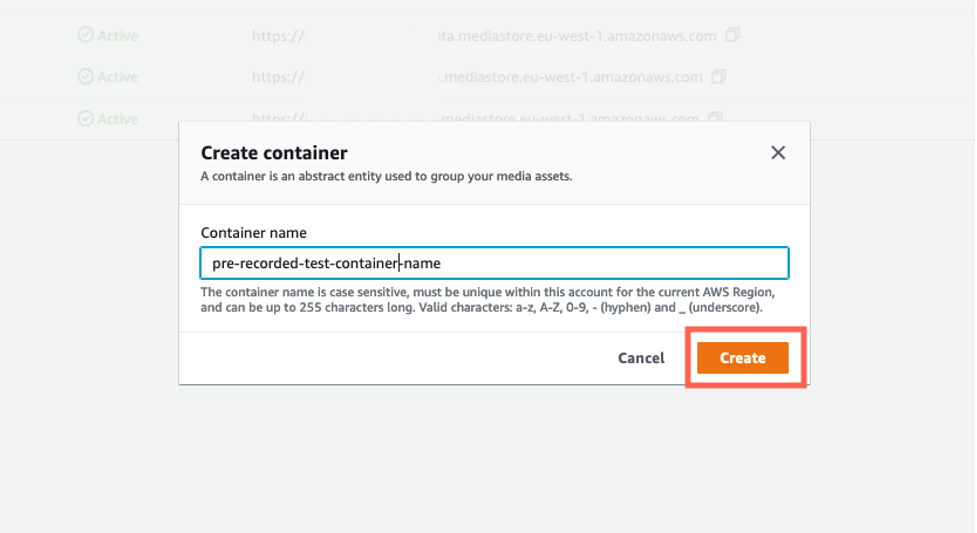
Create a MediaStore container
Once the container has been created successfully, choose the container name.
You need to update the MediaStore container policy to make the container objects read-only accessible to the CloudFront distribution.
To edit the MediaStore container policy:
- On the Container page, choose Container policy
- Choose Edit policy
- Make a note of the arn of your container, then copy/paste the following code
- Replace the resource value with your noted arn of your container
- Choose Save
{
  "Version": "2012-10-17",
  "Statement": [
    {
      "Sid": "PublicReadOverHttps",
      "Effect": "Allow",
      "Action": ["mediastore:GetObject", "mediastore:DescribeObject"],
      "Principal": "*",
      "Resource": "arn:aws:mediastore:<region>:<owner acct number>:container/<container name>/*",
      "Condition": {
        "Bool": {
            "aws:SecureTransport": "true"
        }
      }
    }
  ]
}
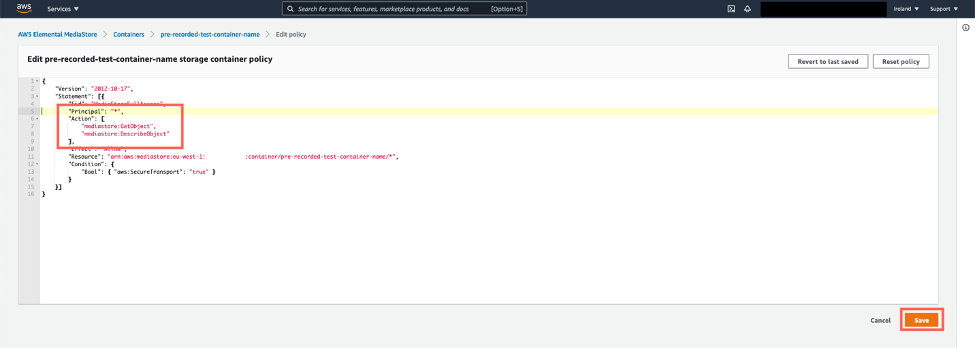
Edit the MediaStore Container policy
To create a MediaStore Container CORS policy:
- On the Container page, choose Container CORS policy
- From Create new policy, choose Create custom policy
- Copy and paste the following policy
- Choose Save
To improve security, change the MediaStore Container CORS policy to restrict read access for a specific domain. Check out the example CORS policy to give read access for a specific domain.
[
  {
    "AllowedOrigins": [
      "*"
    ],
    "AllowedMethods": [
      "GET"
    ],
    "AllowedHeaders": [
      "*"
    ],
    "MaxAgeSeconds": 3000,
    "ExposeHeaders": [
      "*"
    ]
  }
]
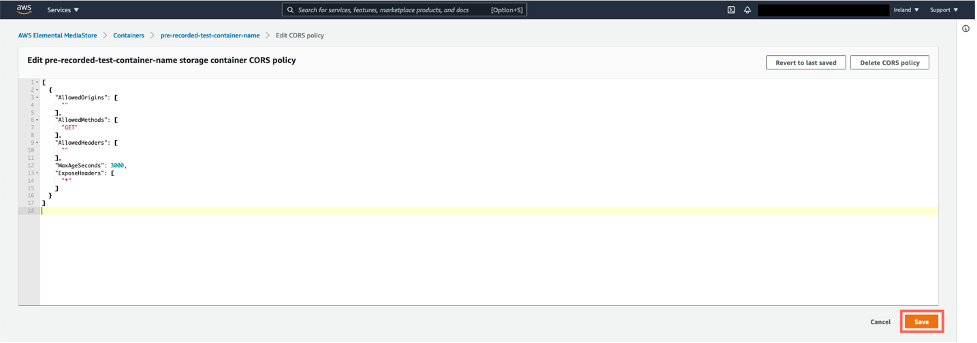
Create a MediaStore Container CORS policy
To create a MediaStore Object lifecycle policy:
- On the Container page, choose Object lifecycle policy
- From Create new policy, choose Create custom policy
- Copy and paste the following policy
- Choose Save
{
  "rules": [
    {
      "definition": {
        "path": [ {"wildcard": "*.ts"} ],
        "seconds_since_create": [
          {"numeric": [">", 300]}
        ]
      },
      "action": "EXPIRE"
    }
  ]
}
To create a MediaStore Metric policy:
- On the Container page, choose Metric policy
- From Create new policy, choose Create custom policy
- Copy and paste the following policy
- Choose Save
{
"ContainerLevelMetrics": "ENABLED"
}
Step 4: Create a CloudFront distribution
Now you can create a CloudFront Distribution using MediaStore as origin.
To create a CloudFront distribution:
- In the CloudFront console, choose Create Distribution
- Choose Get Started
- For Origin Domain Name, choose the MediaStore container that you created earlier
- For Origin Protocol Policy, choose HTTPS Only
- Under Default Cache Behavior Settings
- For Viewer Protocol Policy, choose Redirect HTTP to HTTPS
- for Allowed HTTP Methods, choose GET, HEAD, OPTIONS
- for Origin Request Policy, choose Create a new Policy
- for Name, enter a name for your policy
- for Headers, choose Whitelist, then choose Origin, and then choose Add header
- choose Create cache policy
- for Origin Request Policy, choose refresh, then choose the recently created origin request policy
- Choose Create Distribution
- Copy and note the Domain Name.
We are going to use the CloudFront Domain Name in the following steps to view our output.
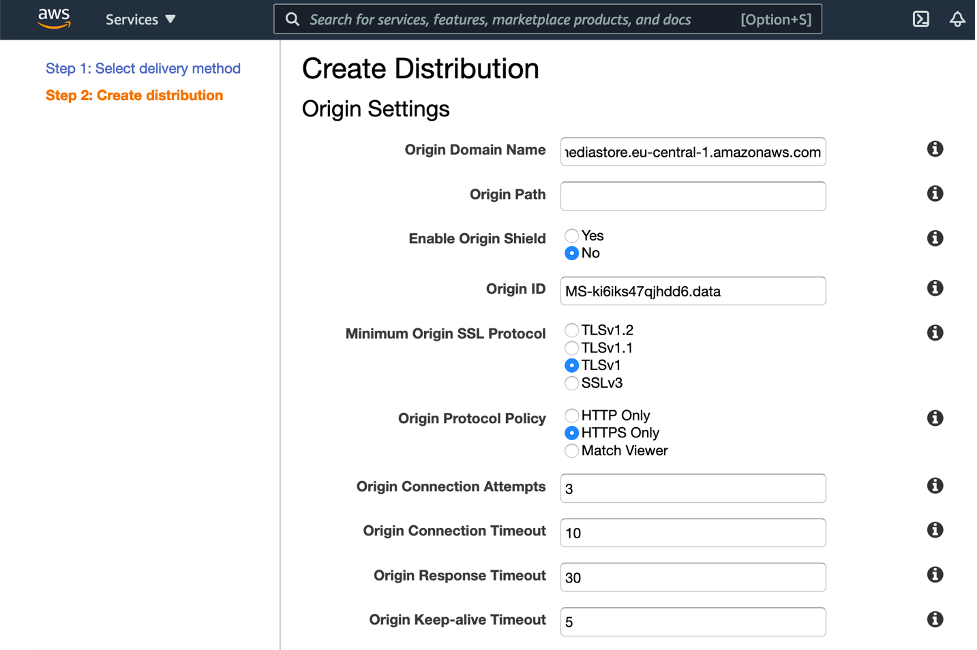
Create a CloudFront Distribution using MediaStore as origin
Step 5: Create a MediaLive Input
Create an MP4 pull input using pre-recorded video stored on an Amazon S3 Bucket.
To create a MediaLive MP4 pull Input:
- Open the MediaLive console
- In the navigation pane, choose Inputs
- On the Inputs page, choose Create input
- For Input name, enter a name
- For Input type, choose MP4
- For Input class, choose SINGLE_INPUT
- Under Input source A, for URL, enter URL of the MP4 video stored on an Amazon S3 Bucket in the following URL format
- Choose Create
s3ssl://YOUR_INPUT_BUCKET_NAME/CONTENT_OBJECT_KEY.mp4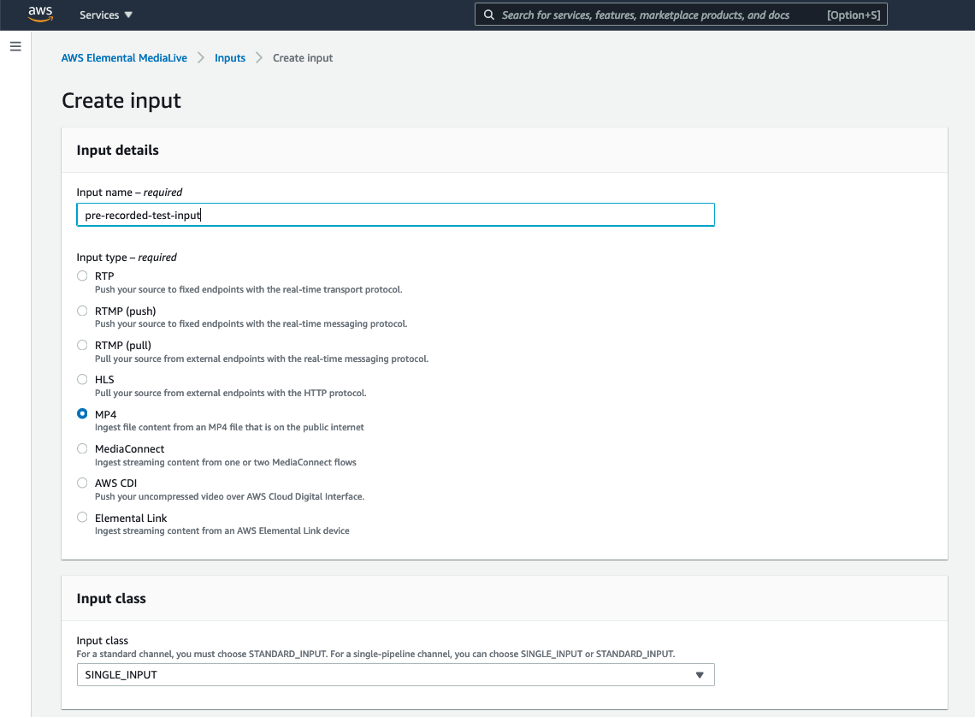
Create a MediaLive MP4 pull input
Step 6: Create a MediaLive Channel
Create a MediaLive Channel to transcode your video and deliver it to MediaStore or social channels like Twitch.
To create a MediaLive Channel:
- Open the MediaLive console
- In the navigation pane, choose Channels
- On the Channels page, choose Create channel
- In the Channel and input details section, in the General info section, for Channel name, enter a channel name
- For IAM role
- If you have an existing IAM role, choose Use existing role and select the IAM role from drop-down list
- If you don’t have IAM role, choose Create role from template
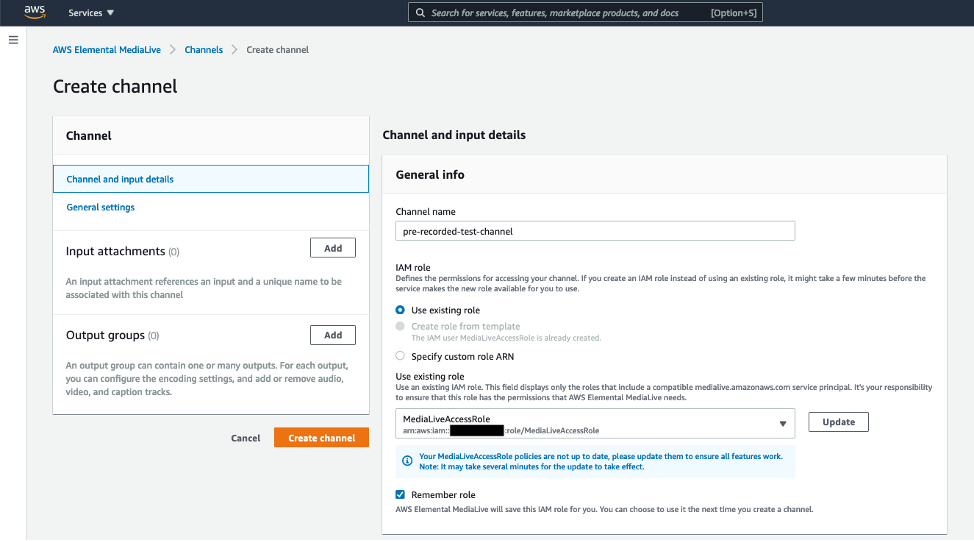
Create a MediaLive Channel, set channel name and IAM Role
- In the Channel template section, for Template, choose Live Event – HLS from the drop-down list
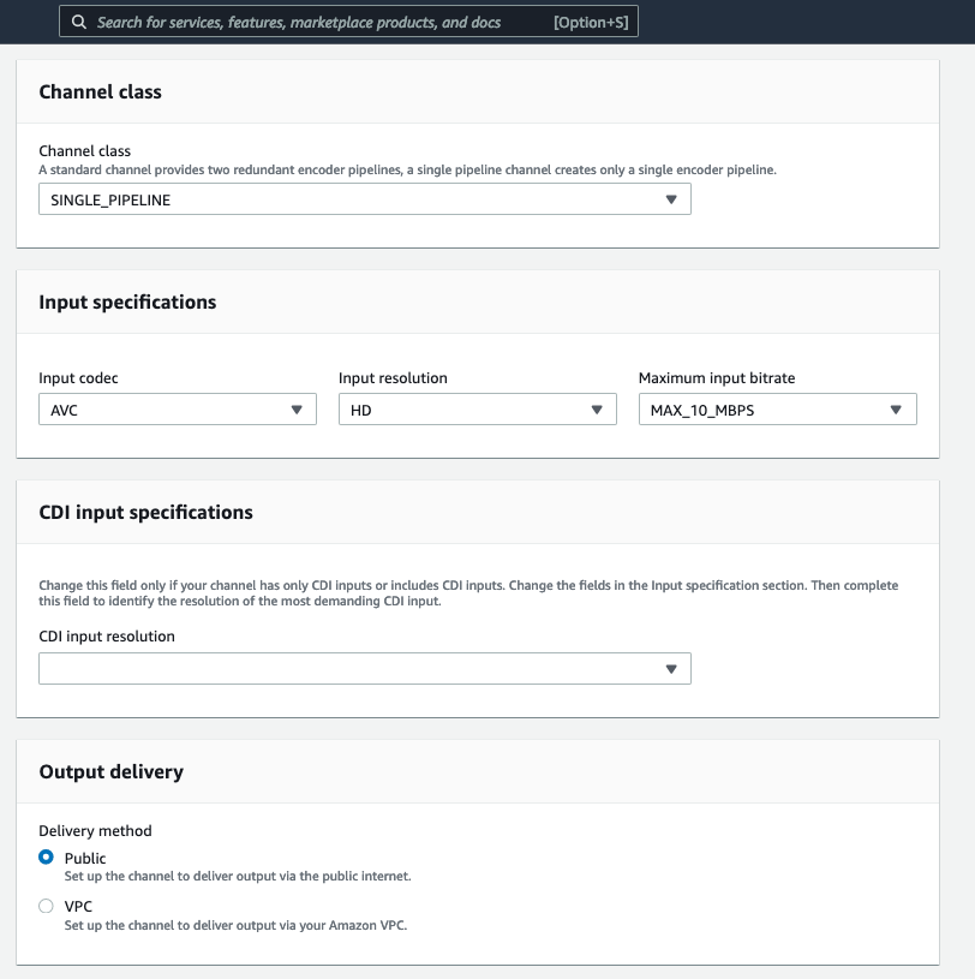
- For Channel Class, choose SINGLE_PIPELINE
- In the Input specifications section, for Input codec, choose AVC, for Input resolution, choose HD, for Maximum input bitrate, choose MAX_10_MBPS
Create a MediaLive Channel, select channel template Live Event – HLS, channel Class and Input specifications like Input codec, input resolution, and maximum input bitrate
- In the Output delivery section, for Delivery method, choose Public
- Under Output groups, in the HD section, in the HLS group destination A, for URL, paste your MediaStore container Data Endpoint then add /live to the end. Replace “https” with “mediastoressl” in the URL
- HLS settings section, for CDN Settings, choose HLS media store
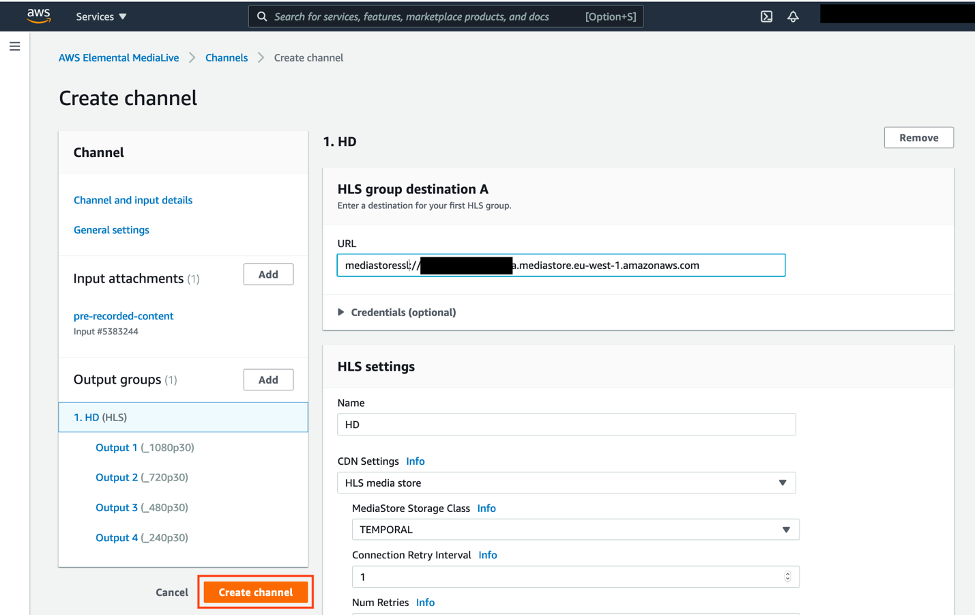
Create a MediaLive Channel, edit destination to MediaStore and change CDN settings
- In the Input attachments section, choose Add
- For Input, select the input from drop-down list
- For Attachment name, enter an input name
- Choose Confirm
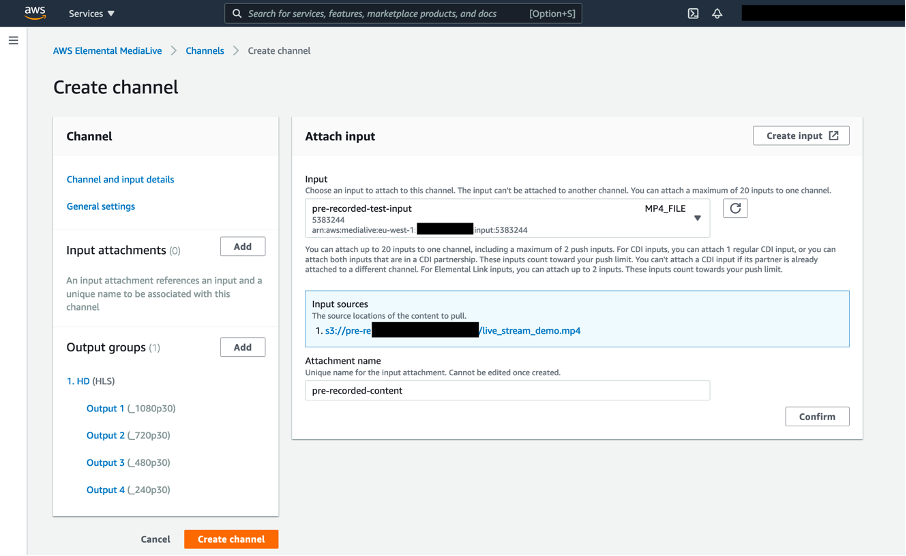
Attach an Input for the MediaLive channel
- Choose Create channel
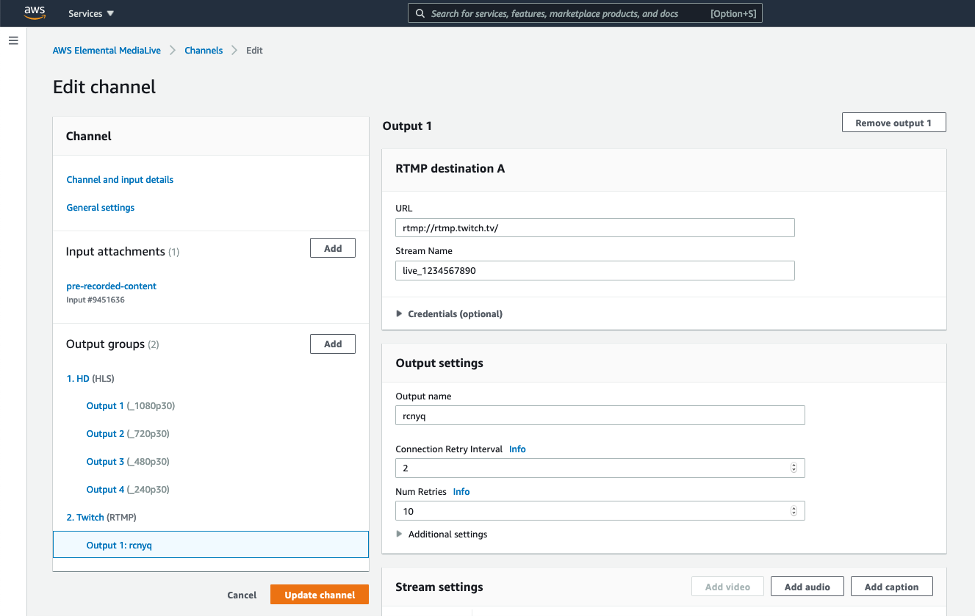
Step 7: Create a Social Channel Output (Optional)
To deliver your stream to social channels like Twitch, create an RTMP Push output group. If you don’t want to stream to social channels, you can skip this part and continue from Starting the MediaLive Channel section.
Once the MediaLive channel has been created, edit MediaLive channel to add an RTMP output group.
To create an RTMP Push output group:
- Open the MediaLive console
- On the Channels page, choose the channel name
- Choose Channel actions, and then choose Edit channel
- Under Output groups, choose Add
- Choose RTMP, then choose Confirm
Add an RTMP output group to MediaLive Channel
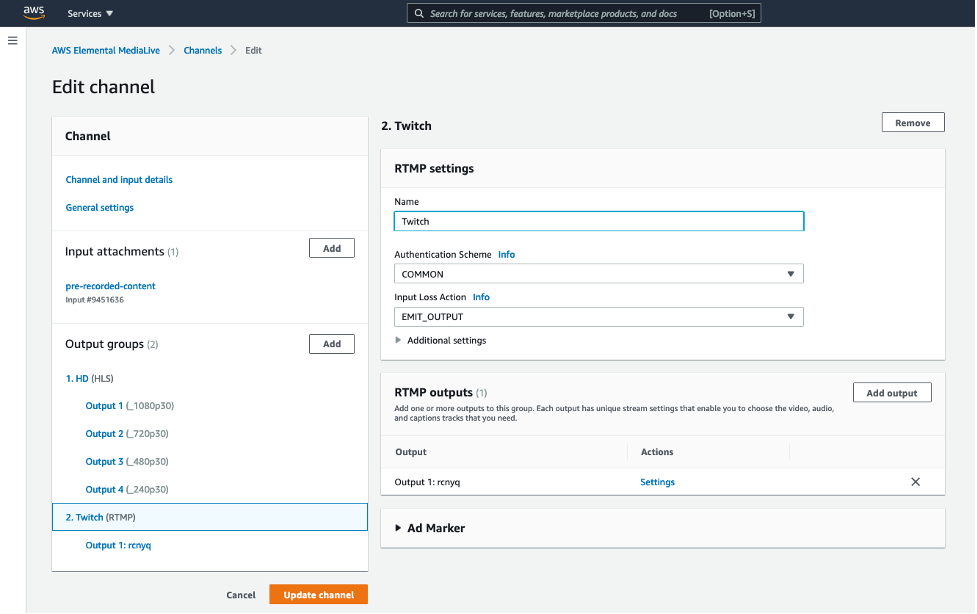
- For Name, enter a name for the social channel
- In the RTMP outputs section, for Actions, choose Settings
- In the RTMP destination A section, for URL, enter RMTP ingest URL provided by the social channel (Twitch, YouTube, Facebook) For example, for Twitch use rtmp://rtmp.twitch.tv/
- For Stream Name, enter the stream key provided by the social channel. For example, for Twitch go to stream settings on your browser by replacing [username] with your Twitch username in the following url https://dashboard.twitch.tv/u/[username]/settings/stream, then copy the primary stream key
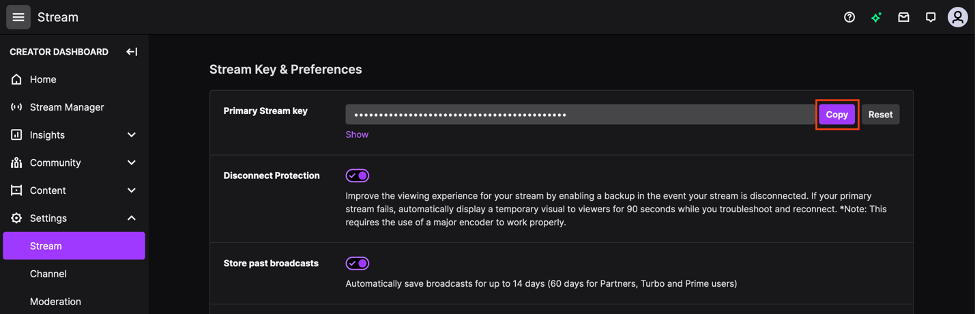
Twitch dashboard, stream settings, copy the primary stream key
Update the MediaLive Channel, enter RTMP URL and stream key for the social channel
- In the Stream settings section, under Video
- for Width, enter a width that is less than or equal to your input video’s width
- for Height, enter a height that is less than or equal to your input video’s height
- for Codec Settings, choose 264
- In the Stream settings section, under Audio 1, for Codec Settings, choose AAC
- Choose Update channel
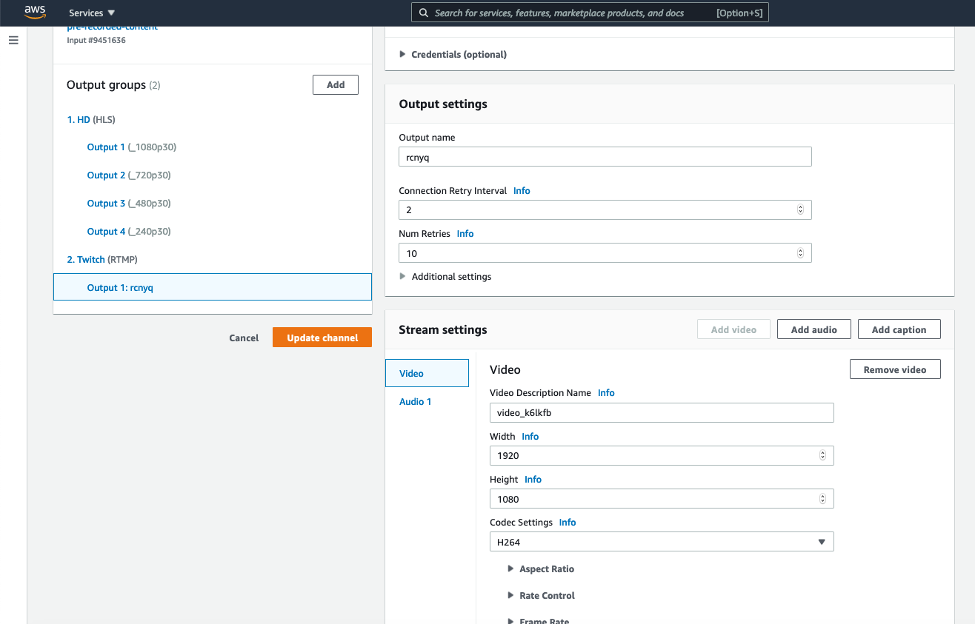
Update the MediaLive Channel, edit Stream settings like Width, Height, Codec for the social channel
If you want to add additional social channel, repeat all steps in the RTMP Push output group section. Please note that width, height, frame rate, and bitrate settings impact your MediaLive cost. For more information check out the MediaLive pricing page.
Step 8: Start the MediaLive Channel
Now you are ready to start your MediaLive Channel.
To start your live stream:
- Open the MediaLive console
- On the Channels page, choose the channel that you want to start
- Choose Start.
Your channel should be started streaming within ~1-2 minutes on average. You can monitor your channel status on your channels detail page, from Channel state.

Start the MediaLive Channel
HLS Output
You need to take out the CloudFront Domain Name from your notes to construct HLS main manifest URL. It should be in the form of https://[id].cloudfront.net. You need to append /live.m3u8 to the end of the CloudFront URL. End result should be similar the following address. Please note that your CloudFront Domain Name is going to be different than the example below.
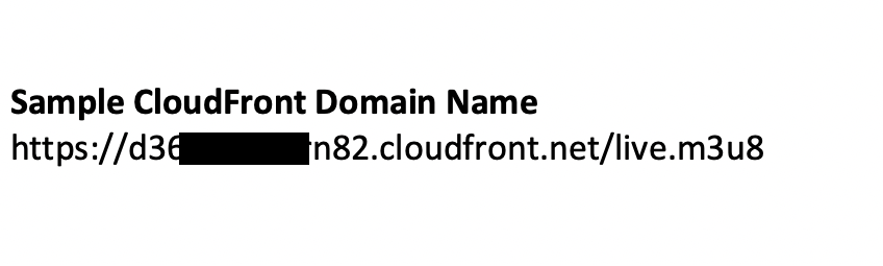
Sample CloudFront Domain Name
To watch the output stream on your browser:
- Copy the code below to your favorite text editor
- Replace the {STREAM_URL} with your constructed HLS main manifest URL
- Save it as HTML file
- Open the HTML file on your favorite browser
- Play the live stream
To make the demo player cross-browser and HLS compatible, I use the Video.js, an open source HTML5 player framework.
<!DOCTYPE html>
<html>
<head>
<meta charset=utf-8 />
<title>Sample Player</title>

<link href="https://vjs.zencdn.net/7.3.0/video-js.min.css" rel="stylesheet">
<script src="https://vjs.zencdn.net/7.3.0/video.min.js"></script>

</head>
<body>
    <h1>Sample Player</h1>
    <video id="example-video" width=960 height=540 class="video-js vjs-default-skin" controls>
    <source
        src="{STREAM_URL}"
        type="application/x-mpegURL">
    </video>

<script>
var player = videojs('example-video');
player.play();
</script>

</body>
</html>
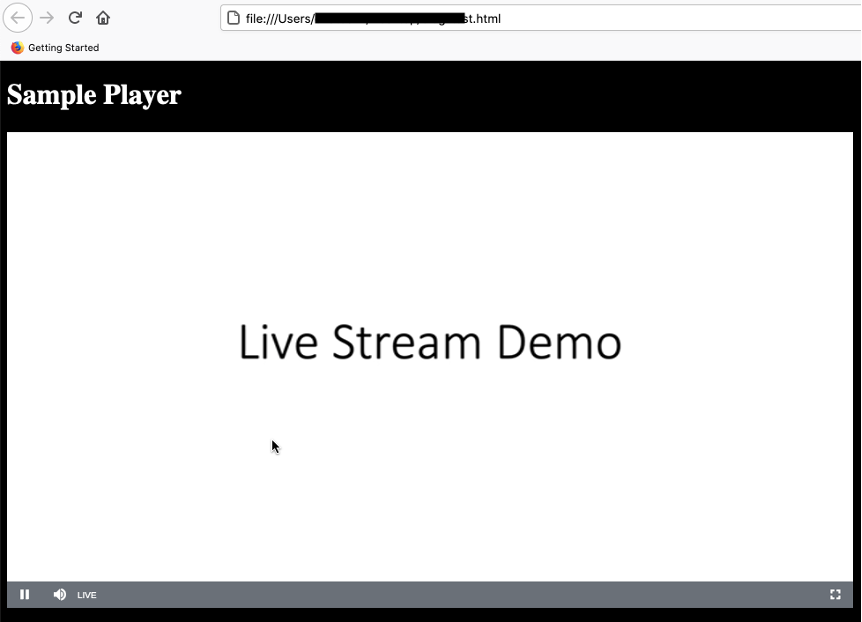
The sample player, the live stream
If you follow the Twitch option, you may also go to your Twitch channel on your browser to watch the live stream. It should be in the form of https://www.twitch.tv/[ChannelName]
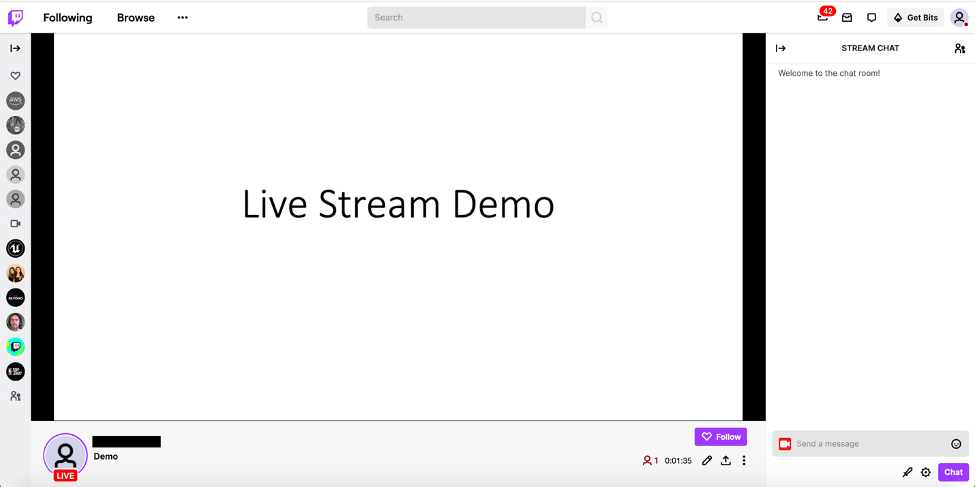
Twitch live stream
Step 9: Stop the MediaLive Channel
At the end of your live stream, don’t forget to stop your MediaLive channel.
To stop your MediaLive Channel:
- Open the MediaLive console
- On the Channels page, choose the channel that you want to stop
- Choose Stop
Clean up
To avoid incurring future charges, delete the resources that has been created by following this blog post including Amazon S3 Bucket, MediaLive Channel, MediaStore container, and CloudFront distribution. Keeping a MediaLive channel active without running results in incurring $0,01 an idle resource cost per hour. For more information check out the MediaLive pricing page. Please note that I have tested this workflow on the AWS Ireland Region and AWS Frankfurt Region.
Conclusion
In this blog post, I demonstrated how to use the AWS Elemental MediaLive to live stream your pre-recorded videos. We set up a live streaming workflow using a pre-recorded video as an input and then live streamed to your website and optionally to social channels like Twitch. To setup the entire workflow quickly, use the MediaLive workflow wizard. To learn more, check out the MediaLive workflow wizard.
AWS offers the most purpose-built services for direct-to-consumer (D2C) & streaming to help companies reliably deliver, monetize, and support live and on-demand media over the internet, and bring unparalleled experiences to screens everywhere. Explore https://aws.amazon.com/media/direct-to-consumer-d2c-streaming/ to learn more.