AWS Public Sector Blog
Automated Earth observation using AWS Ground Station Amazon S3 data delivery
With AWS Ground Station, you can now deliver data directly into Amazon Simple Storage Service (Amazon S3) buckets. This simplifies downlinking because you no longer need to run an Amazon Elastic Compute Cloud (Amazon EC2) receiver instance. It also saves you cost and simplifies the creation of automated processing pipelines like the one we are going to show in this blog.
By using an automated Earth observation (EO) pipeline, you can reduce the operating burden of your staff, as after scheduling a contact, everything is handled automatically and you’ll get a notification when the processed data is available.
Read on to learn how to create an automated EO pipeline that receives and processes data from the NOAA-20 (JPSS-1) satellite, using this new AWS Ground Station feature. We are analyzing data from the Visible Infrared Imaging Radiometer Suite (VIIRS) onboard the craft to produce among others visible light, fire detection, and land surface light images of the Earth. Once in Amazon S3, other AWS services, such as Amazon SageMaker and Amazon Rekognition, can publish data products to data subscribers or retrieve them for near real-time processing.
High-level solution architecture
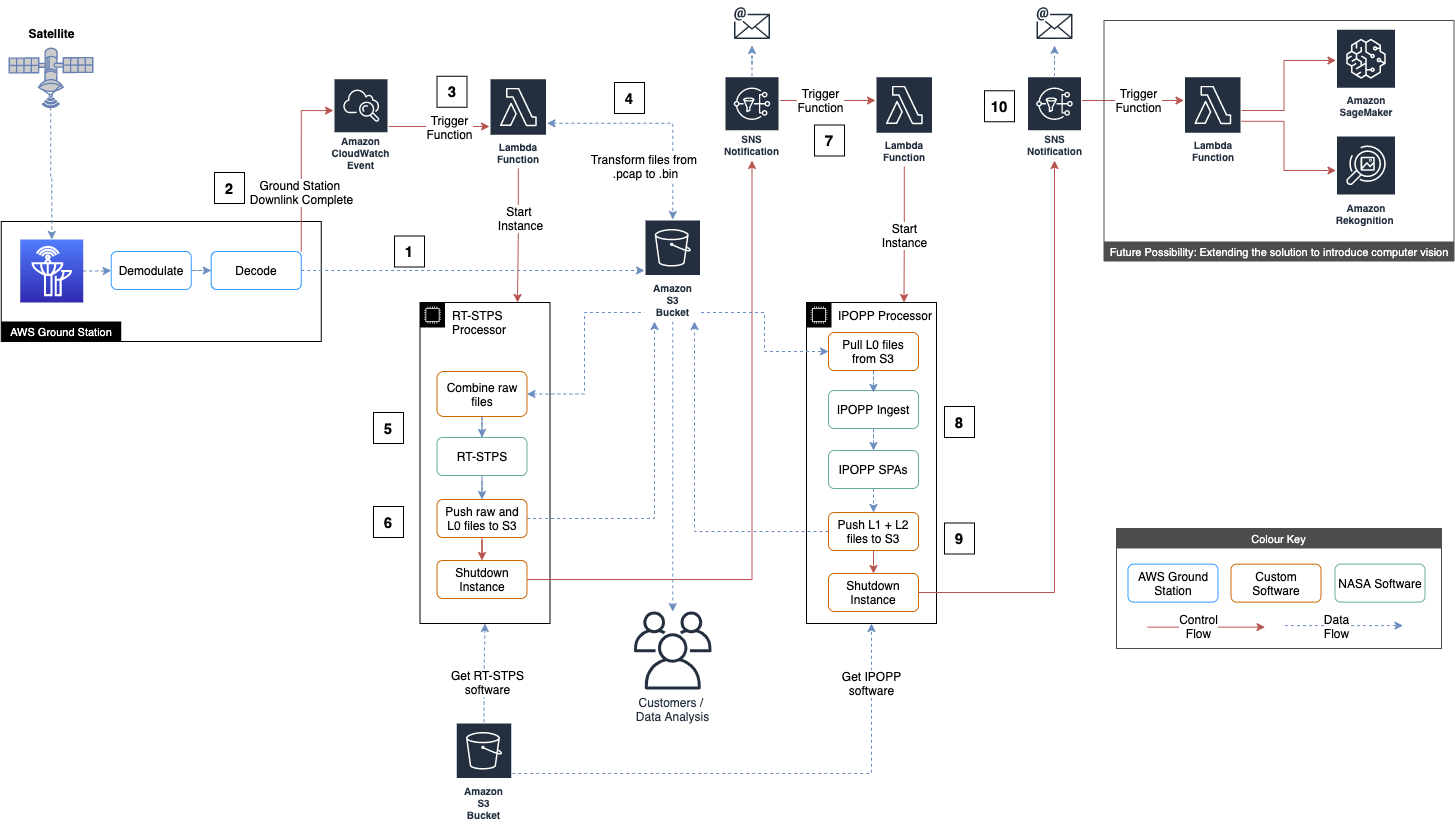
How the solution operates:
- During a satellite contact, the AWS Ground Station Amazon S3 data delivery services deposit the downlink data as VITA 49 in .pcap files in an S3 bucket.
- When AWS Ground Station has finished writing all .pcap files it generates an Amazon CloudWatch event.
- The CloudWatch event triggers an AWS Lambda function.
- The Lambda function strips out the payload data from the .pcap files into .bin raw data files. Then starts the RT-STPS processor EC2 instance.
- The RT-STPS EC2 instance combines the raw data into a single file, which it then processes into level 0 data using RT-STPS.
- The RT-STPS EC2 instance pushes the data to S3, sends an Amazon Simple Notification Service (Amazon SNS) notification, then shuts down.
- The Amazon SNS notification triggers a Lambda function, which starts up the processor EC2 instance.
- The IPOPP EC2 instance pulls the data from S3, then processes it using IPOPP.
- The IPOPP EC2 instance pushes the Level 1A, Level 1B, and Level 2 data it produces to S3.
- The IPOPP EC2 instance sends an SNS notification then shuts down.
By scheduling a satellite contact in AWS Ground Station, steps 1-10 are automatically completed, which result in the data being made available via the S3 bucket. If you subscribe to the SNS notifications, you also receive emails with the output of the processing jobs.
Earth observation science data levels
Earth observation data products are most commonly described using levels 0-4 provided by NASA. The levels are summarized below. For more information go here.
- Level 0: Raw data from sensors with communications artifacts removed
- Level 1: Georeferenced and adjusted for known sources of error or interference
- Level 2: Specific data-rich products such as sea surface temperature data or visible light data
- Level 3: Data mapped onto uniform space-time grid scales
- Level 4: Model output or results from deeper analysis of lower-level data, often using data from multiple measurements
Prerequisites
1. Configure AWS Command Line Interface (AWS CLI): Download the latest AWS CLI and configure it with an Identity and Access Management (IAM) user role with privileges to the AWS account you want to use. If in doubt, use admin for testing but create a least privileged access (LPA) IAM user/role for any other environments.
2. Set up AWS Ground Station in your AWS account: Send an email to aws-groundstation@amazon.com with the following details:
- Satellite NORAD ID: 43013 (JPSS1)
- Your AWS account Id
- AWS Regions you want use the AWS Ground Station Service
- AWS Regions you want to downlink the data to (normally the same as above)
3. Create a Virtual Private Cloud (VPC) with public subnets, plus an SSH key for accessing EC2 instance(s): Make sure at minimum you have one SSH key and one VPC with an attached IGW and one public subnet. This must be in the Region you are downlinking to.
4. Register on NASA DRL website: NASA DRL requires everyone to register who uses their RT-STPS and IPOPP software. Browse to the NASA DRL website and register using your company email address. You need to confirm the email address.
5. Create working directory:
Linux / Mac
export WORKING_DIR='/Users/User/Downloads/jpss-test'
mkdir -p $WORKING_DIR
cd $WORKING_DIR
Windows
S3 data delivery and RT-STPS instance
Follow the steps 1-7 to configure AWS Ground Station to downlink raw data from the JPSS1 Satellite directly into S3 and create level 0 products from it. The AWS Ground Station S3 data delivery services places VITA 49 encapsulated data from a JPSS1 contact into an S3 bucket. The EC2 instances processes it using NASA’s RealTime Satellite Telemetry Processing Software (RT-SPTS) and uploads the data to S3. Once the data is uploaded an SNS notification is sent, which triggers the International Planetary Observation Processing Package (IPOPP) Processing node which creates the usable data products.
1. Create a Software S3 bucket
Setup some variables then create the new Software S3 bucket. Create this in the Region you are downlinking to.
Edit the REGION and S3_BUCKET variables below then execute the code.
Linux / Mac
export REGION='your-aws-region'
export S3_BUCKET='your-software-bucket-name'
# Create the new S3 bucket if not already created
aws s3 mb s3://${S3_BUCKET} --region $REGION
Windows
2. Download RT-STPS from NASA DRL website
Optional: If you already have access to these files on another S3 bucket, there’s no need to download them again.
Download the following RT-STPS files from NASA DRL to $WORKING_DIR: (Or copy them from another friendly bucket—see below); RT-STPS_7.0.tar.gz.
3. Upload RT-STPS to the software S3 bucket:
If you already have the files in another S3 bucket then replace $WORKING_DIR with s3://YOUR-S3-BUCKET/software/RT-STPS/. If your S3 bucket is in a different AWS Region you need to add a –source-region tag at the end of the command.
Linux / Mac
aws s3 cp $WORKING_DIR/RT-STPS_7.0.tar.gz s3://${S3_BUCKET}/software/RT-STPS/RT-STPS_7.0.tar.gz --region $REGION
Windows
4. Copy the lambda code and RT-STPS orchestration script to the software S3 bucket
Find the lambda.zip and rt-stps-process.sh in the S3 bucket hosted by the AWS Professional Services space solutions team, who have developed and maintain this guide.
Linux / Mac
aws s3 cp s3://space-solutions-${REGION}/s3-dd-blog/rt-stps/lambda.zip s3://${S3_BUCKET}/software/RT-STPS/lambda.zip --region $REGION
aws s3 cp s3://space-solutions-${REGION}/s3-dd-blog/rt-stps/rt-stps-process.sh s3://${S3_BUCKET}/software/RT-STPS/rt-stps-process.sh --region $REGION
Windows
5. Create the AWS CloudFormation stack for S3 data delivery and the RT-STPS instance
Create a CFN stack using the template jpss1-gs-to-s3.yml directly by clicking here or by fetching the template from this link:
https://space-solutions-eu-north-1.s3.eu-north-1.amazonaws.com/s3-dd-blog/cfn/jpss1-gs-to-s3.yml
Enter parameters as follows:
- Stack name: any value (e.g. gs-s3dd-jpss1)
- SatelliteName: JPSS1
- GroundStationS3DataDeliveryBucketName: aws-groundstation-your-data-bucket (the name must be globally unique and must start with “aws-groundstation-“)
- SoftwareS3Bucket: your-software-bucket (the one you created in the previous steps)
- InstanceType: c5.4xlarge
- VpcId: the VPC containing the above public subnet
- SubnetId: a public subnet
- SSHCidrBlock: your-public-ip/32
- If needed get it from https://whatismyip.com. Be sure you add “/32” to the end of the IP address.
- SSHKeyName: your-ssh-key-name
- NotificationEmail: your-email-address
6. Subscribe to the SNS topic
During the creation of the CloudFormation stack an SNS topic is created. To receive email messages, you must subscribe to the topic by clicking the link sent to the email address specified when creating the stack.
7. Watch the progress
Once CloudFormation creates the EC2 instance, the required software is installed and configured. You can watch this progress by connecting to the instance over an SSH connection then run the following commands:
SSH connection:
ssh -i <path-to-ssh-key-file> ec2-user@<instance-public-ip>
Check the user-data logfile:
tail -F /var/log/user-data.log
Note 1: In the latest version of this solution, the RT-STPS instance automatically shuts down once configuration completes.
Note 2: For this solution to work correctly, you must shut down the EC2 instance down a few minutes before the contact.
Summary
You now have the following created in your AWS account:
- An AWS Ground Station mission profile configured for the JPSS1 Satellite
- An AWS Ground Station demodulation and decode configuration for the JPSS1 Satellite, compatible with the downstream processing software RT-STPS
- An AWS Ground Station S3 recording AWS Config that delivers VITA 49 encapsulated data directly into an S3 bucket
- AWS Ground Station CloudWatch events
- A Lambda function that strips out the payload from the encapsulated data and calls the RT-STPS processor instance
- An IAM role attached to the Lambda function with permission to connect to the data delivery bucket
- A RT-STPS processor EC2 instance that creates level 0 data files from the raw instrument data.
- An IAM role and instance profile, attached to the EC2 instance with permission to connect to the software and data delivery buckets
- An SNS topic to notify data capture completion
Processor instance creation – IPOPP
Follow steps 1-4 to create the IPOPP instance, which after configuration, ingests the level 0 data produced by the RT-STPS node to create usable level 2 Earth observation data products.
Linux / Mac
export REGION=your-aws-region
export S3_BUCKET=your-software-bucket
Windows
1. Copy the IPOPP files to the Software S3 bucket
The IPOPP scripts (ipopp-ingest.sh, install-ipopp.sh) are in an S3 bucket hosted by the AWS Professional Services space solutions team.
Manually download IMAPP_3.1.1_SPA_1.4_PATCH_2.tar.gz from here to $WORKING_DIR.
Manually download DRL-IPOPP_4.0_PATCH_1.tar.gz and DRL-IPOPP_4.0_PATCH_2.tar.gz from here to $WORKING_DIR.
Manually download VIIRS-L1_3.1.0_SPA_1.9.tar.gz from here to $WORKING_DIR.
Linux/Mac
aws s3 cp s3://space-solutions-${REGION}/s3-dd-blog/ipopp/ipopp-ingest.sh s3://${S3_BUCKET}/software/IPOPP/ipopp-ingest.sh --region $REGION
aws s3 cp s3://space-solutions-${REGION}/s3-dd-blog/ipopp/install-ipopp.sh s3://${S3_BUCKET}/software/IPOPP/install-ipopp.sh --region $REGION
aws s3 cp $WORKING_DIR/IMAPP_3.1.1_SPA_1.4_PATCH_2.tar.gz s3://${S3_BUCKET}/software/IMAPP/IMAPP_3.1.1_SPA_1.4_PATCH_2.tar.gz --region $REGION
aws s3 cp $WORKING_DIR/DRL-IPOPP_4.0_PATCH_1.tar.gz s3://${S3_BUCKET}/software/IPOPP/DRL-IPOPP_4.0_PATCH_1.tar.gz --region $REGION
aws s3 cp $WORKING_DIR/DRL-IPOPP_4.0_PATCH_2.tar.gz s3://${S3_BUCKET}/software/IPOPP/DRL-IPOPP_4.0_PATCH_2.tar.gz --region $REGION
aws s3 cp $WORKING_DIR/VIIRS-L1_3.1.0_SPA_1.9.tar.gz s3://${S3_BUCKET}/software/IPOPP/VIIRS-L1_3.1.0_SPA_1.9.tar.gz --region $REGION
Windows
2. Create the IPOPP instance CloudFormation stack
Note: before continuing, subscribe to the CentOS 7 (x86_64) – with Updates HVM product in the marketplace by clicking here.
Create a CFN stack using the template ipopp-instance.yml directly by clicking here or by fetching the template from this link:
https://space-solutions-eu-north-1.s3.eu-north-1.amazonaws.com/s3-dd-blog/cfn/ipopp-instance.yml
Enter parameters as follows:
- Stack name: any value (e.g. gs-processor-jpss1)
- SatelliteName: JPSS1
- ReceiverCloudFormationStackName: The name of the CloudFormation Stack that created the receiver configuration
- DataS3Bucket: your-data-delivery-bucket (data delivery bucket created in receiver stack)
- SoftwareS3Bucket: your-software-bucket-name (where you uploaded the software)
- InstanceType: c5.xlarge is OK for most IPOPP Software Processing Algorithms (SPAs).
- However, you need c5.4xlarge to use the Blue Marble MODIS Sharpened Natural/True color SPAs.
- IpoppPassword: Enter a password to use for the ipopp user account and VNC password on the EC2 instance.
- SubnetId: A public subnet
- VpcId: Select the VPC containing the above public subnet
- SSHCidrBlock: your-public-ip’/32
- If needed get it from https://whatismyip.com. Be sure you add “/32” to the end of the IP address.
- SSHKeyName: your-ssh-key-name
- NotificationEmail: Email address to receive processing updates
3. Subscribe to the SNS topic
CloudFormation creates an IPOPP processing SNS topic. Subscribe to the topic to receive messages that processing has finished.
4. Watch the progress
The initial part of the EC2 instance set up is automatic. After it has finished, you are prompted to manually complete the set up by following the steps in the next section Processor Instance Configuration (IPOPP). You can follow the progress of the automatic part over SSH by running the following commands. This takes about 10 minutes to complete.
SSH connection:
ssh -i <path-to-ssh-key-file> centos@<instance-public-ip>
Check the user-data logfile:
tail -F /var/log/user-data.log
Summary
You now have the following created in your AWS account:
- An EC2 Instance running CentOS7
- An SNS topic to notify processing completion
- A Lambda function to auto-start the IPOPP instance, triggered by the receiver SNS topic
IPOPP
Follow step 1-5 to configure the IPOPP processor instance. This must be done manually, due to constraints in the distribution and operation of the NASA DRL IPOPP software.
1. Prerequisites
Download and install the Tiger VNC Client from here. Or use the following quick-links for Linux, Mac, and 64 bit Windows.
VNC setup: Linux/Mac
1. Run the command below to connect to the EC2 instance using SSH and tunnel the VNC traffic over the SSH session.
ssh -L 5901:localhost:5901 -i <path to pem file> centos@<public ip address of EC2 instance>
2. Open the Tiger VNC Client application on your device and connect to localhost:1
3. When prompted, enter the IPOPP password you provided to the CloudFormation template in the earlier step.
VNC setup: Windows
1. Download the open source ssh client Putty from here.
2. Open Putty and enter the public IP of the EC2 instance in the Session->Host Name (or IP Address) field.
3. Enter centos in Connection->Data-> Auto-login username
4. In Connection->SSH->Auth, browse to the correct PPK key file (private SSH key) for the EC2 instance.
5. In Connection->SSH->Tunnels, enter 5901 in Source port, enter localhost:5901 in Destination. Select Add.
6. Select Session, enter a friendly name in Save Sessions, and then Save.
7. Select Open to open the tunneled SSH session.
8. Open the Tiger VNC Client application on your PC and connect to localhost:1.
9. When prompted, enter the IPOPP password you provided to the CloudFormation template in the earlier step.
Note: If the Tiger VNC client cannot connect, or you see only a blank screen, you may need to restart the vncserver process on the instance. To do this, run the commands below in the SSH session to start the vnc server as the IPOPP user:
su - ipopp
vncserver -kill <display> e.g. ‘:1’
vncserver
2. Download and install DRL-IPOPP_4.0.tar.gz
Optional: If you already have this archive saved locally or in an S3 bucket then upload it to ${S3_BUCKET}/software/IPOPP/DRL-IPOPP_4.0.tar.gz and skip directly to step 9. If you do not have access to the archive then follow these installation instructions.
Note: NASA DRL requires you to use a system with the same IP address to download and run the DRL-IPOPP_4.0.tar.gz download script. If you restart your EC2 instance before completing the download and it acquires a new Public IP address then it is necessary to download and run a fresh script. The script must also be run to completion within 24 hours after it was downloaded, or it is necessary to download and run a fresh script.
Perform the following steps within the VNC session.
1. Open Firefox and navigate to https://directreadout.sci.gsfc.nasa.gov/?id=dspContent&cid=304&type=software.
2. Login using your credentials.
3. Select the blue box Click To Download Version: 4.0, and accept the statement.
4. Download downloader_DRL-IPOPP_4.0.sh
5. Open a terminal and navigate to the Downloads directory.
cd /home/ipopp/Downloads
6. Move the downloader_DRL-IPOPP_4.0.sh script to /home/ipopp/
mv downloader_DRL-IPOPP_4.0.sh /home/ipopp/downloader_DRL-IPOPP_4.0.sh
7. Make the download script executable and run it.
cd /home/ipopp/
chmod +x downloader_DRL-IPOPP_4.0.sh
./downloader_DRL-IPOPP_4.0.sh
8. Wait for the download to finish. This should take about one hour.
9. Once DRL-IPOPP_4.0.tar.gz is downloaded and assembled, run the install-ipopp.sh script using sudo. Set the needed variables. The variable DataBucket refers to the S3 bucket you created in the receiver template.
export SatelliteName=JPSS1
export SoftwareBucket=your-software-bucket
export DataBucket=your-data-bucket-from-receiver-template
sudo /opt/aws/groundstation/bin/install-ipopp.sh ${SatelliteName} ${SoftwareBucket} ${DataBucket}
3. IPOPP SPA configuration
IPOPP can create a large number of datasets and images from the level 0 data produced by RT-STPS. Among these are true color RGB images of the Earth’s surface. These images are Level 2 products and to get them we must enable a subset of IPOPP Software Processing Algorithms (SPAs). Unfortunately, SPAs can only be configured using a GUI java application. Follow the steps below to connect to the server using a VPC client, then configure the required SPAs.
Perform the following steps within the VNC session.
1. Open a terminal and run the IPOPP dashboard:
~/drl/tools/dashboard.sh &
2. In the dashboard, select Mode->IPOPP Configuration Editor
3. Select Actions->Configure Projection, Select Stereographic, and then Select Configure Projection.
4. Select the JPSS-1-VIIRS tab as shown with a green box in the image below. Then, enable the same SPA modules as in the image by clicking on them. This enables all SPAs for the VIIRS instrument and allow you to see the full range of data products.
5. Select the JPSS-1-ATMS/CrIS/OMPS tab and disable all the SPAs. This improves the processing time of the VIIRS SPAs.
6. Once you have finished configuring SPAs, select Actions->Save IPOPP Configuration
7. Once this configuration process finishes, it does not need to be done again. IPOPP now automatically starts the SPAs each time an ingest is done.
We encourage you to experiment with the different SPAs. Be mindful of their upstream and downstream dependencies. For an SPA to work as expected the upstream SPAs must also be enabled. When you mouse over an SPA, it highlights its upstream dependencies in yellow on the above rows. SPAs require either C-SDR VIIRS_C-SDR* (red box on the image) or VIIRS-L1* (blue boxes on the image) to operate. As per the IPOPP user manual we must only enable one—in our case C-SDR VIIRS_C-SDR*. Do not enable both the red and blue box SPAs, as that breaks IPOPP.
You can monitor the progress of the SPAs during processing. After the IPOPP instance has started and the ingest process has begun, you log into the IPOPP instance via VNC and start the dashboard as outlined above. Navigate to the JPSS-1-VIIRS tab and watch the progress. Once the SPAs have run the results can be found in: $HOME/drl/data/pub/gsfcdata/jpss/viirs/level2
4. Configure the IPOPP instance to shut down after processing
We do this by adding a shutdown command after the processing command in the /etc/rc.local file.
1. In an SSH or VNC session on the IPOPP server, open a terminal.
2. Switch to root.
sudo su -
3. Open the /etc/rc.local
file.
nano /etc/rc.local
4. Locate the last line, which has a call to ipopp-ingest.sh in it, and add && systemctl poweroff -i to the end of the line.
5. You can now exit the VNC and SSH session.
5. Stop the EC2 instances
The EC2 instances are automatically started and stopped as required. To allow this to happen, you must now stop all EC2 instances.
Scheduling a satellite contact
At this point you can schedule a contact with JPSS1 using the AWS console.
Open up the GroundStation console and schedule a contact as required. Ensure you select the correct mission profile and satellite. The entire process is triggered by the Ground Station S3 Data Delivery CloudWatch event as described in the Solution overview section.
Viewing the files created
When you captured data from a live satellite, both instances automatically shut down when they are finished processing. An email with a summary from each node will deliver to your inbox.
You can find the created files in the S3 data bucket as follows:
- Level 0,1,2 data products: s3://${S3_DATA_BUCKET}/data/JPSS1/viirs/
- Logfiles: s3://${S3_DATA_BUCKET}/data/JPSS1/logs
- Raw data for re-processing: s3://${S3_DATA_BUCKET}/data/JPSS1/raw
In s3://${S3_DATA_BUCKET}/data/JPSS1/viirs/level2 images are stored in the .tif format. If you’ve followed the SPA selection above, you will find the following images:
- Files ending in SHARPTCOLOR.tif → Visible light images of the Earth
- Files ending in LST.tif → surface temperature images
- Files ending in TCOLORFIRE.tif → Visible light mages of the Earth with circles around ongoing fires. Red circles indicate high probability of fire.

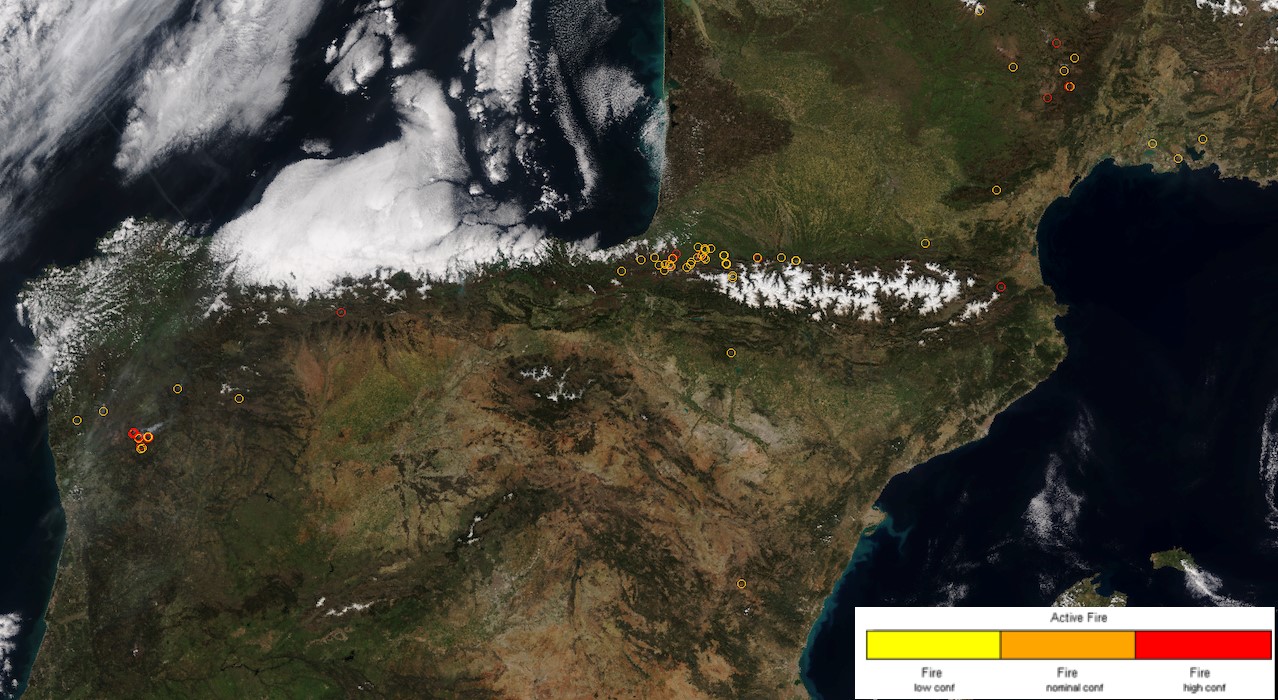
Cropped Active Fire (AF) locations image showing the south of France and Iberian Peninsula, produced using IPOPP’s VIIRS-AF SPA. The red circles indicate active fire areas of high confidence.

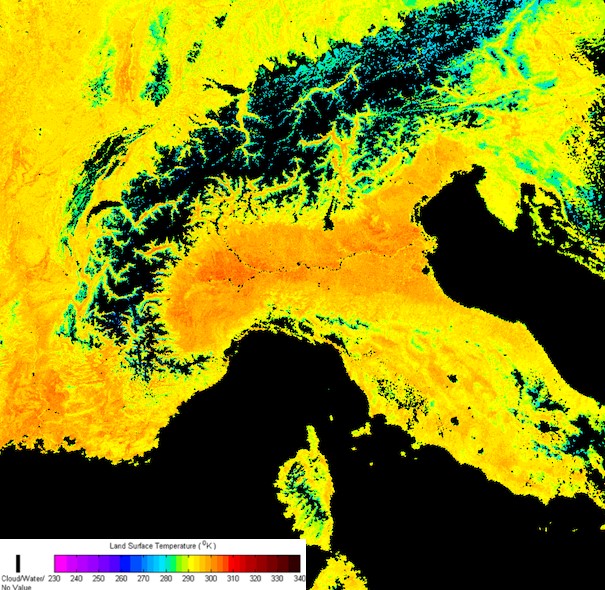
Cropped Land Surface Temperature (LST) image showing the north of Italy and the Alps, produced using IPOPP’s LST SPA. The warmer colors indicate higher absolute temperature in Kelvin on a March day.
Summary
In this blog, you learned to asynchronously downlink data to an S3 bucket without spinning up a receiver EC2 instance. We downlinked data from the JPSS-1 craft and automatically processed it using RT-STPS and IPOPP. The automated pipeline can be applied to data from any spacecraft.
Get started with Earth observation data and AWS Ground Station. Check out how you can process satellite imagery using a fully server-less architecture on AWS. And learn more about AWS Professional Services.