AWS Partner Network (APN) Blog
Build and Deploy a Secure Container Image with AWS and Snyk
By Marco Morales, Partner Solutions Architect – Snyk
By Shashiraj Jeripotula, Sr. Partner Solutions Architect – AWS
 |
| Snyk |
 |
Application security has traditionally been viewed as a one-off activity that was time-consuming, confusing, and error-prone. Snyk brings application security to your pipeline operations and is embedded in multiple AWS services to provide enhanced visibility and remediation guidance for the vulnerabilities in your applications.
When you combine Snyk with AWS CodePipeline, development teams benefit from being able to deliver software applications at scale with the additional benefits of application security. AWS CodePipeline allows teams to check out, build, and deploy applications at scale, while Snyk delivers application security insights for your source code and built applications.
In this post, we will demonstrate how to build a Java application in a Docker container and push the container image to Amazon Elastic Container Registry (Amazon ECR) orchestrated by AWS CodePipeline. We’ll use Snyk to scan your code, build a container image, and display the results in both Snyk and Amazon ECR.
We’ll also show you how Amazon Inspector utilizes Snyk open source to provide insight into your software security vulnerabilities. All of this functionality is available from the AWS Management Console.
Snyk is an AWS Partner with Competencies in DevOps and Security. A developer-first security solution that helps organizations use open source and stay secure, Snyk seamlessly and proactively finds and fixes vulnerabilities and license violations in open-source dependencies and containers.
Customer Value
The value for Amazon Web Services (AWS) customers when they add Snyk to AWS CodePipeline is they’ll gain access to security gates and results within the AWS console by using configuration screens and processes they are already familiar with.
For Snyk customers, the value of integrating with AWS services brings faster identification and remediation of security vulnerabilities for their code and deployed infrastructure. This is end-to-end information and context not previously available. Development teams are now able to see their application security status from development all the way through deployment into AWS.
Additionally, customers will be able to leverage a representative repository to mimic operational behaviors your team is already familiar with. This example is easy to overlay onto your SDLC.
In this post, we’ll build a container from code and deploy a running application. The processes are gated by checks to ensure a more secure application.
Prerequisites
For this walkthrough, you should have the following prerequisites:
- AWS account in a region that supports these services:
- AWS CodeCommit
- AWS CodeBuild
- AWS CodePipeline
- Amazon Inspector
- AWS Key Management Service (AWS KMS)
- AWS Systems Manager Parameter Store
- Amazon Elastic Container Registry (Amazon ECR)
- DockerHub account
- Snyk account
- Existing CodeCommit repository you want to test on. This post uses a reference repository.
The DockerHub account is required for this example, and explained below.
How it Works
Here, we’ll use several AWS services in conjunction with external services as shown in Figure 1 below. As a Git user, you’ll push changes to a repository, represented by AWS CodeCommit, and this repository contains a deliberately vulnerable application. We’ll show how to build this code using AWS CodeBuild managed by AWS CodePipeline.
In the container build part of the pipeline, we’ll use a base container image from DockerHub and push the results to Amazon ECR. In order to make these parts work with secrets, we use AWS Key Management Service (AWS KMS) for the username and password into DockerHub.
This sequence represents how development teams may check out and build code and container images. We’ll review the results in ECR as presented by Amazon Inspector.
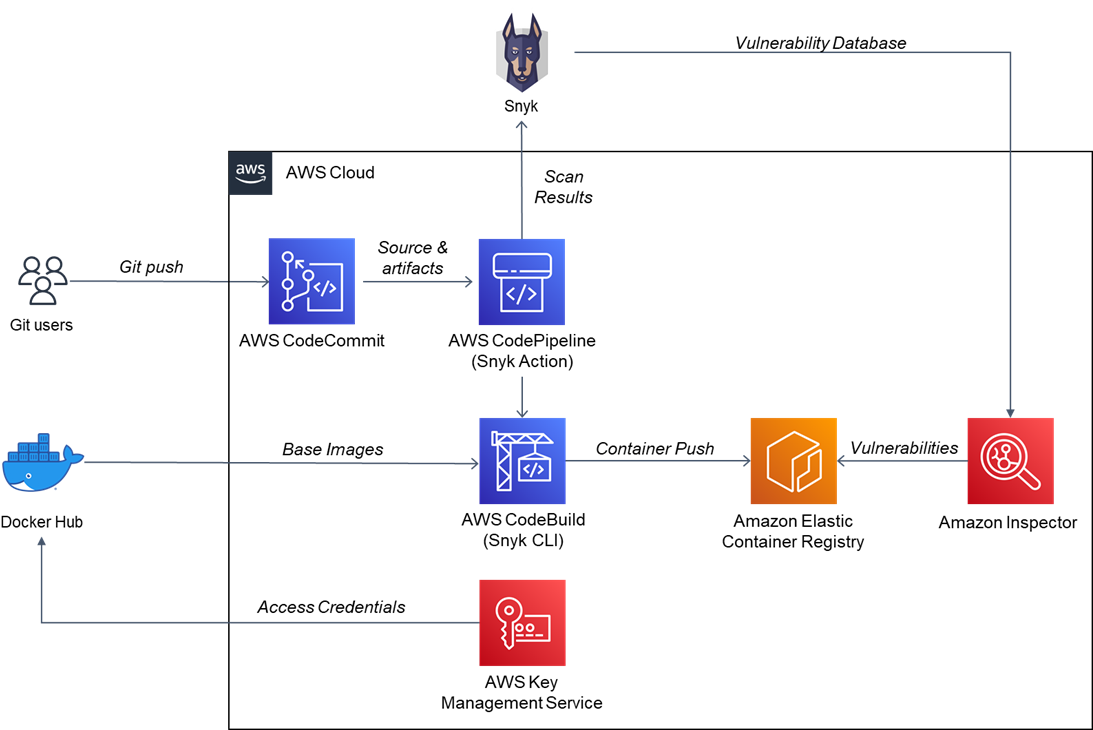
Figure 1 – Architecture diagram with the primary services covered in this post.
Getting Started
In this post, we’ll show you how to utilize AWS services and Snyk to build and deploy a secured container from source. The flow is:
- Start with a code repository in AWS CodeCommit.
- Create an Amazon Elastic Container Registry.
- Add AWS KMS keys and AWS Systems Manager Parameters.
- Create an AWS CodePipeline.
- Add Snyk scans to AWS CodePipeline.
- Review Amazon ECR.
Step 1: Start with a Code Repository in AWS CodeCommit
Let’s start with a code repository in AWS CodeCommit. We’ll mirror the code at github.com/snyk-labs/java-goof into your CodeCommit repository.
Note that your AWS Identity and Access Management (IAM) user needs the “AWSCodeCommitPowerUser” policy to get permissions to interact with CodeCommit at the command line interface (CLI). You’ll also need to create HTTPS Git credentials for CodeCommit. Learn more in the AWS documentation.
In the AWS console, create a new repository named apn-java-goof in your AWS account.
Run these commands at your CLI to mirror the code into your newly-created CodeCommit repository. Below, the values denoted by <YOUR-REGION> and <YOUR-REPO-NAME> should match your definition. Your Git URL is easy to copy from the Repositories view by clicking on the Clone URL link.
git clone –mirror https://github.com/snyk-labs/java-goof apn-java-goof
Step 2: Create an Amazon Elastic Container Registry
This example depends on access to DockerHub and the presence of an Amazon ECR registry.
We’ll need to update some keys and ensure you have an ECR registry, and we’ll start with the repository. Navigate to Amazon ECR, create a private repository, and give it a suitable name. In our example, we disable Tag immutability.

Figure 2 – Amazon ECR definition for a private registry.
Step 3: Add KMS Keys and AWS Systems Manager Parameters
Next, let’s add AWS KMS keys and create AWS Systems Manager Parameters. Navigate to AWS KMS, create a new key, and set its administrative and usage permissions to your IAM username. This gives you the control and limits access for the next service.
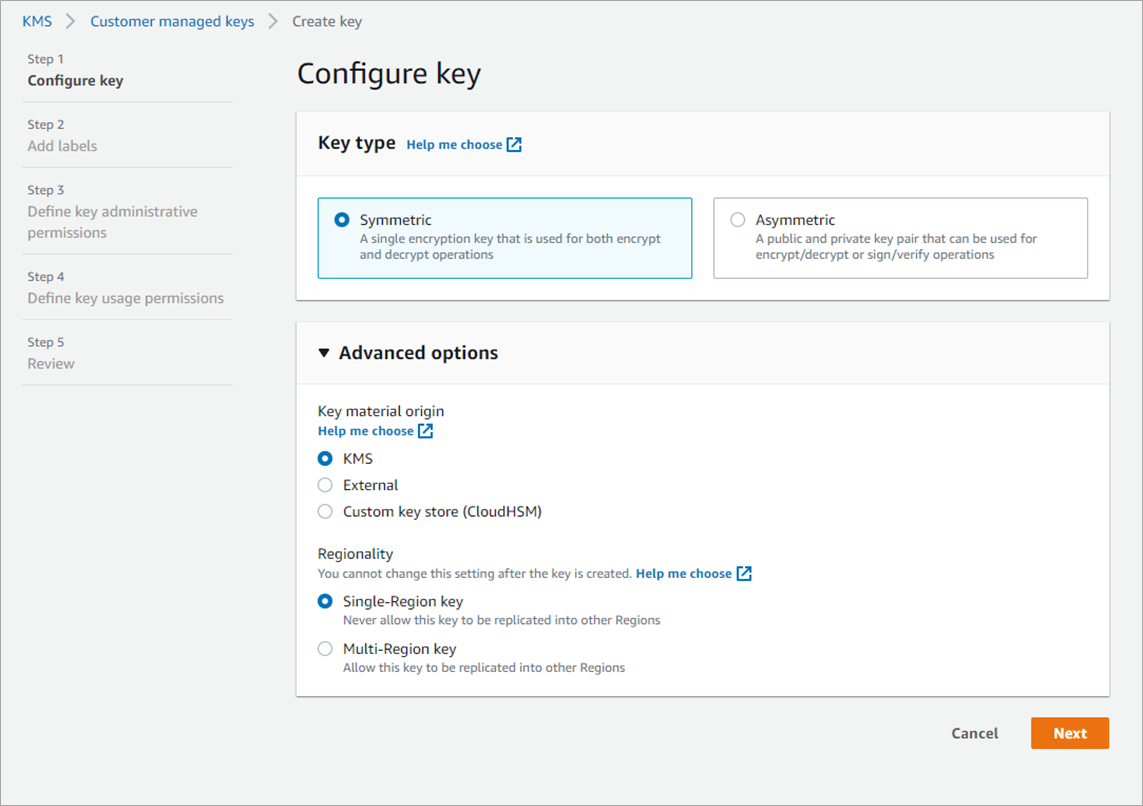
Figure 3 – AWS KMS key definition for the DockerHub username and password.
Once you’ve created your key, navigate to AWS Systems Manager to create two parameters. These parameters are the username and token to sign on to DockerHub for the container build portion of the pipeline.
In AWS Systems Manager Parameter Store, you will create two parameters. The convention we’ll use is in the form of:
This path-like notation helps you better organize your parameters. These values contain both the actual DockerHub username and token to better ensure others can’t use your credentials. Be sure to remember these paths for the CodePipeline environment definition.
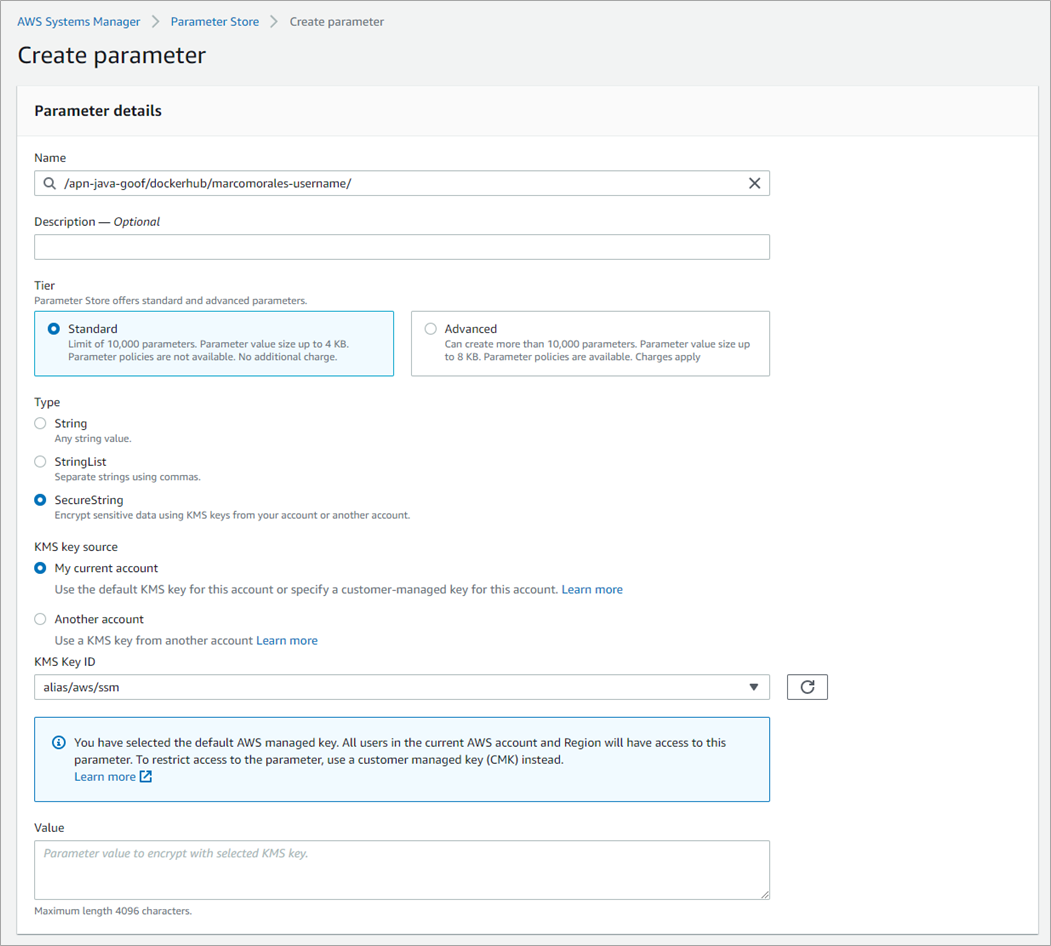
Figure 4 – AWS Systems Manager Parameter definition for DockerHub credentials.
Step 4: Create an AWS CodePipeline
Next, let’s create an AWS CodePipeline in the same region. We’ll break up this step into small tasks to create a CodePipeline with AWS CodeBuild, an IAM role, and permissions.
Note that you will need to modify IAM roles and policies as directed in this post to ensure CodePipeline has access to secrets and Amazon ECR.
Step 4a: Create the AWS CodePipeline
Start by creating a new CodePipeline with the following details:
- Name: apn-java-goof (or a name of your choice)
- Service role: New service role
- Allow AWS CodePipeline to create a role if necessary
- Artifact store: Default location
- Encryption key: Default AWS managed key
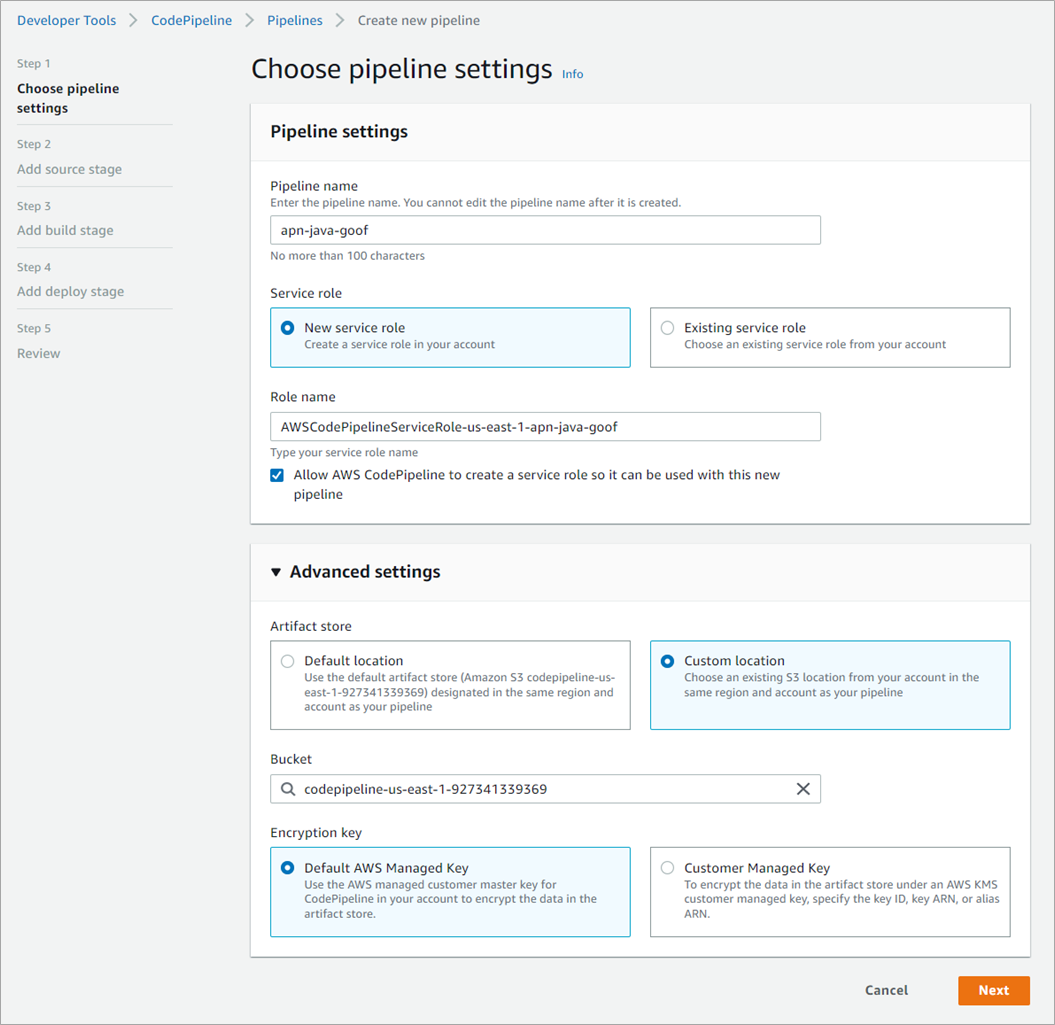
Figure 5 – AWS CodePipeline definition using default values.
In Step 2: Add source stage, define an entry and select your CodeCommit repository by name and branch (main in our example). We recommend using default values for the rest. We also recommend tagging your newly-created resources in line with best practices.
In Step 3: Add build stage, add a build stage that utilizes CodeBuild and let’s create it on the fly. CodePipeline will walk you through CodeBuild screens to create a build project and return to the pipeline definition.
Step 4b: Create a New CodeBuild Project
You will need to define a CodeBuild step to create a new build project and give it a name and set tags. In the first image below (Figure 6), we show the definition of the CodeBuild environment using an Ubuntu image with the latest version and running Linux. In the environment, we enable privilege operations to build a Docker container.
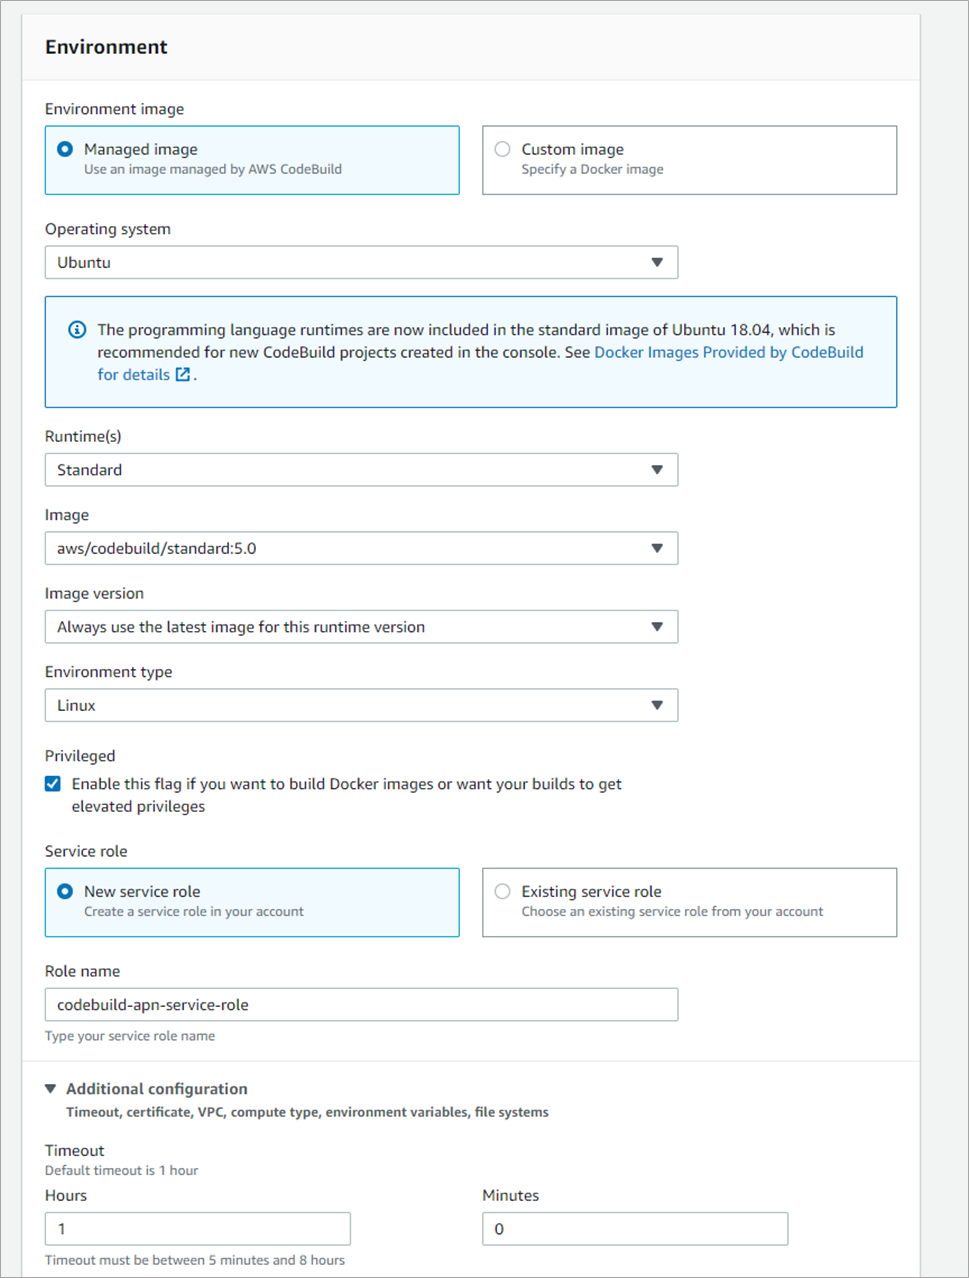
Figure 6 – AWS CodePipeline definition using default values.
In this second CodeBuild image (Figure 7), we use the default timeout and compute sizes but specify custom environment variables. These environment variables are summarized in the next table with the name of the variable, the value, and whether this is a plaintext value or Parameter. The Parameters are the encrypted values we setup for DockerHub.
| Environment Variable Name | Value | Plaintext or Parameter |
| AWS_DEFAULT_REGION | e.g. us-east-1 | Plaintext |
| AWS_ACCOUNT_ID | Your 12-digit account number for Amazon ECR access | Plaintext |
| IMAGE_TAG | apn-java-goof | Plaintext |
| IMAGE_REPO_NAME | apn-java-goof | Plaintext |
| DOCKERHUB_USERNAME | AWS Systems Manager Parameter for your username (e.g. /apn-java-goof/dockerhub/marcomorales-username) | Parameter |
| DOCKERHUB_PASSWORD | AWS Systems Manager Parameter for your DockerHub toke (e.g. /apn-java-goof/dockerhub/marcomorales-token) | Parameter |
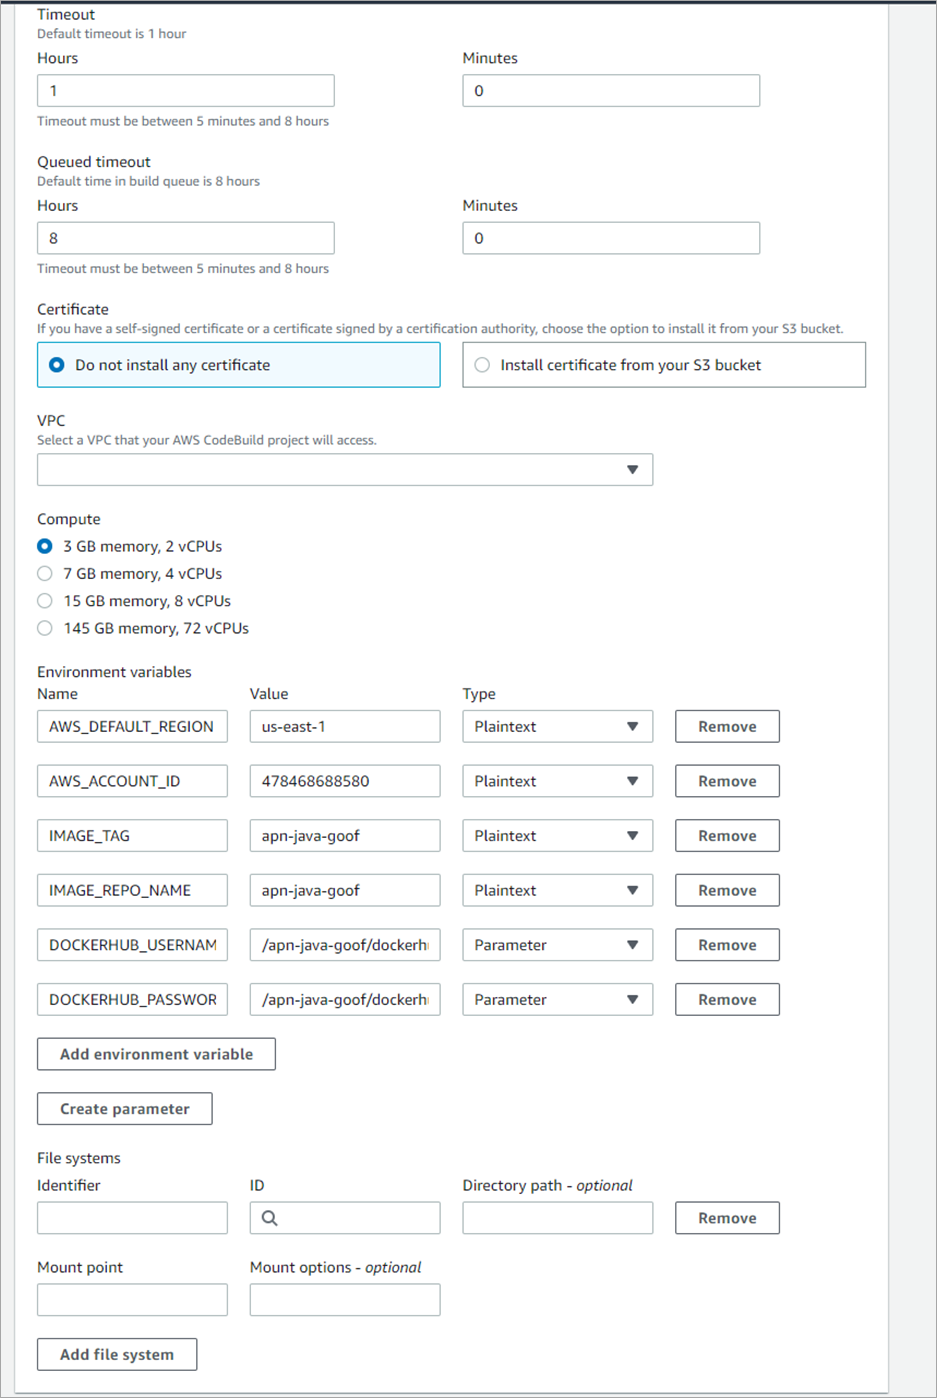
Figure 7 – AWS CodePipeline definition using default values.
The contents of that buildspec.yaml are here for your reference:
In the present form, the build will not yet succeed because we have not yet granted permissions to CodePipeline and CodeBuild to their respective services. Save your pipeline and let’s create the appropriate permissions.
You will make two changes to your CodeBuild role to permit access to AWS KMS and Amazon ECR.
Step 4c: Update the IAM Role for CodeBuild
Navigate to the IAM role for your CodeBuild service role. In our example, our role is named “codebuild-apn-service-role”. We will add two sets of permissions with the IAM Role Visual Editor.
For AWS KMS, we add the Decrypt and GenerateDataKey actions to the KMS key Amazon Resource Name (ARN[BD14] [MM15] ). We also add the GetParameter and GetParameters actions to the Systems Manager parameters.
The resulting JSON looks like this:
Step 4d: Grant ECR Permissions
Next, we grant Amazon ECR access to read and write to the registry and get an authorization token as seen in the password line of the buildspec.yaml file.
The resulting JSON looks like this:
This action should allow you to run a CodePipeline to get the code, build a container image, and publish the image to ECR.
Step 5: Add Snyk Scans to CodePipeline
Let’s finish by adding Snyk scans to AWS CodePipeline. Navigate to your CodePipeline definition and add a stage between Source and Build and name it “snyk-scan”. Next, add an action group and select the Action provider as Snyk.
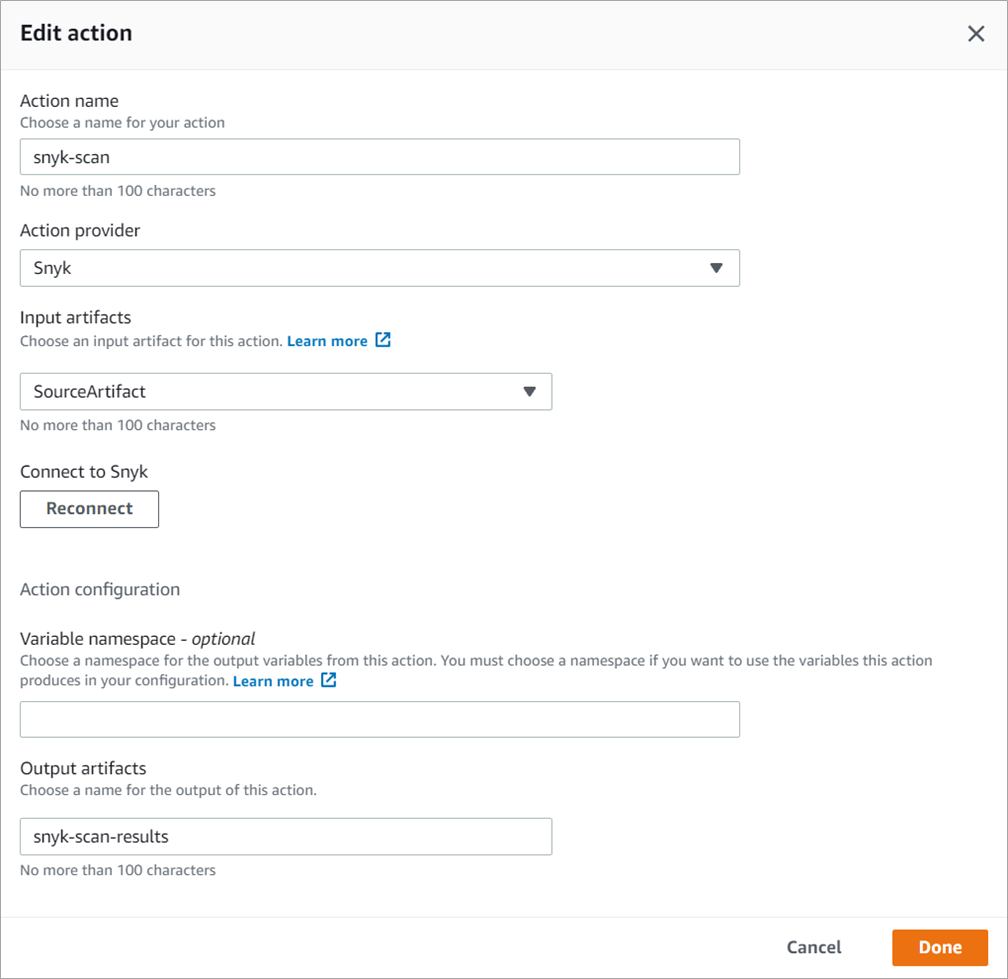
Figure 8 – Snyk action definition in AWS CodePipeline.
When you press the Connect to Snyk button, you’ll be prompted through a few screens to confirm the email identity you wish to use and the Snyk organization. Given the assumption you have already configured a Snyk account, these selections are easy.
For the purpose of this example, we’ll focus on critical vulnerabilities and choose to disable blocking the pipeline when we detect them. Also, we disable monitoring the project because that requires you to already have a project. In steady-state, you’ll likely enable monitoring for ongoing operations.
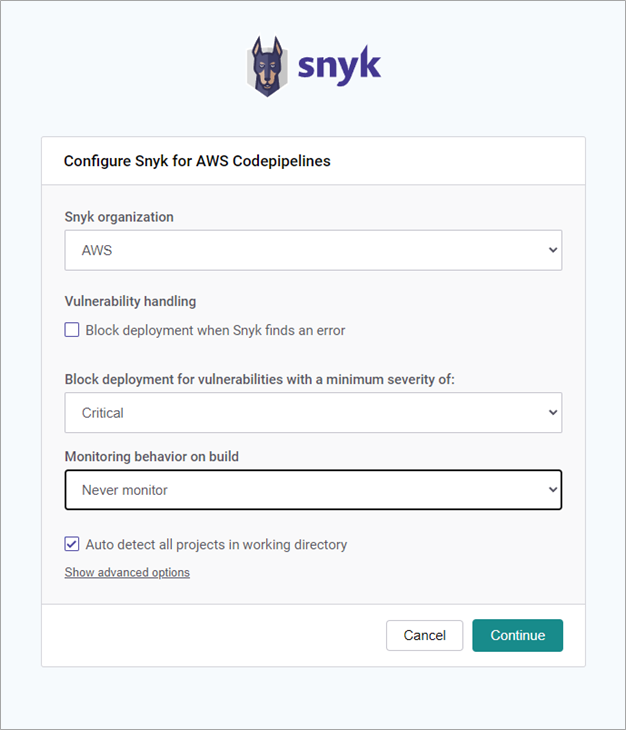
Figure 9 – Snyk authentication prompt for a new integration.
You’ll be prompted to confirm the authentication. Re-run the pipeline to see results from Snyk. When your pipeline finishes, you’ll see in-line results available from the Details link in the Snyk-Scan task.
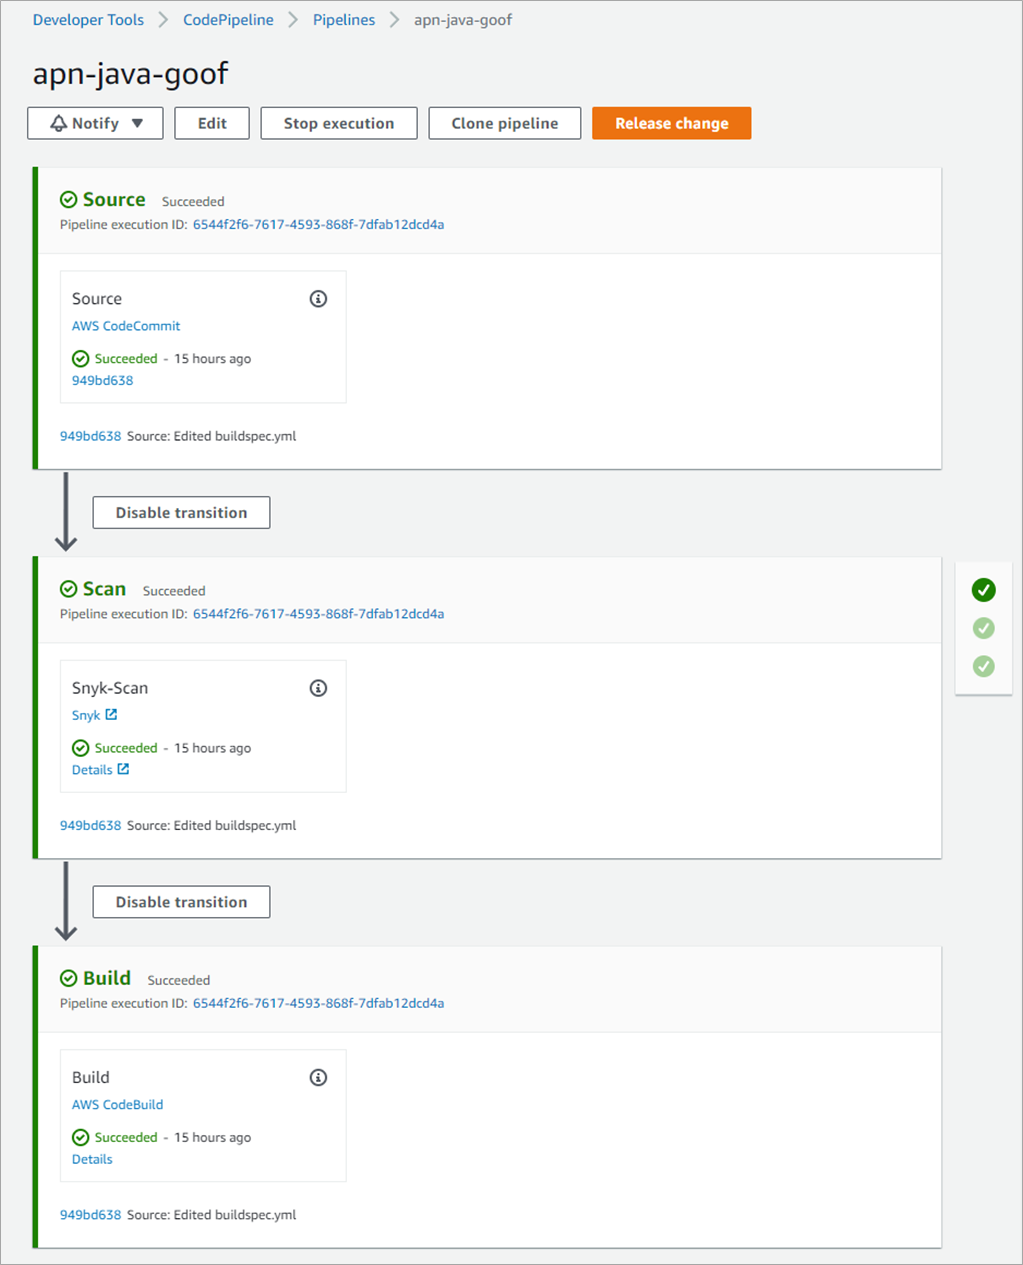
Figure 10 – Successful AWS CodePipeline execution showing Snyk Scan.
Clicking on the Details link takes you to a page with inline results from Snyk for your scanned code. These results provide context in the form of:
- Name of the vulnerability
- Packages and source
- Overview
- Remediation
- Links to references, including vulnerability databases
The results are presented utilizing Snyk’s priority algorithm that combines the severity, CVSS score, and other details, such as if the vulnerability has a known fix as well as known exploits.
Step 6: Review Amazon ECR
Next, let’s navigate to Amazon ECR to see our deployed container image. Navigate to your ECR repository and find the deployed images.
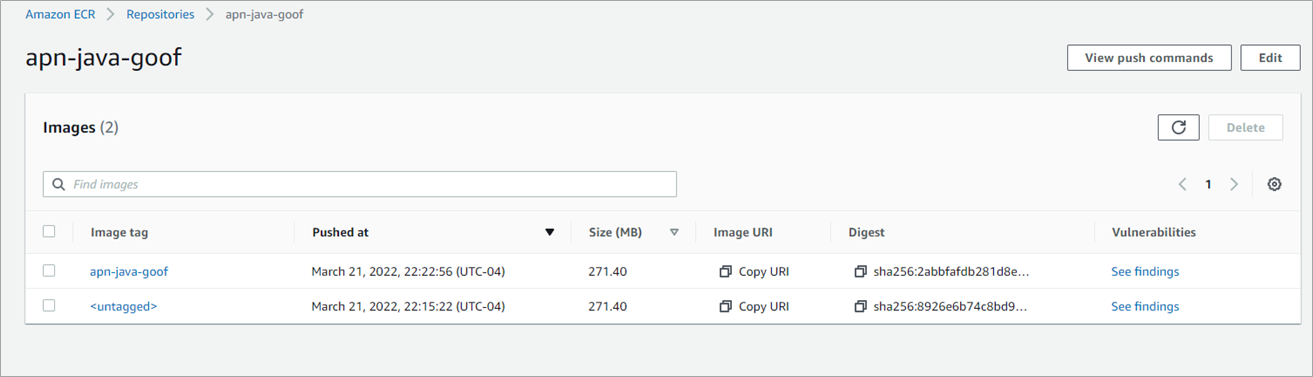
Figure 11 – Amazon ECR showing container images and links into Amazon Inspector.
From here, we can find vulnerability details. In this example, we allowed multiple tags and deploy the same tag name.
Clicking into See findings shows the list of vulnerabilities as provided by Amazon Inspector, which provides results from more than one database, including Snyk.

Figure 12 – Amazon Inspector results showing container image vulnerabilities.
In the image above, you can see hundreds of vulnerabilities categorized by their severity. This information is available to your team in the console, and via API calls to fit the needs of your team.
In the example above, we’ll click on the vulnerability named “IN1-JAVA-ORGAPACHELOGGINGLOG4J-2320014” to highlight the details available in the AWS console.

Figure 13 – Detailed view of an Amazon Inspector vulnerability and identify Snyk as the source.
The details show information important for you and your team. In addition to the account number, we also see the characteristics of the vulnerability such as type, file location, scores, and more. This fine-grained detail helps your team make informed decisions about what to do next.
Cleaning Up
Remember to delete any resources you may have created in order to avoid additional costs.
Snyk is free to set up and use and you do not have to clean up resources. You may choose to delete your project from the settings page to remove the results and data associated with the scans performed in this post.
Summary
In this post, we demonstrated how to set up and configure an AWS CodePipeline build with Snyk to accomplish the following:
- Set up and configure an AWS CodeCommit repository with a sample project.
- Set up and configure Amazon ECR to store our built container images.
- Use AWS KMS keys to securely access DockerHub.
- Set up and configure an AWS CodePipeline with a task to run Snyk.
- Review the results in Snyk and Amazon Inspector.
To learn more about AWS CodePipeline, check out the documentation. If you have any questions, post them on AWS CodePipeline service forum.
You can sign up for Snyk, and if you have questions visit the general Snyk documentation which includes details about setting up and using Snyk with AWS services.
.

.
Snyk – AWS Partner Spotlight
Snyk is an AWS Partner with Competencies in DevOps and Security. A developer-first security solution that helps organizations use open source and stay secure, Snyk seamlessly and proactively finds and fixes vulnerabilities and license violations in open-source dependencies and containers.