Artificial Intelligence
Dive deep into Amazon SageMaker Studio Classis Notebooks architecture
NOTE: Amazon SageMaker Studio and Amazon SageMaker Studio Classic are two of the machine learning environments that you can use to interact with SageMaker. If your domain was created after November 30, 2023, Studio is your default experience. If your domain was created before November 30, 2023, Amazon SageMaker Studio Classic is your default experience. Studio Classic also exists as an IDE within Amazon SageMaker Studio to help you run your legacy machine learning workflows. This blog focusses on Studio Classic only. If you want to learn more about newer version of SageMaker Studio IDE, check out Boost productivity on Amazon SageMaker Studio: Introducing JupyterLab Spaces and generative AI tools.
Amazon SageMaker Studio Classic is the first fully integrated development environment (IDE) for ML. It provides a single, web-based visual interface where you can perform all ML development steps required to build, train, tune, debug, deploy, and monitor models. It gives data scientists all the tools you need to take ML models from experimentation to production without leaving the IDE.
Studio Classic notebooks are one-click Jupyter notebooks that can be spun up quickly. The underlying compute resources are fully elastic, so you can easily dial up or down the available resources, and the changes take place automatically in the background without interrupting your work. You can also share notebooks with others in a few clicks. They get the exact same notebook, saved in the same place.
In this post, we take a closer look at how Studio Classic notebooks have been designed to improve the productivity of data scientists and developers.
Single-host Jupyter architecture
Let’s first understand how Jupyter notebooks are set up and accessed. Jupyter notebooks are by default hosted on a single machine and can be accessed via any web browser. The following diagram illustrates how it works if set up on an Amazon Elastic Compute Cloud (Amazon EC2 instance).
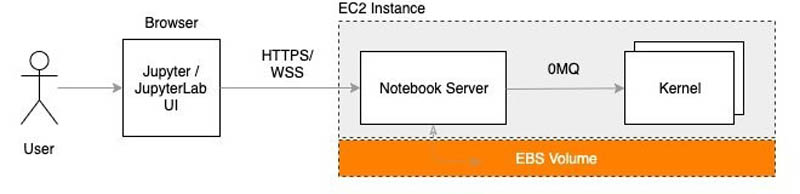
You can access the Jupyter notebooks by opening the browser and entering the URL of the Jupyter server, which makes an HTTPS/WSS call to the machine where the Jupyter server is hosted. The machine runs a notebook server that receives the request and uses zeromq to communicate with the kernel process.
Although this architecture serves data scientists’ needs well, once teams start growing and the ML workload moves to production, new sets of requirements come up. This includes the following:
- Each data scientist might be working on their own hypothesis to solve an ML problem, which requires installation of custom dependencies and packages without impacting the work of others.
- Different steps in the ML lifecycle may require different compute resources. For example, you may need a high amount of memory for data processing but require more CPU and GPU for training. Therefore, the ability to scale becomes an important requirement. A lack of an easy way to quickly dial up or down on the resources often lead to under-provisioning or over-provisioning, which further leads to poor utilization and poor cost-efficiency.
- To overcome this, data scientists might often change the instance type of the Jupyter environment, which further requires moving the workspace from one instance to another, which causes interruptions and reduces productivity.
- At times, the Jupyter environment might not be running any kernels and is only used for reading example notebooks or viewing scripts and data files, but you still pay for the compute used to render the Jupyter environment. There is a need for decoupling the UI from kernel compute on different instances.
- With a large team, it starts becoming an overhead to regularly patch, secure, and maintain all the data science environments being used by the team.
- Different team members might be working on the same ML problem but using different approaches to solve it. In such cases, it becomes important for teammates to collaborate and share their work with each other easily. Sharing it via a version control system (VCS) isn’t optimal because it lacks good support to render notebooks and also requires members to run the notebooks again at their end. There is a need for teams to collaborate and share their work and artifacts easily without taking the trip to a VCS while also preserving the state.
- As ML workloads move to production, there is a need to deploy, monitor, and retrain ML models in an automated way. This typically requires switching between different tools and needs to be simplified so that moving from experiment to production is more seamless without switching between different tools and services.
Studio Classic notebooks architecture
Studio Classic and one of its components, Studio Classic notebooks, has been built to meet such requirements. The Studio Classic IDE has been built to unify all the tools needed for ML development. Developers can write code, track experiments, visualize data, and perform debugging and monitoring all within a single, integrated visual interface, which significantly boosts developer productivity. The following screenshot shows what the IDE looks like.
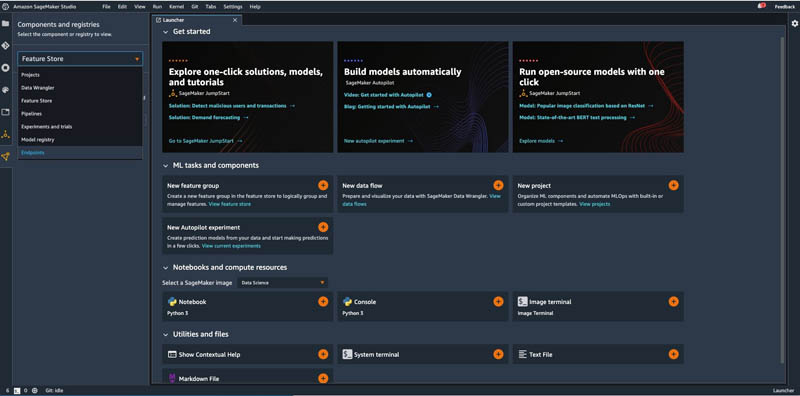
On the Components and registries menu, you can access a set of purpose-built functionalities that simplify your ML development experience with Amazon SageMaker; for example, you can review model versions registered in SageMaker Model Registry, or track the runs of ML pipelines run with Amazon SageMaker Pipelines.
Now, let’s understand how Studio Classic notebooks are designed, with the help of a highly simplified version of the following architecture diagram (click for an enlarged view).

A Studio Classic domain is a logical aggregation of an Amazon Elastic File System (Amazon EFS) volume, a list of users authorized to access the domain, and configurations related to security, application, networking, and more. A domain promotes collaboration between users where they can share notebooks and other artifacts with other users in the same domain.
Each user added to the Studio Classic domain is represented by a user profile. This profile contains unique information about the user with in the domain, like the execution role for the user, the Posix user ID of the user’s profile in the Amazon EFS volume, and more.
A SageMaker image is metadata used to refer to the Docker container image, stored in Amazon Elastic Container Registry (Amazon ECR), typically containing ML/DL framework libraries and other dependencies required to run kernels.
Studio Classic comes with several pre-built images. It also provides the option to bring your own image and attach it to a Studio Classic domain. The custom image needs to be stored in an Amazon ECR repository. You can choose to either attach a custom image to the whole domain or to a specific user profile in the domain. For more information, see the SageMaker Custom Image Samples repository and Bringing your own custom container image to Amazon SageMaker Studio Classic notebooks.
An app is an application running for a user in the domain, implemented as a Docker container. Studio Classic currently supports two types of apps:
- JupyterServer – The JupyterServer app runs the Jupyter server. Each user has a unique and dedicated JupyterServer app running inside the domain.
- KernelGateway – The KernelGateway app corresponds to a running SageMaker image container. Each user can have multiple KernelGateway apps running at a time in a single Studio Classic domain.
When a user accesses the Studio Classic UI using a web browser, an HTTPS/WSS connection is established with the notebook server, which is running inside the JupyterServer container, which in turn is running on an EC2 instance managed by the service.
Studio Classic uses the KernelGateway architecture to allow the notebook server to communicate with kernels running on remote hosts; as such, the Jupyter kernels aren’t run on the host where the notebook server resides, but are run in Docker containers on separate hosts.
Each user can have only one instance of a given type (such as ml.t3.medium) running, and up to four apps can be allocated on each instance; users can spawn multiple notebooks and terminals using each app.
If you need to run more than four apps on the same instance, you can choose to run on an underlying instance of a different type.
As an example, you can choose to run TensorFlow, PyTorch, MxNet, and Data Science KernelGateway apps on the same instance and run multiple notebooks with each of them; if you need to run an additional custom app, you can spin it up on a different instance.
No resource constraints are enforced between the apps running on the host, so each app might be able to take all compute resources at a given time.
Multiple kernel types can be run in each app, provided all the kernels have the same hardware requirements in terms of being run on either CPU or GPU. For example, unless differently specified in the domain or user profile configuration, CPU bound kernels are run on ml.t3.medium by default and GPU bound kernels on ml.g4dn.xlarge, giving you the option to choose different compute resources as needed.
You can also change these instance types if you require more compute and memory for your notebooks. When a notebook is opened in Studio Classic, it shows the vCPU and memory of the EC2 instance (highlighted in yellow) on which the notebook is running.

You can choose the highlighted area and choose a different instance type, as shown in the following screenshot.

Some instances are of fast launch type, whereas some are not. The fast launch types are simply pooled to offer a fast start experience. You can also check Amazon SageMaker Pricing to learn about all the different instance types supported by Studio Classic.
Also, as shown in the architecture diagram, a shared Amazon EFS volume is mounted to all KernelGateway and JupyterServer apps.
Terminal access
Besides using notebooks and interactively running code in notebook cells with kernels, you can also establish terminal sessions with both the JupyterServer app (system terminal) and KernelGateway apps (image terminal). The former might be useful when installing notebook server extensions or running file system operations. You can use the latter for installing specific libraries in the container or running scripts from the command line.
Image terminal
The following screenshot shows a terminal session running on a KernelGateway app with a Python3 (Data Science) kernel running on an ml.t3.medium instance.

From the screenshot, we can see the Amazon EFS volume mounted (highlighted in yellow) and also the Amazon Elastic Block Store (Amazon EBS) volume attached to the container’s ephemeral storage (highlighted in green). We can see the Amazon EFS volume is up to 8 EB and Amazon EBS storage size is around 83 GB, of which around 11 GB has been used.
System terminal
The following screenshot shows the system terminal. Again, different volumes are mounted with the Amazon EFS volume (highlighted in yellow) and the Amazon EBS volume (highlighted in green):
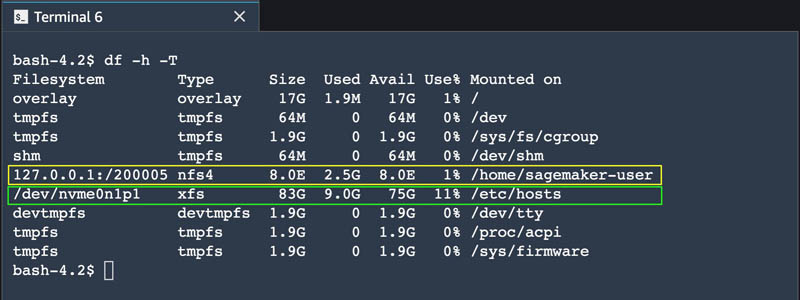
The Amazon EFS volume is the same as on an image terminal. However, the Amazon EFS volume mount point here is different than that of KernelGateway container. Here, out of a total 83 GB of Amazon EBS volume size, 9 GB has been used.
Storage
From a storage perspective, each user gets their own private home directories created on an Amazon EFS volume under the domain. For each user, Studio Classic automatically associates a unique POSIX user/group ID (UID/GID) to make sure they can access only their home directories on the file system. The file system is automatically mounted to the notebook server container and to all kernel gateway containers, as seen in the previous section.
Studio Classic’s Amazon EFS file system can also be mounted by different clients: for example, you can mount the file system to an EC2 instance and run vulnerability scans over the home directories. The following screenshot shows the describe-domain API call, which returns details about the Amazon EFS ID mounted (highlighted).

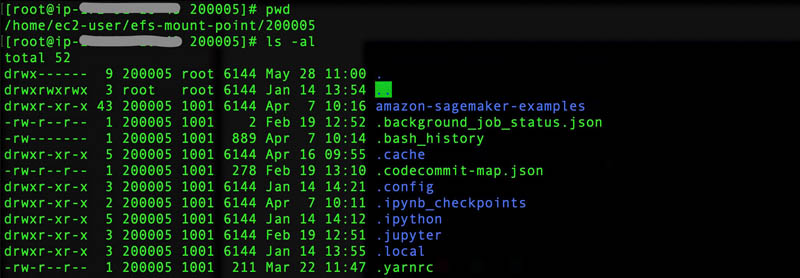
You can use the same Amazon EFS ID to mount the file system on an EC2 instance. After the mount is successful, we can also verify the content of the the volume. The following screenshot shows the contents of the Studio Classic Amazon EFS volume, mounted on an EC2 instance.
Studio Classic also uses Amazon Simple Storage Service (Amazon S3) to store notebook snapshots and metadata to enable notebook sharing. Apart from that, when you open a notebook in Studio Classic, an Amazon EBS volume is attached to the instance where the notebook is running. The Amazon EBS volume gets deleted if you delete all the apps running on the instance.
You can use AWS Key Management Services (AWS KMS) to encrypt the S3 buckets, and use KMS customer managed keys (CMKs) to encrypt both Amazon EFS and EBS volumes. For more information, see Protect Data at Rest Using Encryption.
Networking
Studio Classic, be default, uses two different Amazon Virtual Private Clouds (Amazon VPCs), where one VPC is controlled by Studio Classic itself and is open for public internet traffic. The other VPC is specified by the user, and enables encrypted traffic between the Studio Classic domain and the Amazon EFS volume. For more details, see Securing Amazon SageMaker Studio Classic connectivity using a private VPC.
Security
Studio Classic uses run-as POSIX user/group to manage the JupyterServer app and KernelGateWay app. The JupyterServer app user is run as sagemaker-user, which has sudo permission to enable installation of yum packages, whereas the KernelGateway app user is run as root and can perform pip/conda installs, but neither can access the host instance. Apart from the default run-as user, the user inside the container is mapped to a non-privileged user ID range on the notebook instances. This is to ensure that the user can’t escalate privileges to come out of the container and perform any restricted operations in the EC2 instance. For more details, check out Access control and SageMaker Studio Classic notebooks.
In addition, SageMaker adds specific route rules to block requests to Amazon EFS and the instance metadata service (IMDS) from the container, and users can’t change these rules. All the inter-network traffic in Studio Classic is TLS 1.2 encrypted, barring some intra-node traffic like communication between nodes in a distributed training or processing job and communication between a service control plane and training instances. For more details, check out Protecting Data in Transit with Encryption.
Pricing model
Studio Classic is available at no additional charge to customers. You pay for both compute and storage when you use Studio Classic notebooks. See Amazon SageMaker Pricing for charges by compute instance type. Your notebooks and associated artifacts such as data files and scripts are persisted on Amazon EFS. See Amazon EFS Pricing for storage charges. As part of the AWS Free Tier, you can get started with Studio Classic notebooks for free.
For example, in a Studio Classic domain, when a user is added, a JupyterServer app is launched for the user, which renders the Studio Classic UI in the browser. This JupyterServer app isn’t charged to the user, and they’re only charged for underlying Amazon EFS storage. The user can continue to use the Studio Classic UI for file browsing, reading notebooks, and accessing the system terminal and other UI components in Studio without incurring any compute costs. The user only starts getting billed for compute when they select a kernel for working with a notebook.
When the user shuts down the last running KernelGateway app on an EC2 instance, the instance automatically shuts down and billing stops for the EC2 instance. So users are advised to shut down any unused KernelGateway apps to avoid incurring unintended charges. You can also automate shutting down idle kernels by using the Sagemaker-Studio-Autoshutdown extension.
Benefits of using Studio Classic notebooks
After reading the previous sections, you might have already identified most of the benefits of using Studio Classic notebooks. But let’s do a quick recap:
- Studio Classic notebooks provide a simpler developer experience for data scientists and ML engineers, improving your productivity.
- Decoupling the Jupyter server from kernels enables flexibility. The underlying compute resources are fully elastic, so you can easily dial up or down the available resources, and the changes take place automatically in the background without interrupting your work.
- Using Amazon EFS as storage for users’ home directories, thereby decoupling kernel compute from storage, adds extra flexibility. Because Amazon EFS is instantiated into customer’s accounts, it also remains accessible to other applications.
- Compute resources for Jupyter server and kernel gateways are fully isolated and dedicated to each user. Any installations of customizations you perform don’t impact other users.
- Collaboration is easier because you can share your notebooks, along with its installations, output, and metadata, with other users in the same domain, in just a few clicks.
- Enterprise-grade networking and security controls are in place so users can’t perform any unintended operations in Studio Classic.
- The pricing model is very effective—you’re charged for the compute time of the resources running kernels and Amazon EFS, but are not charged for the Jupyter server.
- Docker containers are a foundational compute abstraction in SageMaker. They’re also used to run processing, training, and inference. Companies have the chance to standardize towards Docker containers for their ML environments in SageMaker. You also have the flexibility to bring your own SageMaker images to Studio Classic.
Conclusions
In this post, we dived deeper in Studio Classic notebooks, explaining its inner workings, which will help you make an informed decision when choosing StudioClassic as the IDE to manage your ML lifecycle. We learned that Studio Classic notebooks use the loosely coupled KernelGateway architectural pattern to achieve scalability and flexibility, and provide great isolation capability for each user working in the same Studio domain. Security controls are also in place to avoid any unintended actions from the users.
As a next step, we encourage you to try out Studio Classic to manage your ML lifecycle. For more information on how Studio Classic works, see Get Started with Amazon SageMaker.
About the Authors
 Giuseppe Angelo Porcelli is a Principal Machine Learning Specialist Solutions Architect for Amazon Web Services. With several years software engineering an ML background, he works with customers of any size to deeply understand their business and technical needs and design AI and Machine Learning solutions that make the best use of the AWS Cloud and the Amazon Machine Learning stack. He has worked on projects in different domains, including MLOps, Computer Vision, NLP, and involving a broad set of AWS services. In his free time, Giuseppe enjoys playing football.
 Vikesh Pandey is a Machine Learning Specialist Specialist Solutions Architect at AWS, helping customers in the Nordics and wider EMEA region design and build ML solutions. Outside of work, Vikesh enjoys trying out different cuisines and playing outdoor sports.